“Love You” Hexagon Shape Card
Hi friends! TGIF! Please welcome first-time special guest JoAnn Danchick to our blog today! Please follow along in her fun tutorial of this gorgeous card inspiration using Honey Bee Stamps!! Enjoy!
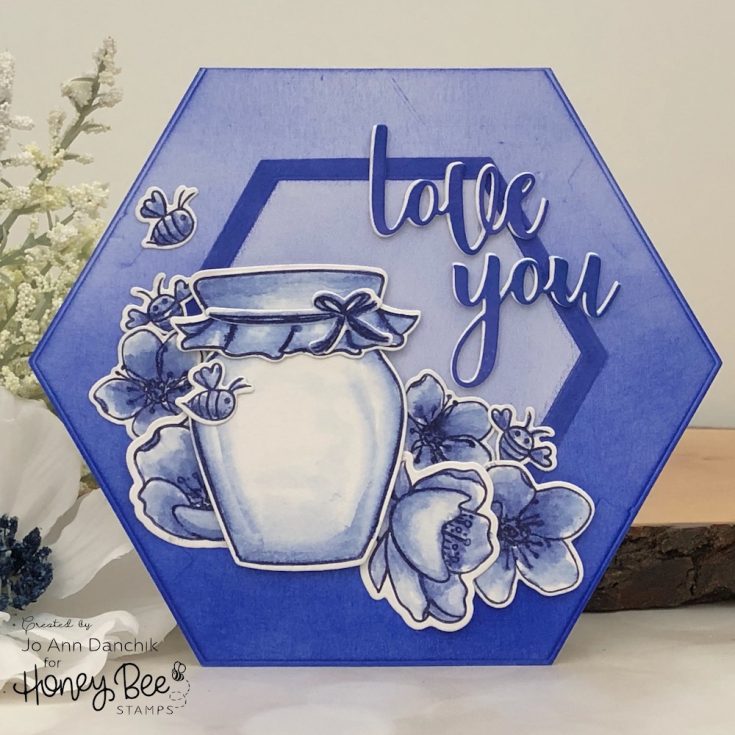
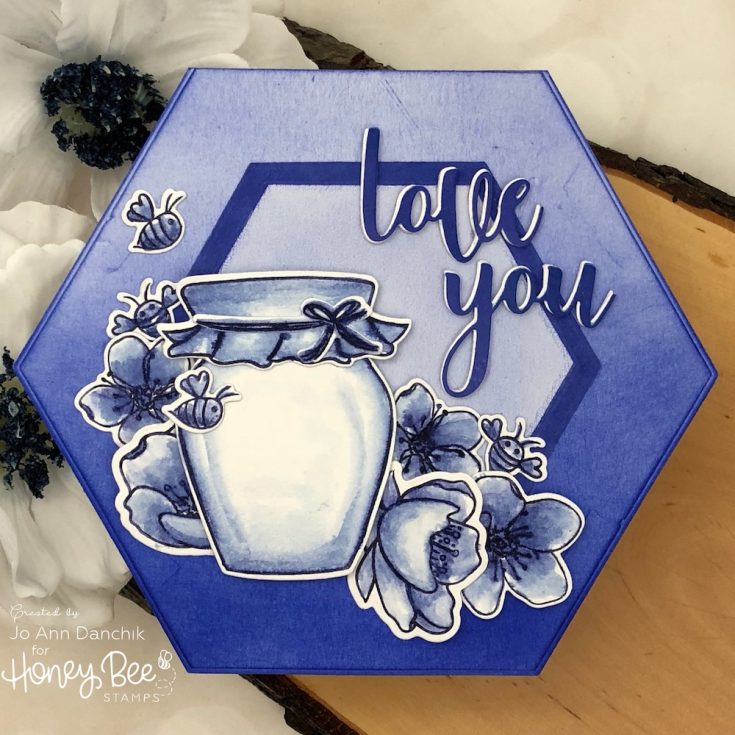
Hi creative friends! I am Jo Ann Danchik and I am thrilled to be here today representing the Honey Bee Stamp Company and showcasing some of their beautiful stamps and dies. I drew my inspiration for today’s card from the Dutch Blue Delft Tiles that I saw in Amsterdam many years ago. I thought that it would be fun to create a card using only shades of blue.
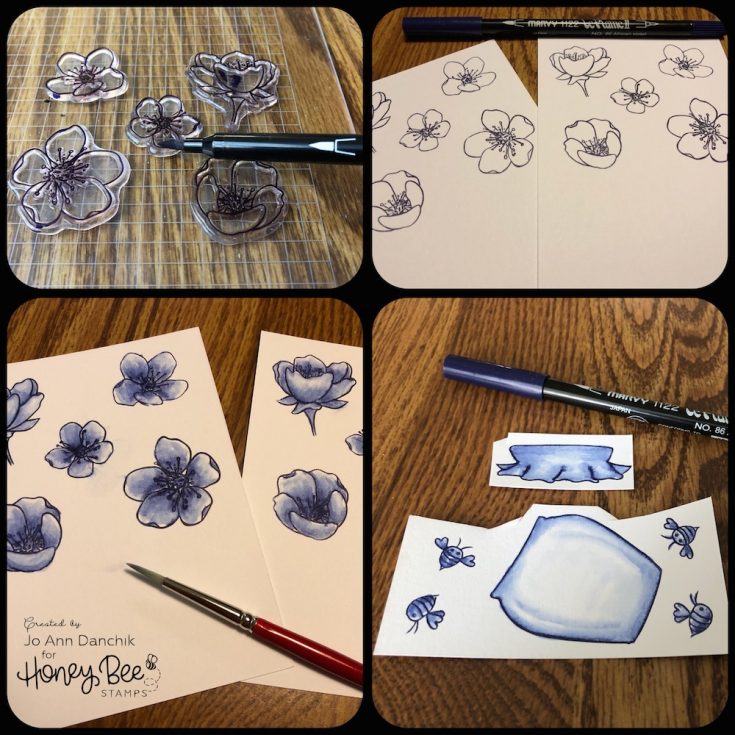
I started by using the small blooms, from the Sweet As Honey Stamp Set, and the larger blooms, from the newer Spring Blossoms Stamp Set. Both sets pair beautifully together. I inked up the stamps using an African Violet Marvy LePlume marker. I find that the Tombow markers work equally as well. Both brands hold a lot of pigment, are easy to stamp with, and can handle a lot of water. I stamped onto the smoother side of Tim Holtz’s Watercolor Paper. I used a MISTI, as it took several layers of ink to get good coverage on the textured paper.
Starting from the center of each blossom, and using a nearly dry watercolor brush, I pulled color from the stamp outline. I added clear water to the edges to lighten the color as I moved out along each petal. While I start out with a general idea of where the card is going it usually evolves and goes in a different direction. LOL! I decided to add the honey pot and a few bees, also from the Sweet As Honey Stamp Set. They were colored in the same manner.
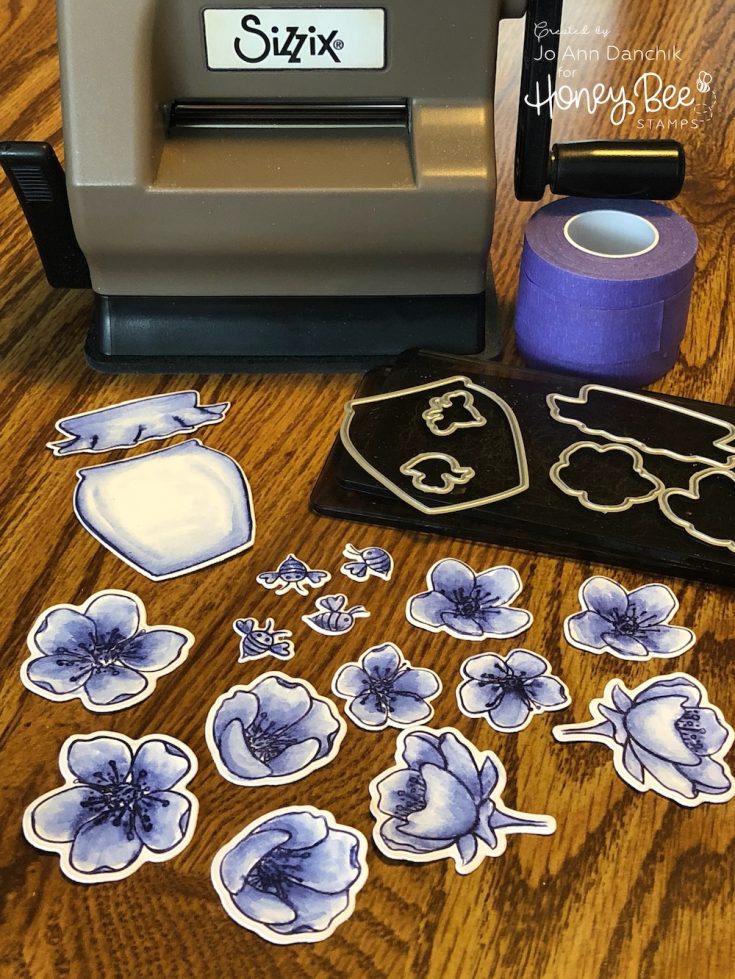
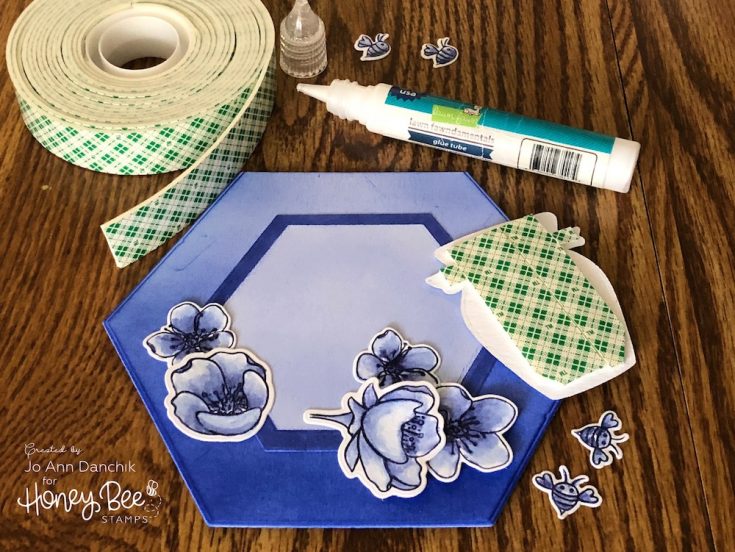
I die cut all the pieces using the coordinating Sweet As Honey Die Set and the Spring Blossom Die Set. The Sizzix Sidekick never leaves my desk. I use it ALL THE TIME! Also, I have been using the Therm O Web purple tape for awhile and love it as well. It releases beautifully and doesn’t tear your paper.
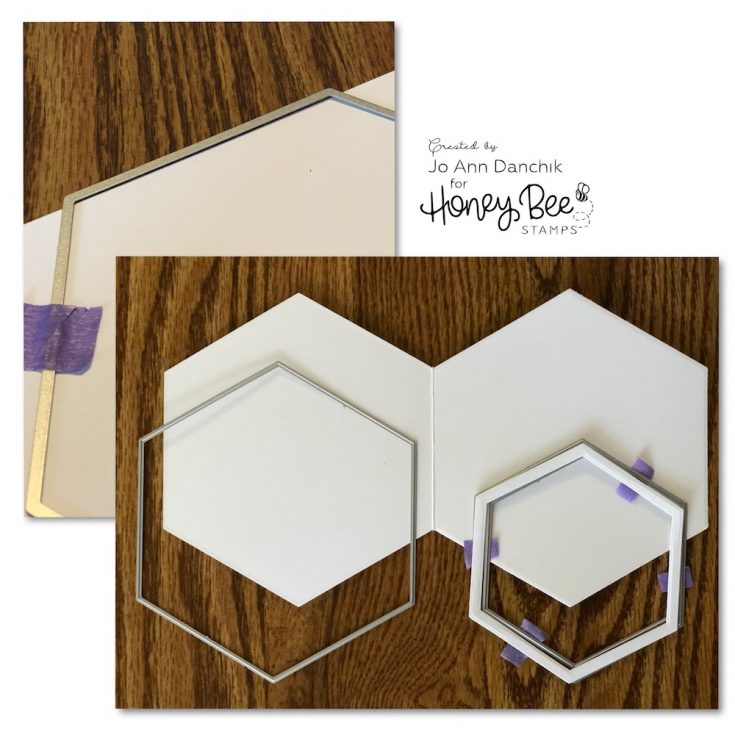
I decided to make the card a hexagonal shape to further mimic a tile. I die cut #110 Neenah Cardstock using the Hexagon Solid Stack die set. Fold your cardstock and make sure that the die is slightly above the cardstock fold to make a shaped card. I also used two smaller dies from the set to create a smaller hexagon frame.
I used Tim Holtz Blueprint Sketch Distress Ink, and one of his new Distress Blending Brushes, for an ombre effect. I continuously added color from the bottom and blended upward. There are some scratch marks on my paper from using old plates on my die cutting machine. I thought about starting over but decided that most of them would be covered and they added a vintage look.
For the smaller frame, I simply went direct-to-paper with the ink cube. I played around with adding the frame to the card and leaving the inside blue…there was not enough contrast. I also tried putting the white inside piece back in…there was too much contrast. I finally settled on brushing a light layer of the Blueprint Sketch Ink on the inside piece. Everything was glued down using a Lawn Fawn Glue Tube.

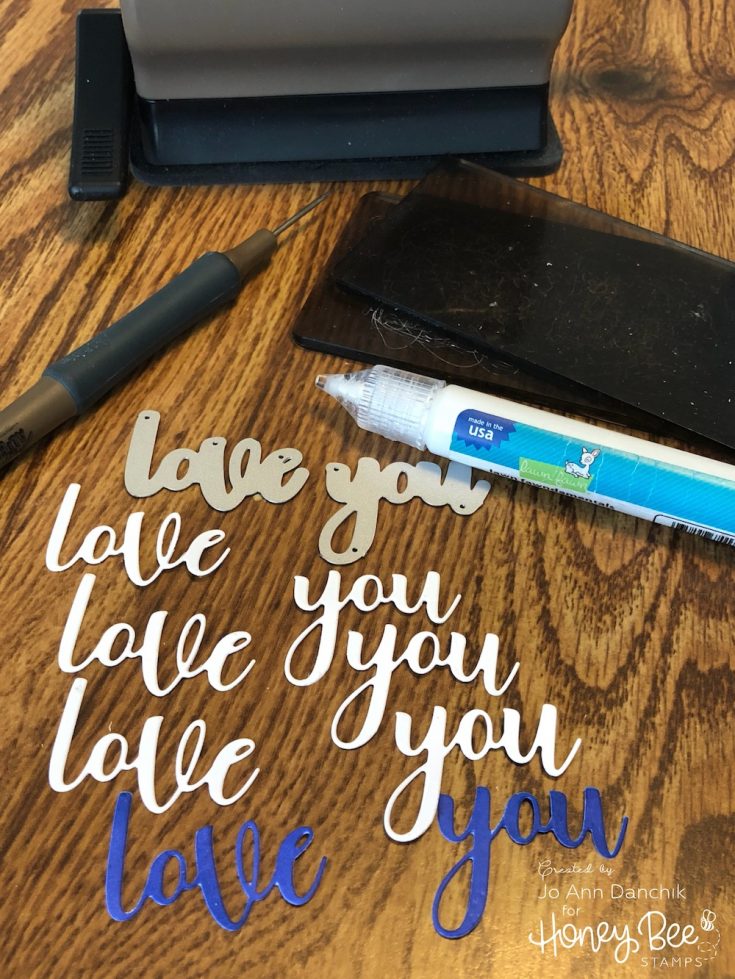
I colored some #80 Neenah Cardstock using the Blueprint Sketch Distress Ink. I cut one blue and three white pieces using the Love You Die Set. They are small thin pieces and are easily released from the die with a Tim Holtz Die Pick…or the Pokey Tool…as most of us refer to it. They were stacked and glued using the Lawn Fawn Glue Tube. I offset the top piece slightly to give a white contrasting edge. It helped to set the sentiment apart from the background.
The pieces were laid out and adhered with the glue tube. Some of the flowers and the honeypot were given added dimension with Scotch Foam Tape.
Thank you for joining me today on this creative journey! I appreciate the opportunity to share my work and hope that it has inspired you to try your hand at a monochromatic card.
Joyfully,
Jo Ann
SUPPLIES:
|


Thanks so much for stopping by today, and thanks to JoAnn for being our guest!

Blog Candy Alert!! Follow our blog via email and comment on this post for a chance to win special blog candy!


I love how the painting with the blending brush came out. So cool!
So sweet. Love the shape and shades of blue.
Beautiful colors, and I love the hex shape! Thanks for the print tutorial!
Beautiful card and images, I love the monochromatic colors!
Wonderful colors & shape. This Bee likes the hexagon shape which I call the Honeycomb shape.
Melissa
“Sunshine HoneyBee”
Beautiful card! I love the purple tones!
Honey Bee Sweet As Honey is adorable, love your blueprint sketch card… great tutorial !
Wow! This definitely evokes Amsterdam and the Delft porcelain. Beautiful!
Your card does remind me of the delft china. Thanks for all the pictures and hints about your process. Shaped cards are so much fun.
This is beautiful! :)
What a sweet card! I love the unique shape :)
Even the bees are blue! I would never have considered doing that, but I absolutely love it! I feel so much better when someone else steps out of the box first! :o) Thank you!
Gorgeous! I always love monochromatic cards as they tend to be so elegant.
Pretty card. I love Distress Inks. I already follow by email.
Love the card! Big fan of Marvy Markers too! Absolutely love how this turned out, thanks for sharing your step by step process!
Love that hexagon shape & those gorgeous flowers! Awesome card!!
This is just stunning! I love anything blue and love your inspiration source too!
I love the hexagon shape of this card and the beautiful blue shading.
What a lovely little card. Thanks for sharing it with us.
gorgeous blues!
Hi Jo Ann welcome to #SSS blog, this card is beautiful! I have never tried a monochromatic design but this definitely has peaked my interest. Thanks for sharing the techniques and the inspiration behind the design/color. I can’t wait to try it myself. :)
What a fun shaped
card and great embellishing.
Carla from Utah
What a fun shape!
So pretty. Love the shade of blue.
Very beautiful card. Love the monochromatic look and the different shape.
Love the blues and the look of this card!
Lovely card! Love the pot of honey
Welcome Jo Ann, you made a gorgeous card, I love the colours that you used. Thanks for the a great tutorial, I hope to see more of you here on the SSS blog.
This is gorgeous! I love the hexagon shape and the beautiful blue colours.
So Pretty!! I love the mono-chromatic colors and the hexagon shape!!!
Oh wow, fabulous card, LOVE the blues!
A beautiful and unique card!
Lovely inspiration ! Cute card;-))m
I love the inspiration behind the colour scheme of your gorgeous blue card!
I love that original hexagon shape ! And the Color combo is so beautiful !!
Pretty blue
Such a sweet lovely card!! :)
Gorgeous card! Love the honey pot and bees you added to the flowers!
Awww!!! So gorgeous!!!
Beautiful card
That color for this card is great. Love the display on how to make a shaped card. Thanks for the great ideas!
Adorable card!
Such a beautiful card, love the shades of blue and the design! Thank you for the inspiration!
Crafty Hugs,
Sherry xx