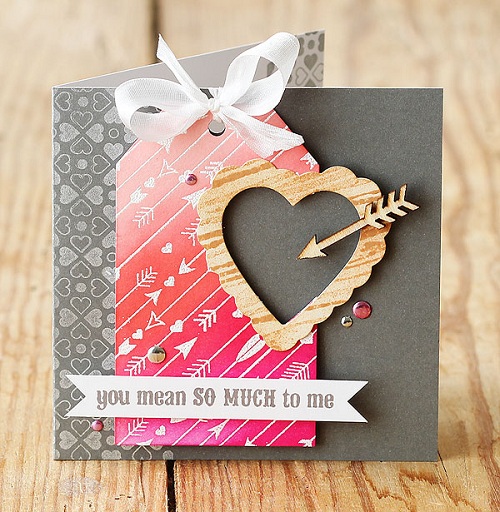
Let’s Make a Cool Card with Lisa Spangler!
Happy Saturday, bloggers! We have a very special treat for you today! Our friend, Lisa Spangler, has made a special exclusive card for our blog today! Get in the festive spirit of the upcoming holiday and follow along with Lisa’s inspiration and step by step instructions on how you can create this card too! Enjoy!
I just couldn’t wait to play with some new goodies from Hero Arts and BasicGrey! I wanted to incorporate some trends that I’ve been seeing everywhere, too: ombre, gray mixed with bright colors, and pops of metallic! This card is for Valentine’s Day, but you could easily change out the inside message and the color scheme to make a card for other occasions.
Instructions:
- Stamp the Arrow Background with white pigment ink on white cardstock and heat emboss in white.
- Use the Large Tag Frame Cut to cut out a tag shape.
- Starting with spun sugar, use a foam ink applicator tool to apply ink to the top portion of the tag, following the diagonal lines that the arrows make. Next add worn lipstick, then go back over where the two meet with more spun sugar to blend. Add picked raspberry to the bottom portion, then blend with worn lipstick.
- Cut out a partial heart from the side using the medium sized heart. (see photo).
- Place the scallop and medium sized hearts on white cardstock and cut out together (see photo).
- Ink the heart with antique linen and tea dye inks, being careful not to tear the paper — a pouncing motion works best!
- Ink the BasicGrey Woodgrain Background with tea dye ink, mist, and stamp on the heart. Adhere the heart to the tag.
- Make a card 4 1/4 square card from Hero Arts Charcoal layering paper. I love this paper since it’s white on the inside, so you can do some stamping or write on it without having to line it first!
- Use silver pigment ink to stamp the BasicGrey Heart Background on the left side of the card, then again on the right side of the inside of the card.

Stamp “Happy Valentine’s Day” with picked raspberry on the inside of the card.

- Position the tag on the card but don’t glue it down yet! Use a hole punch to punch a hole through the tag and the card base. Adhere the card with foam dots and tie a ribbon through the hole.
- Add a wood veneer arrow to the heart — love how these woodgrain arrows coordinate with the stamped background!
- Stamp the message on a white strip and trim the ends, then adhere with foam tape.
- Color some silver metallic decor with a Copic marker and add them to the card — this is a great way to get custom colors!
Thanks for reading today, and special thanks to Lisa, for this special exclusive!
Blog Candy Alert! Join our following and comment on this blog for a special surprise candy!


There are no comments.
Leave the first?