Learning to Fly Home Decor Panel
Hello everyone, it’s Emma here and I hope you’re all having a wonderful weekend! Today, I’m really pleased to be back on the Simon Says Stamp blog and so excited to be sharing this mixed media project that I’ve created. I absolutely love creating my own backgrounds and when I was thinking about a theme for this month’s project, I was inspired by the beautiful new Paper Cut Bird die from Tim Holtz and used this to create an oriental inspired project using a combination of Tim Holtz’s Distress Paints, Layering Stencils and dies to build up the layers. Of course, you don’t have to create a home decor panel like I did, you can also use some of the ideas and techniques to create cards or even scrapbook layouts ~ the choice is yours and there are endless possibilities!
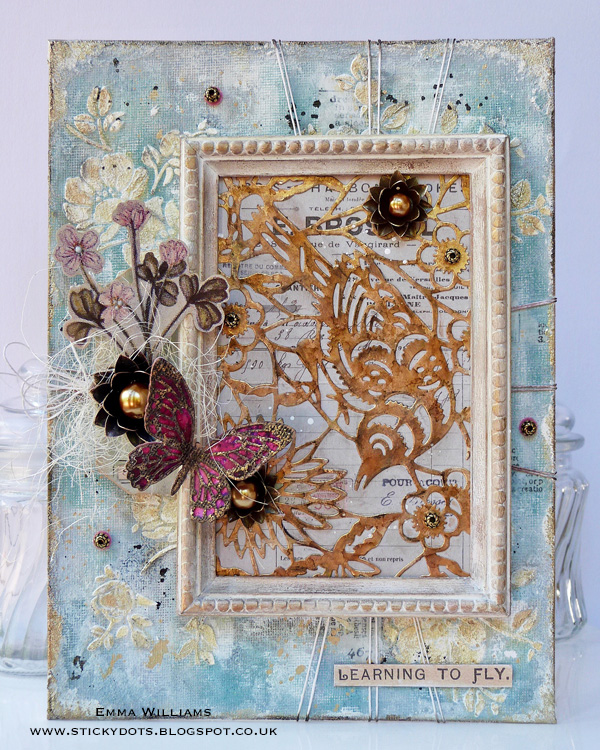
- I began by cutting down the Media Board to measure 7” x 9.5”. The board is pre gessoed and means you can start adding the medium to it straightaway.
- Apply a layer of Weathered Wood over the surface of the board and allow to dry or heat dry using a heat tool. Using a paint brush, lightly dry brush the surface with Antique Linen, allowing the Weathered Wood to still show through but creating a more shabby chic, aged look to the painted surface.
- Once again, dry the paint thoroughly before moving onto the next layer, Peacock Feathers, which again, I applied using a dry paint brush and just gently kissing the surface of the canvas with the paint.
- Place the Floral Layering Stencil in the top right hand corner of the painted canvas and using a palette knife, apply Grit Paste through the stencil directly onto the canvas.
- I continued to add the paste through the stencil, applying the floral pattern to each of the four corners. At this stage, also add a small amount of paste around the edge of the canvas, you only need to smear this on using your finger or a palette knife. Allow the paste to dry thoroughly, and from experience DO NOT be tempted to poke with your finger.
- Once completely dry, take a small amount of the Unicorn’s Hair Sparks Paint and apply to a craft sheet. Add a misting of water and then using a paint brush, brush the paint over the top of the raised stencilled and pasted areas. Gently heat dry the painted surface but don’t leave the heat on any area of the paste too long as it will bubble.
- When the paint is dry, it will leave a very subtle but beautiful shimmer to the stencilled areas.
- Taking the Pumice Stone Distress Crayon, apply a small amount around the outlines of the stencilled areas and then blend the crayon out using your fingers.
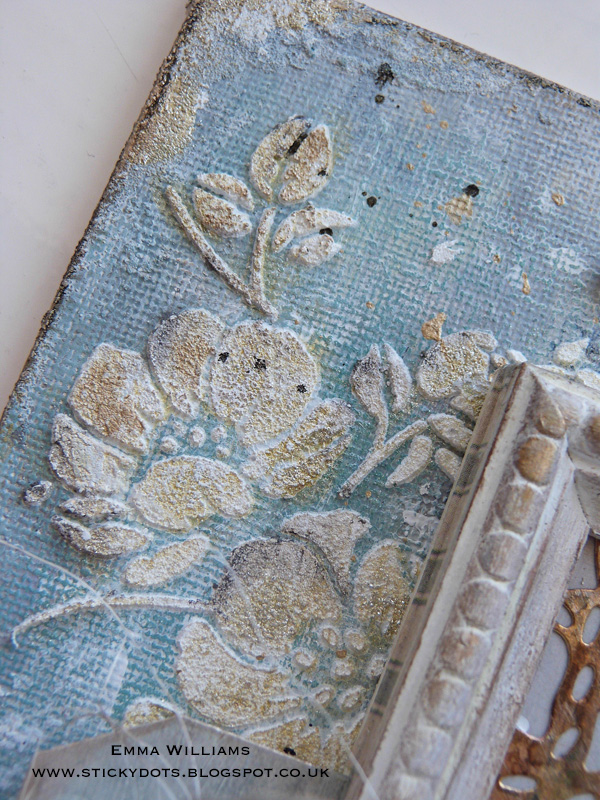
- Splatter the surface with Black Soot Distress Paint and dry the surface completely. Outline the edge of the canvas the Black Soot Distress Crayon.
- Wrap a piece of twine horizontally, three times around the middle of the canvas, creating a fan pattern and securing the ends of the twine at the back. Then wrap a second piece of twine vertically around the canvas creating the same fan out pattern.
- Now, we can move onto the beautiful inlaid style panel and to begin with I gessoed the two sections of the Mini Framed Panel and allowed it to dry. Then add a couple of coats of Antique Linen Distress Paint over the top.
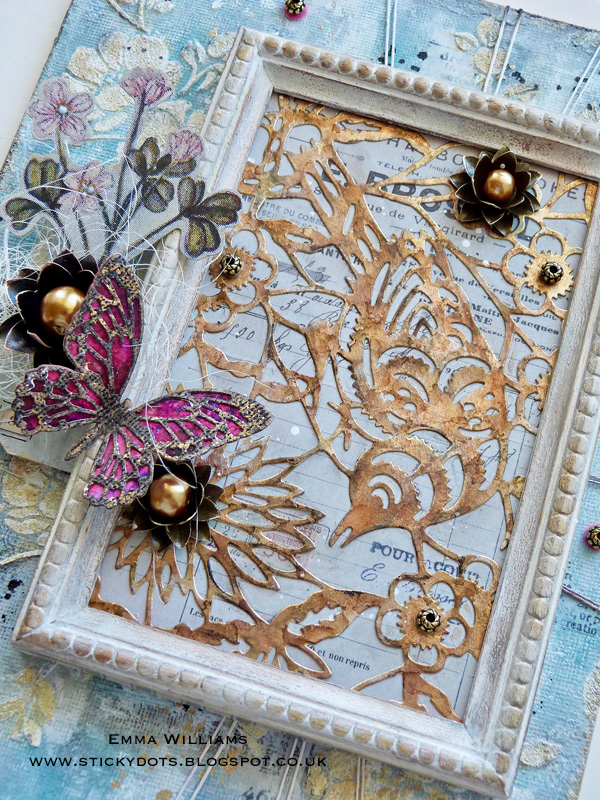
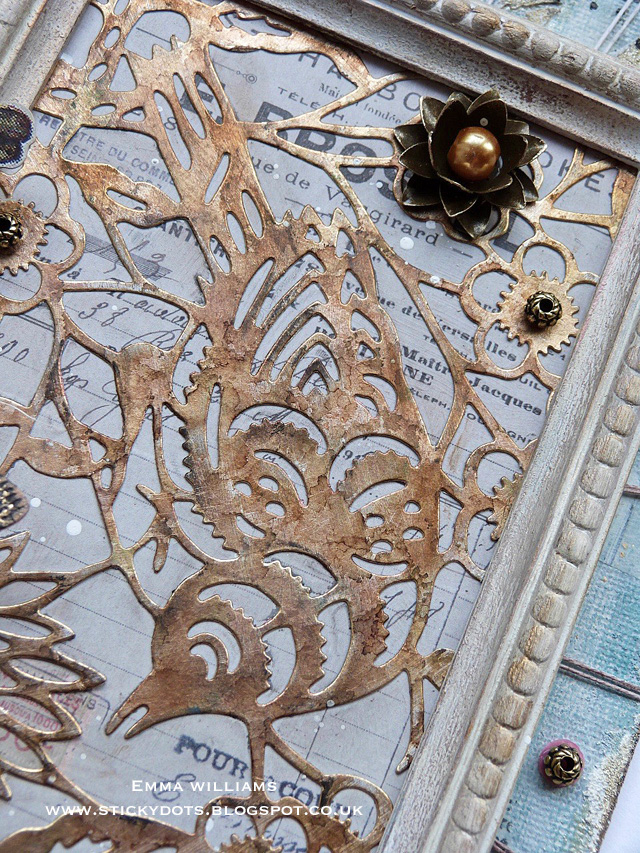
- Once the frame is dry, use your fingertips to apply small amounts of Rose Gold and Bronze Age Waxes over the top to accentuate the beading on the frame. Take the Paper Cut Bird die and die cut the image from Gold Metallic Kraft Paper. For a more aged look, I applied small dots of a combination of Gold Mixative, Mushroom and Hazelnut Alcohol Ink to the ink applicator and pounced the ink over the surface of the die cut.
- Apply a layer of Collage Medium to the back of the die cut and attach to one of the larger pieces of ephemera from the Tim Holtz idea-ology Collector Layer’s pack, before attaching the ephemera piece to the back panel of the frame.
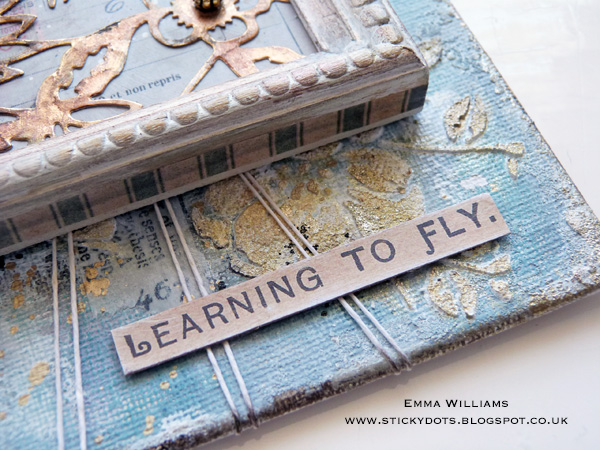
- Place the frame over the top and then apply some of the striped design tape around the frame, to hide the join. Using a hot glue gun, attach the frame to the canvas panel, placing it on the right hand side. Attach Metallic Beads and two of the medium sized lotus flowers to highlight some of the flowers on the inlaid section and place gold glass pearls in the centres.
- Cut a 3cm section from the top of a tag and colour with the same paints that were used on the background. Thread some twine thought the hole and then attach the tag to the left hand side of the frame, placing it onto foam pads and attaching it centrally from the top and bottom.
- Using Collage Medium or a hot glue gun, attach a piece of the Botanical Layers and one of the largest Lotus Flowers directly onto the tag, placing it over a bed of sisal fibres. Add a pearl to the centre of the lotus flower.Using a piece of coloured card, I chose pink ~ use one of the Mini Detailed Butterflies die and die cut the solid section. Die cut the filigree section from black kraft stock.
- Layer the black die cut section over the top of the solid piece and attach with collage medium. Gently rub the Collage Glue Stick over the top of the black outlines and then apply the gold vintage foil transfer sheet, shiny side uppermost, directly onto the tacky areas to transfer the foiling. Attach the finished butterfly to the decorative cluster on the left hand side of the frame.
- To complete the panel, I added some more of the metallic beads and attached them around the frame, before adding one of the quotes from the Clippings set and placed this in the bottom right hand corner.
I really hope you’ve loved the creative process behind this project and you’ll be inspired by some of the techniques I’ve used today, it really was a fun piece to create! Thanks so much for stopping by today and I’ll see you again very soon!
Emma
Supplies:
 |
 |
 |
 |
 |
 |
 |
 |
 |
 |
 |
 |
 |
 |
 |
 |
 |
 |
 |
 |
 |
 |
 |
 |
 |
 |
 |
 |
 |
 |
 |
 |
 |
 |
 |
 |
 |
 |
 |
 |
 |
 |
 |
 |

Blog Candy Alert!! Follow our blog via email and comment on this post for a chance to win a special blog candy!


wow!!! Gorgeously done!
WOW amazing project!!!!
Wow, Emma! Brilliant! I can’t imagine not being able to create something wonderful with your amazingly detailed instructions.
Beautiful project!
WOW! I just really love this! So different. Beautiful job.
Such a pretty project!!
Detail, technique, creativity , beauty =Emma’s art ! This piece has them all . Thanks for sharing and always inspiring Emma x
Wow beautiful project
Amazing details and fabulous composition!!!
Wow, this is gorgeous!!
Pretty Project art ! Love all the detail
Wow, this looks amazing!
It is always a great idea to learn something new. That is why I try to improve my writings with the help of this important site. I hope after reading your article, I will be able to create a Fly Home Decor Panel that will inspire me for learning.
Thanks!
If you’re locked out, need to upgrade your home security, or require new keys, find a local locksmith nearby is essential. Local locksmiths provide quick and reliable services, often offering 24/7 assistance for emergencies. They specialize in various needs, including residential, commercial, and automotive locksmithing. By choosing a locksmith near you, you ensure faster response times and personalized service. Be sure to check reviews and credentials to find a trustworthy professional for your security needs.