Studio Monday with Nina-Marie: Lawn Fawn Magic Slider

Hello crafters, it’s Nina-Marie here with you today for a new Studio Monday video! Have you tried out Lawn Fawn’s fun Magic Slider dies? These make the creating of slider cards SO easy! Today I am going to share this Fall-themed scene slider, which reveals a sentiment on the inside of the slider!
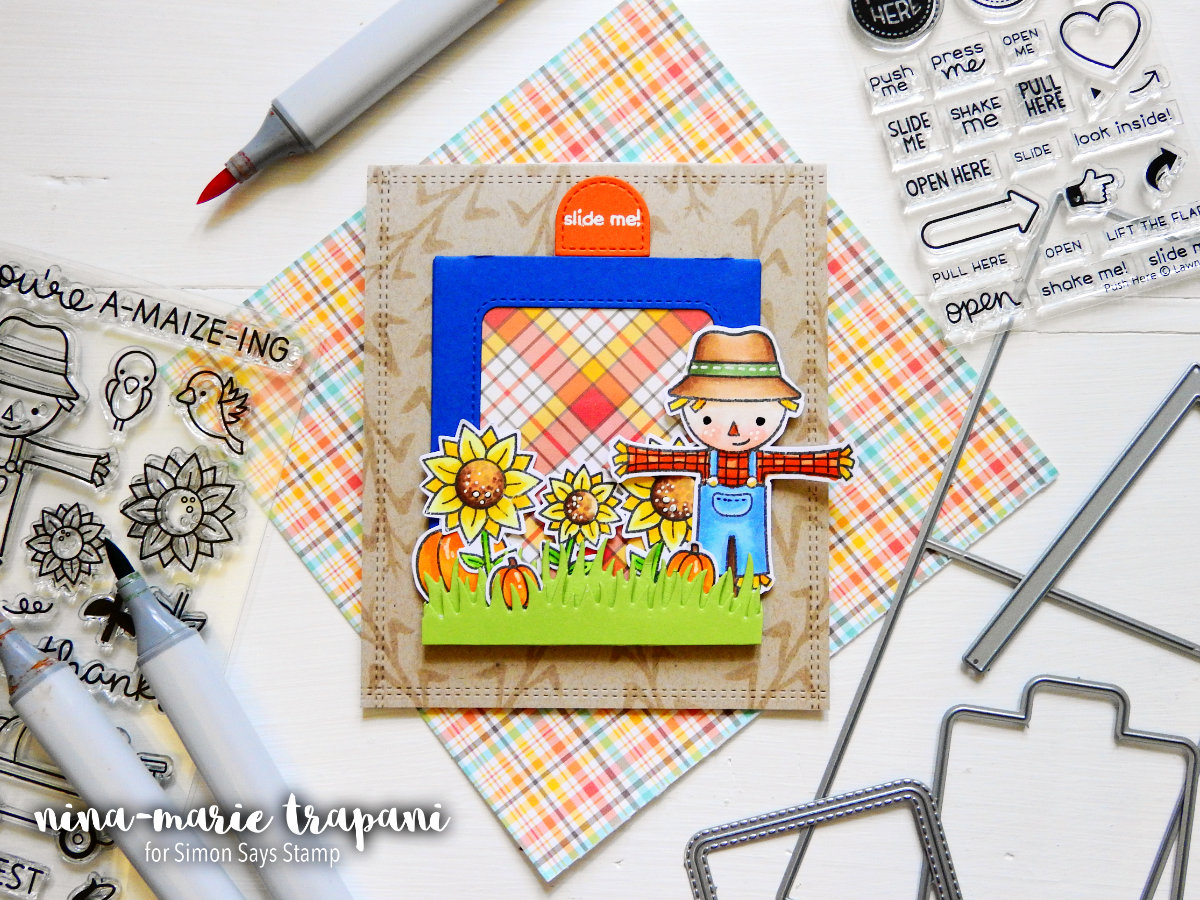
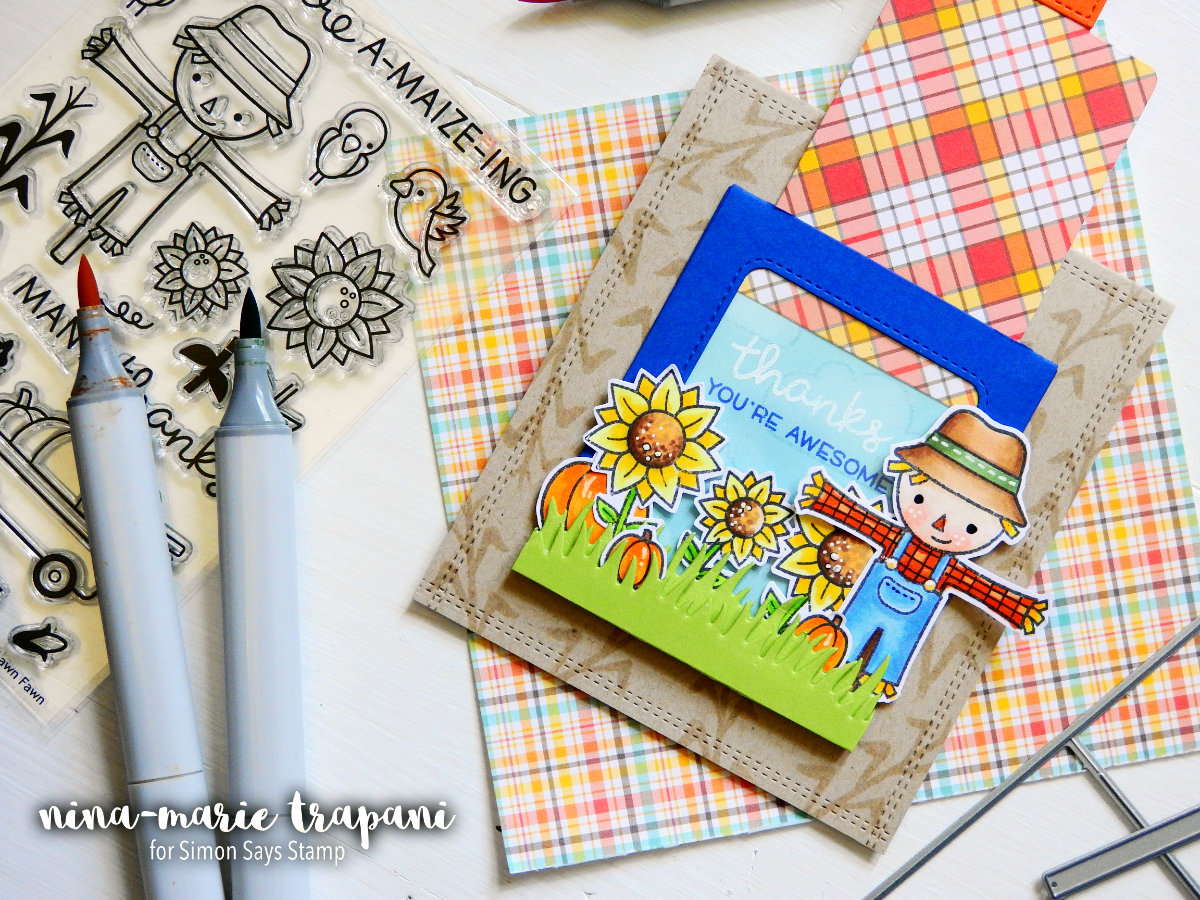
The Magic Slider dies can be used in a variety of ways. I wanted to use it to reveal the sky behind my scene, as well as the sentiment… I also love how the Push Here stamp set from Lawn Fawn allows you to add cute prompts on interactive cards for the recipient. Check out the reveal of the full scene below:
Isn’t that so cool!? All of the images I used in this card were from Lawn Fawn’s Happy Harvest stamp set and I colored everything with Copic markers. If you are interested in the colors I used, I have them listed below.
- Scarecrow; B32, B23 (overalls), YR12, YR09 (shirt), Y15, Y38 (straw), E51, R00, E93, YR18 (face), E53, E55, E57, G24, G94 (hat), E59, E57 (stick)
- Sunflowers: Y11, Y15, Y35 (petals), Y32, Y28, E55, E57, E59 (centers), YG05, YG25, YG09 (stems)
- Pumpkins: Y38, YR16, E57
Because the main focus of the video was building the slider itself and not the scene piece-by-piece, I wanted to touch on a few of the scene/card details that I didn’t get to touch on in the video.
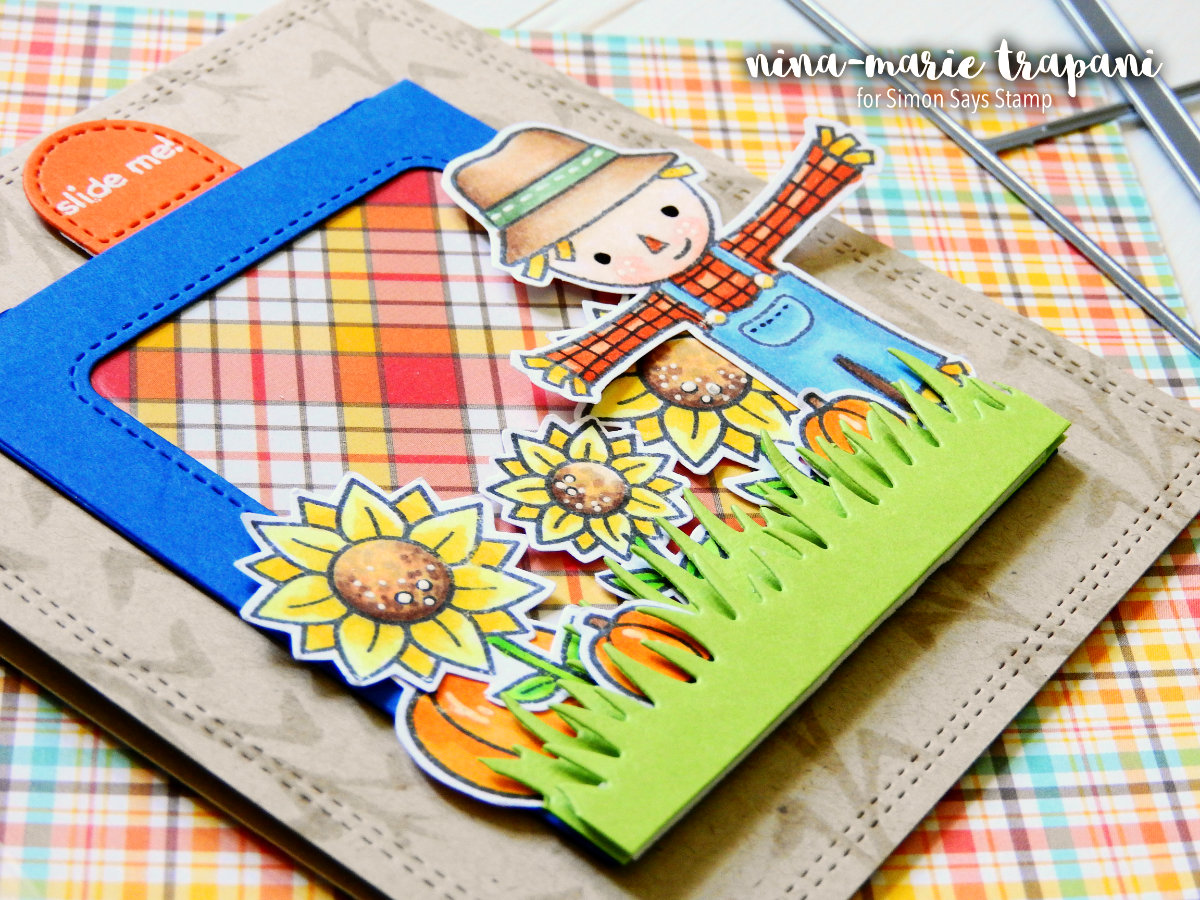
The grass areas were cut with Lawn Fawn’s Simple Grassy Hilldsides dies and I popped those up with foam tape off of the slider housing piece (the navy blue frame). I love how these have a sloped appearance to them!
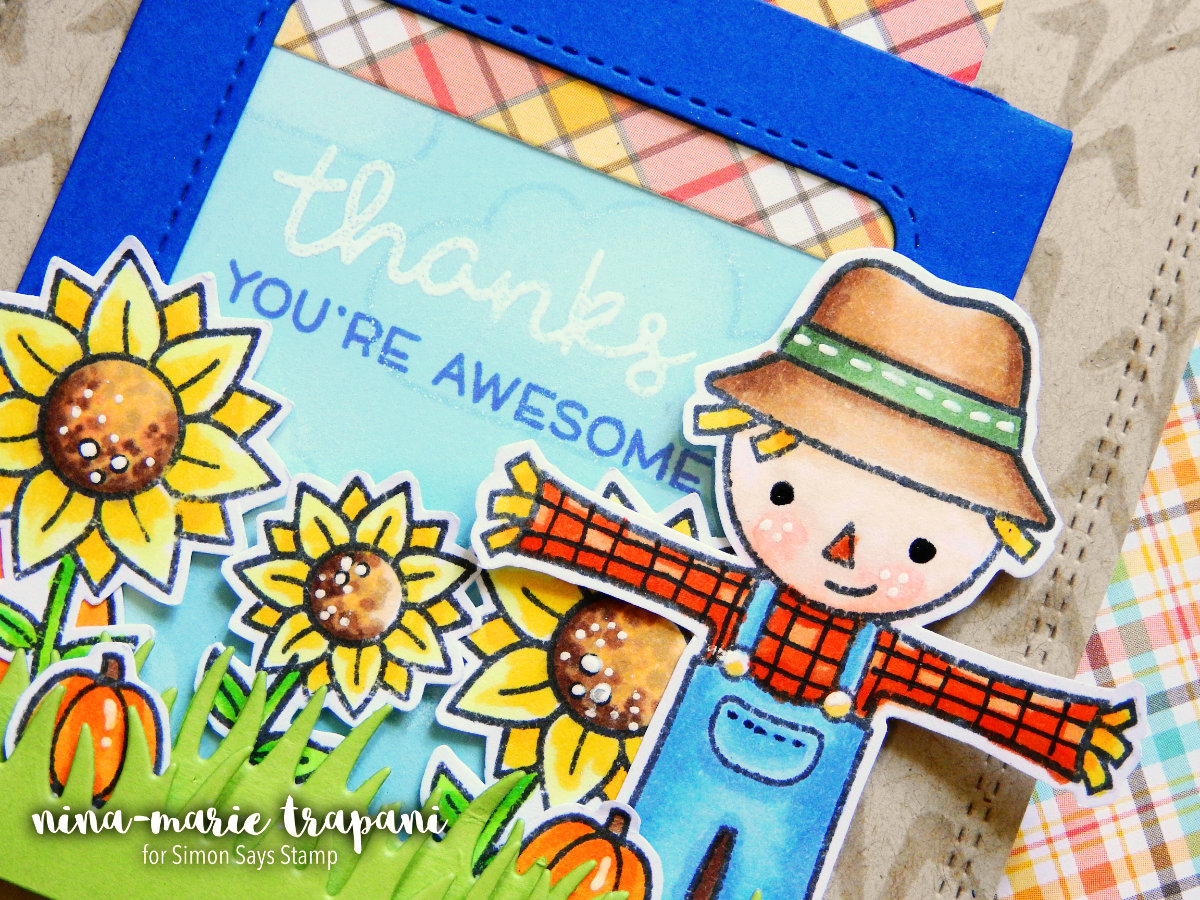
The scene INSIDE the slider was very simple; I cut down a piece of blue cardstock with the rectangle included in the Magic Slider die set. Then with some clouds from Lawn Fawn’s Plane and Simple stamp set, I stamped the entire piece to make a cloudy sky. I used some pigment ink and an ink dauber and randomly added spots of white in the clouds; I didn’t bother to try and stay inside the lines for this.
The sentiment is stamped used two stamp sets; the thanks is from Happy Harvest and the “you’re awesome” is from Plane and Simple. I heat embossed “thanks” and stamped the other sentiment in Indigo Bold ink from Hero Arts.
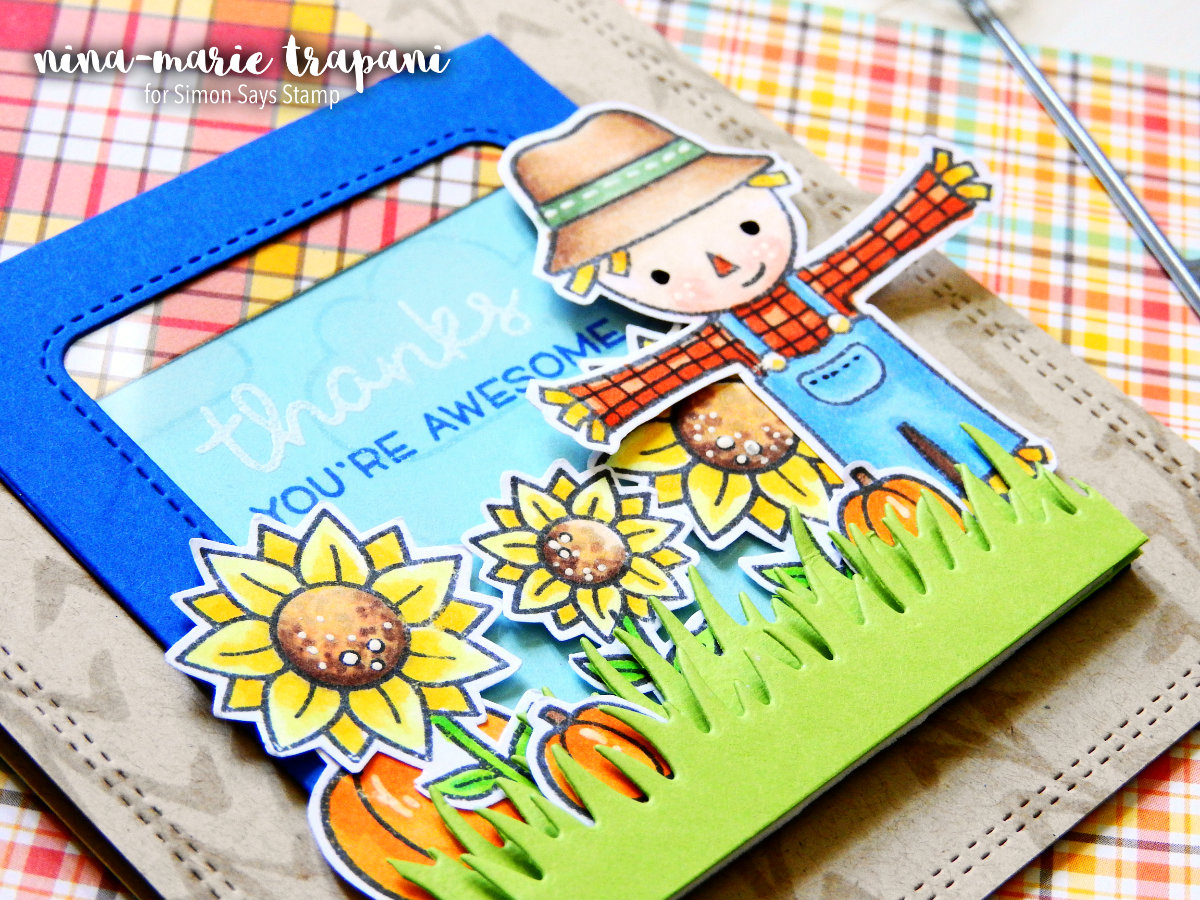
The cute plaid patterned paper from Lawn Fawn’s Perfectly Plaid Fall collection matched so well with the colors in my card! I cut my slider from this paper and I love how it looks.
I also stamped some of the wheat stalks from the Happy Harvest stamp set onto my Neenah Desert Storm card base and added some stitching details using My Favorite Things’ Basic Stitch Line dies.

I again want to quickly touch on one of my favorite aspects of the card; the cute “slide me” message! The Push Here stamp set from Lawn Fawn is a must have if you make a lot of interactive cards! I heat embossed this one onto orange cardstock.
I hope you will watch the video to see the Magic Slider dies used to make this cute Fall-themed thank you card! I’m so glad you stopped by and visited with me today; I’ll be back again very soon with a new tutorial to share with you!
WATCH THE VIDEO
SUPPLIES


Blog Candy Alert!! Follow our blog via email and comment on this post for a chance to win grab bags and blog candy! Remember to tag your awesome projects with #simonsaysstamp on social media so we can see what you are creating!


Love any kind of card that moves, and the little card pulls, so cute and simple with these sets!
What a cute design!
Thanks for an informative video on this slider due set! Very cute card!
Nina, that card is adorable! How fun!
Love this adorable scare crow–thanks for another great video!
Such an adorable card, Nina Marie! Love the little scene you’ve created and the ever fun interactive slider. Such a fun new set! Thanks for the inspiration.
Such a sweet card, Nina! And, thanks for such a fabulous video with great explanations.
Very fun and cute
card, the slider
part is so neat.
Carla from Utah
So cute and clever – love!
I love interactive cards. There are so many possibilities!
What an amazing card! I’ve never made a sliding anything before. That scarecrow is adorable
Darling card.
Love the orange plaid behind
the scarecrow.
thanks for sharing.
Really cute card! This is such a great die set from Lawn Fawn!
So, So, cute. Great coloring and the little scarecrow is so cute. Great video. Thanks for sharing.
Linda D.
This is just darling!
OMG!! Soooo Stinkin’ ADORABLE!!!! I NEED this slider die!!
Such a cute card!! Love it!
Such a great idea
Your card is adorable! Love the fall colors and your scarecrow is awesome!
Super sweet! :)Thank you for sharing,Nina!
I already loved the wonderful plaid background and then you turned it into a beautiful blue sky! Nicely done.
Adorable interactive card!
What a fun and adorable card!!!
So cute! Love how these make inter-active cards so easy!
Oh my goodness Nina, that is just too cute! I adore your scarecrow and how fun as a slider. Awesome job as always!
I love the way you used the slider die set. It’s so cute! Such a fun card and set. :)
This is so, so cute!!!
THAT SCARECROW
IS THE
CUTEST!!!!!!!
Super fun card! Awesome slider die!!
I’m falling for that cute guy on your darling interactive card, Nina-Marie!
This stamp and die set are on my wish list – lovely job here – love that scarecrow and sunflowers very much! TFS
What a great card! Everything about it!
I love action cards and this Fall card is really adorable. I love the plane and simple stamp set as well.
Really enjoying the beginning of your videos, hope you keep that!! Love this card and I love how you explained putting the die together! Love Lawn Fawn products! Thanks for sharing .
Super fun and cute!!, wonderful video full of cool tips/tricks…Thank You!!
Cute card. Good video. I already follow by email.
Such a cute card! Thanks for letting us know how the dies work. This was a great tutorial on them!
Nina,
I love your card. I’m ready for fall. You add so much detail to everything. It’s so cute.
I have this magic slider die set and I love it too.
Just as cute as can be, and much easier than I thought it would be! Thanks!
Fun card, Nina. It was so helpful to have the die pieces & their use explained.
What a great way to use the Magic Slider die! Very cute card!
The card is adorable! I look forward to watching your video when imrezturn from vacation.,,thanks!q
love that plaid paper
Cute card. That stamp set is perfect for interactive projects.
Hi Nina-Marie, LOVED your cute card and all the detail you added to your colouring. Also, your room is STUNNING. I just wish I had a beautiful room like that – you are sooooooo organised. You create gorgeous cards and I enjoy watching your videos. Many thanks for all your creativity and help. Bev from Australia.
Such a cute card! Thanks for showing another way to use the slider card die!
Adorable slider card…love the idea of the plaid panel instead of something fussy. Cute!
So cute, love those amazing dies!
Thanks for detailing out how the slider dies work
Super cute card. I have never use Lawn Fawn sliders dies but I have made a slider card using a template form another crafting company. Interactive cards make a gift even more special.