Julianna Hudgins & Beadalon!

Hello everyone!
Can we say HELLO STAMPtember™?! What a great first couple of days! Today I have a beautiful project Julianna Hudgins created, and it’s showcasing a lot of wire work! When we were at CHA this past summer, I had the pleasure of being in one of Julianna’s classes and completed a wire project. At first, I was like, ‘there is NO WAY I can do this!’ because it looks so intricate- but it’s not true! Once you get the feel of the tools and the projects, it’s just like riding a bike! Plus, the projects that are seem to be the biggest challenge always provide the most satisfaction!
First up, it’s getting used to the wire and twisting it into the shapes you need.
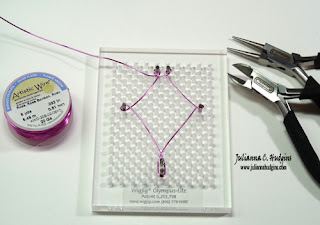

2. Create the small center wire piece for the Goddess.
3. Create two longer wire pieces for the sides of the Goddess. Wrap the wire the length of
the pegs and then take the wire piece up to the top and wrap again to create one long
piece.
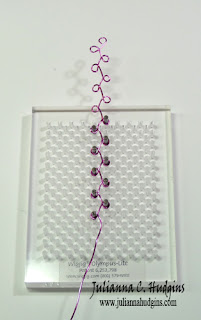
4. Create two top wire pieces for the Goddess. Design the first one and then move the pegs
across to the other side of the WigJig to create the second one.


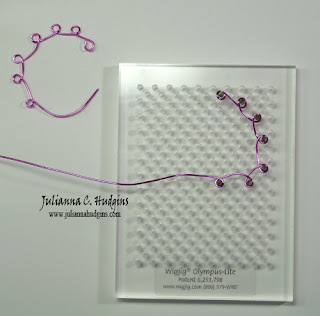
5. To shape the wire pieces lay them on top of the Goddess die template and then bend and
shape to match the curves of the Goddess.
Okay, the wire is done! Way to go! Now, let’s place it onto the Spellbinders Goddess die! The Goddess die was created to embody life and symbolizes strength and empowerment of women!
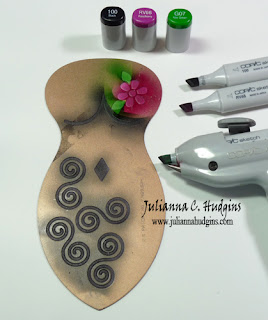
6. Cut/emboss the Baby Goddess using Spellbinders™ Grand Calibur® Machine and
cardstock. Leave the paper in the die template and use it as a stencil to airbrush with
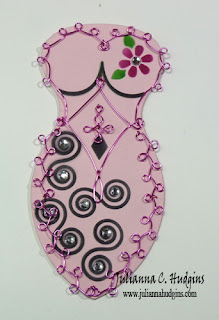

7. To attach the wrapped wire piece to the Goddess cut small pieces of Rose 24 Gauge wire, use
a paper piercer to punch tiny holes, bend small pieces of wire in half and put through the
holes, then bend flat in the back to hold in place.


8. To create the stamped background randomly stamp onto the paper and then lightly ink the
edges.
9. To create the black Goddess outline lay the die template onto the black cardstock and
trace around the die. Then fussy cut the image.

10. Stamp the sentiment on to white cardstock and cut/emboss tag using S5-144 Jewel
Framed Sentiments. Cut/emboss a second tag using black cardstock. Layer the two
pieces and add 3D Foam Squares to the back and adhere to the top of the pink mat. Then
add two small wire wrapped pieces to the top of the card on each side of the tag.

11. Layer the stamped background on to the black mat and adhere to card front. Then layer
and adhere to card front. Add rhinestone embellishments.
Here are some Beadalon products, and the other ingredients for this card!
 |
 |
 |
 |
 |
 |
 |
 |
 |
 |
 |
|
 |
 |
 |
 |
 |
 |
 |
 |
 |
 |
 |
 |
 |
 |
 |
 |
 |
|
 |
 |
 |
|
|
 |
 |
 |
 |
 |
Thanks so much Julianna! And guess WHAT?! Julianna’s blog has a special coupon code for you to use for 20% off Spellbinders products! Oh yeah! Go to her post now to see more!

To win today’s blog candy, join our blog following and comment below!
Thanks for reading today, and our STAMPtember™ has just begun! Stay tuned the whole month to see more projects from designers and have special deals!
-Michelle


Great work!