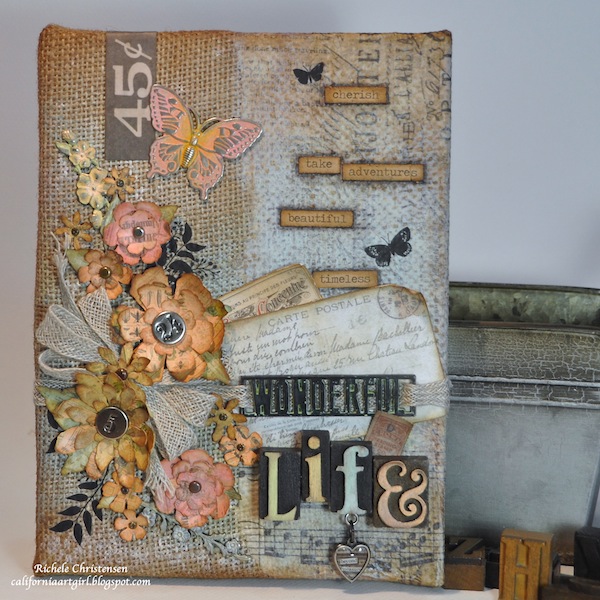
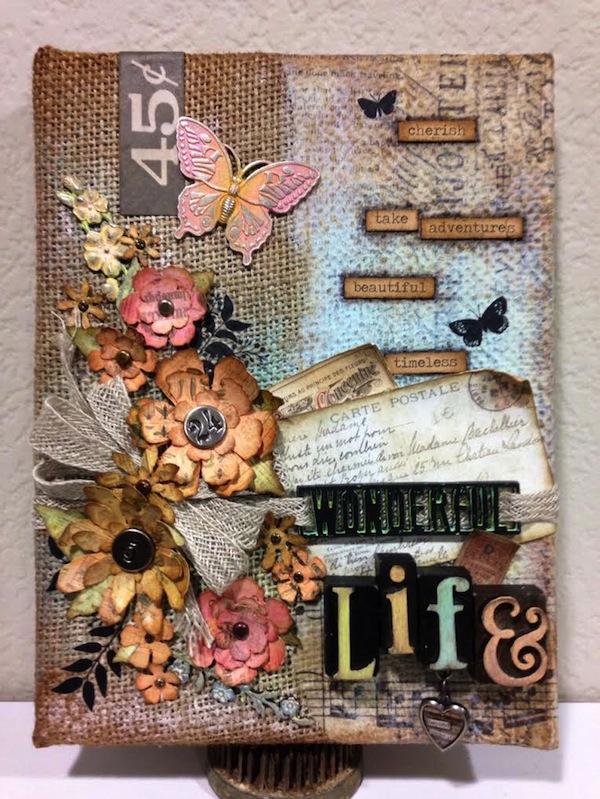
It’s a Wonderful Life
Hi there! Happy Sunday, readers! The fantastic Richele Christensen provided us with some really really WONDERFUL inspiration today! Grab a big cup of coffee (or the beverage of your choice) and check this out!
Enjoy!
Hi everyone! It’s Richele Christensen…I’m so honored to be back to share my canvas with you using lots of the new Tim Holtz goodies. I’m not sure if I have a favorite but I really love the new Letterpress! You can use them for mixed media project, configurations boxes or even by themselves. What will you make with them?
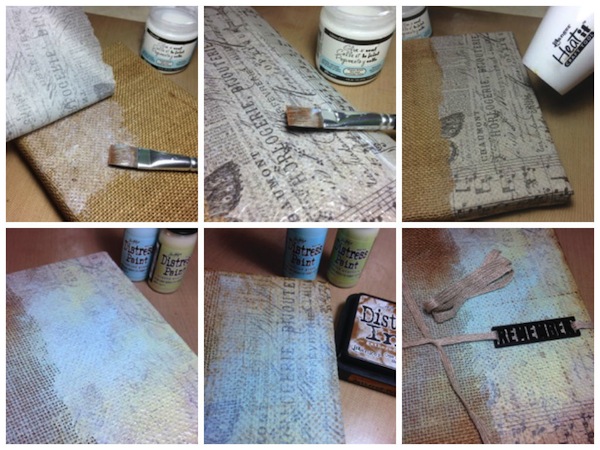
#1 Start with a 6” x 8” Burlap Panel. To create the background for your canvas tear a piece of Melange Tissue Wrap to cover approximately half of the canvas. Apply a layer of Glue n’ Seal (matte) directly to the canvas and adhere the Tissue Wrap.
#2 Apply Glue ‘n Seal to the top of the Tissue Wrap.
#3 Dry with a heat tool. so cool how you can still see the burlap through the Tissue.
#4 Paint Canvas with Distress Paint.
#5 Use Distress Ink on an Ink Blending Tool to add color and create a vintage look.
#6 Make a big bow by wrapping the Linen Ribbon around your hand three times. Set the wrapped loops aside. Weave the ribbon through the Framed Alpha Part word “Wonderful” then wrap around canvas. Tie as shown.
#7 Put the loops over the tied area. Secure the loops to create a bow with a square knot leaving the knot at the back of the bow. The nice thing about the Linen Ribbon is that you can crinkle it up or even ink it if desired.
#8 Add Remnant Rubs by rubbing them onto the canvas were desired.
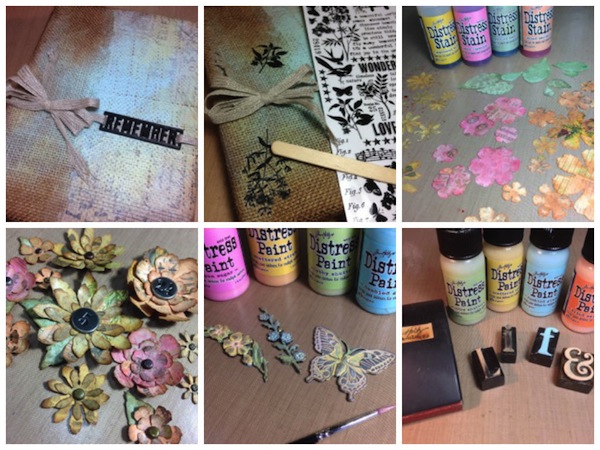
#9 Cut 2 strips 2 1/4” x 12” from the Wallflower Paper Stash. Die cut the flowers from the Tattered Flower Garland Decorative Strip. Color the flowers with Distress Stain. Dry with a heat tool. Distress the edges with Gathered Twigs Distress Ink on an Ink Blending Tool.
#10 Make the flowers by shaping the petals. Add a few layers together and secure with a Number Brad, Long Fastener or Mini Fastener to the center.
#11 Color the metal embellishments using Distress Paint. Partially dry with a heat tool and buff of before the paint dries completely to reveal the metal.
#12 Sand the letters on the Letterpress blocks. This will help the paint to adhere. Paint the letter with Distress Paint. Let dry.
#13 Lightly sand the letter then ink with Distress Ink on an Ink Blending Tool.
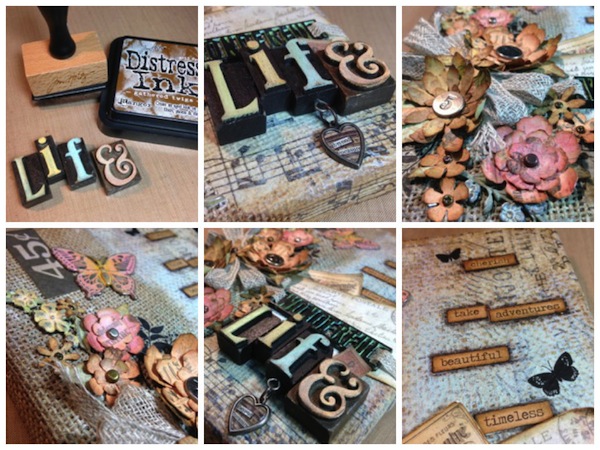
#14 Poke a small hole in the center bottom of the letter with a Craft Pick or Awl for the Screw Eye. Screw the Screw Eye in. Create the Heart Charm by attaching the included sticker to the recessed area then add the included epoxy stick on top. Add the Heart Charm with a Jump Ring to the Screw Eye.
#15 Adhere the flowers to the canvas with a hot glue gun. #16 Add the metal elements.
#17 Tuck a few pieces of ephemera under the flowers and ribbon band from the Thrift Shop Pack of Ephemera. You get SO many pieces in the pack and there’s an Expedition assortment which is great for travel journals.
#18 For the finishing touch add some Chitchat. Ink the edges with Distress Ink on an Ink Blending Tool and adhere in place. Note that the Chitchat comes in white and kraft. Draw around the words with a Black Soot Distress Marker then rub with your finger to blur the ink. The Glue ‘n Seal enables you to blur the Distress Marker to create this fun look.
I hope you will try making a canvas, they make wonderful gifts or a great decor piece for your home. So many fun goodies to use….the Letterpress, the Heart Charms, maybe the new Botanical Adornments or the Wallflower Paper Stash? So many to choose….what’s your favorite?
Thanks for stopping in! Have a creative day! Richele
SUPPLIES:
 |
 |
 |
 |
 |
 |
 |
|
|
 |
 |
 |
 |
 |
 |
 |
 |
 |
 |
|
|
 |
 |
|
 |
 |
 |
 |
 |
 |
 |
Wow! What a fun project! Let’s have another look at the final project:
Thanks so much for reading and thanks to Richele for being our guest today!
Blog Candy Alert!! Follow our blog via email and comment on this post for a chance to win a special blog candy!


Beautiful piece, the textures are wonderful!
WOW!! This is just BEAUTIFUL!! LOVE the tutorial!! THANKS for sharing and have a FABULOUS WEEK!! =)
Wow this is sooooo beautiful love it and thanks for the tutorial.
lovely project.
What an amazing piece of art! So many cool techniques in one project.
This is stunning. I love all the tutorials and videos shown on this blog and thank you for the inspiration and help I receive from them!
Beautiful project !!!
Wow. This is so beautiful!
Wow, I love all the layered elements and distressing on this gorgeous project!
Wow o wow! This looks AMAZING! I hope to have a go. Thanks for sharing!
Looks fabulous. Will have to give this a try. Love seeing your work on the SSS Blog. Thanks for sharing
Wow! Just beautiful. So many techniques in a small space.
OOOhhh, I can smell the burlap. And I have some distress inks needing to be used. Thanks for the idea.
I love the soft colors against the burlap! And the wordblock-letters are great in this way! It has a nice tuch of spring…
Wow, what a fabulous project!
Ohhh, what a beautiful project. Thanks for sharing!
What a great canvas. Love all the Tim Holtz goodies that you used on this. Thanks for sharing with us.
Gorgeous!
Really beautiful. I think the decorative ‘E’ is my favorite part.
Such beautiful colors and textures!
Love the vintage look, the flowers and the butterfly.
Stunning piece!!!
Beautiful vintage project! the textures are fabulous!
I am blown away! The project is gorgeous, especially with all the Tim stuff. Kudos to Richele!
It turned out great. I really like this one.
Creative, artistic and beautiful. Great tutorial. Thank you.
Love the vintage look of this.
Thanks for the step by step for this lovely project. I follow the blog by email.
Fabulous canvas. Thank you for the inspiration.
Beautiful canvas. I love everything about it especially the ribbon. love the flowers and colours.
Love all the texture in this project!
What a beautiful project you made, I just love that vintage look.
Love It!!
Great project!
WOW! Lovely!
Sandra ltb
Beautiful, love the textures, colors and flowers. TFS
WOW! What an amazing project!
I just started to work with canvas projects and this tuitorial today has really inspired me. I love the distress look and the great balance of the embellishments.
Really amazing project
Love everything about this! Love all of these Tim products and your made something so colorful and pretty! Thanks for sharing.
Katie B.
I love this project-so pretty!
Wow! So much to look at on this one project!
Absolutely beautiful! Love, love, love this. Thank you for the step by step details.
So beautiful project!!! I love the way that every item is combined on the canvas! The step by step details are so helpful! Thank you for sharing and for the inspiration!
So gorgeous! I would love to try canvas, but I think I’d need to perfect freestyle collage first..hehe. Such a beautiful look that I could stare at it for hours!
I love the feminine colour palate without being fru fru :)
Thanks for sharing this absolutely fabulous piece of stunning art with us!!!
xx Irene M
Oh my goodness, this is soooo gorgeous. Richelle have done an amazing job on this, and I absolutely love every little detail on here. Sooooooooo beautiful work, I´m totally stunned about it.
Beautiful! Love the color combo and distressed flowers.
Love this beautiful project, love mi-media and the idea of working with burlap and metal, this project is such an inspiration!! thank you for explaining with step by step pics !!