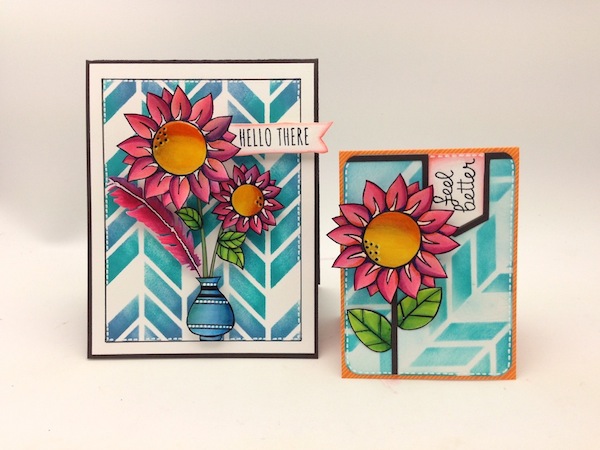
Hello There: Blender Pen Highlighting Tips!
Hi bloggers! Happy Thursday to you! We’re so thrilled to have dear friend of Simon, Kathy Racoosin as a guest on our blog today! Her blog is appropriately titled The Daily Marker, and folks, let me tell you, this gal can COLOR. She totally made our day when she said she would join our STAMPtember® celebration with some cool coloring tips & tricks!
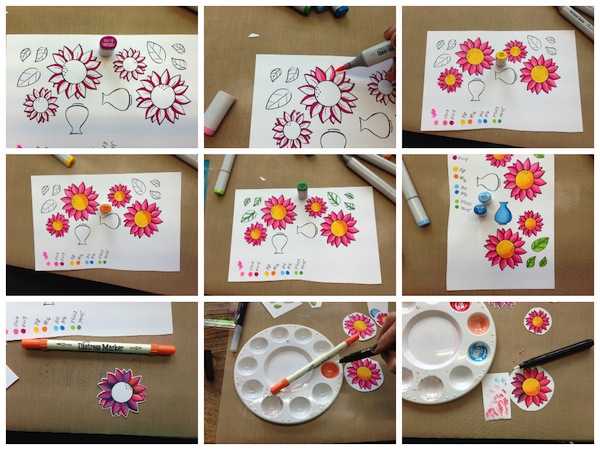
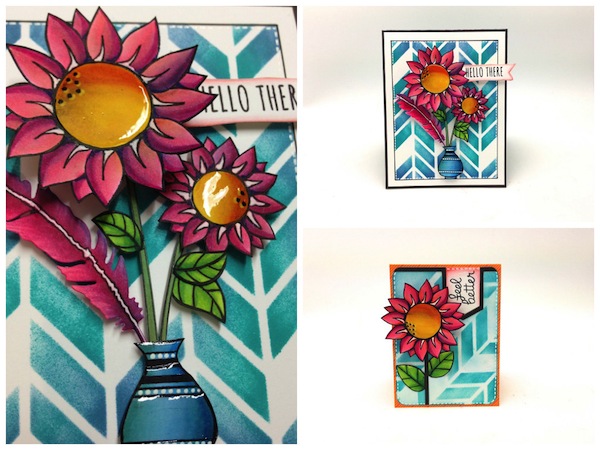
(Follow photos with numbered instructions in clockwise order)
Enjoy!
-
Stamp images beautiful flowers from Lawn Fawn called ” Our Friendship Grows” with Memento Tuxedo Black ink.Add a line with a dark pink alcohol marker onto the petals.Note: This is an ink for coloring with alcohol markers & NOT recommended for water color markers but, it’s works if you are careful.
-
Color on top of the dark pink marker with a lighter color pink. This will soften the hard line on the petals.
-
Add a medium yellow color to the flowers center.Note: This photo shows dots of the colors selected to use on the images for an easy reference.
-
Add a darker color of yellow for the flowers center overlapping the lighter yellow color.
-
Add some lines to the leaves with a medium green marker and continue to color the leaf with a lighter color.
-
Repeat with blue markers to color the vase.
-
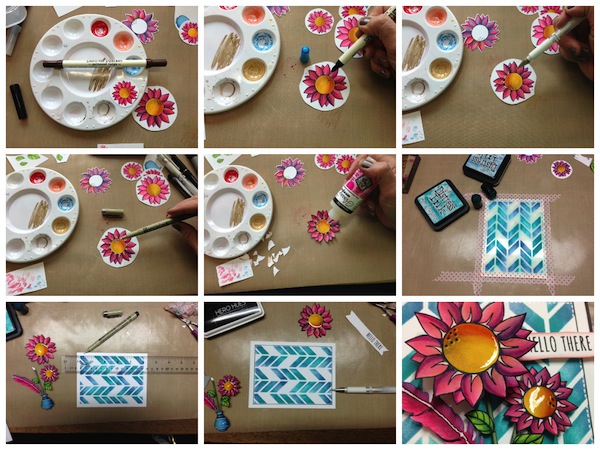
This is the fun part…. Add some pretty highlights to your stamped images by using Distress Markers with a Dove Blender pen.Note: Since Distress Markers are water color markers you must be careful to not apply to much color.Always stamp an extra image to test what color distress markers you like best and or practice before adding color to your image.(This flower was tested using 3 different shades of blue and orange to see what would yield the desired look).
-
Scribble the Distress Marker into a palette or onto a craft sheet. Pick up some of the orange color from the palette with the Dove Blender. Add the color from the Dove Blender to your petals giving them an orange wash. One time is a charm. If you over color your paper will begin to pill.A FEW TIPS FOR BEST RESULTS USING A DOVE BLENDER PEN:
- The dove marker is being used instead of using a paint brush or a water brush. When water isn’t being applied it’s easier to control the color added to the images. A Dove Bender works great with most colored pencils as well.
- If you have a heavy hand when coloring use a heat tool and try on the back of the image between colors so your paper doesn’t become to saturated.
- Always scribble off the color from the tip of the Dove Blender on some scrap paper before switching colors just like you would do with a paint brush.
9. Scribble a dark blue Distress Marker into the palette. Pick up a dab of the color on the tip of the Dove Blender. Add the blue starting in the corner of the petal and working your way along side of the petal to keep a shaded look on the petal. If the petal becomes to dark make a note to self to pick up less color on the tip of the Dove blender or scribble some color off on a scrap sheet of paper first before blending onto the petal.
-
Add some Gathered Twigs Distress Marker to the flowers center.
-
Take the small tip of the Distress Marker adding many teeny tiny dots in the cracks of the flowers to add some extra highlights to the petals.
-
Dry your image with a heat tool on the back to be sure that its dry.A FEW TIPS FOR BEST RESULTS USING A WHITE GEL PEN.
- Adding some white pen accents on any image really enhance your overall project & always practice on scrap paper first.
- For best results with the gel pen place a dot on your finger and be sure to let the white dot “pool” on your finger. This way you know the pen is flowing nicely and is ready to go.
- If you feel that you added to much white pen on your image you can hid some of the white by coloring on top or use a black permanent marker (depending on where the white was added on the image).
- Trace around the white gel accents you placed on your image with a Micron .01 marker.
-
Add some white around half of the dots on the flowers center. Trace around the white with a Micron .01 marker. This extra step will really make the white accents really stand out. However, you might be happy skipping this step. Use the black marker to enlarge the small black dots in the flowers center.
-
Cut your flower out and bend the petals upward gently. (This particular flower has a die cut for quick results.)Add Glossy Accents to the centers of the flowers. Set aside to dry for a few hours or overnight.
-
Cut some white card stock 4.25 x 5.5. Use washi tape to hold the chevron stencil onto your craft sheet.Using a dauber blend some distress inks around the stencil.
-
Using a ruler draw a black line to around the pattern with a Micron pen. Wipe the ruler cleanbetween each line so you don’t’ get any smears on your card. Stamp lines on the blue vase and add some dots with the Gel Pen.
- Add some faux stitching around the black line for some extra detail. Die cut Sketchy Banners adding a bit color with the Dove Blender. Stamp the sentiment with Hero Arts Black Die ink. Die cut the feathers and color the same way as the flower adding blue highlights and a white line down the center. Layer your images and use pop dots behind the images for dimension . Add to your card base.
- Close up of the flowers!! Ooooh! Ahhh!!
Supplies:
                        |

Congrats! Blog Candy Winners!
From: DIY Embossing Glitter with Jennifer McGuire!: Rachel K!
From: CLASS GIVEAWAY! New: Insider by Online Card Classes!: Natasha Marr
Please email me ([email protected]) with your mailing address (if applicable) and the name of the blog you won from!


Love the color of these flowers and the glossy accents is a perfect topper to the card. TFS
Great card, thanks you for a fantastic tutorial.
What a pretty card! Thanks for the step by step tutorial!
This is beautiful…Kathy nevers disappoints! Going to try this technique right away.
Beautiful flowers. Great tutorial.
Thanks for all the details on how to create these vibrant cards. Love the happy colors!
Another gorgeous card from Kathy!!
Wow–what gorgeous coloring! Thanks for all the tips and photos!!!
Oh, so adorable! I love it!
So gorgeous and what a detailed tut!
That girl sure is a walking wonder, when it comes to coloring, and her work always looks fabulous, and so does this one here today. And what an awesome tutorial here Kathy, sooo easy to follow and understand, thanks so much for that hun.
Thanls to SSS for sharing all these amazing things with us here all month, it´s absolutely awesome. Hope you´re all having aaaasuch an awesome time as I am here.
Have a wonderful day ladies and lots of great coloring fun too.
Wonderful card,Nice colors,Thanks for sharing this tutorial kathy!!
Awesome colours, will have to give it a try!
Soo beautiful!
Lovely results with your wonderful tips!
<3 J
GREAT GREAT coloring and beautiful card!!! Thank you for sharing all those tips and tricks! Greetings from Greece!
Beautiful coloring! Thank you for tips.
What a beautiful and colorful card, love it!
I am not a fan of copics, but follow Kathy on the daily marker to get inspired by the colours she uses and try to learn to colour better… Inky greetings, Gerrina
Great tips and the end result looks amazing. Love it :)
WOW!! BOTH CARDS ARE ABSOLUTELY STUNNING!!!!
Absolutely perfect (as always)
The colours are so vibrant and so well done…a very clever woman!!! And her tutorial is brilliant, even for a novice like myself. Really appreciate her sharing her wonderful skills with us all!!
just delightful Kathy. Saw this on SCS too. Great tutorial. Thanks for the chance to win some goodies.
Such a great card! Thanks for sharing the how to! Love the great background, and the details on the flowers.
Love the card, tutorial and products. Gotta get some of those dies.
Thanks for the tutorial and the chance to win :D
Gorgeous cards and thanks for all the tips :)
WOW!!!
Stunning..thanks so very much for the tutorial….
AMAZING Details as usual Kathy!! ;) I LOVE the FUN Colors you used and the idea with the stenciled background!! THANKS for sharing and for the chance to win!! Have a Fabulous Week!! ;)
What an amazing result! Thank you for the tutorial :)
puts a smile on my face!!!!!!
Laura
Thanks for the great tutorial. Your instructions are clear and concise. Your flowers are amazing. I saw your tutorial on SSS and became your follower.
These really are stunning! Thanks to Kathy for the detailed instructions!
Absolutely love this tutorial! Thanks Kathy! Great cards and technique!
Beautiful flower, TFS :)
Those flowers are so pretty! Thank you for sharing how!
I adore Kathy’s works….and this is great! Beautiful as always!
I am always amazed by the beautiful coloring Kathy does. BTW, I sub here and there. :)
This is fabulous. Kathy does such amazing coloring! Thanks for the tips.
Absolutely gorgeous colouring. Thank you for the wonderful tutorial and tips
Thanks for the great tutorial The flouwers are so beautiful.
Gr Elly
Another stunner for Stamptember!
Very pretty card…love how you showed us step by step.
Funny — I just read the tutoriaL ON scs about 15 minutes ago. Amazing work with color and blending.
thanks Kathy for this great tutorial, love the bright colors of the flowers
What a beautiful card!
Great cards!!!
Wow! What stunning creations and effect! xx
Absolutely beautiful flowers. Thanks for the step by step tutorial. Love the colors.