Happy Pumpkins!
Hi readers! Happy Monday! We’re so excited to share this super fun and cute Halloween project by the super talented Anna-Karin Evaldsson today! Read on for a full tutorial and photos.
Enjoy!
Hi everyone! I am so happy to be here today with a fun Halloween tutorial, using products by Tim Holtz and Sizzix.
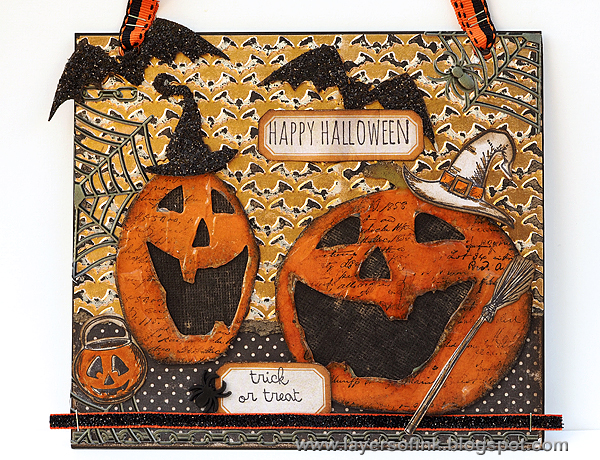
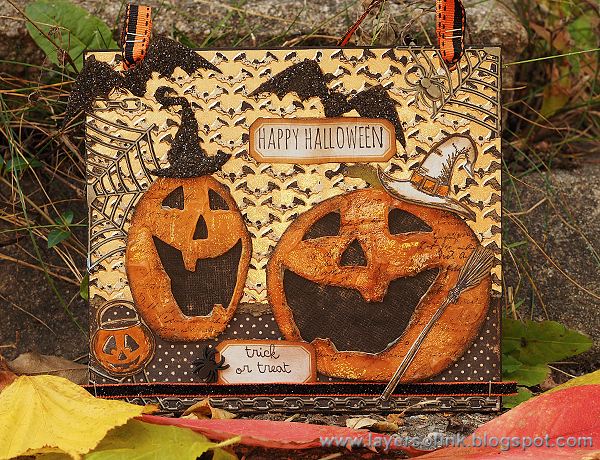
I was in the mood for something fun rather than spooky today and made a happy little wall-hanger, using the Jack-o’-Lanterns die. The pumpkins look pretty friendly and hilarious. The techniques used to create this wall-hanger can be used on any type of project, and not only for Halloween of course. The panel is 6 x 7.7 in.
-
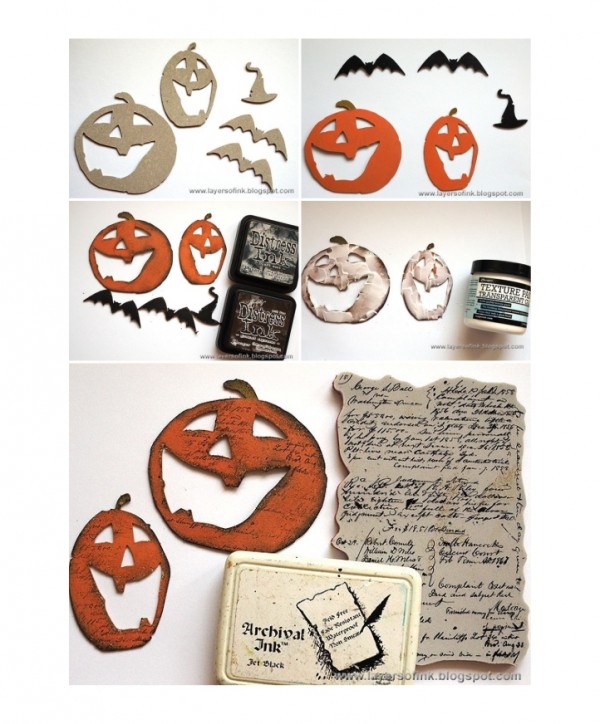
Die cut the pumpkins, as well as a witch hat and two bats from the Hocus Pocus die, from grungeboard or chipboard.
-
Paint the bats and the hat with Black Soot Distress Paint, and the pumpkins with Spiced Marmalade, Rusty Hinge and Peeled Paint. Let dry.
-
Sand the shapes with a sanding block and then ink with Ground Espresso and Black Soot. The ink will stick to the sanded areas, giving the shapes a grungy look.
-
Stamp with one of the new Ledger Script stamp. These stamps are great for adding just the right amount of texture.
-
I wanted the pumpkins to look glossy, but not as glossy as a coat of Glossy Accents. I got the idea of trying to use Ranger’s Transparent Gloss Texture Paste instead, and applied it unevenly with a palette knife. Let dry overnight.
-
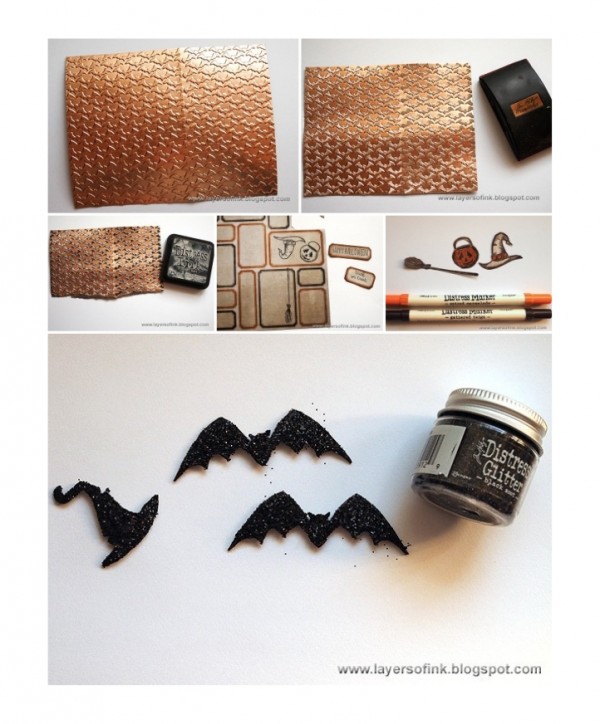
Have you seen the Metallic Kraft-Core papers? They are pretty cool and come in gold, silver and copper. I used the copper one here, embossed in the Batground Texture fade.
-
Sand, to reveal some of the kraft paper.
-
Ink by smearing Black Soot ink directly onto the paper. Wipe with a slightly moist cloth. The ink will stick to the sanded areas. Tear the lower edge.
-
I used the Crazy Things set and the Crazy Talk sentiments to dress up my wall-hanger. They were both meant to coordinate with the Bird Crazy stamp set, but they work great together with other images too. I liked the background of this label paper from the Regions Beyond paper stash and stamped the sentiments on two labels and three images in the centre of other labels. Cut out.
-
Colour the stamped images with Distress Markers and ink the edges with Ground Espresso.
-
Smear a thin layer of Glossy Accents on the bats and hat and sprinkle with Black Soot Distress Glitter.
-
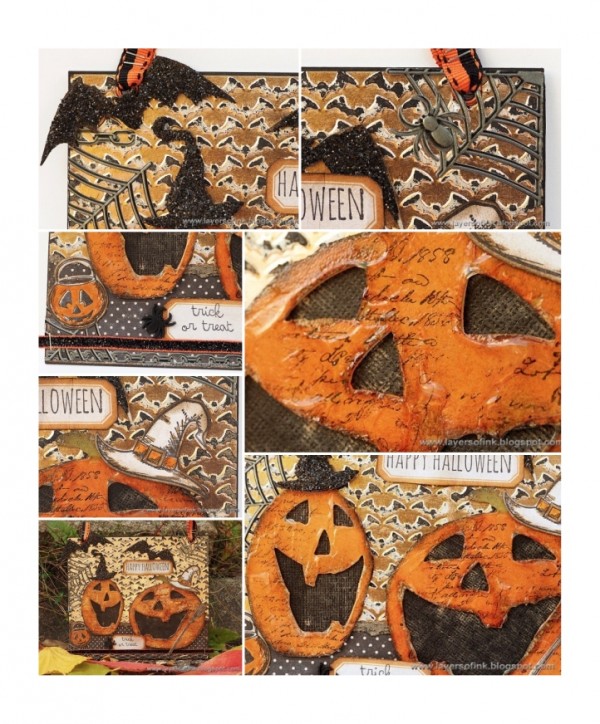
The black glitter looks great in combination with the distressed copper background. Punch holes with a Crop-a-Dile and staple a Halloween Trimmings ribbon to hang the panel.
-
I adhered some Gothic Industrious Stickers to the background. Cut one of the spider web apart to use in three places on the panel.
-
Glue the pumpkins to a sanded piece of black Kraft-Core cardstock.
-
I really liked the effect of the Transparent Gloss Texture paste. It gave just the right amount of gloss to the pumpkins, while also adding texture.
-
Give the smaller pumpkin, the glitter hat and the larger pumpkin, the stamped hat.
-
At the bottom, there is an Industrious sticker border, as well as a piece of Halloween Trimmings. The glitter in the ribbon coordinates nicely with the Black Soot glitter on the bats and hat.
-
Here you can see the panel in its right element among some pretty autumn leaves. The copper shines real nice and gives a warm glow to the project.
Thank you so much for looking!
Happy Halloween crafting!
Anna-Karin
SUPPLIES:
 |
 |
 |
 |
 |
 |
 |
 |
 |
 |
 |
 |
 |
 |
 |
 |
 |
 |
 |
 |
 |
 |
 |
 |
 |
 |
 |
 |

Blog Candy Alert!! Follow our blog via email and comment on this post for a chance to win a special blog candy!


How cute – those pumpkins really look like they are laughing at each other in their tiny hates – made me giggle, too!!
Such a cute and perfect Halloween card!!!
Now that I don’t have any children of trick or treating age, I don’t decorate much for this holiday, but I really do find this project cute!
What a great project. I still think it’s spooky, though!
love the fun papers. Great card
Awesome wall hanger Anna-Karin! Thanks so much for instructions on how you made it. I think I’ll try to create a scene with trees and snowmen.
This is fabulous! I love those pumpkins.
What an adorable banner! Of course now I want to make one.
Love pumpkins during the fall! It makes me remember the fun times I had as a kid with my grandfather carving them each Halloween!
I love pumpkins, especially happy ones.
This is very cool! The pumpkins look great with the transparent paste! And, I love the background!
what a lovely project. . . . so in the season
Very spooky–perfect for the season.
Wow, what an amazing and awesome Halloween card.
What a cute Halloween card! I love the pumpkins and texture, thanks for sharing.
Spooky and cute!!!
What a super fun project! LOVE it ♥
Very cute happy pumpkins.
This is so much fun; and I always learn so much from your website!!
Another cool Halloween project.
This looks amazing I love all the texture
What a cute project!
I like how that looks and really like how the pumpkins are made
These pumpkins really do make me smile! Awesome techniques, awesome creations!
Great work. I am loving that new ledger stamp. I never thought I would need a new script stamp, but now I do.
Love it!
I love the effects you created and all of the cool texture! What a wonderful piece–I’m just crazy about it! Thanks so much for sharing it with us!
Always good to see how someone else does it! Learned again… Great way to make the embelishments!
Halloween is my favorite holiday and THIS CARD IS FABULOUS! LOVE every single detail about it. Wonderful bkgrd, pumpkin, glitter, glaze and paste! Every detail makes it marvelous! Reading the tutorial, I became aware of some new-to-me products and a couple terrific techniques to try. THANKS! :)
Tha is amazing!! Anna-Karin is SO talented!
Thanks for all the steps to explain how you got all the cool textures and effects on your hanging!
Super cute!
These pumpkins sure do look happy! Cute wall hanging!
This is such a happy card Anna-Karin, I love it! x
So cool. I love Halloween.
OMG, This is beyond CUTE. I love, love this !!! Thanks a lot Anne-Karin, now I have to spend a bunch of money to buy the supplies, because I HAVE to make this LOL. Thanks to loving Mr, Holtz products I already have some of the items on hand. Great post today.