Happy Pumpkins!
Hi readers! Happy Monday! We’re so excited to share this super fun and cute Halloween project by the super talented Anna-Karin Evaldsson today! Read on for a full tutorial and photos.
Enjoy!
Hi everyone! I am so happy to be here today with a fun Halloween tutorial, using products by Tim Holtz and Sizzix.
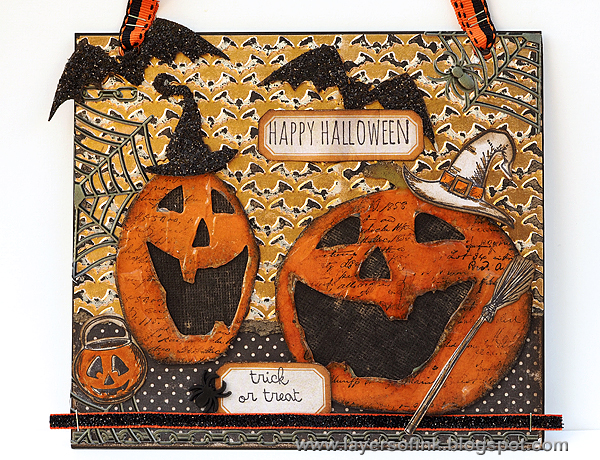
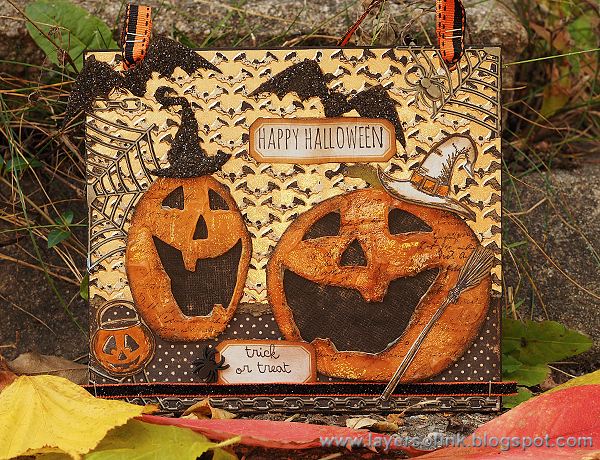
I was in the mood for something fun rather than spooky today and made a happy little wall-hanger, using the Jack-o’-Lanterns die. The pumpkins look pretty friendly and hilarious. The techniques used to create this wall-hanger can be used on any type of project, and not only for Halloween of course. The panel is 6 x 7.7 in.
-
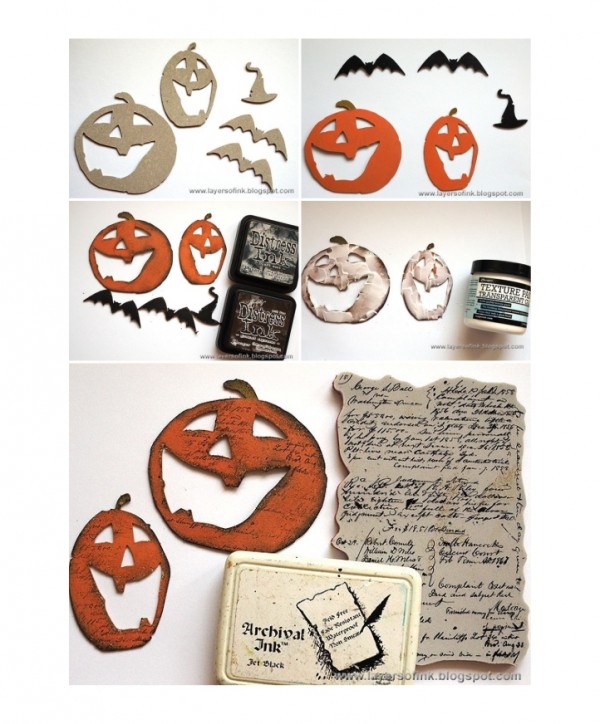
Die cut the pumpkins, as well as a witch hat and two bats from the Hocus Pocus die, from grungeboard or chipboard.
-
Paint the bats and the hat with Black Soot Distress Paint, and the pumpkins with Spiced Marmalade, Rusty Hinge and Peeled Paint. Let dry.
-
Sand the shapes with a sanding block and then ink with Ground Espresso and Black Soot. The ink will stick to the sanded areas, giving the shapes a grungy look.
-
Stamp with one of the new Ledger Script stamp. These stamps are great for adding just the right amount of texture.
-
I wanted the pumpkins to look glossy, but not as glossy as a coat of Glossy Accents. I got the idea of trying to use Ranger’s Transparent Gloss Texture Paste instead, and applied it unevenly with a palette knife. Let dry overnight.
-
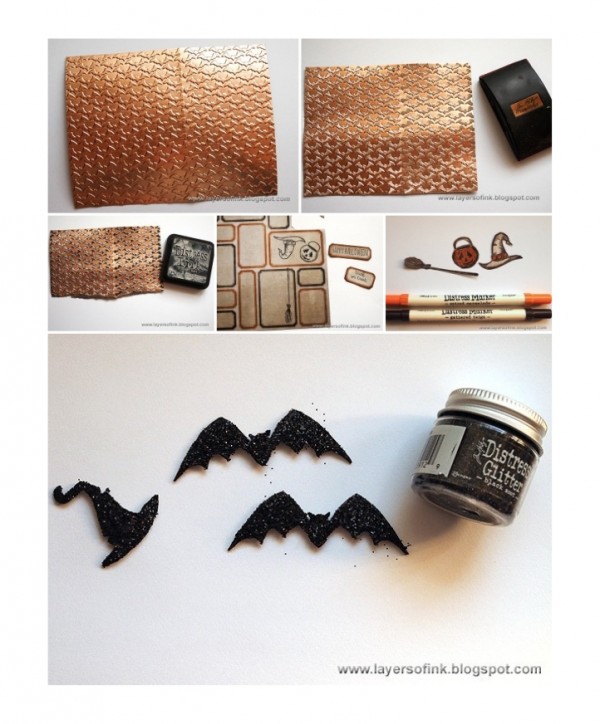
Have you seen the Metallic Kraft-Core papers? They are pretty cool and come in gold, silver and copper. I used the copper one here, embossed in the Batground Texture fade.
-
Sand, to reveal some of the kraft paper.
-
Ink by smearing Black Soot ink directly onto the paper. Wipe with a slightly moist cloth. The ink will stick to the sanded areas. Tear the lower edge.
-
I used the Crazy Things set and the Crazy Talk sentiments to dress up my wall-hanger. They were both meant to coordinate with the Bird Crazy stamp set, but they work great together with other images too. I liked the background of this label paper from the Regions Beyond paper stash and stamped the sentiments on two labels and three images in the centre of other labels. Cut out.
-
Colour the stamped images with Distress Markers and ink the edges with Ground Espresso.
-
Smear a thin layer of Glossy Accents on the bats and hat and sprinkle with Black Soot Distress Glitter.
-
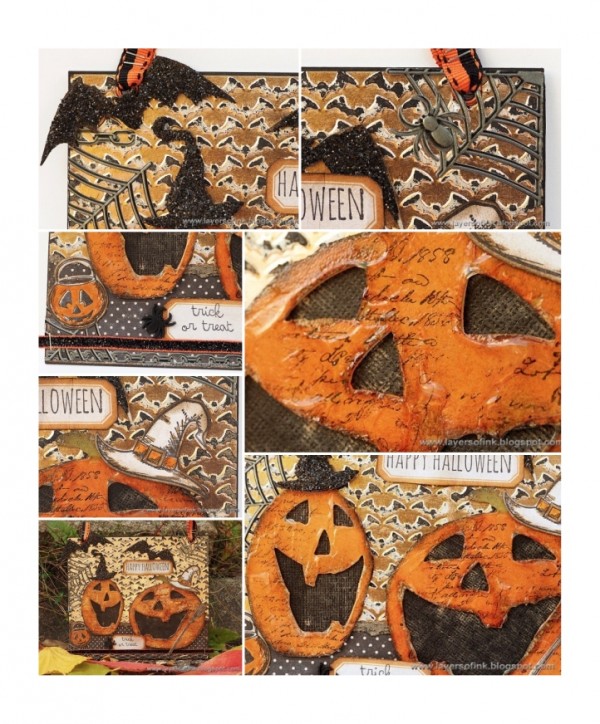
The black glitter looks great in combination with the distressed copper background. Punch holes with a Crop-a-Dile and staple a Halloween Trimmings ribbon to hang the panel.
-
I adhered some Gothic Industrious Stickers to the background. Cut one of the spider web apart to use in three places on the panel.
-
Glue the pumpkins to a sanded piece of black Kraft-Core cardstock.
-
I really liked the effect of the Transparent Gloss Texture paste. It gave just the right amount of gloss to the pumpkins, while also adding texture.
-
Give the smaller pumpkin, the glitter hat and the larger pumpkin, the stamped hat.
-
At the bottom, there is an Industrious sticker border, as well as a piece of Halloween Trimmings. The glitter in the ribbon coordinates nicely with the Black Soot glitter on the bats and hat.
-
Here you can see the panel in its right element among some pretty autumn leaves. The copper shines real nice and gives a warm glow to the project.
Thank you so much for looking!
Happy Halloween crafting!
Anna-Karin
SUPPLIES:
 |
 |
 |
 |
 |
 |
 |
 |
 |
 |
 |
 |
 |
 |
 |
 |
 |
 |
 |
 |
 |
 |
 |
 |
 |
 |
 |
 |

Blog Candy Alert!! Follow our blog via email and comment on this post for a chance to win a special blog candy!


Very cute!! Love the happy jack-o-laterns!
OOOH this project is so cool!!!
Cristina
thehouseoftheblackbirds.blogspot.it
Wow! This is amazing! Those jack-o-lanterns sure do look like they’re having a good time!!
What else can I say but: spook-tacular! Thank you for the tutorial!
~c
Spook-tacular. Like the look of the pumpkins & especially like the glitter on the bats.
Melissa
“Sunshine HoneyBee”
Love the way you made the background with the foiled Kraft card and sanding it down. Beautiful results:)
Great texture and depth!
Halloween cards are the best!
stamping sue
http://stampingsueinconnecticut.blogspot.com/
i hate to eat them, but they’re very decorative and so is your card
Nice project! Love the happy pumpkins!
Oh My just love this project. The pumpkin die cute are a must for me.
Love this project. What a fabulous wall hanging for Halloween !!
Super CUTE!
SO FUN!! LOVING the New Pumpkin Dies!! THANKS for sharing and have a FABULOUS WEEK!! =)
Great card. Love the jack-o-lantern very cool.
I love the happy pumpkins and the bright shiny background. Thanks for sharing Anna-Karin!
Quite a few different techniques going on here! Though I personally don’t celebrate Halloween, I can appreciate the time and effort you have put into making this piece come out special for you. I do really like the metallic Kraft core cardstock! Sure adds a bit of shine! TFS
This is so cute. Love all the black glitter and orangey goodness of the pumpkins. Thanks so much for sharing.
Fun. I’ve been meaning to make some paper pumpkins for a while but I forgot!
What a ton of work you put into this card. Great results.
Wow-oh-wow! This is so cool & I bet seeing this in person with the glitter sparkle & copper glow, makes it that much more fabulous!
Awesome happy pumpkins. So worth the effort!!! Thanks for sharing with us!
Beautiful tutorial, I really like this :)
Love the texture of the metalic/sanded/inked batground!
So fun! Love the pumpkins and glitter :)
Love how you stamped on the pumpkins. So cool.
Those pumpkins are so happy they’re scary!
These are awesome! Love the look!
Halloween is a fun time.
Love the pumpkins, the witches – everything that’s supposed to be scary
thanks for sharing a darling card.
The pumpkins are so cute.
Love those pumpkins! Perfect for Halloween!
wooooww your step by step is so complete I adore to read and see your process
adorable and cool project
love this much
So totally fabulous! The Metallic Kraft-Core paper is one of my favourite “discoveries”.
Ooohhhh! What a lovely Halloween project! I LOVE those pumpkins die-cuts and the black distress glitter on the bats and the hat! They look so perfect! Thank you for the inspiration!
I bet the batty copper background looks amazing in the real. Love your pumpkins. Ooh errrr!! Hugz
Love the textures and the cheesie pumpkin grins! Yay for Tim Holtz fun designs! Great project!
Great project! Creative use of materials and details!
Wow, that certainly is a lot of work put into this gorgeous project.
Love the texture.
What great expressions these pumpkins have !!!
Loved the pumpkins and the metallic kraft paper. Very cool!
Love it!
Fun project. I love your style, colors and the bright feel to it.
AWESOME!
LOVE your Halloween wall hanging, all those textures are awesome, thanks for the info about the metallic Kraft core paper too, I didn’t know about that good stuff!
Cute! Love those happy pumpkins and the sparkly hats!
that’s some amazing texture. i put all my halloween things away and now i want to drag them all back out. :D
Fabulous Halloween fun. Love the texture and all of your details.
fabulous card! i would love to know how long that took to put together….so many elements! i keep staring at it..well done.
Super Awesome Creepy Goodness!! I Love it!!
The pumpkins are just the happiest ones ever. Love the card. Love the metallic.
Cute card and I love all of the elements and techniques of the card. Thanks for sharing
Linda D.