Happy Holidays with Kit Inspired by Tim Holtz
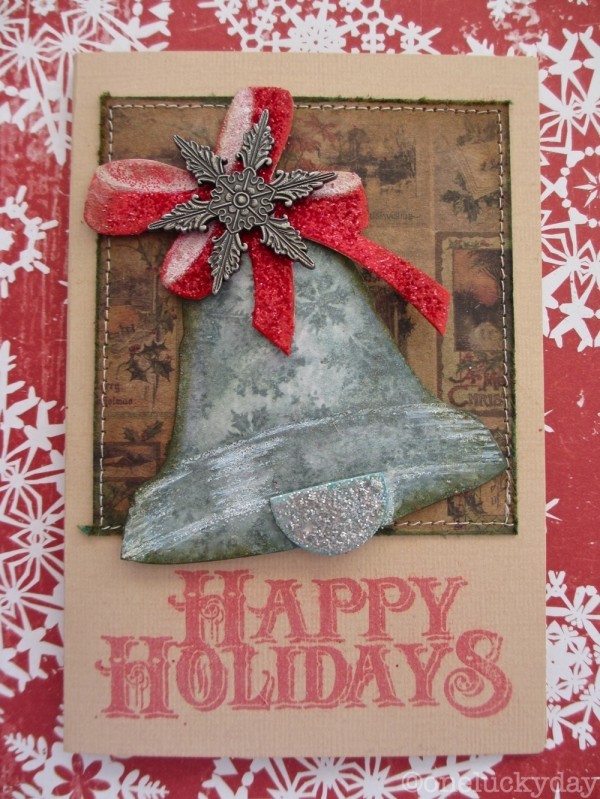
Hi Bloggers! Happy Sunday to you! I’m excited to bring you this fun & festive card by Paula Cheney! It’s almost entirely made with the contents of our 2013 Holiday Card Kit inspired by Tim Holtz! That’s right! So much crafty goodness in ONE kit! How awesome is that? You can even pick if you want CLEAR or CLING stamps in your kit!
Paula provided some great step by step still shots & instructions so you can make your own version of this great card! Enjoy!
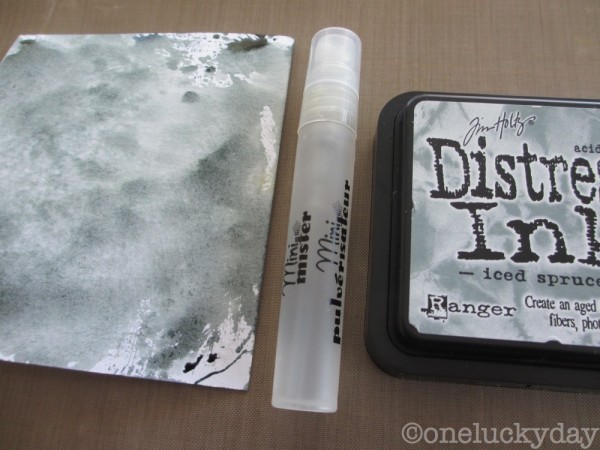
Step 1: Color one of the Ranger Watercolor paper pieces with Distress Ink – Iced Spruce by rubbing the ink pad on a Ranger craft mat. Spritz ink with water from a mini mister. Lay the watercolor paper into the mix. Dry with a Heat tool.

Step 2: Once dry, cut out bell shape using the Sizzix/Tim Holtz – Christmas Bells Bigz die.

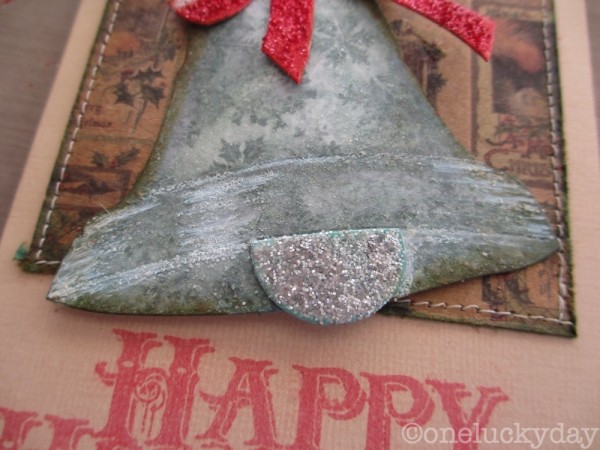
Step 3: Ink the edges of the bell with Iced Spruce. Use the snowflake stamp, that is part of the Stamper Anonymous set included in the kit, to add snowflakes to the bell in Iced Spruce.
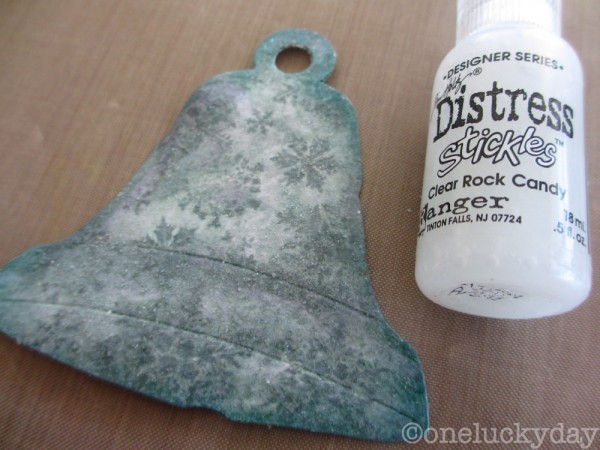
Step 4: Ink the edges with Evergreen Bough then add a layer of Distress Stickles – clear rock candy over the top. Set aside to dry.

Step 5: Use a manila tag for the ribbon shape (from the same Christmas Bells Bigz die). Ink entire bow with Festive Berries Distress Ink. Cover with a thin layer of Glossy Accents and add Distress Glitter in Festive Berries over the top. Repeat the same steps with the 1/2 circle die cut – using Evergreen Bough Distress Ink and Pumice Stone Distress Glitter.
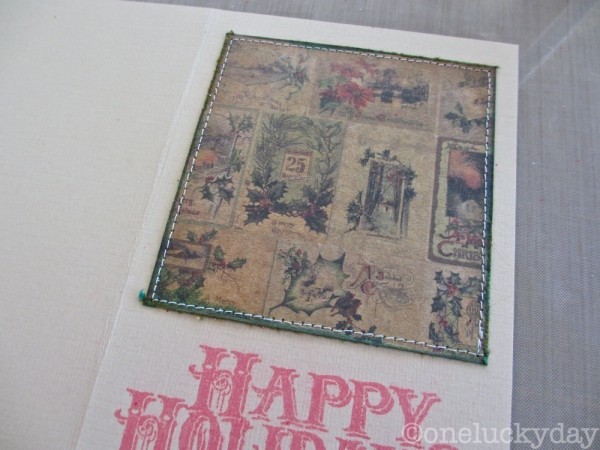
Step 6: Stamp Happy Holidays with Distress Ink Festive Berries. Cut one of the cards included in the kit, to fit new card made from solid cardstock. Ink the edges of the paper with Evergreen Bough Distress Ink. Finish off edges with an edge distressing tool. Sew to card front with sewing machine.

Step 7: Once the bell is dry, add to card using a double layer of foam tape under the center of the bell. It helps to bend the watercolor paper slightly so the bell is curved over the foam tape. Add bow to the top of the bell. Use Distress Marker – Picket Fence to color the shadows in the bell and bow.
NOTE:When using the Distress Marker to draw shadows, I just plowed right over the Distress Glitter and Distress Stickles with the brush end of the marker. The marker was not damaged at all. I just had to wiped off the excess glitter when I was done.
One note on the Picket Fence Distress Marker (aka the magic pen), the pen looks clear when you are using it, the white color only appears as it is drying (like magic!). Once you start coloring, wait 5 or 10 seconds before adding more of the white color. Love the effect it gives!

Step 8: Add metal embellishment snowflake to bow.
SUPPLIES:
 |
|
 |
 |
 |
 |
 |
Blog Candy Alert!! Follow our blog via email and comment on this post for a chance to win a special blog candy!


Great card, Paula! So glad to read/see how you made the fabulous-looking bell! :)
I love the technoque you used for the bell!
Thanks for showing us how gorgeous we can make that bell look!!
xx Irene
Wow Paula,
You make me look at the Christmas Bells Die with different eyes.
What a great card. Thank you for sharing the technique for making this card.
I LOVE IT!
This is so awesome, I absolutely love it.
Love this card, it is really different but very festive
Gorgeous card! Love the snowflake stamp you used on the bell. The distress glitter really sparkles.
I love the bell with the snowflakes! so pretty!
what a cool card! I like that bell with bow die. thanks for sharing
stamping sue
http://stampingsueinconnecticut.blogspot.com/
Can you make all my Christmas cards? :)
What a beautiful card- the bell is so pretty, & that bow is stunning! Thanks for the tip on the white marker, it adds so much. And of course the glitter- I love it!
I love all the details of this card, especially the bell and bow.
Wow, that is n amazingly creative project. Gorgeousness!
This card is just gorgeous! I think it should be framed!
An amazing project. Thanks for a chance to win a grab bag.
thanks for sharing that technique, the result looks great :)
Great card, love the tutorial
Love vintage cards and this one is great!
Gorgeous card! You just can’t go wrong with Tim Holtz!
Love Iced Spruce used as the color for the bell!
I follow by email-I can’t wait to add color to my bell die cuts as you did on this card-looks so realistic!
What a beautiful card!
This card is stunning! Thanks for sharing all the techniques. I love the distressed look and that background is gorgeous.
This card is absolutely fabulous! I love how Paula created the bell and the bow! TFS! :) xo
Love your card! Thanks for sharing your techniques :D
Fun technique, and fun card!
Thanks for sharing your technique. Love how the bell came out especially with the shading.
Awesome!! Loving this card and the AWESOME ideas!! Thanks so much for sharing and have a Fabulous Week!! ;)
Very pretty….thanks for the wonderful steps.
This is awesome – love the bell.
great inspiration, thanks;-))m
What a gorgeous vintage looking card! Love the bell! Thank you for the tutorial :)
Jingle bells
Jingle bells
Jingle all the way!
Love it!~
Love all the sparkle and glitter. My santa list has just had a few more ink and stickles added to it.
The glitter on the bottom of the bell just makes me smile — the perfect finishing touch.
very beautiful card, love the way the bow is made !!
I love *everything Paula!!*; this card is stunning & she shares every little detail to make this in your own time….thanks, Paula & to Simon Say…for sharing Paula card & for fixing the link!
wow, die Karte ist sehr edel
lg gila
Wow….you really brought that bell to life. Gorgeous! Thanks for sharing with us!
Gorgeous card–I have’t tried using the distress marker over glitter–thanks for testing that out for us!
Thanks for the step-by-step directions…. love the inspiration!
beautiful combination of color awesome card
What a pretty card! Thanks for the instructions.
Awesome card. Thanks to Paula for sharing how to create the stunning bell and bow.
Really great tutorial guiding us each step of the way on the journey to create this AMAZING project! Just stunning results!!
Paula, thank you for sharing these awesome goodies….very pretty. Oh, and I love the goodies that you used to create this lovely piece!!
Love the card, so delicate and beautiful!
LOVE IT!!! Anything Tim Holtz is fabulous!! Thanks for sharing your creativity!!!
Beautiful card!