Happy Easter!
Hi readers! Happy Easter! We have a lovely Easter themed project today by the always delightful Emma Williams. This project is Easter Bunny approved! Read on for a full tutorial and pictures!
Hello everyone!
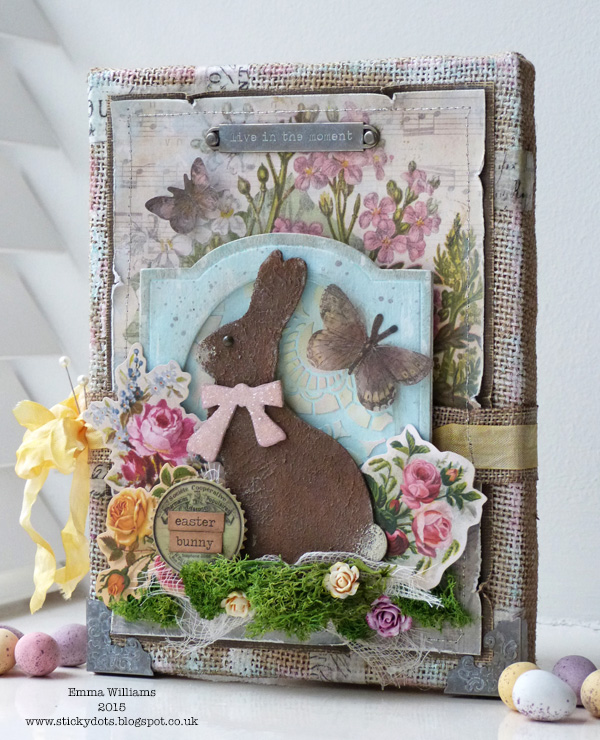
Today, I am so thrilled to be sharing my Victorian inspired Easter Bunny burlap panel here on the Simon Says Stamp blog. I absolutely adore the imagery and style of the beautiful vintage illustrations from this era and wanted to create a piece of seasonal home decor that encapsulated the same feel using products from Tim Holtz and Ranger.

- Apply random strokes of colour to the surface of the burlap panel using Picket Fence, Tumbled Glass and Spun Sugar Distress Paints. It’s not necessary to cover the entire surface, as I think it’s nice to see some the natural hessian colour popping through.
- Tear small amounts of Tissue Tape and attach these to the panel, wrapping the tape around the sides and securing them into place with Multi Medium.
- Cut a piece of the Wallflower Stash paper to measure 5” x 7” and distress the edges. Matt the paper onto Walnut Stain Core’Dinations card stock and machine stitch around the edge. Mount the matted layers onto the front of your panel.
- Attach metal corners to the bottom left and right hand corners of the panel, adhering them into place with Multi Medium.
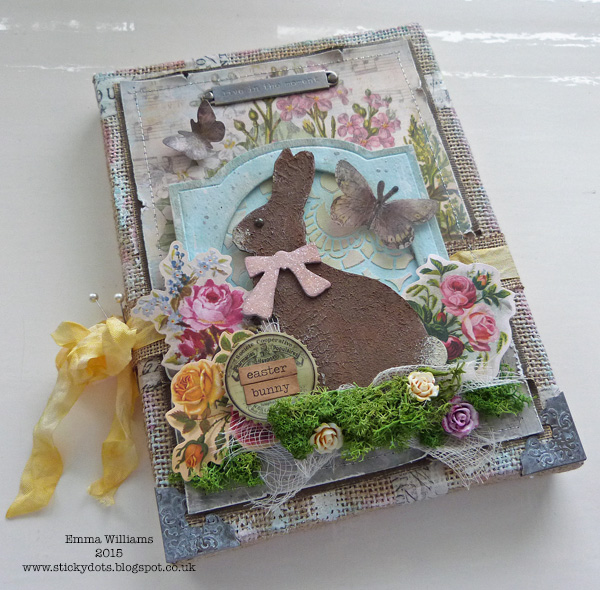
- Apply some Scattered Straw Distress Stain to a craft sheet, spritz with water and dye a strip of Crinkle Ribbon by soaking up the stain. Dry the ribbon, (you can use a heat gun for speed) and then cut a strip of the dyed ribbon the width of the panel. Stitch the ribbon over the top of a piece of burlap ribbon and wrap it around your covered panel. Tie the remaining strip of dyed ribbon into a bow on the left hand side of the panel.
- Die cut a piece of chipboard using the Cameo Frame die and then die cut a second piece but this time placing the largest of the Oval Movers & Shapers in the centre to create an aperture.
- Cover both pieces with Gesso, then paint each piece with a combination of Tumbled Glass and Picket Fence Distress paint, creating a pastel blue colourway.
- Using a palette knife, apply Texture Paste through the Lace Layering Stencil onto the solid die cut shape. Once the paste is dry, apply a small amount of Antique Linen and Spun Sugar over the top of the paste to colour it. (I find using your fingertip is the best tool for this).
- Place the aperture die cut over the top of the first die cut and ink around the edges of the frame with Pumice Stone Distress Ink. Flick small amounts of Brushed Pewter Distress Paint over the frame and then attach to your covered burlap panel using foam pads.
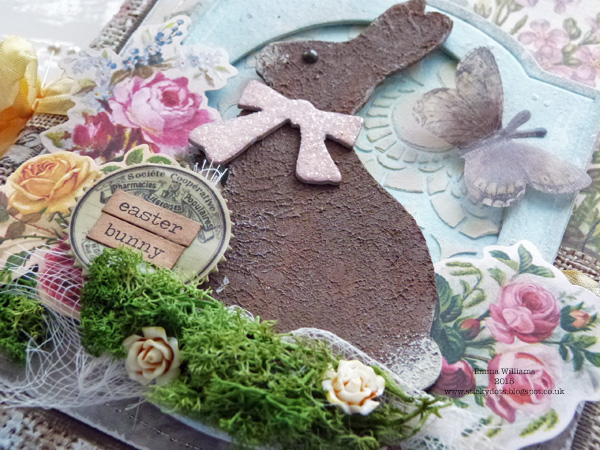
- Using the Easter Elements die, die cut the bunny and his bow from Grungeboard. Apply a small amount of Texture Paste to the surface of the bunny, stippling the paste to give a textured effect. When the paste is dry, paint the textured bunny with Walnut Stain Distress Paint and then apply small amounts of Antique Linen paint to his bobtail and nose.
- Paint the bow with Spun Sugar Distress Paint and then add a layer of Glossy Accents before sprinkling the bow with Clear Rock Candy Distress Glitter. Attach the bow to the bunny and add an enamel dot for his eye.
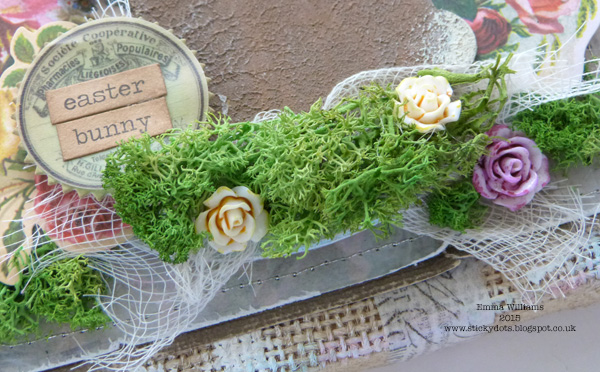
- Place the bunny in the centre of the frame using foam pads to attach him. Arrange various pieces of floral ephemera around the base of the die cut, together with some dried moss and cheesecloth.
- Apply a small amount of Alcohol Ink directly onto the Heirloom Roses to add colour and then attach the roses by tucking them in amongst the moss.
- Shape the wings of two vellum butterflies from the Ephemera Pack, to give them the appearance they are in flight and attach the butterflies to the panel by adding a small amount of glue to the centre of their bodies, leaving the wings to flutter freely.
- Place the “Easter Bunny” Chit Chat Stickers onto a circular Ephemera piece and attach amongst the flower arrangement.
- Pierce two small holes into the panel and attach a Word Band securing it into place with two fasteners.
- Finally, place two decorative pins into the bow.
I really hope you’ve enjoyed the tutorial for this Easter project and thank you so much for stopping by!
Happy Easter!
Emma
SUPPLIES:
 |
 |
 |
 |
 |
 |
 |
 |
 |
 |
 |
 |
 |
 |
 |
 |
 |
 |
 |
 |
 |
 |
 |
 |
 |
 |
 |
 |
 |
 |
 |
 |
 |
 |
 |
 |
 |
 |
 |

Blog Candy Alert!! Follow our blog via email and comment on this post for a chance to win a special blog candy!


Wo
Love all the texture and dimension! Thank you for the tutorial.
Happy Easter to you to. Cute bunny. Love the texture. Hugz
Happy Easter to you. Beautiful. love all the dimension and texture.
So BEAUTIFUL!! I LOVE the FUN Design and all of the Texture and Layers!! =) THANKS for sharing and have a FABULOUS EASTER Sunday!! =)
Absolutely lovely! Great instructions. Your bunny looks almost good enough to eat. What a darling Easter decoration. Well worth passing down in the family!
Emma, that bunny is adorable. Love your texture. Great card!
Beautiful! Happy Easter everyone. :-D
What a beautiful card!
So beautiful….Emma , your is always stunning and creative!! Thanks for sharing!
Happy Easter Everyone! Isn’t Emma’s Easter panel gorgeous! I love it!
This ia a hopping great creation. I love all the things you did and shared. I completely forgot I had the TH Bunny die. I need to get some texture paste. I used the Bunny Blueprint stamp for my Easter cards this yr. Happy Easter! Here in Central TX it is raining so it is #WetBunny. Please stop by my blog to see Daisy’s Easter photo that thank goodness I photographed yesterday since it is raining today.
Melissa
“Sunshine HoneyBee”
Absolutely gorgeous!! Happy Easter :)
Such a beautifully crafted card!!! Happy Easter to one and all!!!
Love the vintage look of the project. The bunny is darling
Happy Easter.
Wow! This is gorgeous!!! Love all the details and different textures! FABULOUS!!! ♥
I wish that I can do something like this…This is fabulous! I can not say what is best: Bunny, grass, Metal corners, colors, texture or…Everything is perfect!
Absolutely gorgeous!! I love all the textures!!
Beautiful! X
Those roses are gorgeous on the project
Great card – lots of techniques.
So cute! Happy Easter!
This is so cute, a gorgeous piece of decor for Easter.
What a beautiful project. I love working with burlap.
What a lovely way to start the day! TFS Emma!
Happy Easter to everyone! This Victorian inspired Easter card is stunning! Anyone would be thrilled to receive it.
Oh My!! How beautiful! I’ve had an empty canvas just this size for over a year – you have inspired me to try and make it as beautiful as yours!! Thanks for sharing how you did this. Your project is amazing!
A beautiful and cute project! Thanks for the detailed tutorial. Happy Easter!
WOW!! Gorgeous project – so detailed and so much to see. Thank you for sharing this piece of art with us:)
What a delightful project and all the wonderful details come together so perfectly. Thank you, Emma, for Easter inspiration.
What a BEAUTIFUL project!! Happy Easter:)
Beautiful canvas, that bunny looks like melted then solidified again chocolate… I want to try a bite!
Love this!
gorgeous! love the dimension!
Stunning! Adore this piece, beautiful work!! :D
Thanks for sharing this gorgeous creation with on today! Happy Easter :)
Happy Easter Wonderful, love the bunny, grass, metal corners, colors, texture, oh everything. Thanks for sharing this wonderful creation with on today!
Love it !!!
I love this easter bunny
cute canvas, the bunny looks like chocolate!!
That texture on the rabbit is FAB! Thank you so much for the step-by-step!!!
Happy Easter! Definitely Easter Bunny approved!
Oh what a darling project!!! Happy Easter to all at Simon Says Stamp!!!
Wow what a fab creation, love all the texture :)
What a beautiful Easter Bunny design! Love the vintage look. Happy Easter!
What an AMAZING project! Every detail is so beautiful! Happy Easter to ALL of you at Simon Says Stamp! ♥
Happy Easter and thanks so much for sharing such a lovely project!~kim
So very adorable ~ I love it!! Hugs, Robin
happy Easter and thanks for the inspiration art project~
I love her piece! Thanks :-)