Felt Flower Gift Heart by Tammy Tutterow
Hi readers! I can hardly believe as I type it… but it is the last day of July! My goodness, where is 2014 going? It’s flying by! Today we’re sharing a super fun gift idea by the very talented Tammy Tutterrow. It’s getting to be the gift giving time of year so now so what better time than now to start CRAFTING?!
Enjoy!
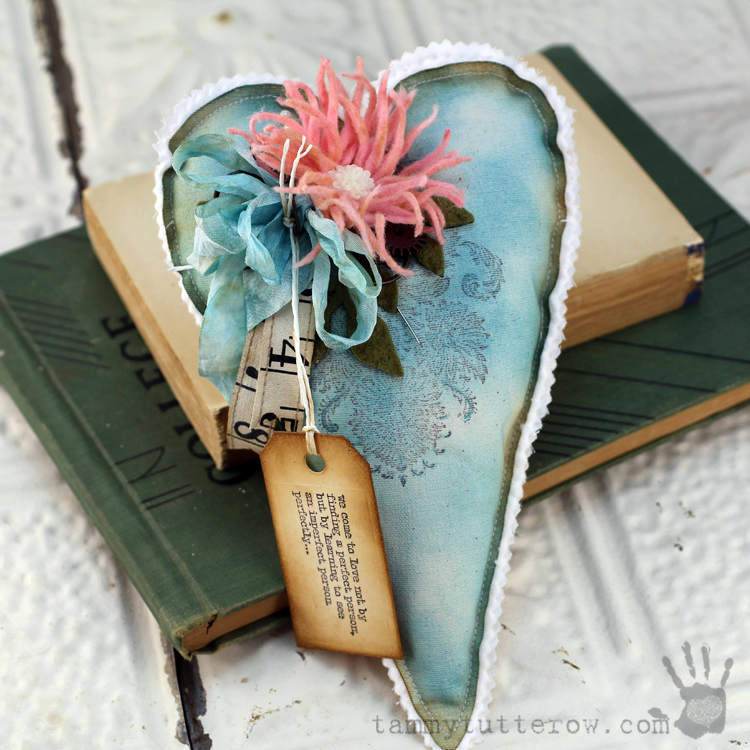
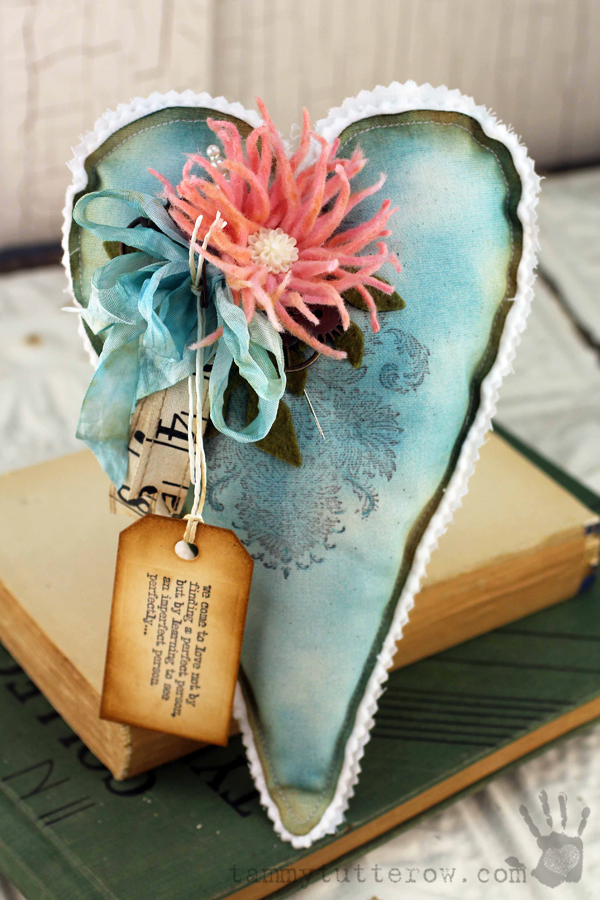
I love when I can use my papercrafting supplies to make something for my home or as a gift. What better gift from the heart than a small embellished heart that can be displayed. By combining a few sewing supplies with inks, stamps, and dies, I was able to create something unique that a friend is sure to love.
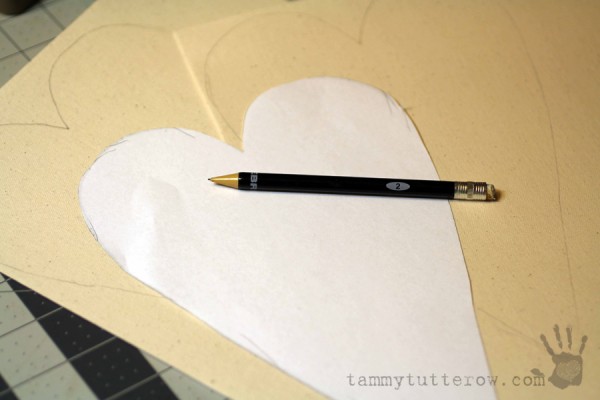
Trace the heart pattern onto two pieces of natural colored Sticky Back Canvas.
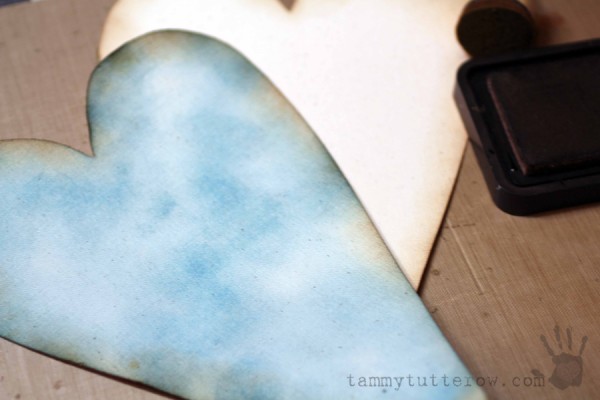
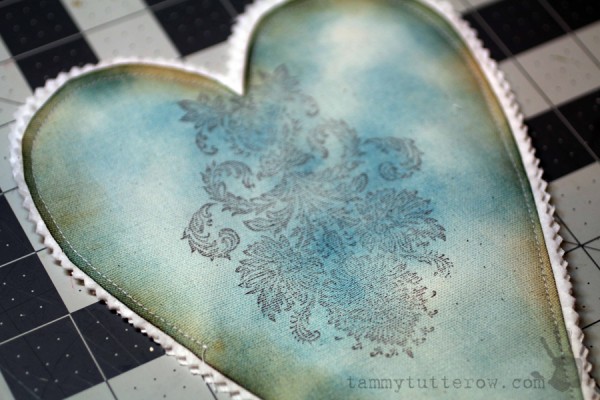
Use an ink blending tool to apply the desired color of Distress Ink onto the front of one of the hearts. I used Broken China. Use an ink blending tool to apply Vintage Photo Distress Ink to the edges of both hearts.
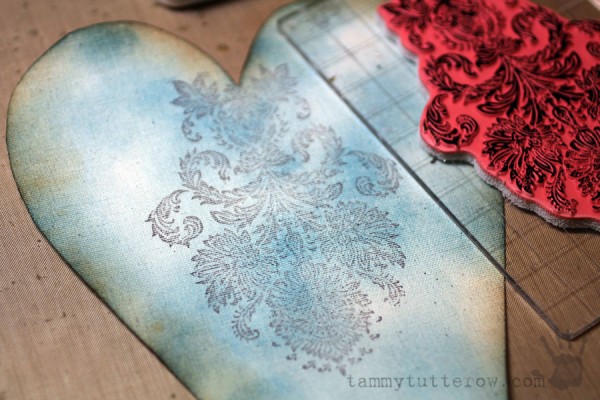
Stamp a design onto the front of the colored heart using Jet Black Archival Ink.

Peel away the backing on the piece of colored Sticky Back Canvas. Adhere it to a piece of cotton batting. Trim around the edges of the heart with pinking shears.Peel away the backing on the natural colored piece of Sticky Back Canvas. Adhere it to a piece of cotton muslin. Trim around the edges of the heart with pinking shears.
Sew the two hearts together with the batting and the muslin on the inside. Leave a small opening for filling.
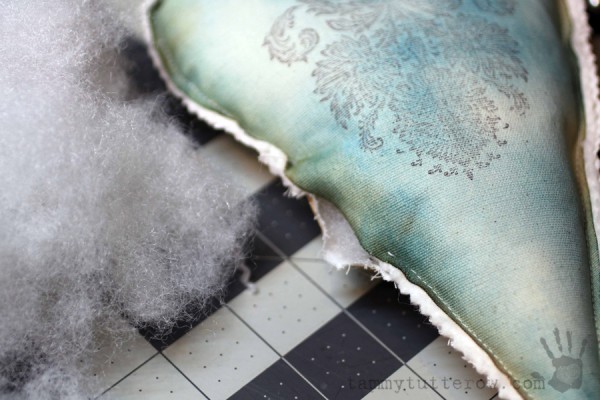
Stuff the inside of the heart with fiberfill. Sew the opening closed.
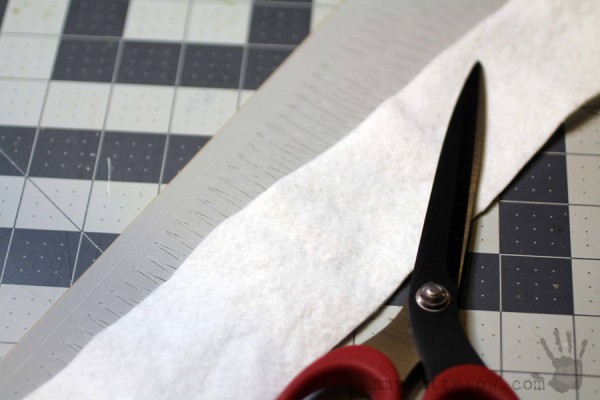
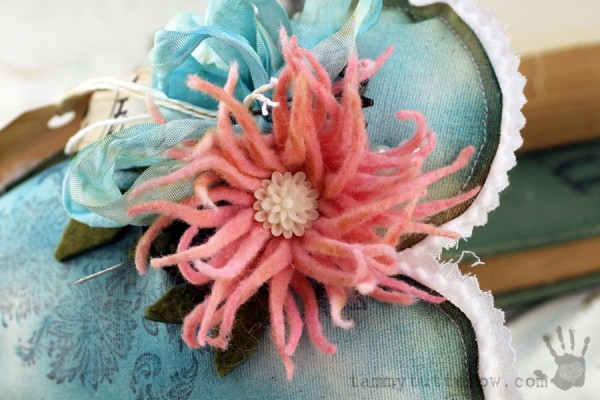
Cut a piece of white or cream wool felt the same size as the Tapered Fringe Die. Die cut the felt.
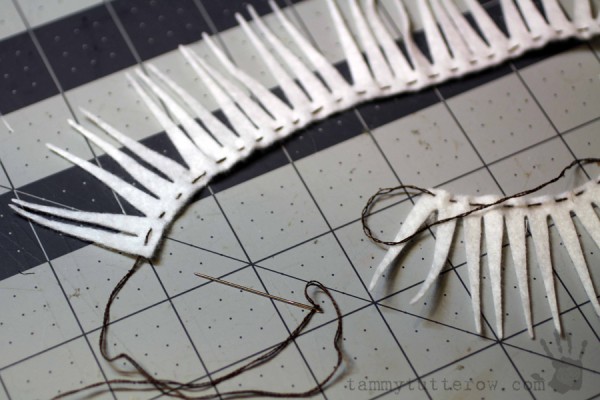
Use a needle and embroidery thread to make a running stitch along the bottom edge of the felt die cut. (I used brown so that you can see it better.)
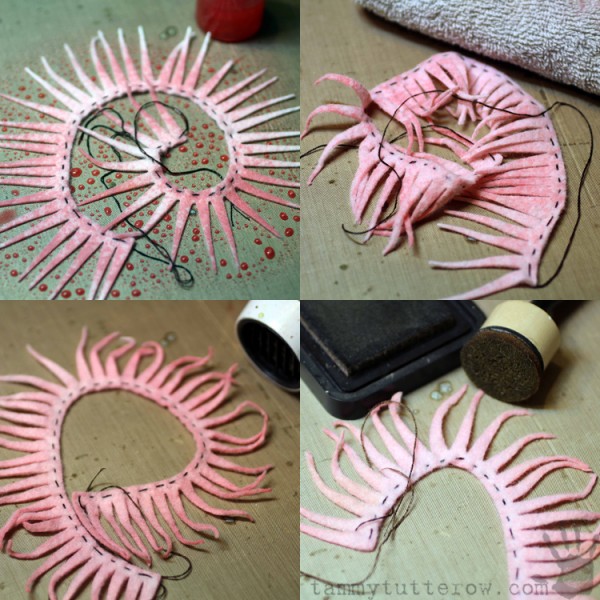
Place the desired color of Distress Stain into a mister bottle. (I used Spun Sugar.) Mist the die cut felt piece with the stain. Allow the stain to soak into the felt for a minute or two. Blot the excess stain with a dry cloth. It will be fragile while wet so blot with care. Dry with a heat tool. Use an ink blending tool to dab on some additional color or age with Vintage Photo Distress Ink.
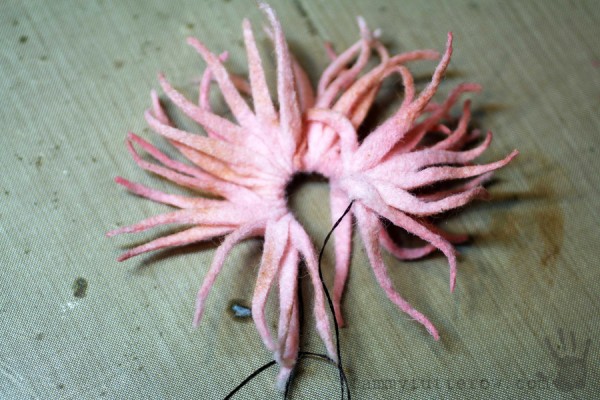
Gather the felt on the embroidery floss. Tie the embroidery floss in a knot when the felt is gathered all the way.
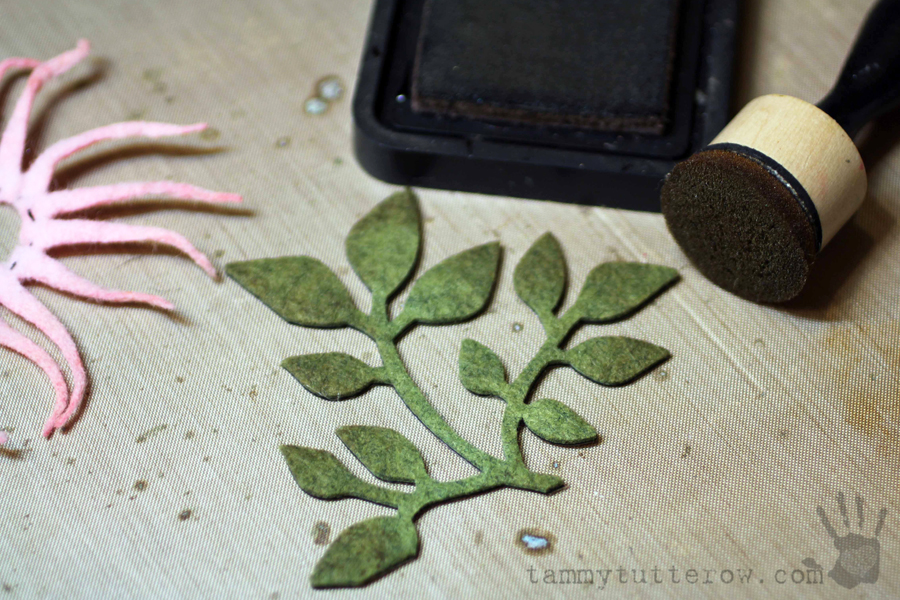
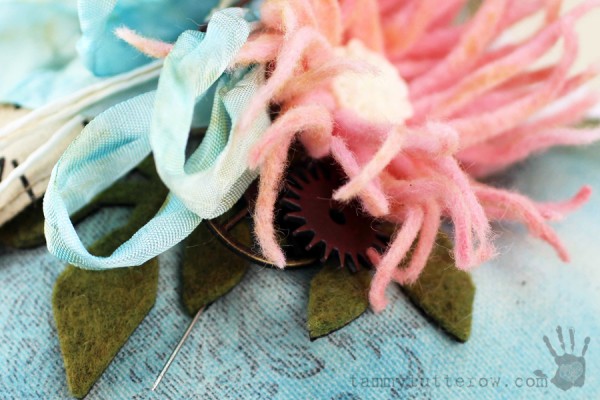
Adhere a piece of green wool felt on a piece of Phoomph (double sided adhesive foam). Die cut leaves from the felt using a the Spring Greenery die. Dab Vintage Photo Distress Ink onto the green felt to add some age.
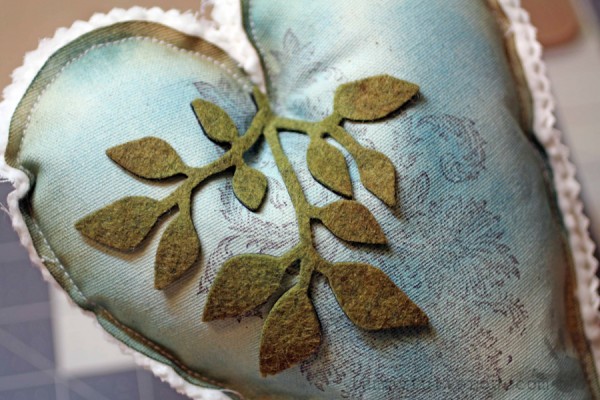
Adhere the leaves to the heart.
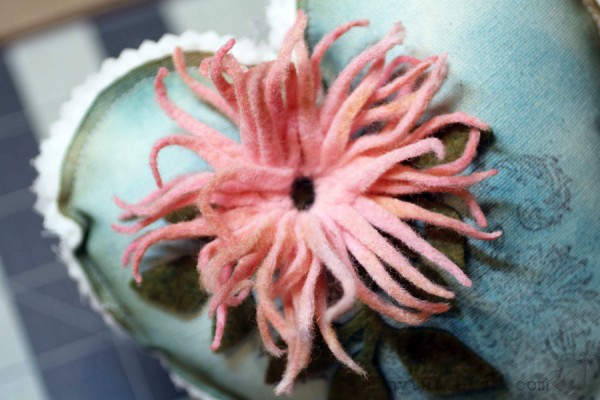
Adhere the felt flower to the front of the heart over the top of the leaves.
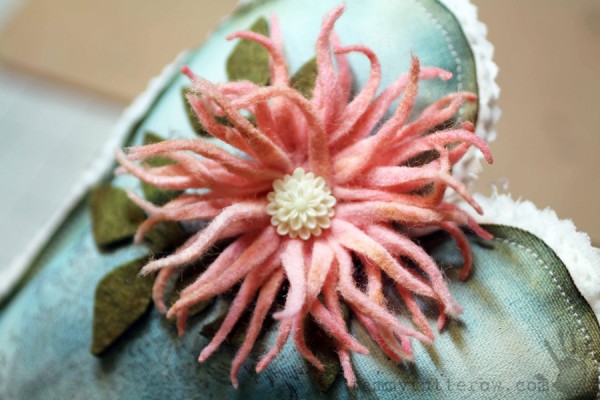
Add a button or small round embellishment to the center of the heart.
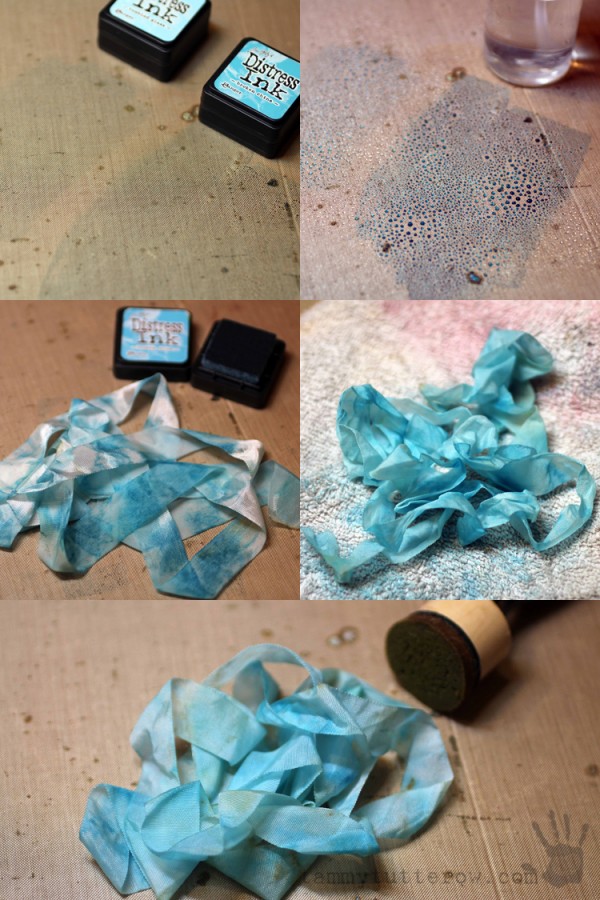
To die Crinkle Ribbon, scribble the desired ink colors onto your craft sheet (shown- Tumbled Glass and Broken China). Mist the ink with water. Toss the ribbon around on the ink droplets. For intense color, tap the ink pad directly on the ribbon. Mist with water to blend. Use a dry cloth to wring out excess moisture. Dry with a heat tool. Dab Vintage Photo Distress Ink over the ribbon to add age.
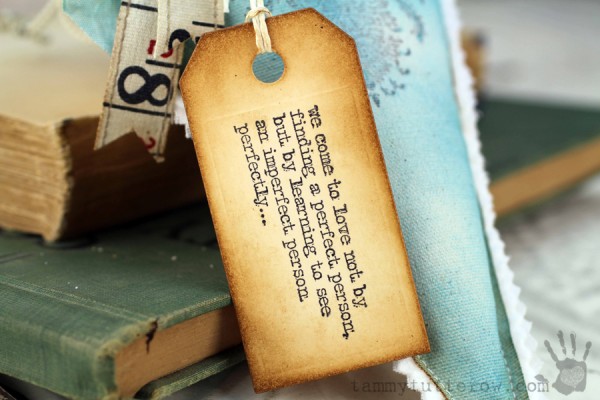
Die cut a small tag from manila cardstock using the small tag from the Tim Holtz Framelits Tag Collection. Stamp a sentiment on the tag using Jet Black Archival Ink. Tie a piece of Paper String onto the tag.
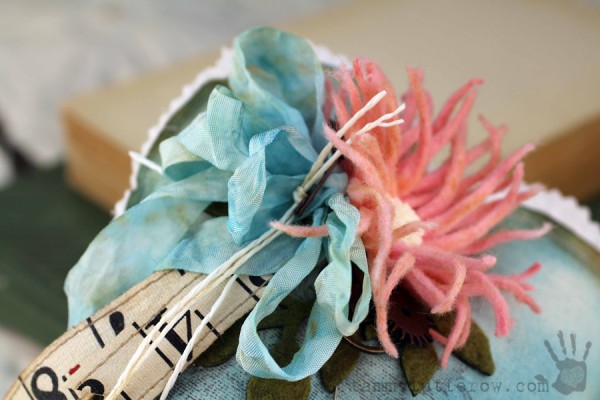
Create a bow with the Crinkle Ribbon. Adhere the bow to the heart under the edge of the flower. Pin the paper string with tag onto the bow using a Wire Pin. Tuck to small pieces of Ruler Ribbon under the bow.
Adhere a few random Gear pieces around the flower and bow.
I love how soft and unique this finished flower looks. It is so easy to make and truly add a “wow” to any project.
SUPPLIES:
 |
 |
 |
 |
 |
 |
 |
 |
 |
 |
 |
 |
 |
 |
 |
 |
 |
 |
 |
 |
 |
 |
 |
 |
 |
 |
|
 |
 |
 |
 |
 |
 |
 |
Thanks for reading today and thanks to Tammy for this awesome inspiration!
Blog Candy Alert!! Follow our blog via email and comment on this post for a chance to win a special blog candy!


Tammy’s creation is just amazing! Love that flower! And I agree that it is hard to believe the July is almost over … where does the time go to?!
Splendido !
This is great
The Heart you made is adorable. Love it! Thank you.
Oh wow this is so gorgeous!
WOW this is just the cutest.. thanks for the tutorial.. totally inspired..
Beautiful, this would certainly make an amazing gift :)
Absolutely beautiful! I love the felt flower.
Fantastic tutorial on working with fabric and felt! Love your heart Tammy and the felt flower looks awesome!
Amazing details
This is awesome! Love how everything was made!
Wow, I wish I had the talent to do what Tammy Tutterow is able to do!
How fun! I especially love that flower!
Fun idea, I think I would put some lavender in side the heart. I love the flower idea.
I love this! What an awesome gift. The flower accent is amazing!
What a lovely gift! Lovely heart. i follow the blog by email.
What a fun heart! Very creative!
Stunning!!!
WOW this heart is so vintage looking!
Gorgeous! Thanks for the inspiration!
Amazing project!
Stunning!
Awesome project!
I am still in complete awe from the project that you created today. You are one talented lady. Thanks for sharing.
So pretty Tammy, thank you for sharing your process!
Great project. Thanks for the step by step.
Fabulous flower and tutorial!!!
<3 J
jwoolbright at gmail dot com
HerPeacefulGarden.blogspot.com
Amazing creation and awesome tutorial for this heart and flower. Tammy did a really awesome job here.
Thank you for the great tutorial! Aside from myself, I can think of a couple of friends who would love to receive this beautiful heart.
Great idea! Thanks for the step by step pictures. Love the flower.
Wow! This is gorgeous, love the flower! x
Wow that is amazing awesomeness!!!!
~God bless~
This is beautiful! Thank you for sharing how you made it too! Would love to try this!
So stunning, especially that flower.
LOVE stitched fabric creations and that flower is spectacular. Beautiful Tammy!
This is absolutely beautiful Tammy!!!
Beautiful!
Beautiful ideas that we shared with the new products, I am happy
This is so pretty!
so pretty – love the flower and the ribbon
This tutorial is fantastic! I would not have thought of making a flower like that and it looks so realistic. Love being able to repurpose my stash for fabric and felt, thank you for the inspiration!
Such a sweet and pretty project. I can see making a sachet.
tfs
So beautiful! Love your fantastic tutorial Tammy! You Rock!
Really gorgeous project, Tammy! Thanks so much for sharing the step-by-step tutorial, too!
What a darling project! And great instructions. Thanks for sharing
This is so beautiful! I love the flower.
I like the layers and the texture.
Beautiful!!!
Wow such a pretty heart…love the flower.
Great project – beautiful colors and great use of products!