Extra! Extra! Exclusives here!
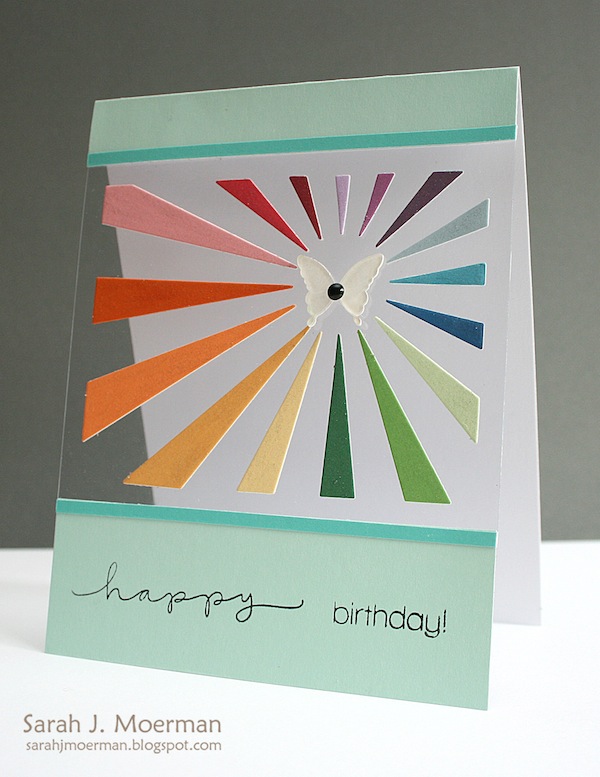
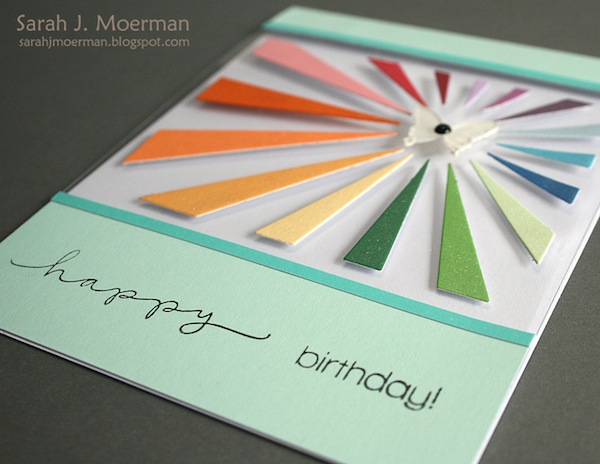
Hi bloggers! Happy Wednesday to you! Is the week flying by as quickly for you as it is for me?! I’m super pumped to bring you not one, or even two exclusives cards…but THREE!!! To start us off with a literal rainbow of sunshine, we have the amazing Sarah Moerman! See below for some detail shots as well as instructions to make your own version of this card & view the supplies!
Instructions from the designer:
- Make a top-folding card using Shallows cardstock (from Hero Arts Pool Mixed Layering Papers).
- Cut 1 ½” off the bottom of the card front and save for later.
- Cut off the rest of the card front, leaving a ¾” flap at the top.
- Cut the acetate notecard in half along its fold. Adhere one piece to the back side of the ¾” flap of the card front. (The acetate should line up perfectly with the card back.)
- Adhere the saved 1 ½” piece of Shallows cardstock to the bottom of the acetate.
- Adhere strips of Pool cardstock where the acetate and Shallows cardstock meet.
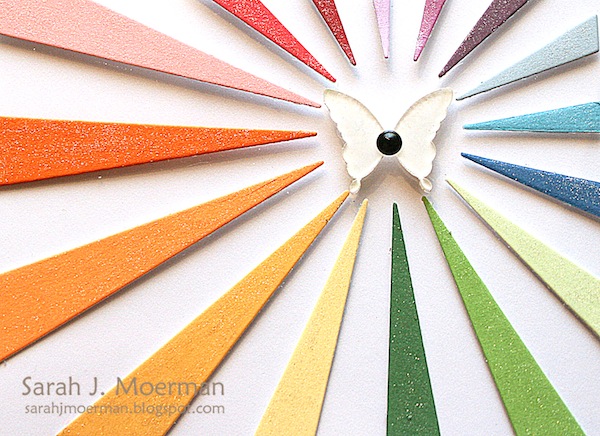
- Die cut the Simon Says Stamp Sunshine Die with white cardstock to create a guide. (Save the white sun rays.)
- Die cut individual sunrays from various colors of cardstock to create a rainbow of color. Using your guide piece to help, adhere the sunrays to the card as shown. Color them with a Clear Wink of Stella Brush.
- Using Ranger Shrink Plastic, die cut the Simon Says Stamp Chrissy Butterfly image and follow the instructions to shrink the butterfly.
- Ink the butterfly with white Stazon. Let it dry. Adhere to card.
- Add black Metallic Décor.
- Stamp sentiment.
Tip #1: Adhere the saved white sun rays to the back of the acetate to cover the adhesive showing through. Cut pieces of white cardstock for the same purpose for the top and bottom of the card front.
Tip #2: Either write a short message at the very bottom inside the card or write your greeting on the back so that it doesn’t show through the front of the card.
SUPPLIES:
 |
 |
|
 |
|
 |
 |
 |
 |
 |
 |
 |
 |
 |
 |
 |
 |
 |
 |
 |
 |
 |
 |
From the designer:
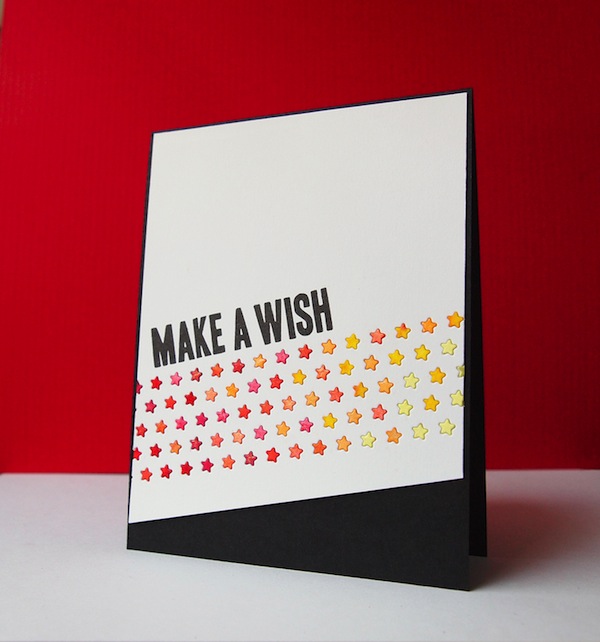
To start, I die-cut the Star Border twice (to make sure I had plenty of stars). After removing the stars, I grouped them into seven small piles onto my craft mat. I dropped a few drops of a spray mist on each pile — just enough to cover the stars. The stars tend to clump together, so I used the bottom end of a paintbrush to cover the stars with the spray mists. When I was done with each color, I lightly misted them with the Pearl spray mist.
While the stars were drying, I die-cut the Star Border at an angle on the cardstock panel. I stamped the sentiment above the die-cut. To make sure the stars had something to adhere to, I matted the panel on another A2 panel. I could have skipped this step since I adhered the panel to a black card base, but at this point, I wasn’t sure if I was going to use a black or red card base.Using a tiny amount of glue, I adhered the stars in the negative spaces to create an ombre. Tweezers would work great fro this process!
SUPPLIES:
 |
 |
|
|
 |
|
 |
 |
 |
 |
 |
 |
 |
 |
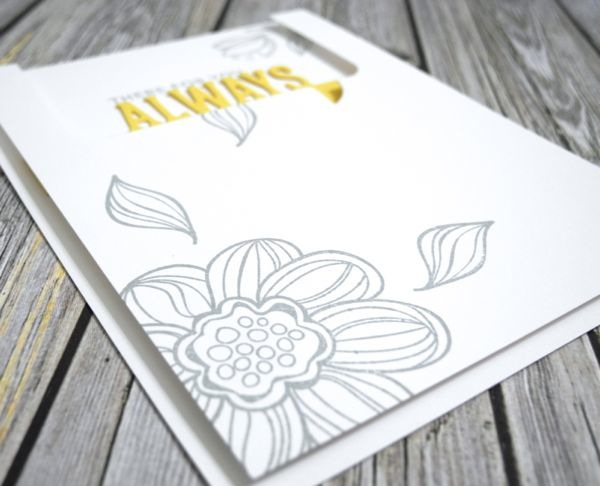
Lastly, we have the super talented Jennifer Ingle to provide another amazing card!!
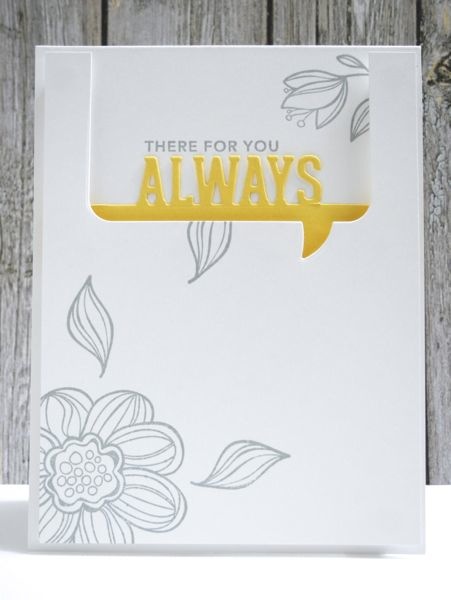
Jennifer explains how to make the card & the full supplies list are below!
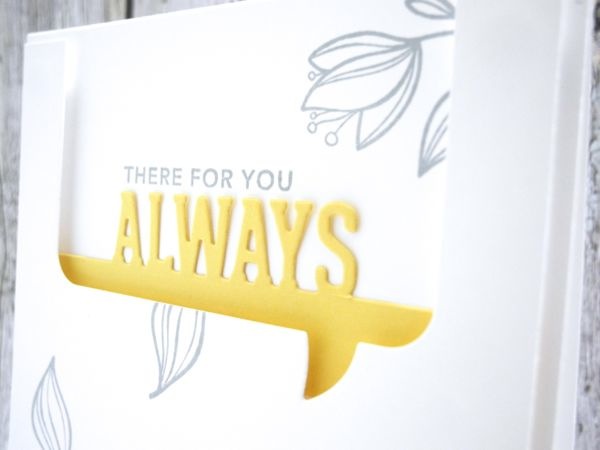
From the Designer:
I love my Simon Says Stamp Exclusive Dies! I pulled out a couple of favorites for this card, the Life Bubble Vertical 1 die and the fabulous Always On the Edge die along with the beautiful Always and Forever stamp set. I love working in the yellow and grey color palette and found that it can be so subtly gorgeous when combined with white space and that is what drove the design of this simple encouragement card. I die cut the speech bubble from just the top of the white panel and then layered the Always die beneath it against the card base. The white panel is stamped and adhered with foam tape to add soft, subtle dimension.
SUPPLIES:
 |
 |
 |
|
 |
 |
 |
Thanks for reading today & thanks to these 3 amazing designers for inspiring us!!!
Blog Candy Alert! Join our following and comment on this post for a chance to win a special blog candy!


Thanks for sharing these great cards.
AMAZING PROJECTS!!!!
Absolutely amazing!
Very beautiful cards!
Whoa! These cards are amazing!!!!
the last one is so simple but it has a huge impact!
I love the cards done by these ladies, especially the first one. Great ideas and great job!
Fabulous cards! Sarah’s acetate card is amazing!
What great cards. I especially like the rainbow sunshine on acrylic…fantastic!
Cards were great. I love the rays on the clear plastic. I have to try that one.
The cut out stars is very pretty too.
Wow! Three gorgeous cards. The acetate card suggests all sorts of possibilities, but the sun rays design was perfect.
Amazing creations! Love the dies….beautiful!
Gorgeous cards! Loving how the dies were used!
Wow! What a great job !
WOW! A trio of greats. Beautiful.
Wooow! These are three truly beautiful cards! I love all them all! TFS! :-) xx
Beautiful cards!! My favorite is the first one:) I think using the acetate makes cards look stunning:) Thank you so much for sharing!
lovely cards today thanks for sharing them with us.
great cards oday tfs !!
What lovely inspiration today…thank you for sharing it with us
Beautiful cards. I love the one done on the acetate. I love how nice and simple looking th last one is. Thank you so much for sharing.
Oh my goodness! Such Fabulous and creative cards..all 3 of them! I’m so loving the sunshine die! The way Sarah used it on her card, is just stunning! Thank you to all three of you for sharing such FAB cards! So inspiring!
Gorgeous cards! The sun rays are amazing.
fabulous cards!!! great inspiration as always :) ♥
Wowee, these are gorgeous cards! Thanks for the step by step, I’m definitely going to give some of these techniques a go :)
Amazing!! Such beautiful cards! Thanks for sharing. :)
I absolutely love these dies. I think i need the always to add to my collection though. Thanks for the samples.
Beautiful cards – thanks for sharing
Wow, these cards are amazing!
Wow! These cards are fabulous!
These cards are simply gorgeous!!
I am in love with the rainbow sunshine! All these cards are amazing. :)
WOW, these cards are stunning! Thank you for the inspiration.
That sunburst card is divine! Very creative! Love that mini star border on the diagonal and especially the die cut on the 3rd card! Wonderful inspiration ladies!
The sunburst card is beautiful. You can’t look at it and not feel happy!
The use of SSS dies in all 3 of these cards is amazing. Love the grey and yellow color palette. It’s the same as my kitchen!
Just found you — wow AMAZING stuff! SIgned up for emails and I am ready to go!!
Amazing, Amazing, Amazing cards!
All super cards! I especially like the way the Always is tucked into the bubble window.
Absolutely adorable cards!!!
That first card by Sarah had me stop and stare. It is simply gorgeous and seems easy enough to recreate.
I love the rainbow sunburst card, so vibrant!
such great cards!
Such lovely cards…thanks so much for sharing these.
Wow is that card awesome! Striking and contemporary!
great showcasing team simon, love those cards, well designed
Gorgeous cards. Thanks for the inspiration.
These cards are fantastic. So creative. You are an inspiration.
Wow very inspiring cards!!
Love all three of the beautiful projects. very nice.