Entomology Frame by Emma Williams
Hi friends! Happy Thursday! Welcome to another STUNNING project tutorial by the fabulous Emma Williams! She kindly provided text and photo step by steps so you can try to recreate this for yourself! Read on and enjoy!
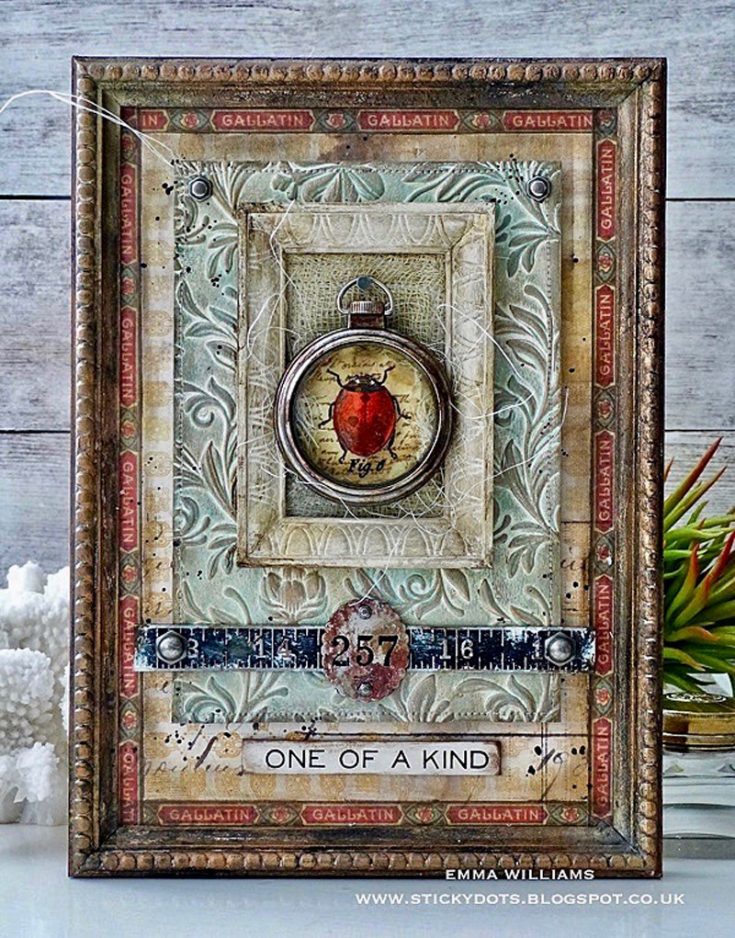
Hi everyone, it’s Emma here and I’m so happy to be back on the Simon Says Stamp blog to share my latest project with you all ~ my Entomology Frame, a home decor piece that I’ve created using the fabulous Entomology stamps from Tim Holtz and combining them with products from his idea-ology and Sizzix ranges.
I just love these stamps so much, the detail of the images is so beautiful and they create such stunning focal points for any project that you create and with this in mind, I decided to make this project that had just one of the stamps as the focal point and was inspired by the beautiful vintage plates and frames that I’ve seen in museums and books.
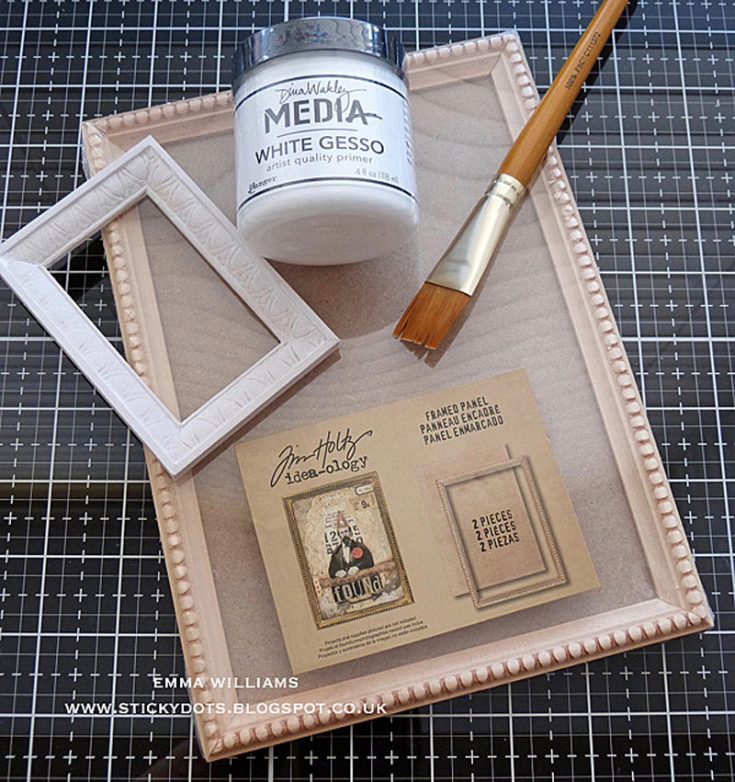
1. I began by prepping my small Vignette Frame that sits inside, and the framed panel which comes in two separate pieces, the base, and the frame. For this particular project, I wanted to create an aged, antique feel to the wood and started by applying a layer of gesso to the framed panel, around the edges of the base piece and also the small Vignette Frame.
2. Once the medium is dry, set aside the smaller frame for later and using the Framed Panel, I started to layer my paints ~ I used Distress Paints for this and started with a layer of Walnut Stain as a base. I usually dry my paints between each layer, just so they are touch dry and won’t become too muddy in appearance when applying each color. I then dry brushed Antiqued Bronze over the top, followed by a layer of Black Soot.
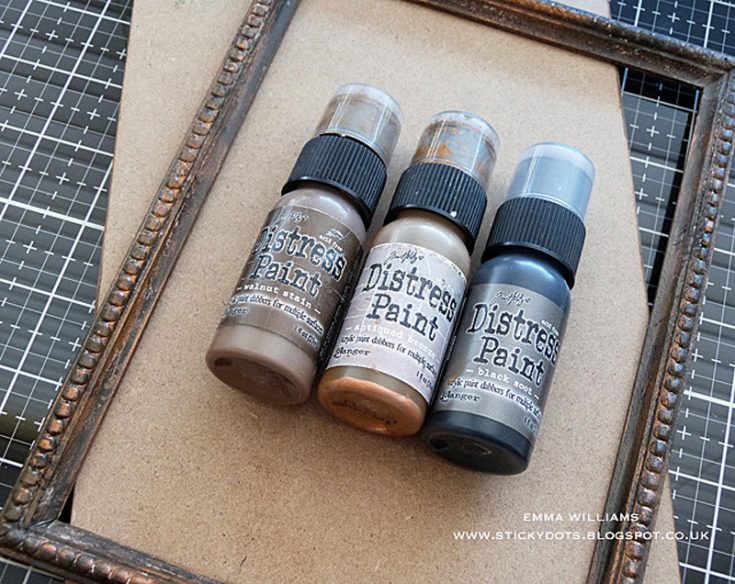
3. Once I was happy with the color, I then added some Aged Brass Alchemy Wax over the top to accentuate the beading on the frame.
4. Take the base section and cut a piece of paper from the Etcetera Paper Stash. Adhere the paper with Matte Collage Medium, placing it centrally onto the base and then applying a layer of Collage Medium over the top. The paper won’t fit over the entire base, but this isn’t a problem as the frame will be attached over the top.
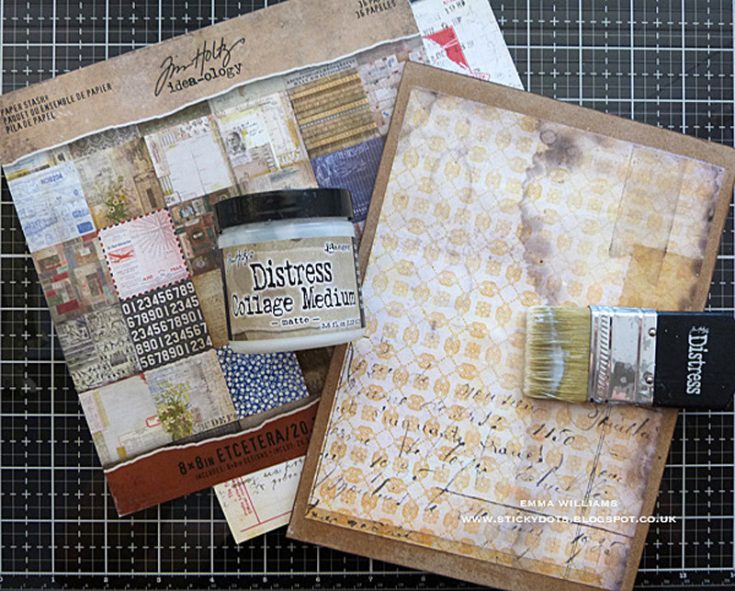
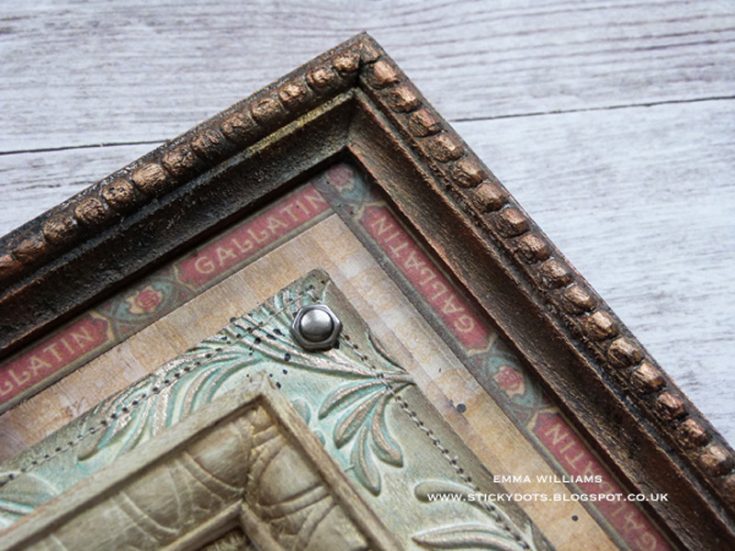
5. To form an inner border to the frame, I then attached tape from the Humidor Design Tape set around the four sides of the panel, placing the tape approximately 1.5cm from each edge.
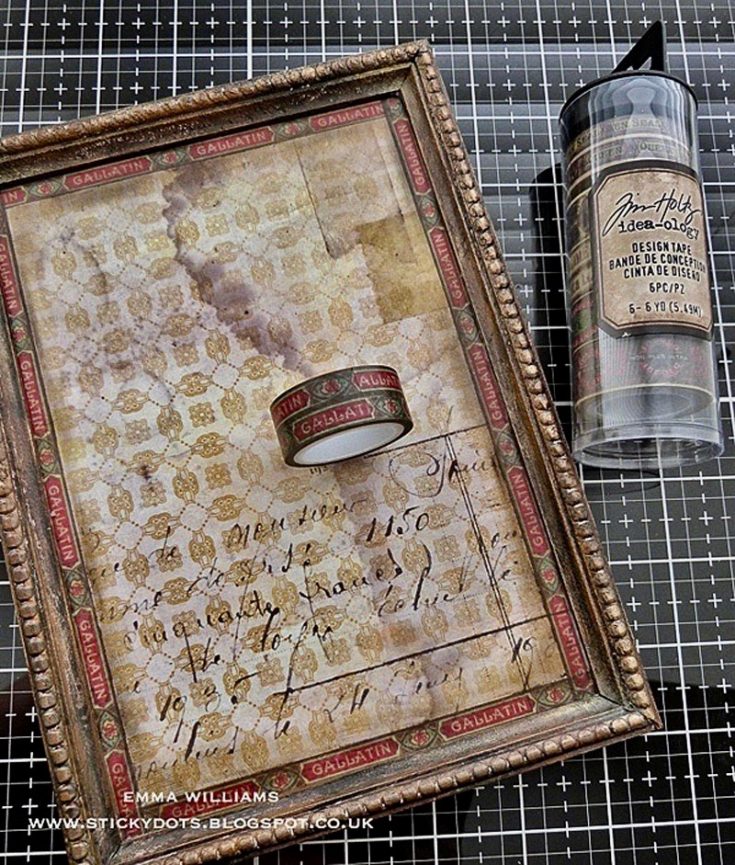
6. Attach the frame over the top using Matte Collage Medium before running Ground Espresso Distress Crayon around the inside of the frame, blending out the color with a semi-dry baby wipe, which will create a more worn and aged look to the background paper.
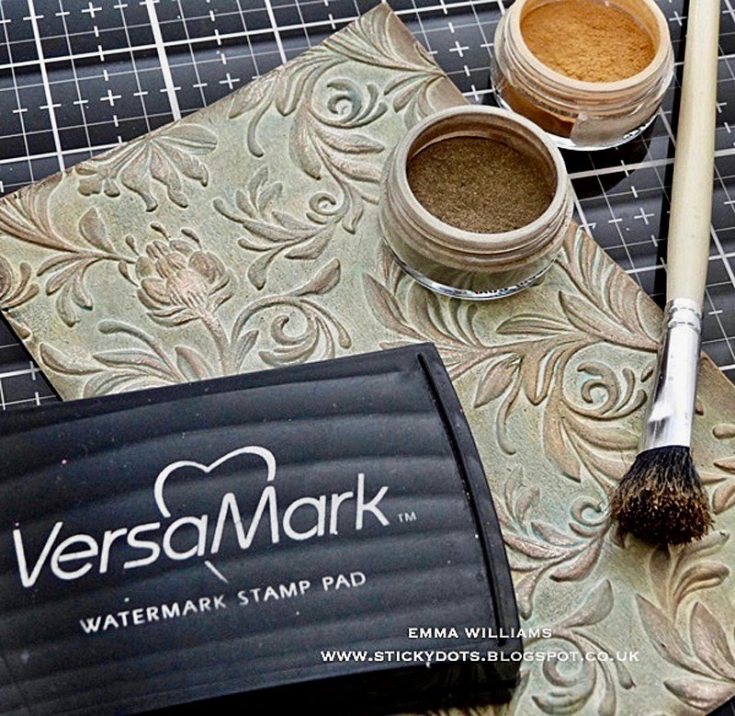
7. For the next step, I embossed a piece of Heavystock Mixed Media card using the 3D Botanical Texture Fade. Place the card measuring 11 x 15.5cm inside the folder and run through the machine before adding a coat of gesso over the top of the surface ~ the gesso acts as a primer on the card, giving a nice surface to work on and allowing you to add all the mediums that are to come.
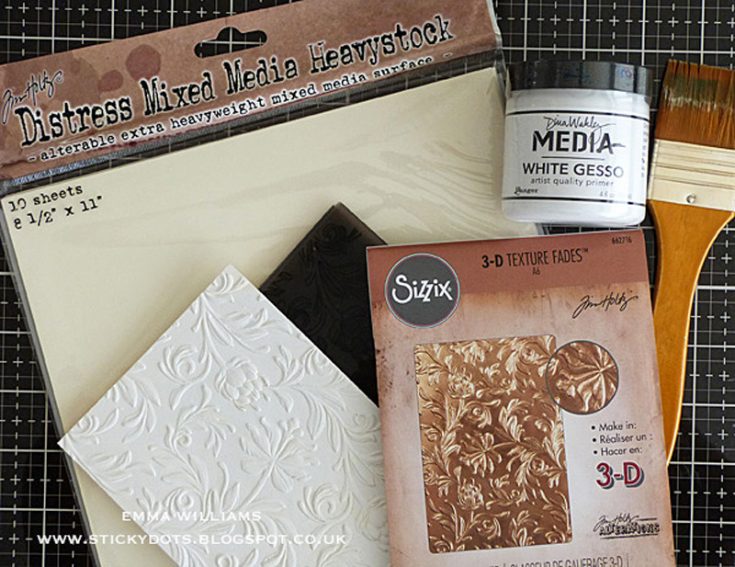
8. To add color to my embossed card, I used the following Distress Paints, Tumbled Glass, Antique Linen, Walnut Stain, Frayed Burlap and Picket Fence.
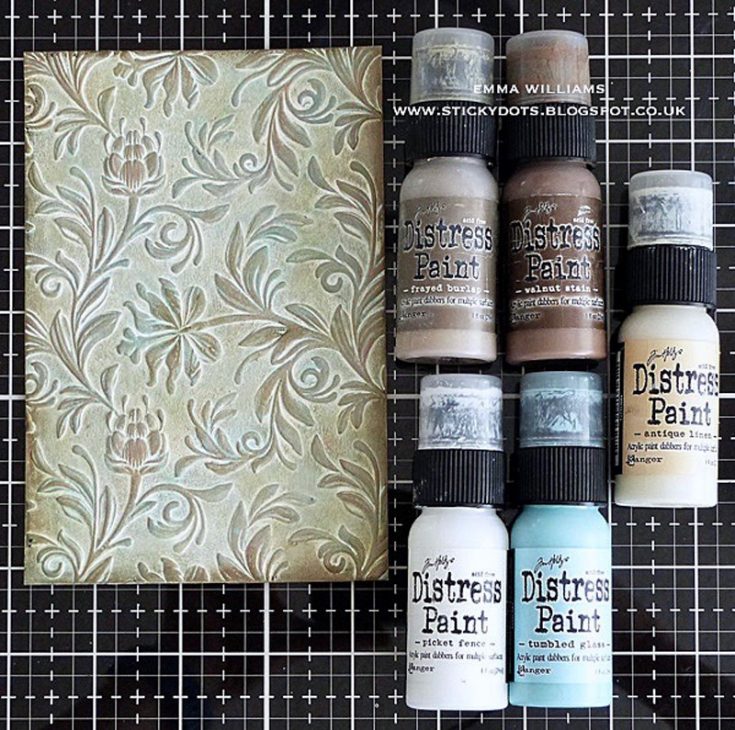
9. I started by applying a layer of Picket Fence mixed with a touch of Antique Linen directly onto my card, working the paint into the embossed areas with a brush. Once the paint was touch dry, I then dry brushed Tumbled Glass over the top, followed by a light touch of Frayed Burlap and once again heat dried the surface between each layer. By dry brushing the paint, it won’t create a solid finish and allows some of the paint layer from the underneath to show through
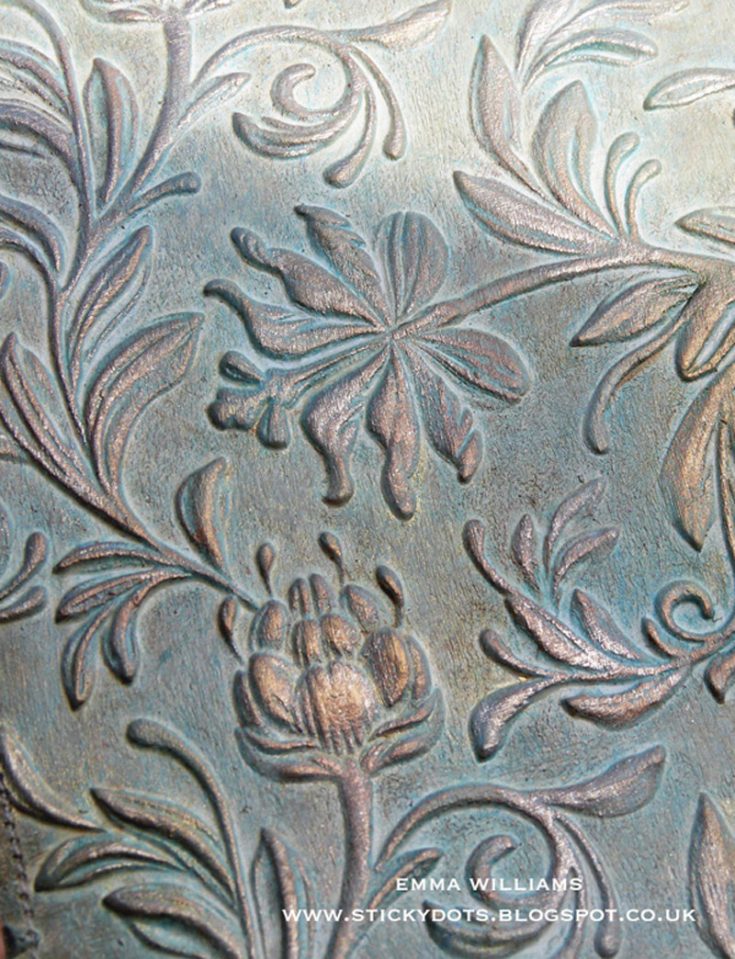
10. I then added my next layer, Walnut Stain and again dry brushed the paint onto the surface but this time, just catching the embossed, raised areas and avoiding the recessed part.
11. Using a semi-dry baby wipe, I gently wiped away the majority of the dark paint from the embossing ~ this technique allows the darker paint to sink into the recesses but not add too much color.
12. Once the paintwork is dry, I lightly swiped a Versamark Embossing Pad over the top of the raised, embossed areas and then using a Perfect Pearls brush, picked up a small number of Perfect Pearls and brushed the pigments, Heirloom Gold, and Perfect Gold, over the top, accentuating the embossing. Lightly spritz with water to set the pigment and heat dry.
13. The depth of embossing from these folders, which you can see below is simply amazing and by using the Perfect Pearls, it just creates such a wonderful sheen and a beautiful faux patina to this piece.
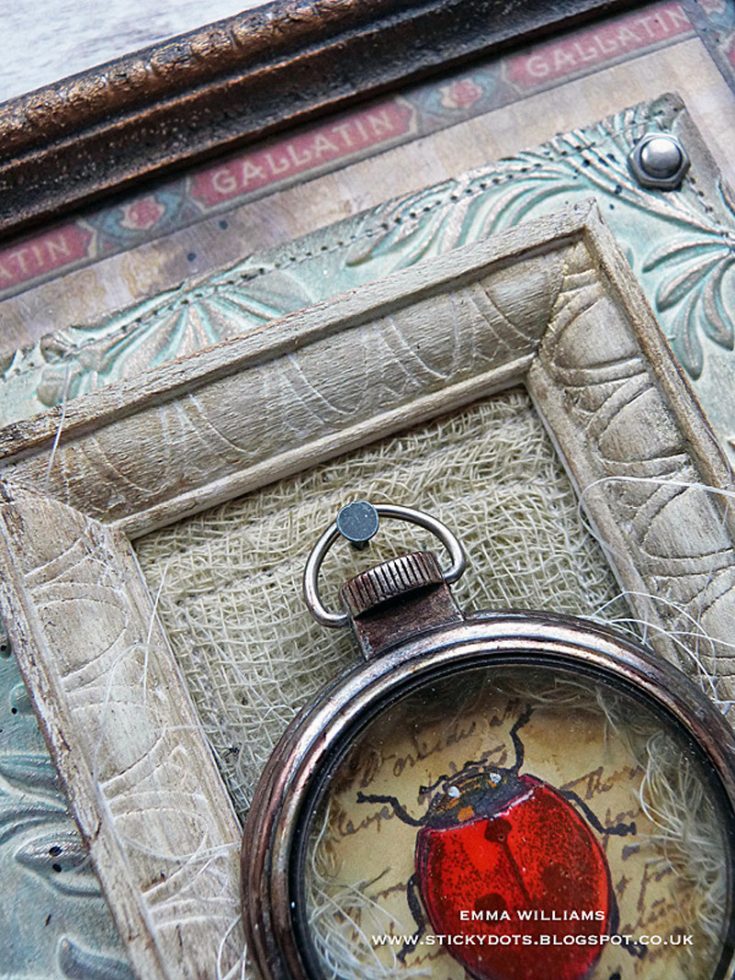
14. Machine stitch a border around the edge of the embossed card before attaching a Hex Fastener to the top right and left-hand corners. Apply foam pads to the back of the card and place it inside your frame.
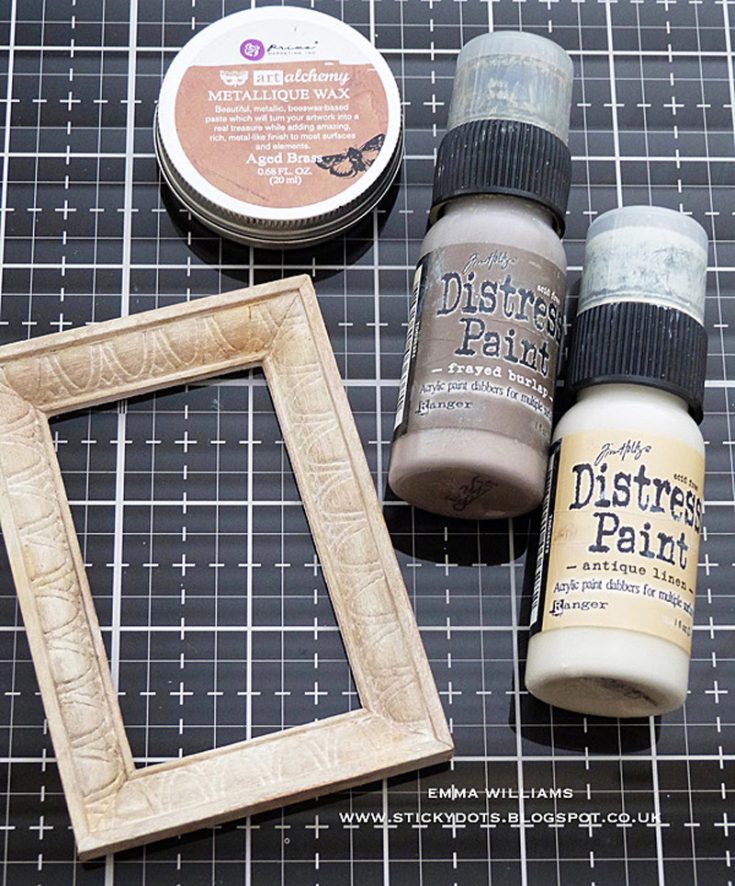
15. Now moving onto the gessoed Vignette Frame that I set aside and I began by painting the entire frame with a coat of Antique Linen, then dry brushing Frayed Burlap over the top. Once dry, I applied Aged Brass Alchemy Wax over the top.
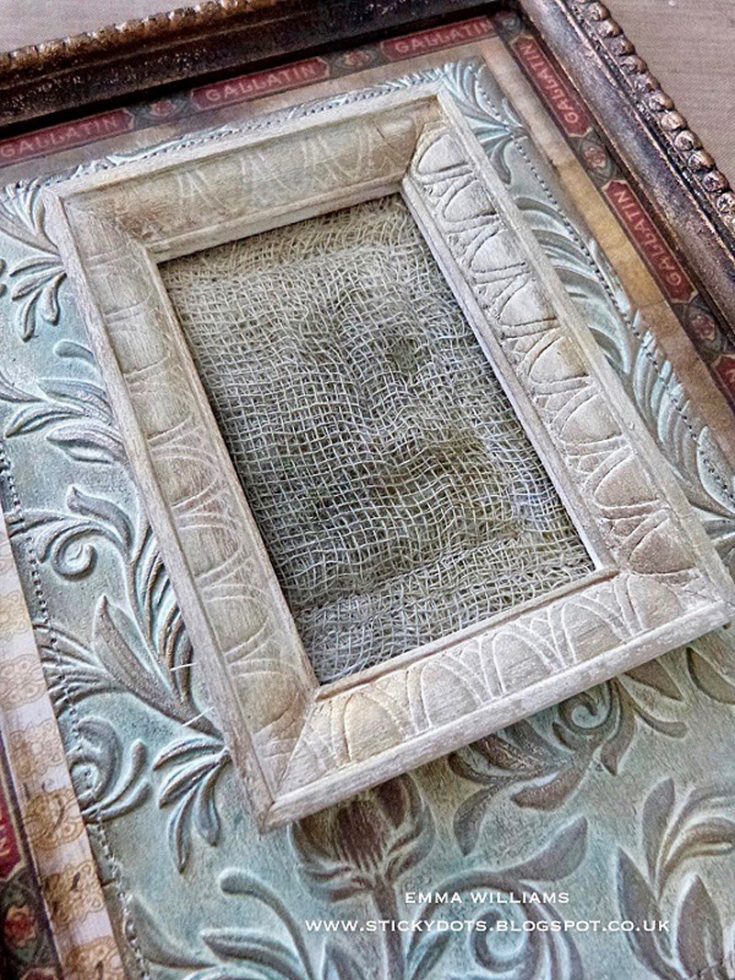
16. I placed the frame over a bed of cheesecloth which I hand dyed using a combination of Antique Linen and Pumice Stone Distress Spray Stain and adhered the frame into place with College Medium, placing a heavy object over the top to ensure it was well and truly stuck.
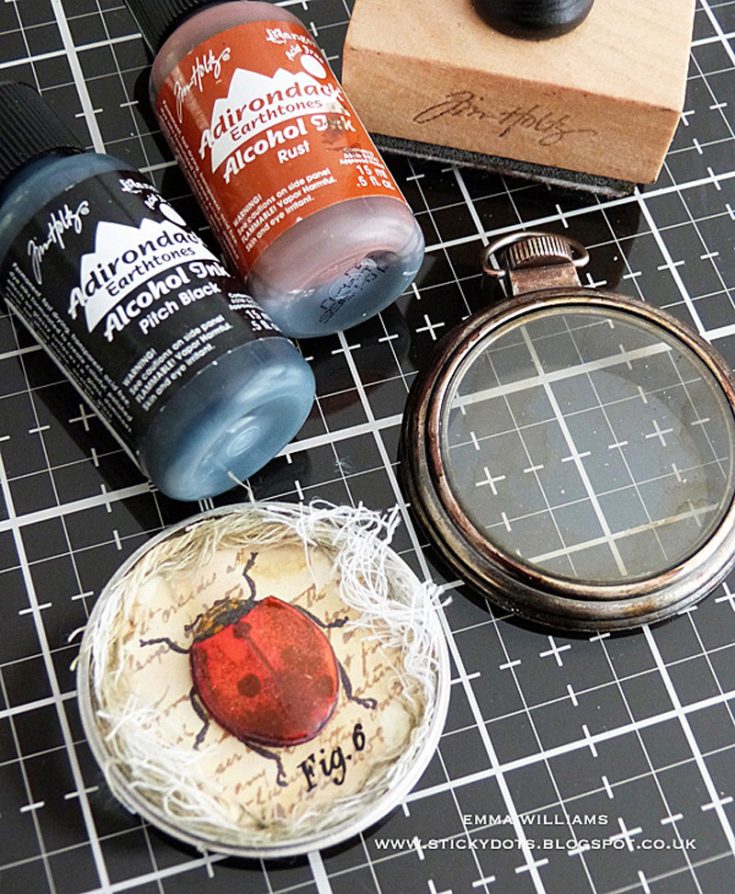
17. Now moving onto the focal point of this project, the pocket watch…
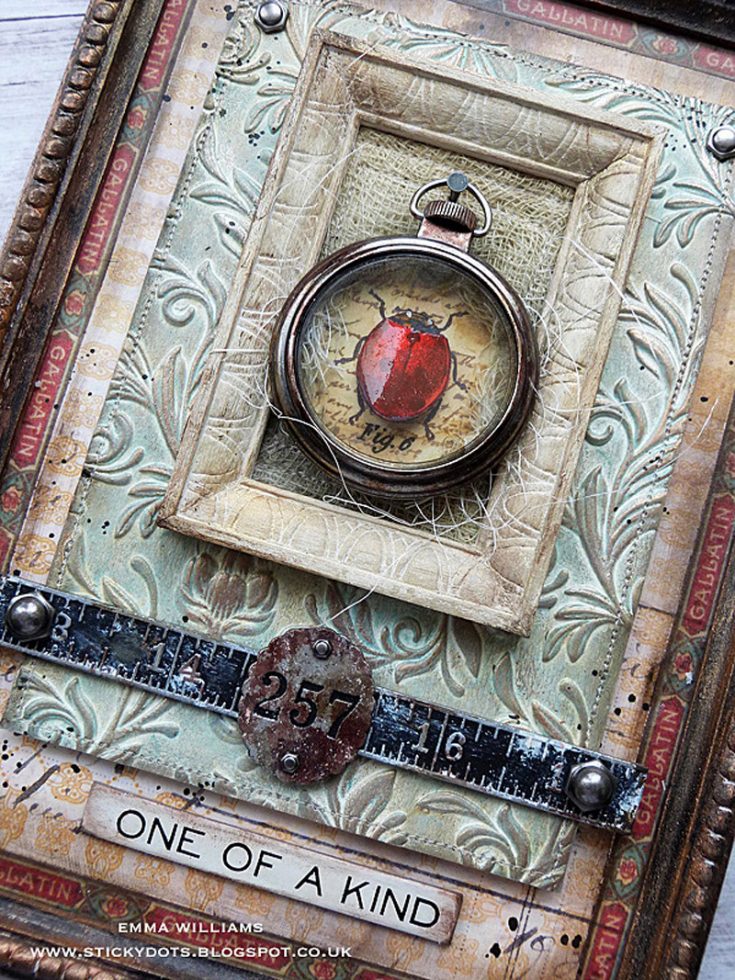
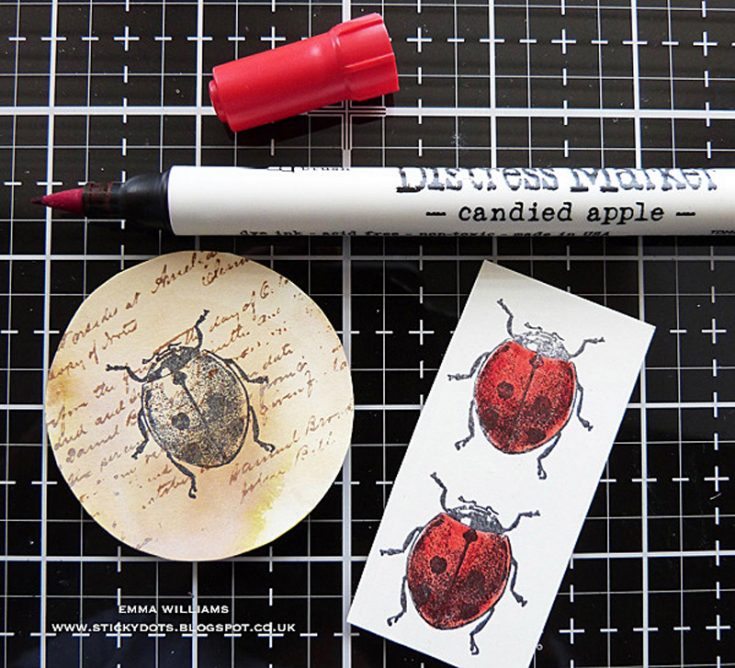
18. I started by cutting a circular panel of Mixed Media Heavystock card to fit inside the pocket watch. I then applied Antique Linen and Frayed Burlap Oxide Ink directly onto the Glass Media Mat, spritzed the inks with water and smooshed the card through, picking up the color. Heat dry the inked card and then inked up the Entomology Script Stamp with Frayed Burlap and stamp the script over the top of the circle.
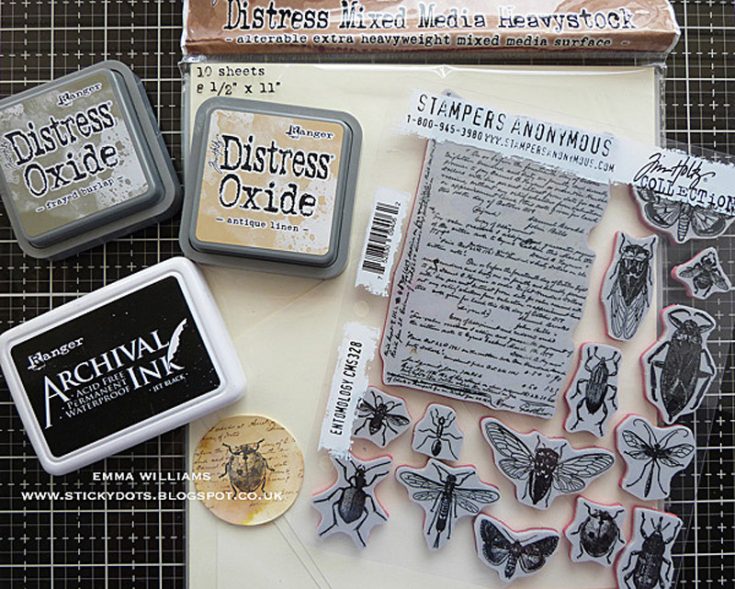
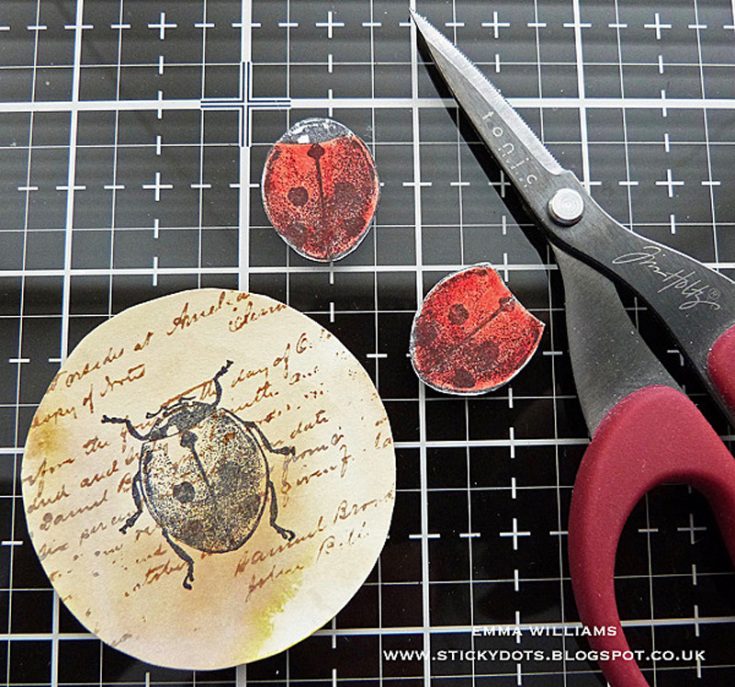
19. I inked up the ladybird with Jet Black Archival Ink and stamped it in the center of the inked circle, and then stamped a further two images on a separate piece of card, before then coloring the body on all three pieces with the Candied Apple Distress Marker Pen.
20. Cut out the two separate images of the ladybird, each time cutting away a small section of the bug. Layer up each piece using foam pads and placing them over the top of the main image.
21. Attach the circle in the center of the pocket watch and apply a layer of Glossy Accents over the top of the ladybird. Add a small amount of torn cheesecloth around the edge of the watch. To create a more aged look to the watch, I then applied Rust and Pitch Black Alcohol Ink to the metal and then applying a small amount of Mushroom Alcohol Ink around the edges of the glass, on the front of the watch.
22. Pop the glass into place and then attach the watch over a bed of sisal fibers in the center of the frame.
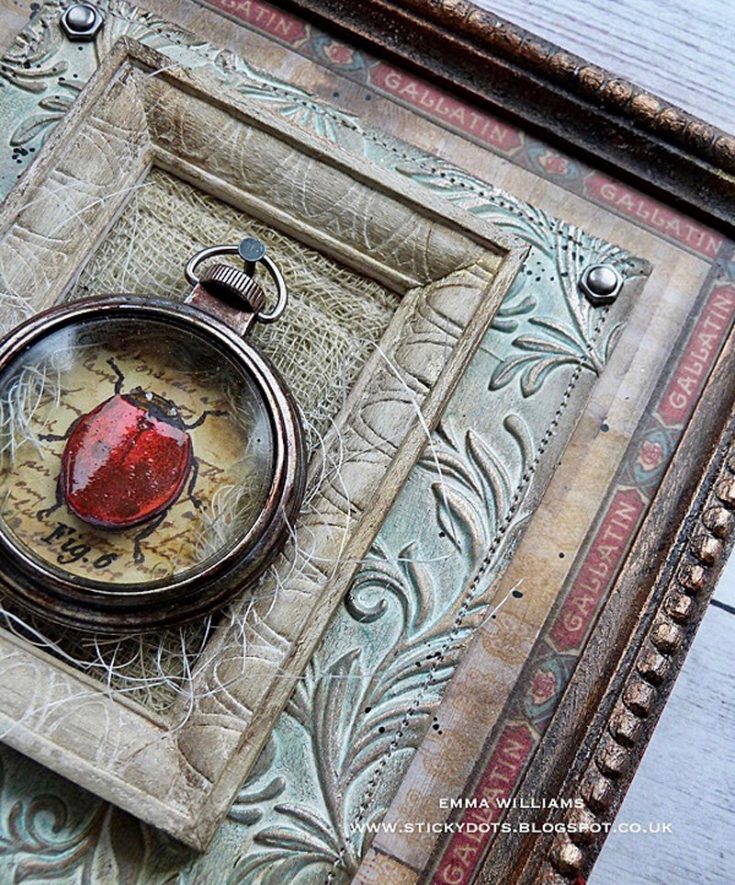
23. Hammer a Vignette Finding through the handle of the watch.
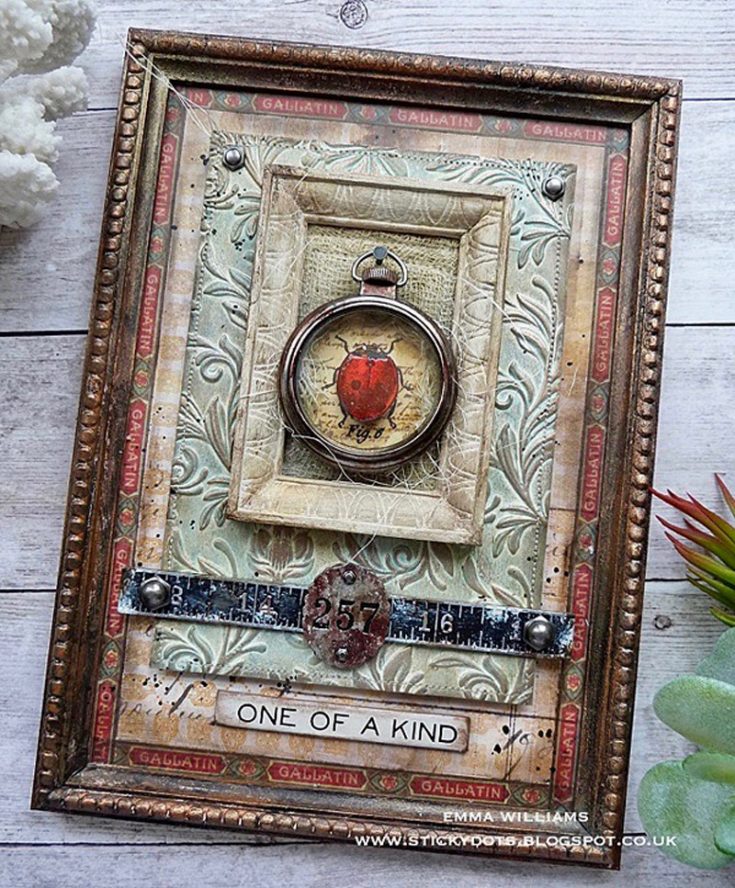
24. I attached a Measurements piece, altered with a touch of Picket Fence and Ground Espresso Distress Paint for a more worn look and placed this beneath the frame. I then took a Foundry Adornment and applied Rust and Pitch Black Alcohol Ink over the metal. Place two small Hex Fasteners into the fixing holes and then attach the Foundry Piece to the center of the metal ruler using Collage Medium.

25. Adhere two pieces of Mini Hardware either side of the ruler.
26. Lightly sand the edges of a Quote Chip and then ink with Walnut Stain Distress Ink. Attach the quote chip beneath the embossed panel.
Thank you so much for stopping by today ~ it’s been fun to take you through the creative process of this piece and a project that I hope will inspire you with ideas of your own.
See you again soon…
Emma
SUPPLIES:
|


Thanks so much for stopping by and thanks to Emma for being our guest!

Blog Candy Alert! Follow our blog via email and comment on this post for a chance to win special blog candy!


This looks amazing! Love all of the little details that were added to this project. :)
This is such a fabulous piece that you have created. The layers of individually beautiful texture and color come together to form an extraordinary composition. I just love how you have incorporated the ladybug in the pocket watch as a focal point. Such an amazing piece of art. Thank you for sharing your talents. xx
Knew this was by Emma the moment I saw it. Very classy, detailed and beautiful, as always xx
What an awesome project!
Thanks for the inspiration.
Gorgeous frame!!
Love the layering of frames.
Fantastic project.
thanks for sharing
txmlhl(at)yahoo(dot)com
What a beautiful home decor piece Emma, you are extremely talented. Love the 3-D Texture Fades and how you used it. Just beautiful. Thanks for sharing all the great ideas.
Emma, this piece really does have the wow factor! Love how you encased the ladybird in the beautiful pocket watch – gorgeous! Anne x
Wow, gorgeous project Emma!
wow what an amazing piece of art – thanks for sharing:)
Absolutely stunning Emma!! So many beautiful details on your piece. I just love this. Thanks for sharing this tutorial with us so that we can try something similar.
What a wonderful frame!
This is absolutely incredible!! I love it! Thanks for sharing!
Truly one of a kind, your project is gorgeous and the tutorial was wonderful.
this is stunning
This is just fabulous! Stunning work of art.
Such a beautiful project! Thanks for the tutorial!
LOVE
O
V
E
LO
VE
THIS!!!!!!!!!!!!!!
Wow, what a masterpiece!
WOW, Emma this is just STUNING, I LOVE mixed media and this is truly amazing!!!!
So unique and creative!
Amazing details! Love the ladybug pocket watch!
Totally awesome!❤️❤️❤️
I LOVE IT. I have everything needed to make this already. I bought them and didn’t know what I would use them for. Now I know. Great idea!
Oh my!! This is stunning!! Look at all those gorgeous effects! Fabulous!
This is awesome!
I love this project (I love everything Tim) and this is over the top – I can think of multitudes of ideas using this format to showcase small items as well as just the “bug” stamps – thank you!
WOW what an amazing project!!!
Great bug!
This piece is absolutely stunning! I looove it!
Stunning work! Love every bit of this beauty!
Great step-by-step!
Wow that’s super cool. Looks like it came out of the vaults or old chest of an entomologist!
Neat idea!
This piece is stunning. A love all the elements used and the colors are spectacular!
Emma, this is an amazing project! You really have an eye for details.
Wonderful tutorial! Boy would I love to be in a class with you to make this!
I adore this project! The step-by-step photos and instructions are wonderful. Thank you!
I love the effect you get from layering the ladybug images and coating with glossy accents. Neat!
Beautiful piece of framed art.
Thanks so much for sharing…
Beautifully created project! Looks absolutely amazing! Thanks for the photo tutorial.
This is SO BEAUTIFUL!
What a beautiful picture!! I love all of little details. Great job!!
Gosh I love this! I want to buy all those products now… No, stop me! LOL
Wow – this is an amazing project!
BEAUTIFUL! SO MANY AGED TONES & TEXTURES! JUST BEAUTIFUL!!! ;) (And I don’t like “bugs!” LOL) ;)
Wonderful mixed media 3D creation. Like the lucky LadyBug creation.
Melissa
“Sunshine HoneyBee”
OMG… Emma !! These layers and the techniques are over the top awesome!! Loving the candied apple lady bug !!
Gorgeous home decor item!
Beautiful frame! Love the rustic feel from the Tim Holtz products!