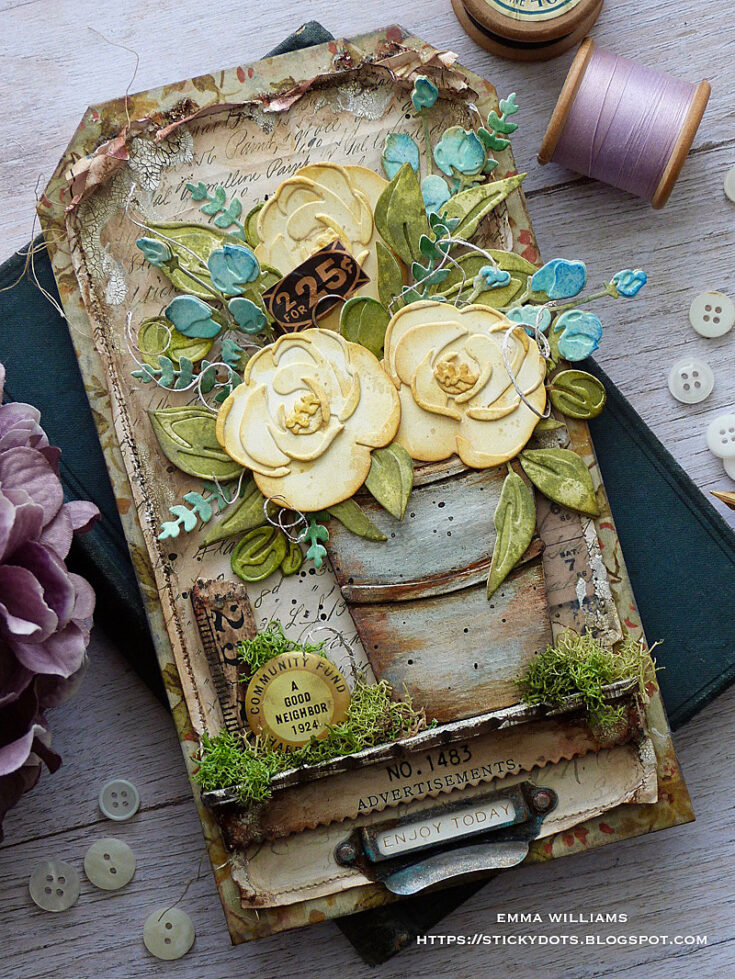
Enjoy today — etcetera tag by Emma Williams
Hi friends! Happy Sunday! Please join me in a warm welcome back to the always awe inspiring Emma Williams as a special guest on our blog! Read on to learn all about this stunning tag! Enjoy!
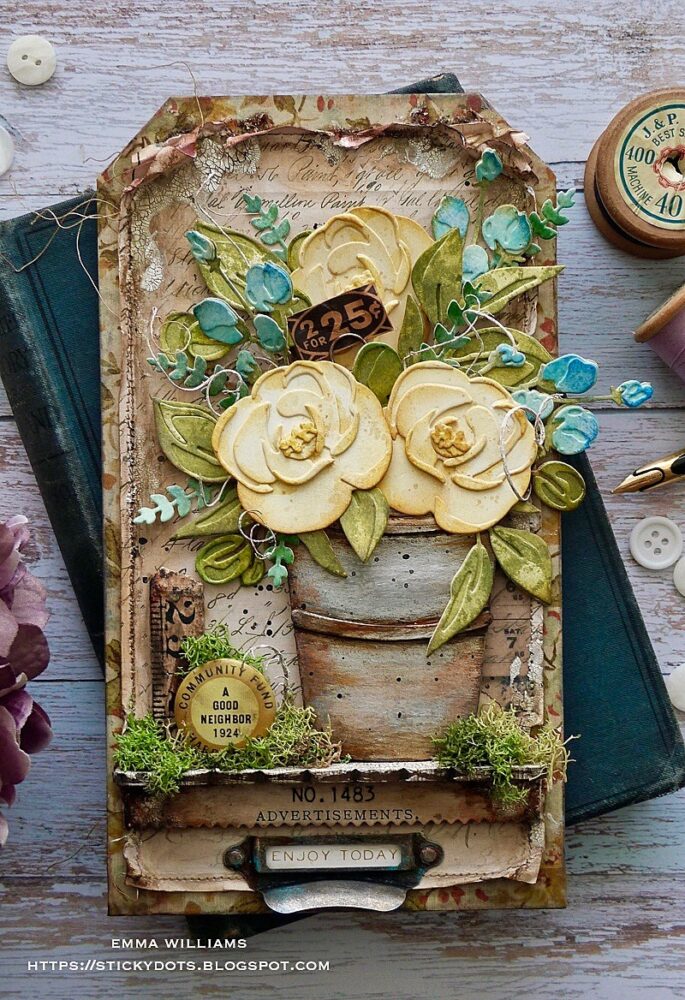
Hello everyone! I’m so happy to be back on the Simon Says Stamp blog, and I’m really excited to be sharing my latest project with you all ~ a vintage style Etcetera Tag, full of layers and dimension which has all been created using some of the gorgeous Tim Holtz dies from Sizzix combined with other products from Tim Holtz brands.
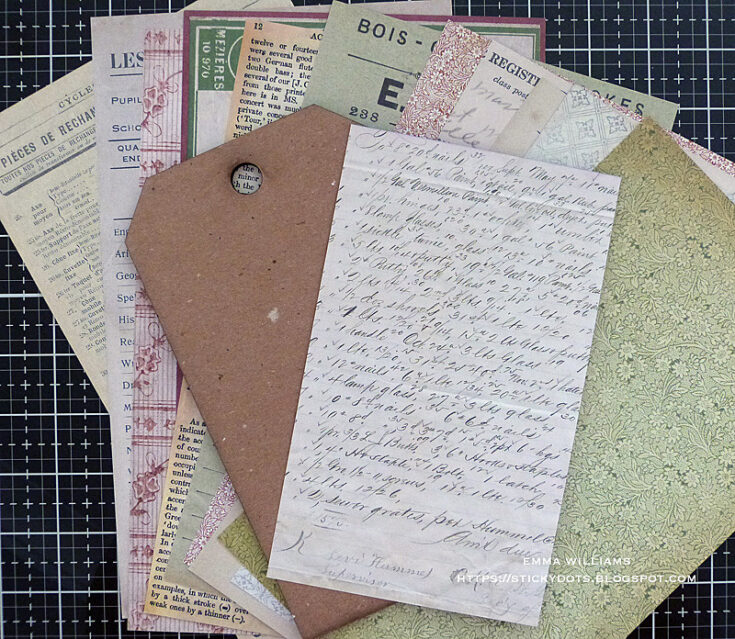
I started with my Mini Etcetera Tag and cut a panel of paper slightly smaller in size that the tag it-self, which I took from the Backdrops Volume 1 set.
I applied strips of Collector Design Tape by Tim Holtz around each of the tag edges and sealed them with a coat of Matte Collage Medium. I then machine stitched a border around the edge of the panel of paper before adding tiny rips and tears around the edges to create a more vintage feel.
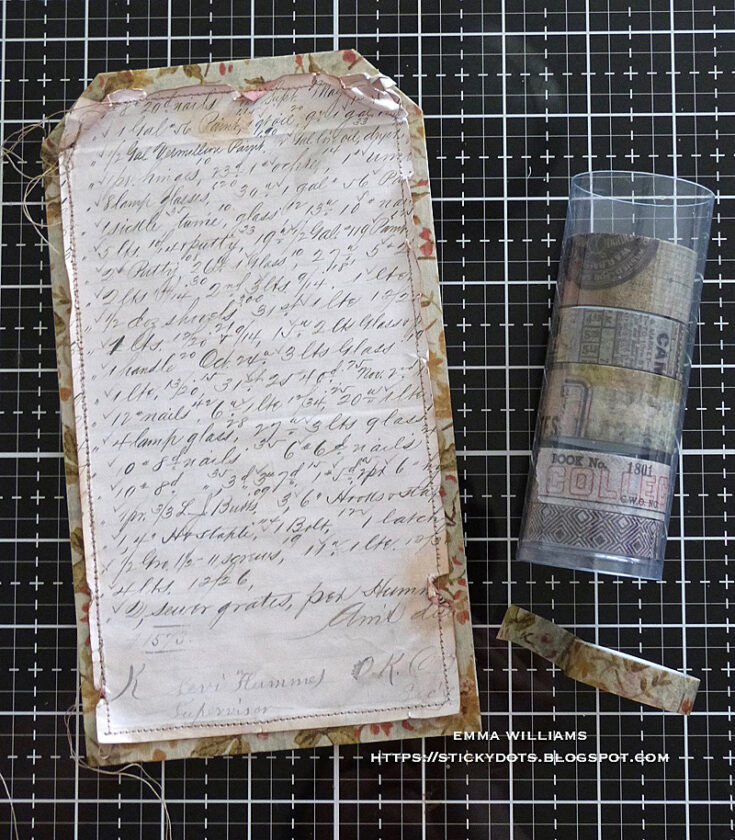
After inking the edges of the paper with Walnut Stain Distress Ink, I then adhered it onto my Etcetera Tag with Matte Collage Medium, allowing the border of tape to show around the edge. I then applied a coat of the medium over the top of the paper to seal it.
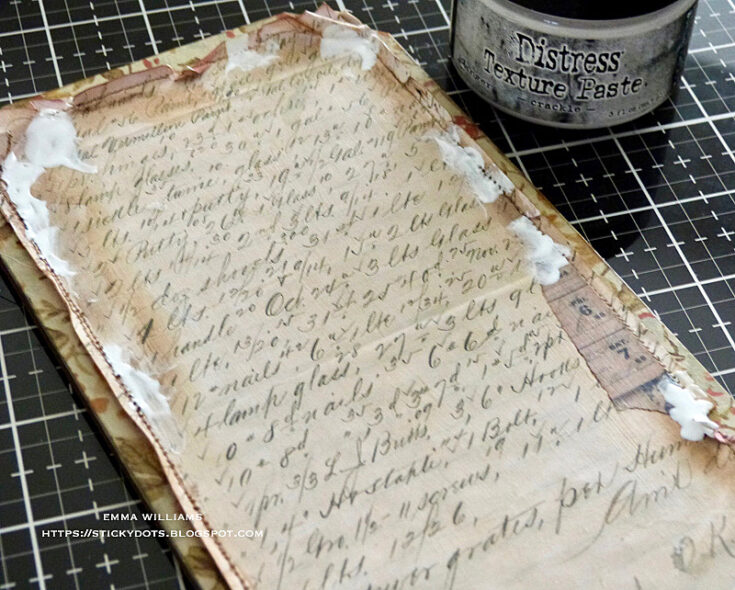
To add some texture around the edges of the paper, I applied Tim Holtz Distress Crackle Paste which I added directly to the surface with a palette knife.
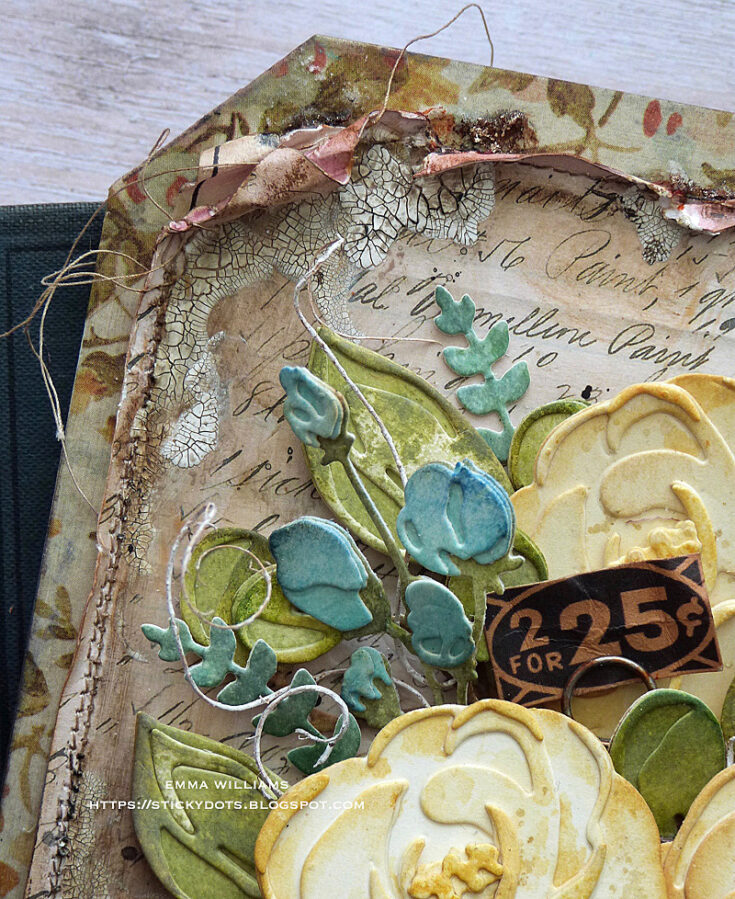
Set aside for the paste to dry and for the crackles to appear before adding Walnut Stain Distress Crayon. I scribbled the crayon over the crackles, then using a damp water brush, I blended the crayon into the cracks to accentuate them. At this stage, I also added a second layer of small offcuts of the paper which I tucked in behind the main panel, just to create more interest to the layers.
With the background complete, I moved onto creating the ledge that sits across the tag.
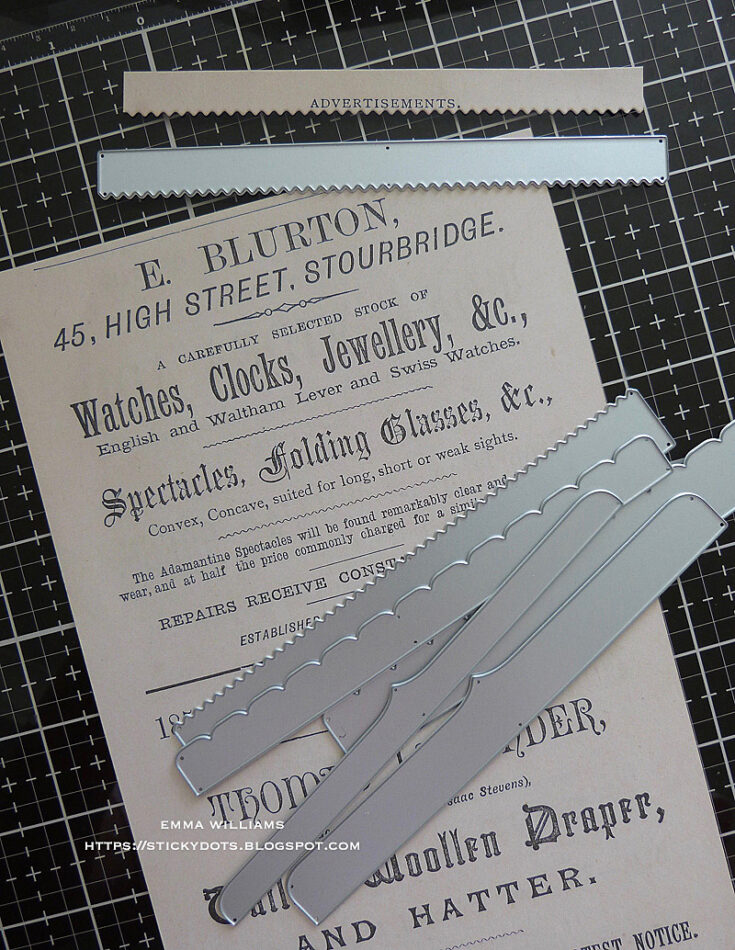
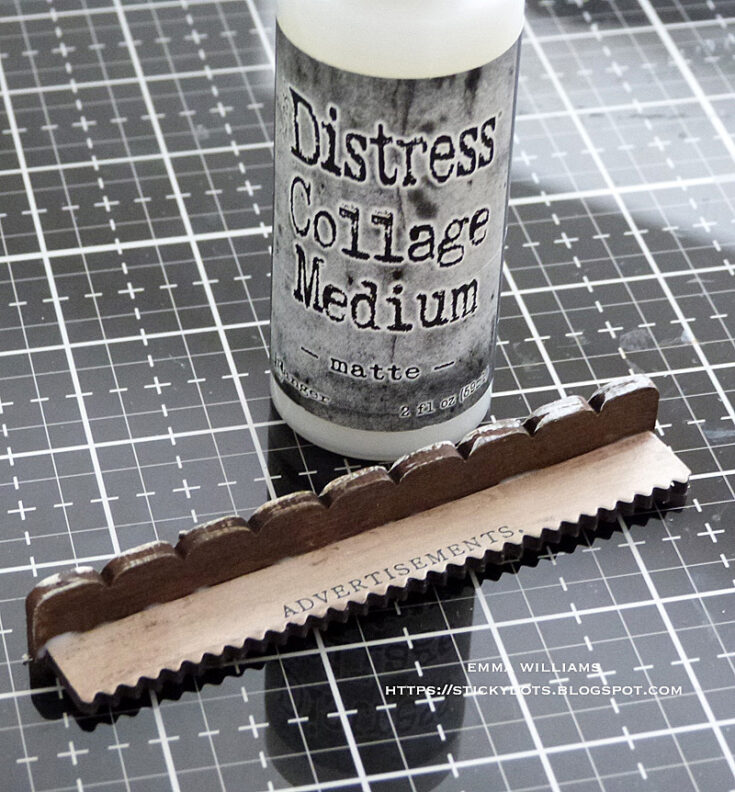
For this I used two of the smallest sized Etcetera Trims ~ one Pinked Trim and one Scalloped Trim and starting with the Pinked Etcetera Trim, I covered this using a corresponding die for the trim, from the Decorative Trims Die Set by Tim Holtz and cut one of the paper designs from the Backdrops Volume 1 set, ensuring that I had the word, “Advertisements” in the centre. Attach the paper trim to the Etcetera Trim with Matte Collage Medium and cut away the excess paper. Apply a coat of medium over the top of the trim.
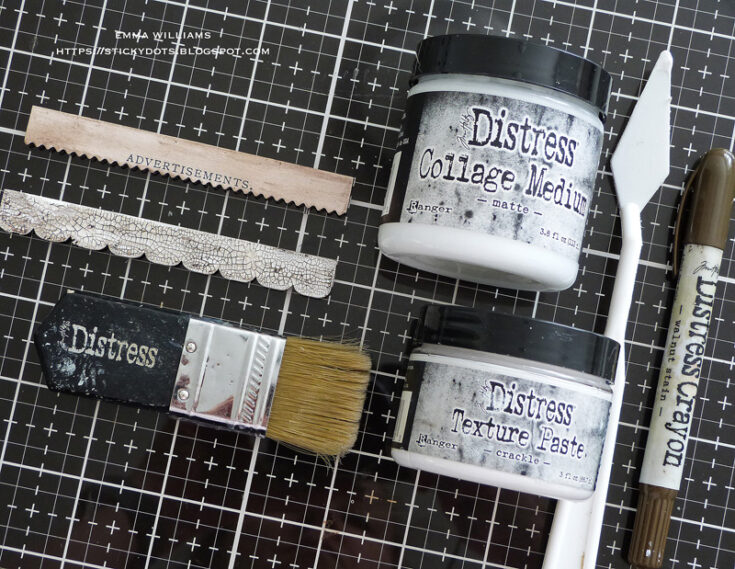
Taking the second trim, the scalloped design, I applied a good thick coverage of the Crackle Paste directly over the surface. After allowing for it to dry and the cracks appear, I applied Walnut Stain Crayon to accentuate the crackle.
To create the ledge, I attached the Scalloped Trim at a right angle to the Pinked Trim and adhered them with matte Collage Medium.
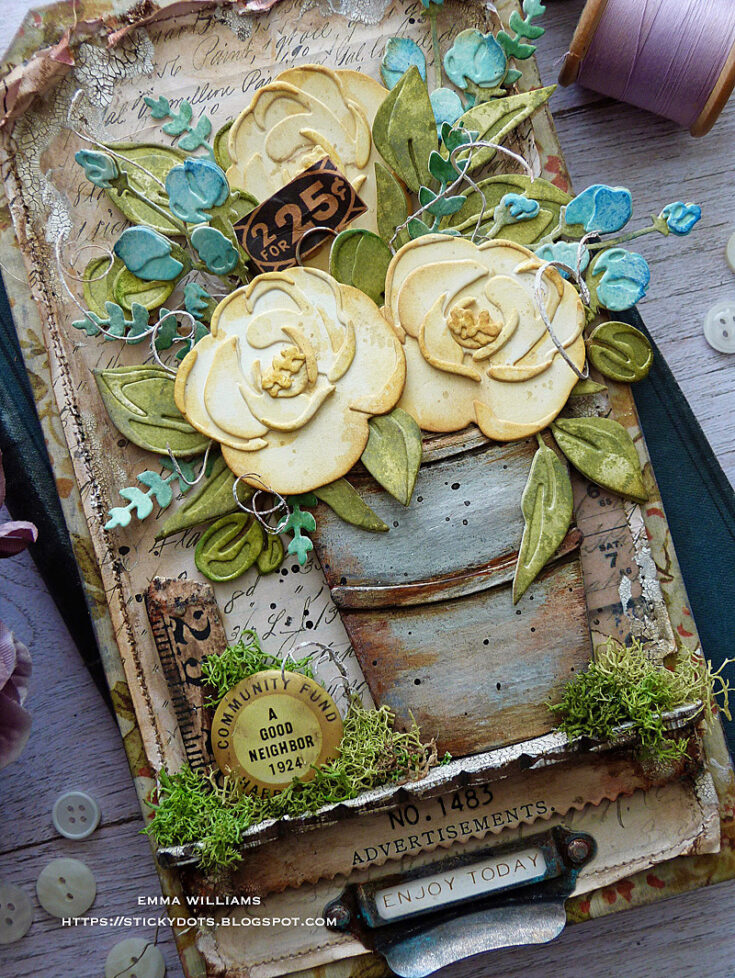
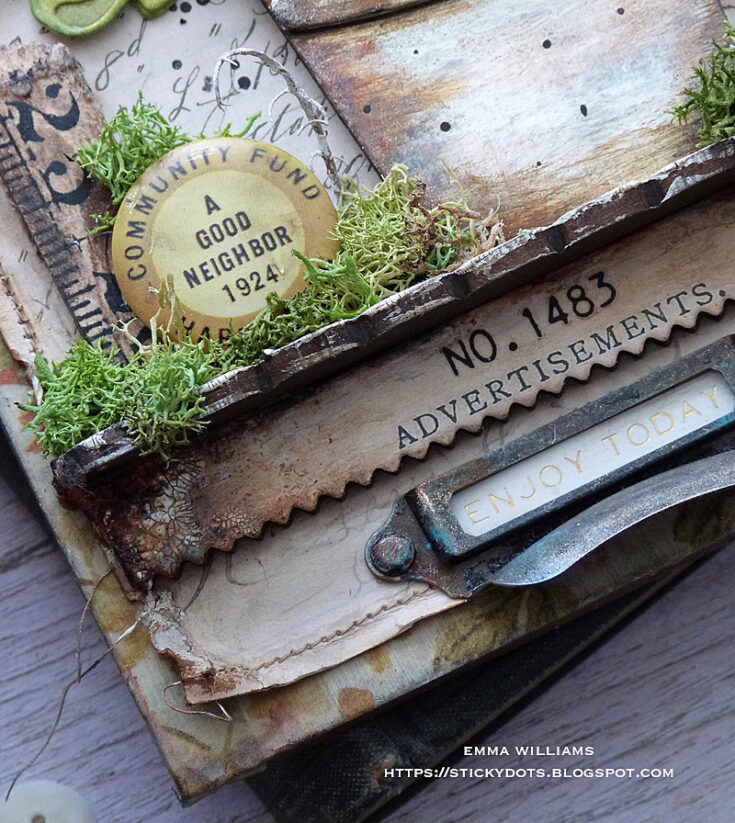
Attach the ledge onto the tag, placing it about 4cm (1.5”) from the bottom edge of the tag. In the photo below, you can see how it looks on the finished tag.
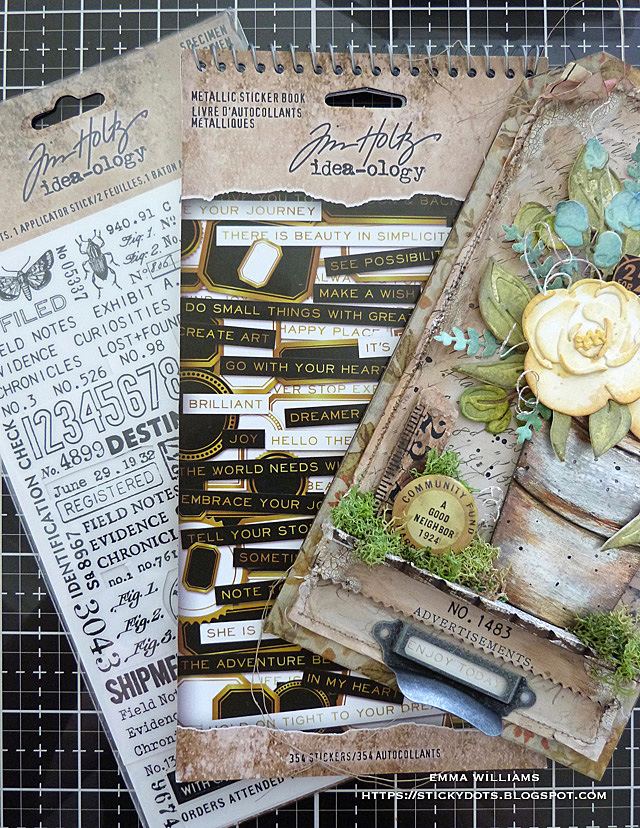
Beneath the ledge, I added a Specimen Remnant Rub, No. 1483, above the Advertisement wording and also attached a Drawer Pull, complete with an ‘Enjoy Today’ Metallic Quote Sticker behind the window aperture.
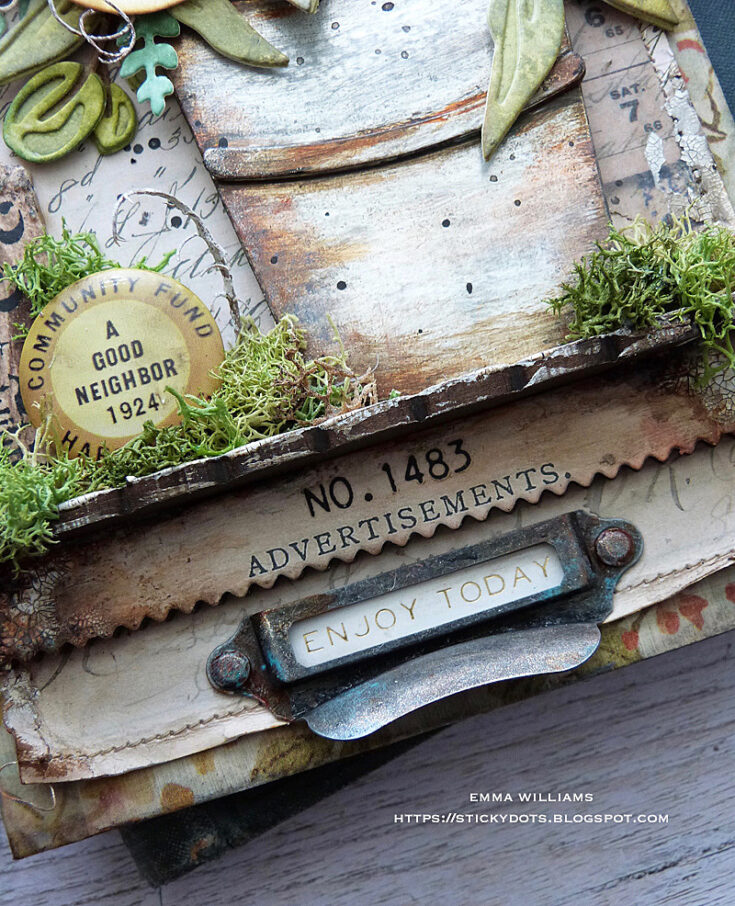
I completed the pull by attaching Hardware Heads to cover the holes on either side and painted the Hardware Heads. I smeared a small amount of Distress Paint over the metal to add color to the pull and the hardware heads, and used Crackling Campfire, Evergreen Bough and Ground Espresso Distress Paint for this.
To add more of a vintage feel to the trim, I applied some more Crackle Paste, concentrating on each corner. Once again, allow for the paste to dry before applying Distress Crayons over the top to add color. This time I used Crackling Campfire, Ground Espresso and Black Soot to create the look of rust.
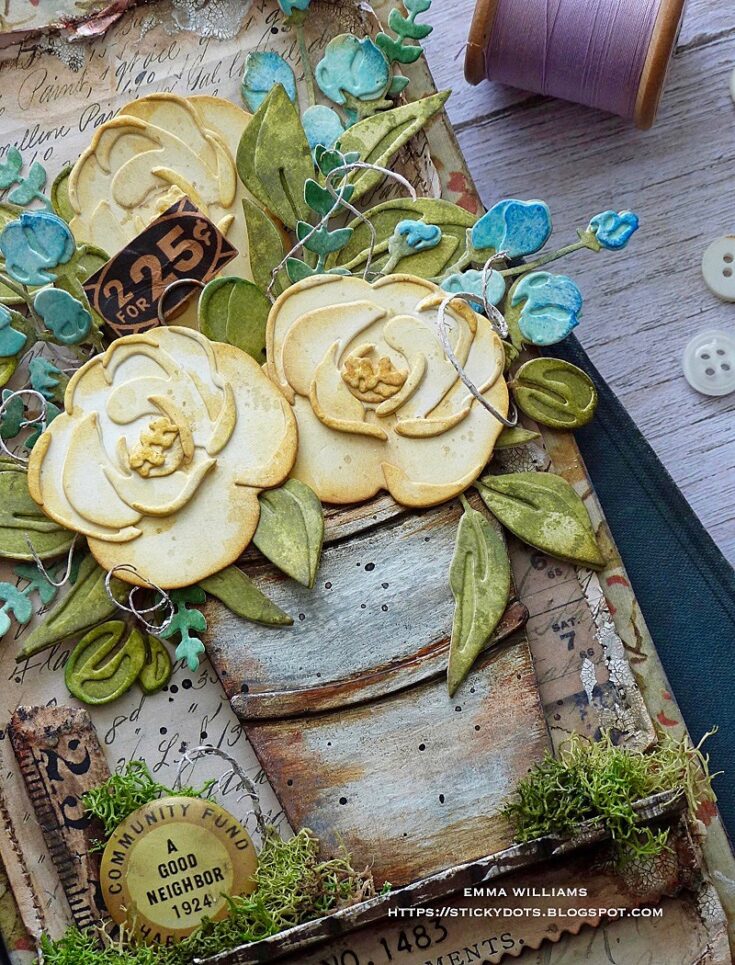
Now for the main feature of this tag, the galvanized steel pot of beautiful blooms.
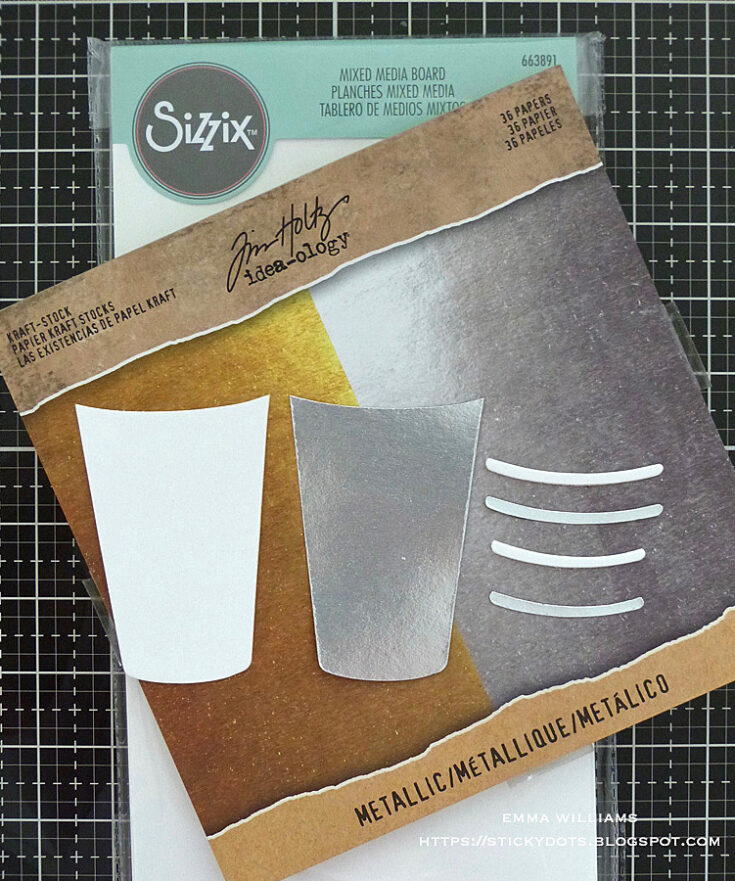
Starting with the pot ~ I used the Sizzix Potted 2 Bigz Die by Tim Holtz to die cut the main pot and the bands once from Mixed Media Board, and then another set from silver metallic kraft stash.
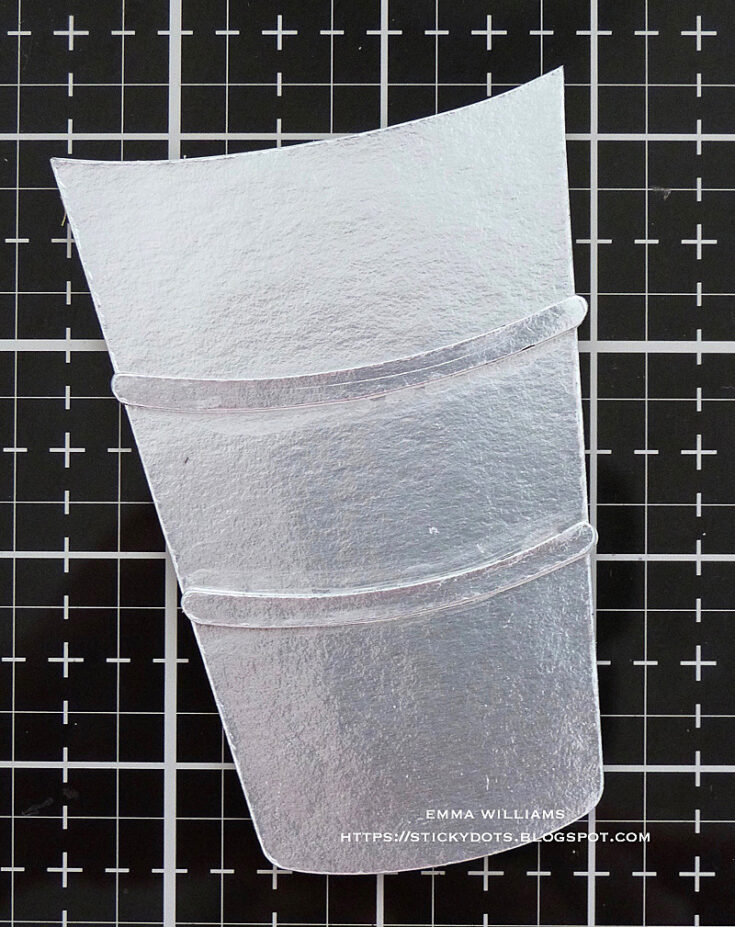
I attached the silver pieces over the top of the thicker board and then assembled the pot.
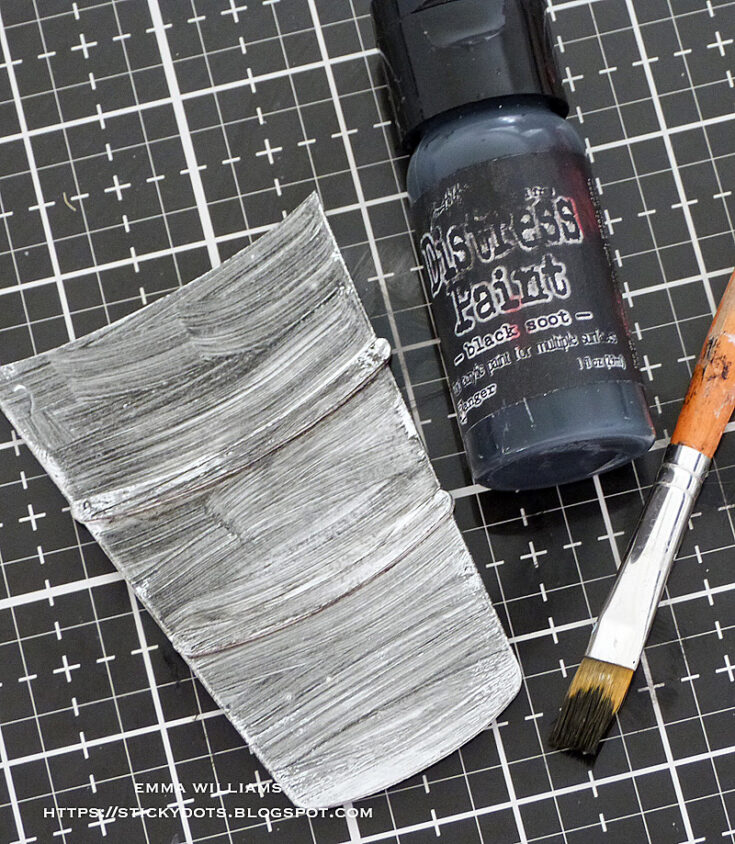
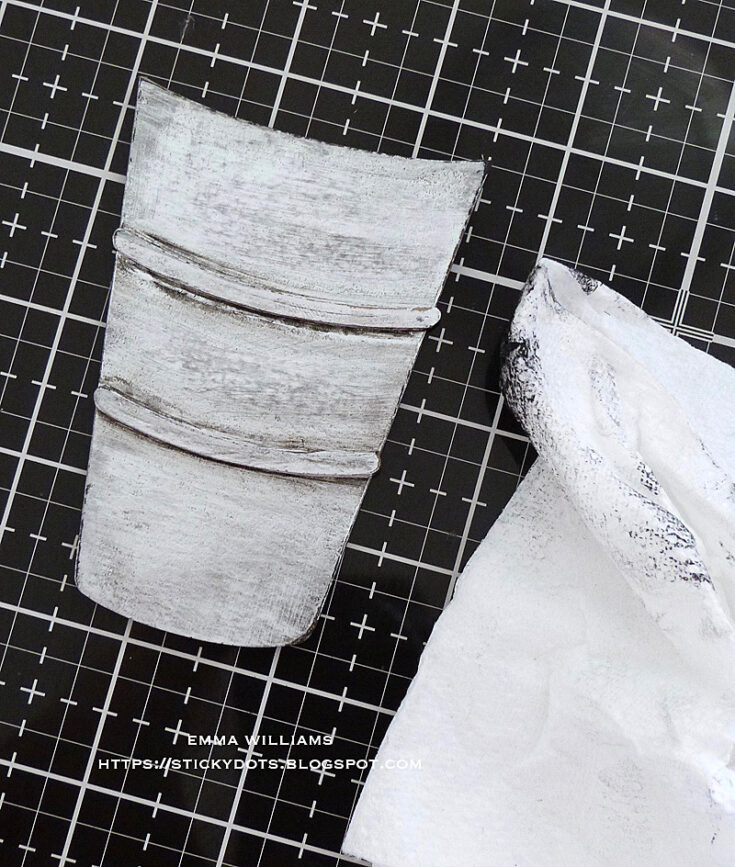
To create the galvanized rusty finish, I began with an application of Black Soot Distress Paint which I painted over the surface before rubbing away the excess paint with a kitchen towel. The surface will cling onto some of the paint to knock back the shine on the metal.
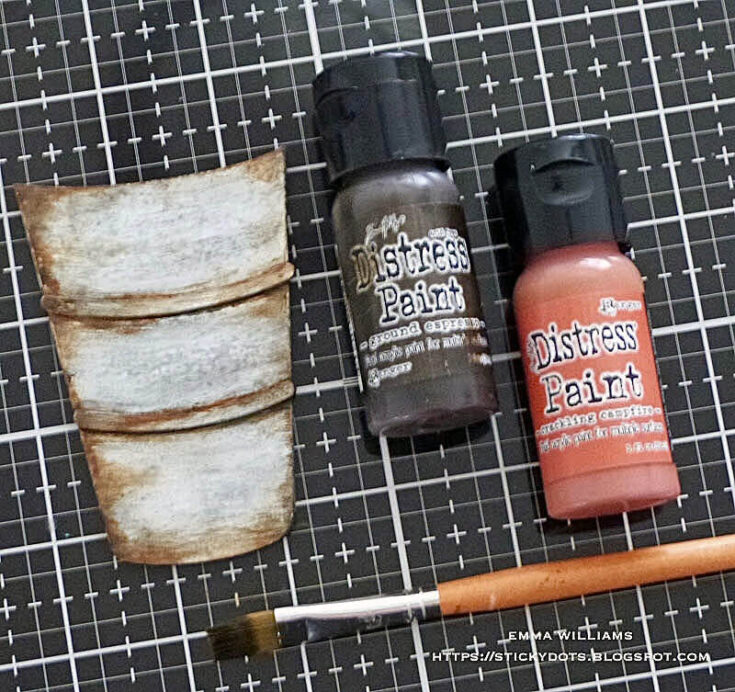
I then applied the second layer of paint, adding Crackling Campfire and dried this layer before applying the third and final layer, Ground Espresso.
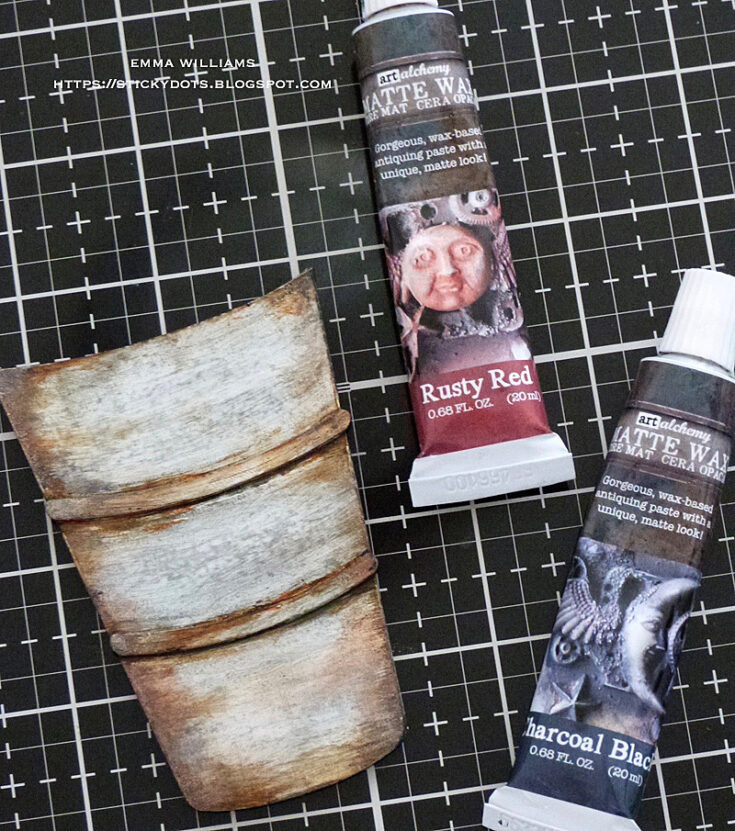
Once all the paint was dry, I added some Prima Marketing waxes, Rusty Red and Charcoal Black, and using my fingertip I applied these over around the edges and along the bands. Lightly flick Black Soot Distress Paint across the surface of the pot to create tiny splatters.
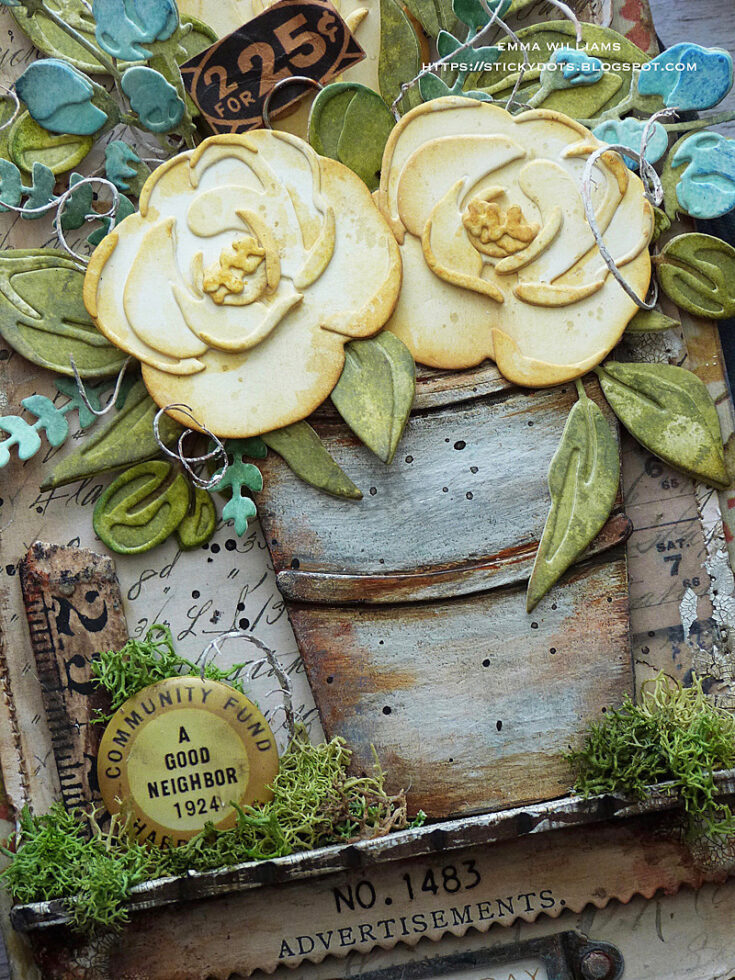
Attach the pot to the tag, placing it to sit on the ledge and adhere clumps of moss around the base.
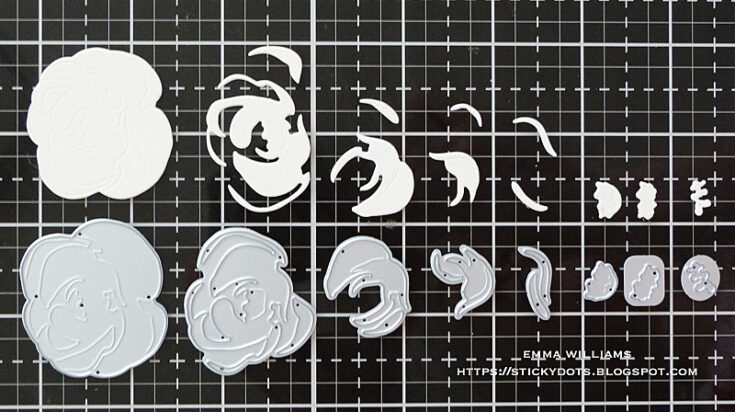
To make the flowers I used the Sizzix Bloom Colorize Thinlits Die Set by Tim Holtz and cut all my pieces to make three separate flowers, from Mixed Media Heavystock Card.
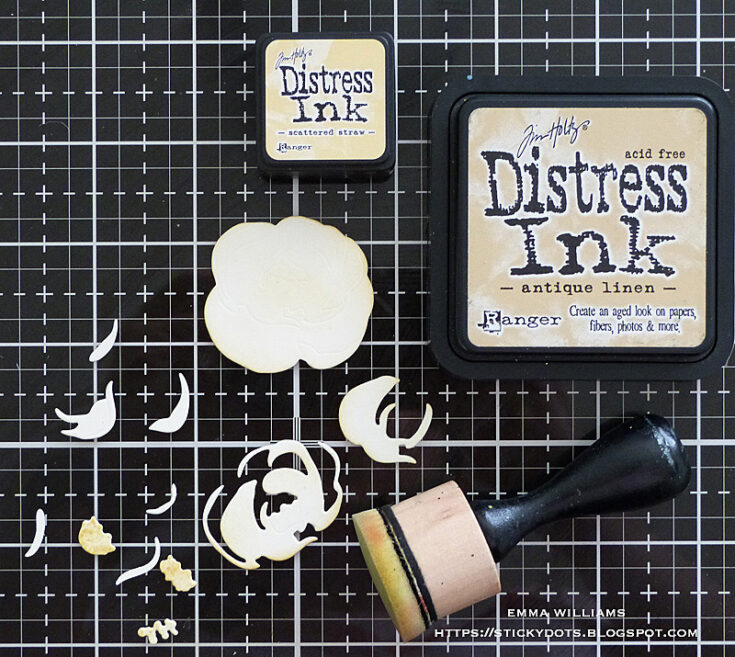
I then inked each individual piece using a blend of Antique Linen and Scattered Straw Distress Inks, before assembling the pieces to create the blooms.
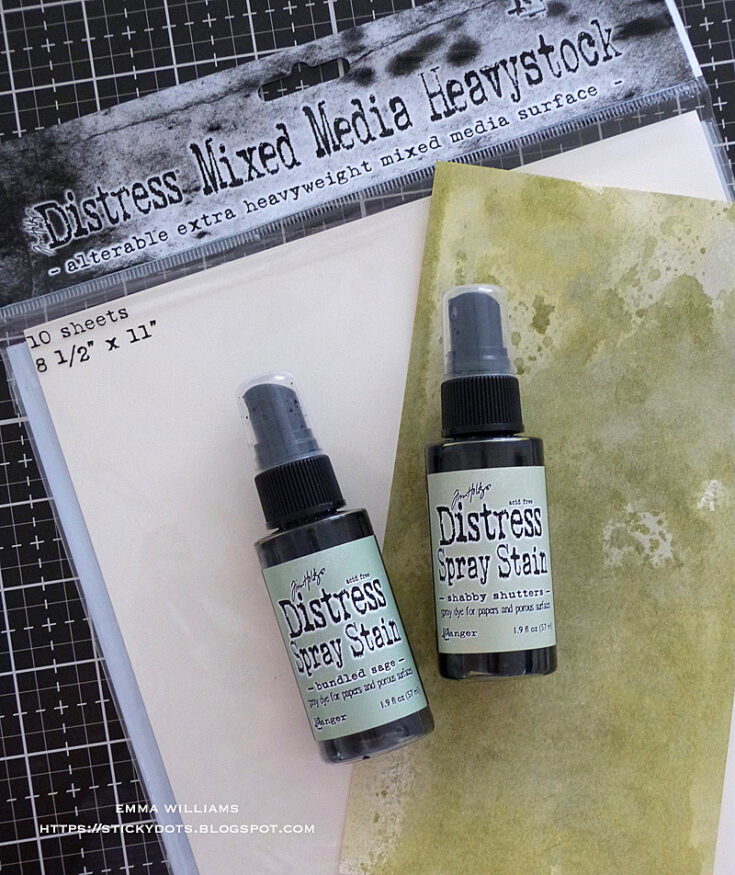
For the foliage, I cut these pieces from the same cardstock but this time I applied the Distress Inks to the card surface before cutting. I used Peeled Paint and Shabby Shutters Distress Spray Stain which I spritzed directly onto the card surface before misting the inks with water and then heat drying the card.
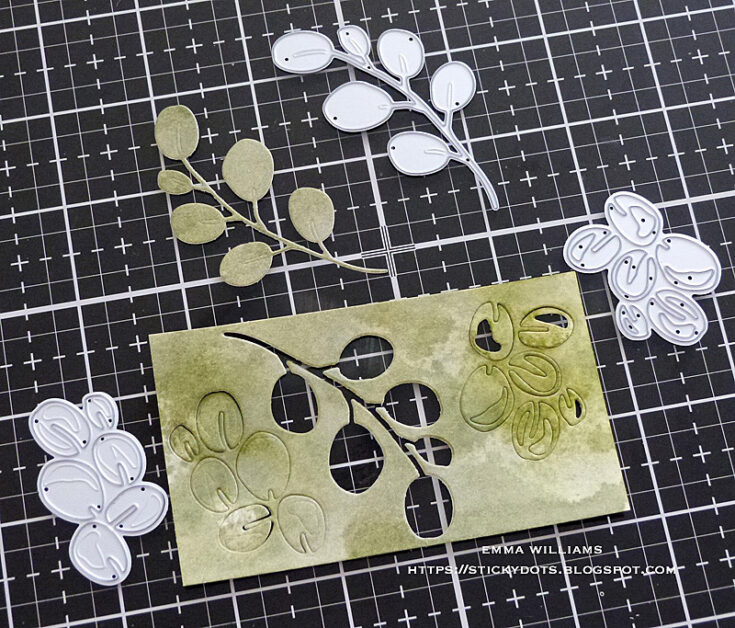
I then used the inky green card to die cut the foliage before I assembled each piece.
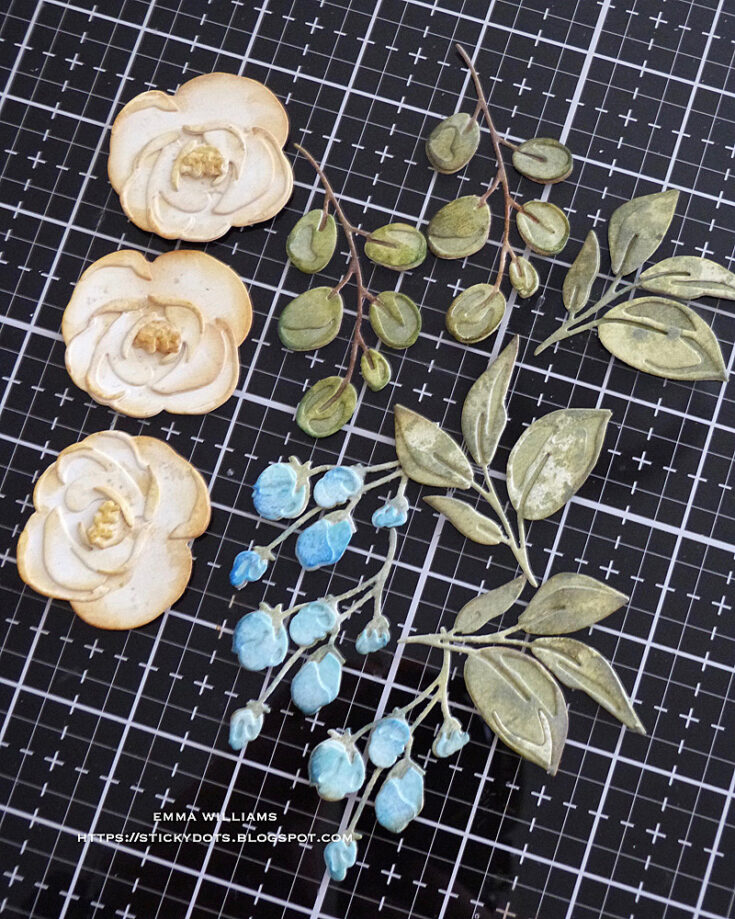
For the third set, the buds, I cut the leaves from the green colored card, and then cut the blue buds from card colored with Tumbled Glass and Speckled Egg Spray Stains. I assembled all the die cut pieces to make enough foliage for the project.
Arrange all the flowers and foliage in and around the pot and if you need smaller pieces of foliage, just snip into the die cuts for separate leaves ~ you don’t have to use the complete die cut. I attached my pieces using a combination of hot glue and foam pads to add variation of height and depth to each piece.
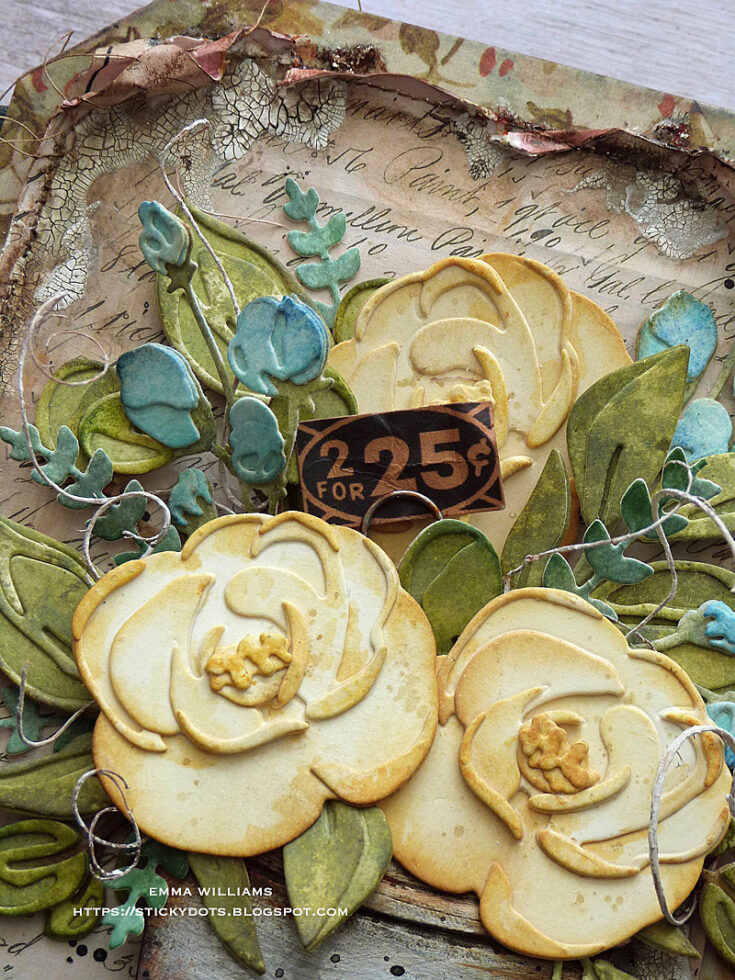
To complete the floral bouquet, I took a Snippets Ephemera piece, ‘2 for 25c’ and attached it to a memo pin, which I then tucked into the floral arrangement, together with some floristry moss that I had in my stash.
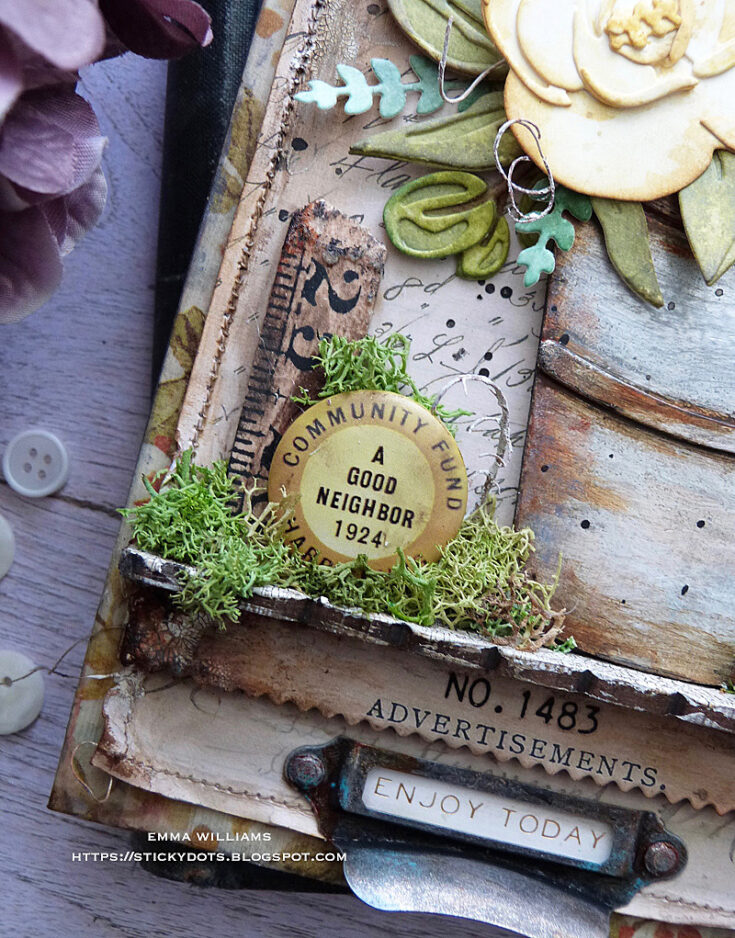
For the final embellishments on this tag, I used a ruler piece and a Flair Pin. I broke the ruler piece into two pieces and using one half, I rubbed Walnut Stain Distress Ink over the surface to slightly darken the wood. I then attached this with matte Collage Medium onto my ledge, placing it to the left of the pot, together with the Flair Pin which I placed in front. I then added a touch more moss around these last embellishments to complete the tag.
Thank you so much for stopping by today and I hope you’ve loved the project I’ve made because it was such a fun piece to create! See you again soon…Emma x
SUPPLIES:
|


Thanks so much for stopping by, and thanks to Emma for being our guest!


This tag is a true work of art! I can see it framed and displayed prominently! I love everything about it! Excellent creation, Emma!
Emma ,your work is so inspiring!!! So stunning !
I am in love with that beautiful tag!
Wow!!! Absolutely Gorgeous tag!!! Your details are Amazing!!
Emma’s work never ceases to amaze me! Always a true masterpiece!
Wow! This is absolutely stunning
Absolutely gorgeous. Stunning! ???
Just love this!
So many beautifully designed details. Didn’t think I needed the flower or vase die but . . . !
This tag speaks to me as it seems more Victorian which I love. Guess because I’m getting Victorian. Thanks for sharing all your great tips and techniques.
I love this tag!!!
Using the etc. tag gives this lovely assemblage the permanence it deserves. Very inspirational! Thanks for sharing.
This is a fabuloous tag Emma, I love everything on it!
Thank you so much for sharing this and the great tutorial with it. Stay safe and have a wonderful week.
Simply stunning! A work of he-art! All those little tiny details/embellishments are really amazing. TFS and thanks for the inspiration. ?
Emma, you’re amazing!!! I’ve learned soooooooo much just reading this post!!! Thank you for the tips, tricks and teaching along with the inspiration ???
It’s unbelievable how much work and thought goes into these projects. The attention to detail is really what puts Emma’s makes at the top of my list.
so gorgeous!!