Dry Embossed / Painted Backgrounds
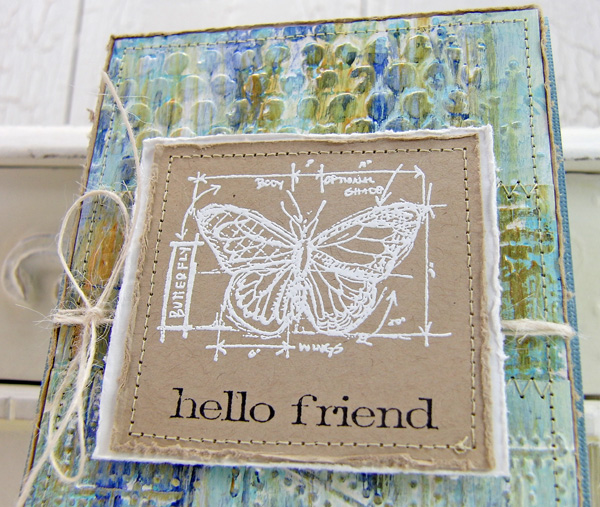

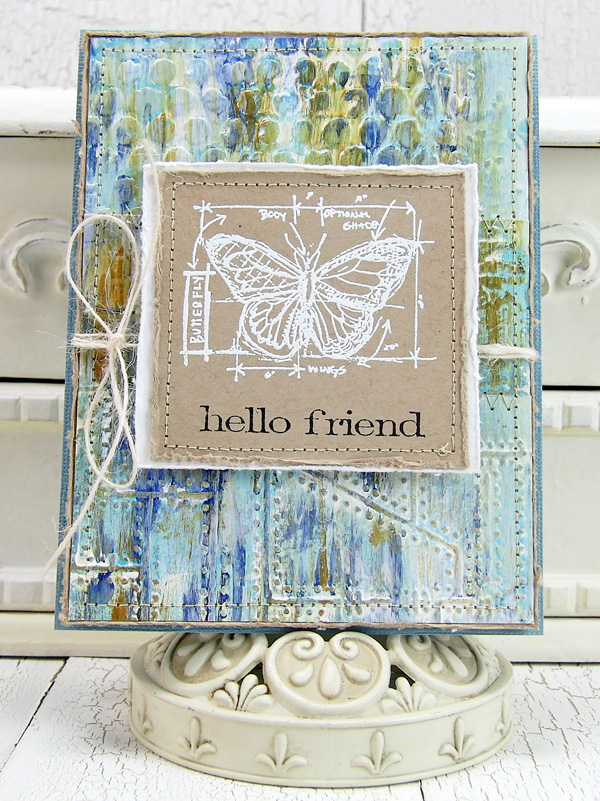
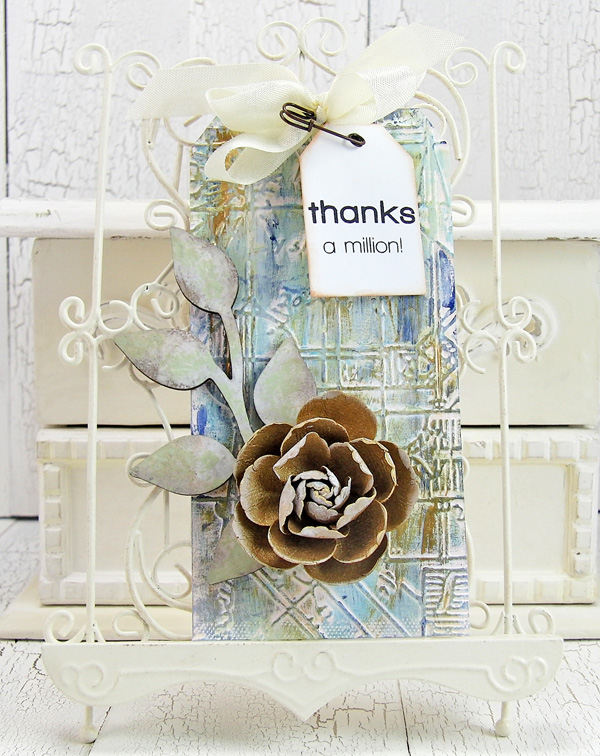
Hi readers! Happy Sunday to you! I’m so pleased to bring you this gorgeous tag & card made by Mona Pendleton using lots of goodies from Ranger, Tim Holtz, and even some Simon Says Stamp exclusives! If you’re loving this background as much as me, you’ll want to be sure to read on to get some extra tips & tricks on how to perfect this technique!
See new inspiration from Mona every week on our Monday Challenge Blog!
Enjoy!
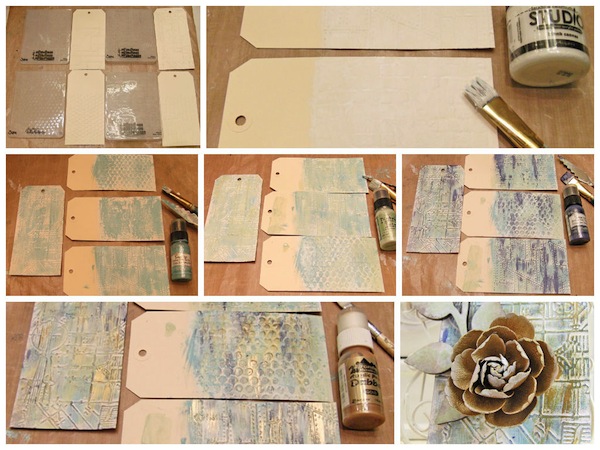
Steps to create beautiful dry embossed / painted backgrounds:
Step 1: Emboss tags.
Step 2: Apply blank canvas acrylic paint to embossed tags.
Step 3: Randomly apply broken china distress paint using palette knife and dry paint brush. Repeat step using the following distress paints: bundled sage, chipped sapphire, gold acrylic paint.
Step 4: Once dry, use backgrounds to create various projects.
Tip: If you would like to lighten the background randomly apply picket fence distress paint.
SUPPLIES:
|
|
 |
|
 |
|
|
 |
 |
 |
 |
 |
|
 |
 |
 |
 |
 |
 |
 |
 |
 |
 |
 |
 |
 |
 |
 |
 |
Blog Candy Alert!! Follow our blog via email and comment on this post for a chance to win a special blog candy!


Very neat technique!!
Very cool
Fabulous technique and stunning makes from Mona! I’m always thinking I should use my embossing folders more often – so this is great inspiration, thank you.
Alison x
Love love love this so much! I’m going to have to give this technique a try!
Mona is one of my favorite designers & this post shows why! Absolutely stunning use of color–doesn’t have to be intense to grab attention when Mona does the creating! Thanks for always inspiring!
Such a FUN Card and Tag for today Mona!! I LOVE the colors and the fun texture!! Thanks for sharing and have a Fabulous Week!! ;)
Thank you Simon Says Stamp for the awesome opportunity and thank you all for the sweet comments :) Happy to hear you like the tutorial!
Beautiful results!! Love your card and tag. These backgrounds are so rich looking, I love the layered color. Thanks for the tutorial! Thanks for sharing.
Katie B.
I love the idea of getting more out of my embossing folders. I hardly use them and my sister gave me heaps. I will have to play with them!
Lovely card and tag. I have tons of the embossing folders but I forget to use them. TFS!
Beautiful projects with so much dimension! Love. :)
I do not own a die cutting machine. But I make do because I can hand-cut most everything I want or need. However, it would be impractical (if not impossible) to dry emboss such intricate designs by hand and your demonstration is a fine example of the cool things I could do if I had one.
Lovely tag and card, stunning!
That is super cool!
Adore the texture shown in your work, Mona – just lovely. Your choice of colours wins me over.
lovely projects
tjanks for sharing it all with us
thanks for sharing with us today
Love this technique! great use for my collection of embossing folders. I follow the blog by email.
Would love to give this a try — so stunning!
Awesome backgrounds! I love these cards
Great technique! TFS
Beautiful colourful card!
Mona’s card and tag are gorgeous – I love the painty background!
Love this effect.
My gosh, I just love the Distress line.
Beautiful backgrounds and finished projects!
Very pretty and the
gold flower came out
so nice.
Carla from Utah
These are absolutely stunning! I love that gorgeous background & the finished projects are awesome. Thanks for the tutorial, Mona!
Loved the tags. Remember a bottle of this pain was in one of the stamp kits! Can’t wait to try this. Thanks for sharing. Love candy!!
Thank you Mona for sharing you’re great technique using tags. Great ideas. I’d like to try something like this myself.
Thank you for the tutorial, I may try this. Your tag is lovely.
Awesome background.
Wow, this is really an equiste card. Thanks for today’s inspiration.
These cards are so pretty!
I am definitely trying this technique!
Beautiful background and lovely effects, really wonderful!
WOW – these are GORGEOUS!!!
THANK YOU for sharing this technique Mona … I’ve added it to “to-try” list and now that I am gradually releasing the tight grip on my ruler, I know that I will be trying it soon :)
Wow these are really gorgeous.
Great technique.
Thank you for sharing your technique. I see the distressed technique all the time and always wonder how to get it done. So thank you x
Thanks for showing us how to create these stunning tags, absolutely gorgeous!!
xx Irene
Love the colours and texture of these cards.
It is always fun to use embossing folders to create unique backgrounds.
stamping sue
http://stampingsueinconnecticut.blogspot.com/
Thank you, Mona, for sharing this gorgeous technique and card with us! I love this look and may try it for some ATC’s I need to make for a swap!
Love this tag, what a great technique. So creative!
Wow, love how you created the background! Thanks for fabulous inspiration!
Want to get my hands on some distress paint now. I am wowed by the creativity in these.
Embossed and painted – gorgeous combo.
What a gorgeous card! What a beautiful technique this is and the colors are so soft and pretty. The flower is so perfect it looks so real. What a talented gal. Thanks too for a most generous prize.