Doodling with Debby: Die Cut Winter Wreath
Hi friends! Happy Sunday! I hope the weekend is treating you well so far! Don’t miss the latest inspiration from the fantastic Debby Hughes in our Doodling with Debby series! Read on and enjoy!

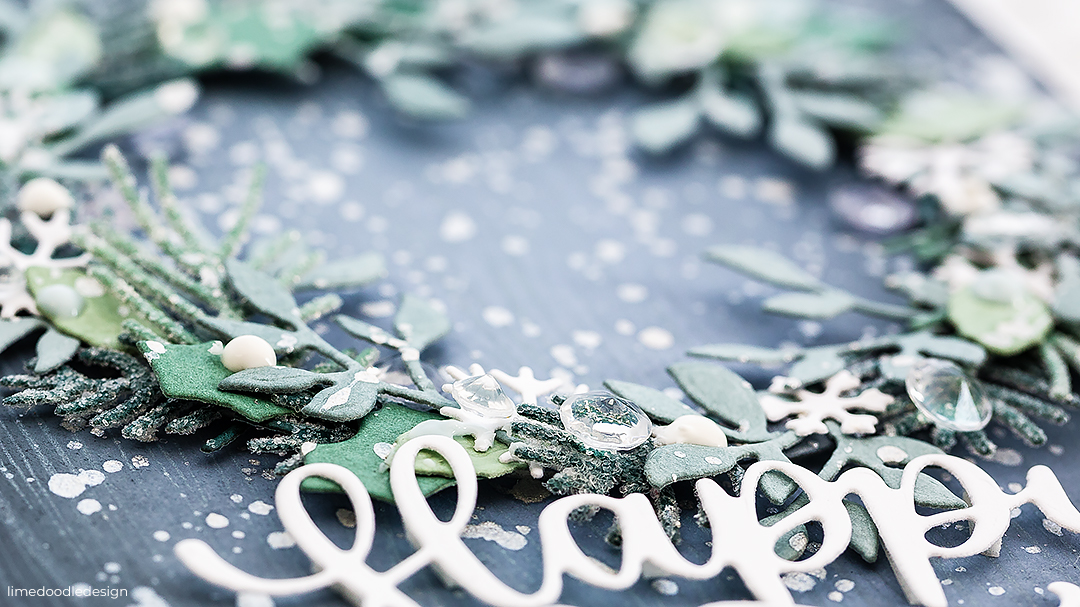
Hi, it’s Debby here with my monthly Doodling With Debby video feature on the Simon Says Stamp blog and for today I’m taking inspiration from the front cover of a clothes catalog which dropped through my door to create this die cut winter wreath card.

Inspiration is all around us but don’t you just love when it literally falls at your feet or at least onto your doormat! As soon as I saw the catalog, the front cover drew me in with the muted dusky shades, simple white wording, and snowy bokeh and I was itching to translate it into a card.
I debated how to get the door with vignette effect of the darker edges fading into a spotlight around the wreath. In the end, I decided that the simplest, most effective way was to use a couple of colors of Distress Oxide inks and blend them into a piece of Neenah Solar White card. I pulled out Stormy Sky for the main color and Black Soot to create the vignette.

I did ponder on how to get the background to look like a door. I wondered about catalog or drawing lines with a black pen, but I wanted to keep the background simple so that the wreath and sentiment were the main focus. In the end, I decided on a subtle wood texture by using this Designer Woodgrain stamp from Hero Arts. This is one of the first background stamps I ever bought, and I still love it. I inked the stamp with Stormy Sky Distress Oxide and some Black Soot too around the edges as I wanted to get the same effect with the woodgrain as I had over the rest of the card. I then placed the card on top of the stamp and thoroughly rubbed with my fingertips to make sure I had an excellent impression.
I love adding splatter to my cards, and one of my favorite ways to do so is to use a solution of Perfect Pearls. I add a scoop or two of Perfect Pearls to a mini mister, then top up with water and give it a good shake and then I use the tube from the bottle to splatter the sparkly mixture. In line with the inspiration piece, I really went to town with the splatter and then set the background aside to dry while I worked on the rest of the card.
For the wreath, I used pieces of Neenah Solar White card colored with Dye inks from Simon Says Stamp – Midnight Green, Seafoam, Laurel Green, Dusty Sage, and Cloudy Sky. The night before I filmed the video, I rubbed the inks over pieces of white card and left them to dry. There are two reasons why it is a good idea to leave the ink to dry before using the card. Firstly, the ink smooths and lightens as it dries and so you get the true color to work with. Secondly, if you try to die cut from the card before it is fully dry, you’ll find that your die cuts get stuck in the die and become misshapen when you try and pull it out.
I dug through my die collection looking for any small delicate foliage dies. In total I used the following dies to create my wreath – Pine Needle Trio, Forget Me Not Flowers, Pine Needle Wreath, Holly Collage and Leafy Circle which I cut from the dye ink colored card and during the making of the wreath I thought a few snowflakes would be lovely and for those I used the Sparkling Snowflakes Breeze die cut from white card.
Next, I added some Tim Holtz Distress Glitter in Rock Candy to the pine needles die cuts. This is my all-time favorite glitter for this time of year as it adds lovely sparkle and sugar texture. I used Ranger Multi Medium Matte and squeezed a blob onto my glass craft mat before taking a leaf and rubbing the glue over the leaf with my finger and then quickly dunking into the glitter.
To mount the wreath to the card I die cut a ring. I used two Nested Circle dies from Simon Says Stamp and ran them through my die cutting machine with a white card I then used the same two colors of Distress Ink to color the ring so that it would blend into the background if any of it was visible once I’d constructed the wreath. I then foam mounted the ring onto the card front to give me a guide as to where to adhere the die cuts and to add more dimension.
To attach the foliage to the ring, I dipped the ends of each leaf in Ranger Multi Medium Matte and then pressed down onto the ring. I kept adding more and more of the leaves until my wreath was full to bursting with texture and dimension.

I splattered the wreath with more of the Perfect Pearls solution and then further accented it with Nuvo Crystal Drops in Simply White and Duck Egg Blue and finally Dewdrop Diamonds from Little Things From Lucy’s cards.
For the sentiment, in line with the inspiration, I die cut the Happy Christmas die from white card. This die comes with the delicate script wording as well as a shadow die, but I chose just to use the delicate script as I felt it went better with the design. I added lots of tiny little pieces of foam adhesive to the back of the words. You could cut several of each word and layer then on top of one another to get a more dimensional sentiment, but I find I lose the elegant look when I do that and prefer just a single layer with foam adhesive to give dimension. I kept the dot of the i in place with Ranger Multi Medium Matte.
Finally, I added the finished panel to a Neenah Solar White card base in the 110lb weight to give a sturdy base to cope with all the dimension on this card.
Thanks for joining me today, and I’ll see you next time for Doodling With Debby.
WATCH THE VIDEO:
Watch below or in HD on YouTube.
SUPPLIES:
|


Thanks so much for stopping by and thanks to Debby for being our guest!

Blog Candy Alert!! Follow our blog via email and comment on this post for a chance to win special blog candy!


Beautiful wreath. Love your card. The colours are fantastic.
I love the diecut sentiment!
Spectacular wreath.
Beautiful card. I love the wreath, and your background is gorgeous.
I think this is absolutely gorgeous!
I just love this card! Your detailed wreath against the woodgrain background is stunning. tfs
Beautiful wreath with all the different greenery.
Such a beautiful wreath!
Thanks so much for sharing…
Oh my, that’s just stunning! I have a thing for wreaths, too.
I really love how you got the effect of a door without stamping or die cutting a door. Gorgeous wreath, love the colors.
Wow!!!! Your wreath is GORGEOUS!!!! I love how full you got it and all the embellishments!!!!
The green colors are ethereal! Swoon…the build up of greens are perfect
To my eyes! Thank you Debbiej
Beautiful wreath. There is so much
dimension to it. thanks for sharing
txmlhl(at)yahoo(dot)com
Wow, absolutely gorgeous!
I love this wreath card. It is really stunning.
Love the card. Such a clever idea!
Beautiful card!
Absolutely breathtaking card!! The colors are stunning!! Your creativity is out of this world!! I couldn’t even think of doing something like this. Thank goodness we have you to inspire us!!!
This is simply stunning! I like everything about it. Thanks for sharing!
Pure holiday magic. So beautiful. Love the colors and all the wonderful splatters. Nicely done.
Gorgeous card. Love the beautiful wreath and the splattered background. Thanks for sharing the video.
Very pretty card and thanks for sharing.
Linda d.
Debby this is a fantastic card
What a FABULOUS wreath!
This is such a gorgeous card! I just love the snow splatter and all the texture and dimension of your wreath. :)
So pretty. The other day I was in the doctor’s office and snapped a picture of the nurses scrubs because I liked the color combination. She thought it was funny. I already follow by email.
Wonderful card! Like the blue door!
Wow! The colours, dimension and texture of this card are just beautiful!
It’s so fun when we find inspiration by accident! This has certainly inspired me. I think I have enough similar elements to make a take-off on this! I have to try. It’s gorgeous!
That wreath is just gorgeous!!
This is so beautiful! It gives a bit of inspiration! Thanks
Whoa, that is beautiful! Not the quickest Christmas Card to make, but the kind I love. Maybe a few for the most special of my listees. It will be such fun to do something like this. As always, Debby, you are over the top with your creations. Thanks for the inspiration.
Nice card!
Absolutely stunning!!!!
Oh wow – I love everything about this – the colours, the design, the texture! So pretty
Beautiful card Debby. I love the blue door!
This turned out surprisingly beautiful.
I love everything about this card. Thanks for the inspiration and great tutorial.
Brilliant and oh so beautiful!!
Fabulous job and
the wreath and card
looks beautiful!
Carla from Utah
Absolutely gorgeous! Ok Debby, I think this is going to be my favorite winter/Christmas card of the year. I love that you found inspiration from a magazine, your interpretation is amazing! As always thanks for sharing and inspiring.
Beautiful wreath and I love the background.
The wreath is amazing! I love the colors you used and all the different types of foliage. If I received a card like that I would display it every year!
Beautiful wreath!!
Stunning. I so need this die. I’m feeling quite inspired. It’s just lovely.
What a beautiful and festive wreath card for the holidays!
Beautiful card!!! Love the colors!!!
Amazing wreath Debby! Not sure if my hands would let me work with all those tiny pieces, but I sure would like to try. Thanks for sharing this beautiful card with us.
Your wreath is stunning! All those layers, wow! Thanks for the inspiration!
Beautiful card! Thanks for sharinv how it was made and the inspiration it came from!