DIY Project Life!
Hi there everyone! Chaitali here today to share a few tips on DIY Project Life cards with you. For those of you new to Project Life, it is an awesome system of quick scrapbooking! I have 5 tips for you that I learned when I started making my own Project Life cards. Trust me, they are addictive! So shall we get started with the countdown? :)
Tip 5: Use your stash!
If you are using the most common Design A for Project Life, you will need 8 cards of 3 X 4 size per week. With 52 weeks in a year, you do the math on how many 3 X 4 cards you will need. Tons! What a great opportunity to use your stash!
Here are 2 cards I made with things from my stash. The left one uses stamps, re-inkers and a fun DIY inkpad technique I learned from Jennifer (McGuire). The right one uses another fun stamp set and some paper piecing.
Stamped Card Supplies
{1} CAS-ual Fridays Bold Wishes Stamp Set {2} Distress Ink Refills {3} Ranger Cut-N-Dry Stamp Pad {4} Neenah Classic Crest Solar White paper
Paper Pieced Card Supplies
{1} TAWS Adorabowl Stamp Set {2} Studio Calico Snippets 6×6 paper {3} Neenah Classic Crest Solar White paper
Tip 4: Keep the embellishments less bulky.
Here are 2 cards I made with embellishments that aren’t so bulky. The left one uses brads and the right one uses flowers.
Brads Card Supplies
{1} Basic Grey Glazed Epoxy Brads {2} Copic Markers {3} Neenah Classic Crest Solar White paper
Flower Card Supplies
{1} Flowers {2} Studio Calico Snippets 6X6 Paper {3} Spica Glitter Pens {4} Neenah Classic Crest Solar White paper
Tip 3: Personalize Them!
Remember, they are YOUR journaling cards and you are making them yourself because you want them to be different from all the other ready-to-use cards out there! So personalize them to your needs. Use your supplies to make them extra special.
Here are 2 personalized cards I made. The left one lists all the sicknesses and Dr. visits we had that week. The Alley Way Gotta Bug stamp set was perfect for this! The right one details my husband’s birthday planning. Both are perfectly themed to the write-up because I made them myself!
Sickness Card Supplies
{1} TAWS Gotta Bug Stamp Set {2} Copic Markers {3} Neenah Classic Crest Solar White paper
Birthday Card Supplies
{1} CAS-ual Fridays Bold Wishes Stamp Set {2} Copic Markers {3} Memento Tuxedo Black Ink {4} Neenah Classic Crest Solar White paper
Tip 2: Think of them as mini cards or mini layouts
If you are a cardmaker primarily, try thinking of these as mini cards. And if you are a scrapbooker, think of them as mini layouts. Either way, when you think of them as miniature canvases, you will open a whole new world of possibilities! All your techniques and tricks will work here too!
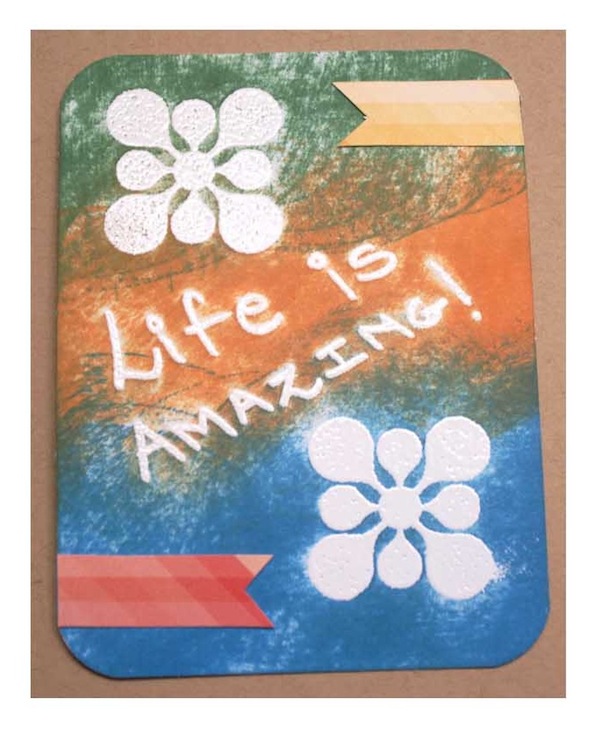
Want an example? How about a filler card with the Emboss Resist technique?
Emboss Resist Filler Card Supplies
{1} CAS-ual Fridays Bold Wishes Stamp Set {2} Memento Tangelo Ink {3} Memento Bahama Blue Ink {4} Memento Cottage Ivy Ink {5} Tsukineko white embossing powder {6} Ranger Emboss It pens {7} Neenah Classic Crest Solar White paper
Tip 1: Have Fun!
That’s the main aim after all, isn’t it? :) Its interesting what you can come up with when you just think about having fun instead of trying to finish a scrapbook! For example I found that everything doesn’t have to be single layer and on a 3X4 card when I decided to have some fun…
Emboss Resist Filler Card Supplies
{1} Nestabilities Fleur De Lis Square {2} Studio Calico Snippets 6X6 Paper {3} Tsukineko white embossing powder {4} Ranger Emboss It pens {5} Neenah Classic Crest Solar White paper
Hope you enjoyed the countdown and picked up some inspirational ideas for your journaling cards! I would love to see your work if you create some DIY journaling cards!
Shop all the supplies:
Happy Crafting!
-Chaitali
Blog Candy Alert! Join our following and comment on this post for a chance to win a special blog candy!


There are no comments.
Leave the first?