Custom Holiday Gift Tags
Hi readers! Happy Tuesday! If you’re ahead of the game, (or at least begun), it’s time to start thinking about how to WRAP those lovely presents you lovingly picked out for the special people in your life! We’re happy to welcome back guest designer Richele Christensen to our blog for some fun gift tag & wrapping ideas… just in time for Christmas!
P.S. How FUN are the Tidings Tokens?!
Enjoy!
Hello friends! It’s hard to believe Christmas is right around the corner and if you’re like me you have lots of packages to wrap before the big day. Making a custom stamp pad with Cut-n-Dry Felt is the perfect technique to make personalized tags for all the gift under your tree. I love the gift giving season!
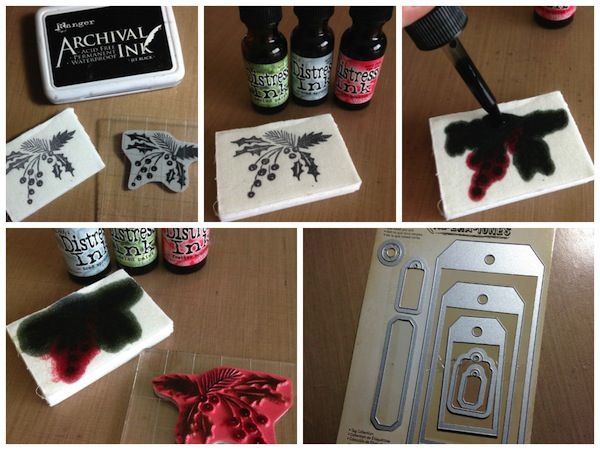
1. Stamp image on to Cut-n-Dry Felt with Archival Ink. This will act as a guide for where to add the reinkers.
2. To make our custom stamp pad choose Distress Reinker colors for your design. (Peeled Paint for the greens, Iced Spruce for the pine needles, Festive Berries for the berries and Gathered Twigs for the Pinecone.
3. Use the dropper applicator to add reinker to the design where desired. Work quickly so the reinker doesn’t spread out to much between colors.
4. Now you have a custom stamp pad. The stamp pad can be stored in a plastic baggie to use later or reinked if necessary.
5. The Tag Collections Framelits set will be perfect for cutting our tags and bands. Look at all the dies you get in this set.
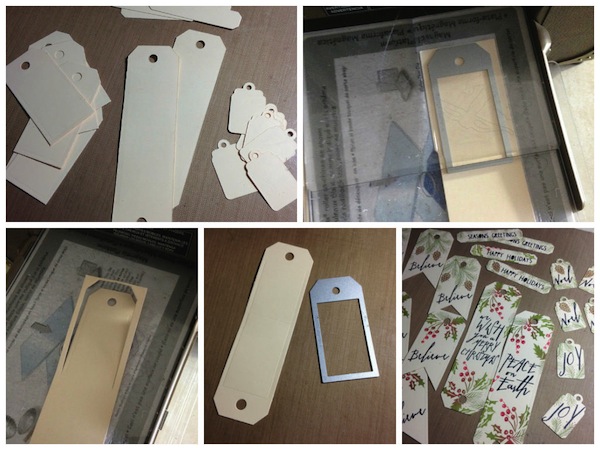
6. Die cut several tags from manila cardstock.
7. Make a long band with the tag shape on each end by die cutting one side of the tag and positioning the Dimensional Cutting Pad so it doesn’t cut the end or center of the band.
8. Turn the die around and cut the other side using the Dimensional Cutting Pad again so not to cut the center.
9. You will end up with a band that has the tag shape on both ends. This technique enables you to make die cuts longer if desired.
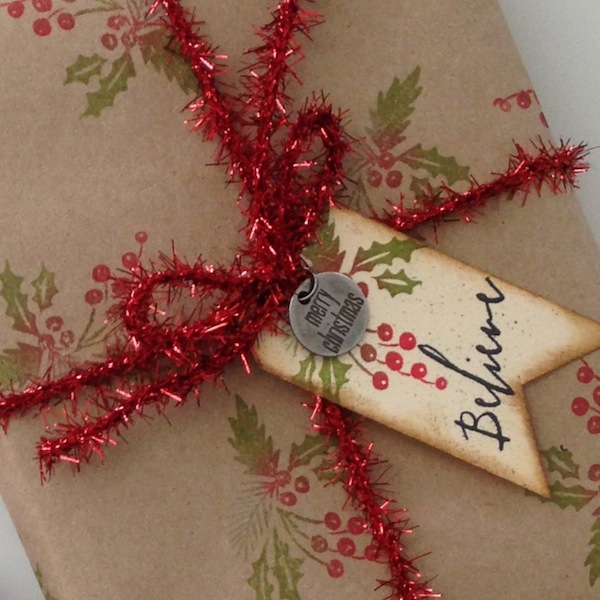
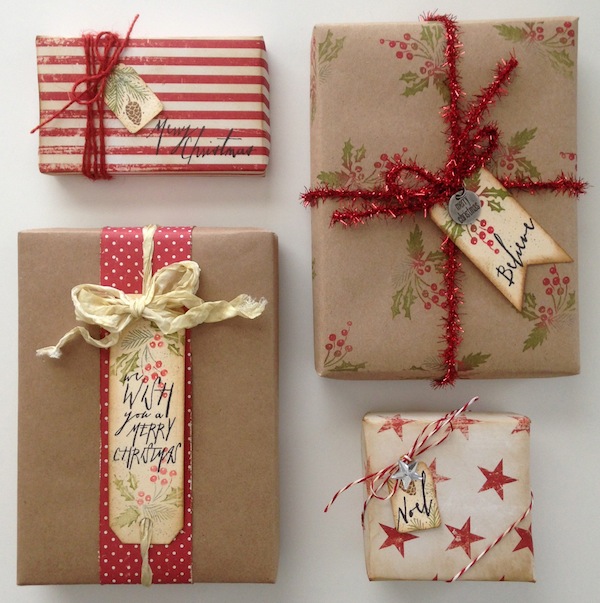
10. Stamp the messages with Jet Black Archival Ink with the Mini Handwritten Holiday set from Stampers Anonymous. Stamp your Holly or Pinecone images using your custom stamp pads.
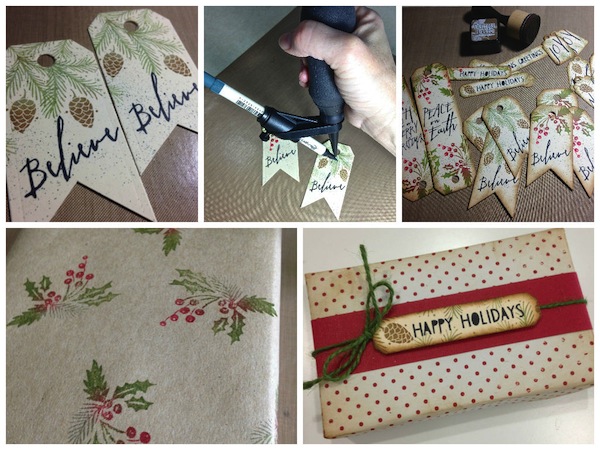
11. Add some background texture with the Distress Spritzer and the Iced Spruce Distress Marker. Load the marker in the Spritzer so the tip of the marker is over the end of the spritzer.
12. Hold the Distress Spritzer straight up and down then squeeze the Spritzer to blow air over the marker and you get this fun texture in the background.
13. Ink the edges of the tags with Gathered Twigs Distress Ink.
14. You can also make your own wrapping paper with your custom stamp pad. Love how the tag matches the wrapping paper.I hope you will try making a custom stamp pad. I can’t tell you how easy it is to make lots of cards or tags in a short period of time! I cant wait to see all the pretty packages under my tree!
Thanks for stopping in today and I hope you and your family have a very Happy Holiday!
Richele
Supplies:
 |
 |
 |
 |
 |
 |
 |
 |
 |
 |
 |
 |
 |
 |
 |
 |
 |
 |
 |
 |
 |
Thanks for reading today, and thanks to Richele for being our lovely guest!
Blog Candy Alert!! Follow our blog via email and comment on this post for a chance to win a special blog candy!

From: NEW Lawn Fawn Valentines are HERE!: Mary Roberson!


The Cut-n-Dry felt is amazing. Thanks for sharing how it works. Love the tags!
wow great inspiration!
SO cute Richele!
I love making presents look pretty! It’s almost like a gift before the gift.
Beautifully wrapped packages. I like the custom stamp pad.
Great tags love it !!!!
I’ve been on a tag making kick lately, so these ideas are very timely!
Beautiful tags! I Love the tag die set too! Just might need this one!
Wow! I am learning so many new things!
How fun! I might not want to open a gift wrapped that beautifully!
Thanks for the ideas and inspiration. ;-)
I haven’t used cut-n-dry felt in used, will have to get my back out and play with it. These tags are just beautiful.
Love those gift Wrapped Tags! Awesome idea and Thanks for sharing!
Wow so pretty!! No one will want to open then!!!
Wonderful tags! Love how the tag can be ‘stretched’ longer and be used in different ways!
WOW – these are FABULOUS – THANK YOU for sharing Richele!!!
These gifts are almost too gorgeous to open! And I love the clever idea for multicolor inking shown here.
Lovely tags!
Such pretty tags and wrapping paper. I love the Tim Holtz stamps she used for this project.
Your tags are beautiful. I really like that pine stamp too. It’s so pretty!!
Beautiful tags, and a beautiful inspiration :)
Great tags and gifte wraps!
These tags and the wrapping are stunning! If I received gifts presented this way, it would be quite a while before I opened them! So incredibly pretty!
~c
Would love to receive such great looking presents.
Lovely. lovely packages and a smart idea.
Beautiful, great ideas! x
Beautifully designed tags. Thanks for the inspiration!!!
fabulous ideas, and so pretty!
Gorgeous wrapping!
thanks for the ideas for tags. I make all of my tags so I’m always in need of inspiration.
so many tag ideas!!! I like those tag framelits.
stamping sue
http://stampingsueinconnecticut.blogspot.com/
Wonderful ideas and tags!
Lovely tags! They are absolutely stunning!! :)
It is so much fun making the packages look pretty. These are wonderful ideas!
What wonderful cards! Too nice to open!
these are amazing!!! thanks for the tips <3
Fabulous gift wrapping ideas!
I am really starting to like kraft paper for background.
Beautiful packages and amazing tags!!! Thanks for the tutorial:)
Cool idea about the custom stamp pad! Thanks for sharing!
Love these! I will try to make similar tags for the presents :)
Now that’s the way to wrap a gift! TFS Richele!
Beautifully wrapped!
These are wonderful!
I really like your wrapping ideas, it makes the work of wrapping look like fun.
Like the look of the tags. Especially like how the paper stamping matched the one tag.
Melissa
“Sunshine HoneyBee”
These tags are so cute! and not difficult to whip up before giving away presents!
I love the packaging with the mathcy tags, it’s fantastic!
These are BEAUTIFUL!!!!!!!!!!!
Fabulous gift tag ideas – and stellar gift wrapping!