Creative Uses: Custom Dimensional Background
Hi readers! Happy Tuesday, and WELCOME to the latest Creative Uses installment by the fabulous Debby Hughes! Be sure to watch the video, and enjoy!
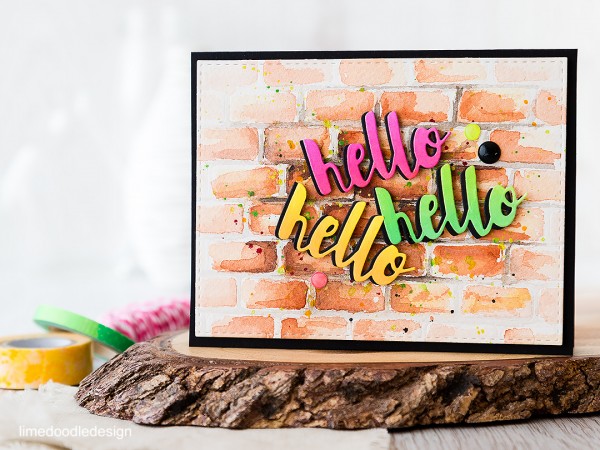
Hello, Debby here today with a video below looking at how you can take one of your smallest dies to create a dimensional background. I used a rounded rectangle die from the Cuddly Critters Accessories set for the graffitied brick wall of this card by running it through my die cutting machine with some Arches cold pressed watercolor card and an embossing mat. The mat enables the die to be pressed in to the thick card without cutting all the way through and instead leaves a brick shaped impression. I ran the die backwards and forwards through the die cutter until I had a whole panel of bricks.
I then used this dimensional pattern as a guide to add watercolors. As I watercolor a lot I have collected a mishmash of my favorite tube watercolors in a palette, however, excellent alternatives would be the Gansai Tambi watercolors or Distress Inks. I cut the watercolored piece with the largest of the Stitched Rectangles to give a finished edge to the panel and splattered it with a combination of mists and paints.
I used the Painted Hello die to create the graffiti words; blending in Hero Arts Neon inks in to white card and then die cutting. I also cut some more of the hellos from black card and used these to back the neon ones so they popped off the brick wall nicely. The finished panel is then mounted on a Black card base.
I think this graffiti style would suit one of the categories I struggle with most – those tricky teens! And the wording can be switched out to fit the occasion with the wonderful array of painted style word dies available. Thanks for joining me today and I will see you next time for another look at how to stretch your supplies :D
Watch the video:
Supplies:
 |
 |
 |
 |
 |
 |
 |
 |
 |
 |
 |
 |
 |
 |
 |
 |
 |
 |
 |

Blog Candy Alert!! Follow our blog via email and comment on this post for a chance to win a special blog candy!


This background is quite awesome! Great job!
FABULOUS! Love watching your process! Wow!
Love the video, Debby. Very clever way of creating the brick dimensional background and awesome water coloring:)
Very nice video with h nice card
Thanks for the video! Very well done. The card looks great and what a wonderful way to create the background. Great job.
What a great idea to extend the use of dies. I love your background.
This is such a cool card. really enjoyed listeneing to your process.
Wow, an amazing tutorial and really love the finished card!!
You guys sure know how to share new tips and tricks! How creative you are! Love seeing all your work, it’s awesome!
The dimensional brick look is well worth the back & forth multiple times with the rounded die. You ccertainly have patience & talent. Makes me think of the wonderful song lyrics “Another brick in the wall.” Have a BEE-utiful day!
Melissa
“Sunshine HoneyBee”
loving this one.
the background tutorial is so appreciated … great card !!
A labour of LOVE that is a DELIGHT to the eye!!!
WOW – FABULOUS card and AWESOME tutorial!!!
THANK YOU SO MUCH for sharing with us Debby, I’m INSPIRED and can’t wait to try making a brick background of my very own :)
This graffiti wall is nothing short of fantastic! Thank you for the marvelous video: love seeing the magic of creativity unfold!
~carol
What a great back ground you created with one simple die. Love the whole look of this card, very current & fun!!! Enjoyed watching your wonderful tutorial!!!
Great card. I love the background. I can’t wait to try it.
Debby, how very clever of you. Great inspiration.
Love the technique and the die used on today’s card!
Awesome!!! :o)
Wonderful creation by the artist. Thanks for sharing.
Amazing card! I love the look & can’t wait to try making one!
Nice video and very interesting technique. Thanks for sharing.
Love all the details provided in the video – thanks, Debby! Love this fabulous card!
Great technique! I cant wait to try it myself. Lovely brick wall, too.
This is great!
Just love this fantastic technique.
I like that brick background. Would look good on a scrapbook page
Super cute and fun card! I enjoyed watching you create and learning from you!
Fabulous card! Love love love! :-)
Thanks Debby for a wonderful tutorial! Great idea with the brick wall!
OMG! I absolutely adore this background! Think of all the possibilities…especially for masculine cards! This would be perfect for grads too!
Very cool!
Love this card! The background is so clever and amazing and I know I can use it with my superhero stamps. :-) Love all of Debby’s designs.
love that brick wall! and the almost graffitilike hellos in neon spray paint colors
That background is AMAZING!! And the neon colors are perfect for the graffiti!!
Fabulous card design, so retro and cool!!!
Love this card. Always needing masculine cards and this graffiti wall card looks awesome. Too bad there wasn’t a 3-D brick wall EF to save time on embossing with the die. Creative and clever.
What a clever way to get the most out of your dies. Once again, “why didn’t I think of that?”. I love what you did. The card is really great. Thanks so much for the great design idea and technique.
Great card and another awesome way to use our dies. Great coloring tips for the bricks.
Wow!! I absolutely love this card!! Your background looks amazing, Debby!!
Great video with some cool ideas–I like the way you explained why you did some things (like what competed with the neon ink colors). Thanks for sharing!
Fabulous tutorial and a lovely finished card! I’m tempted to have a go myself!! Hugs, Lesley
Beautiful work. Love the video. Glad to see SSS including more videos on the blog.
Totally wonderful card, Debby! Love the neons and spatters. The turorial on making the bricks with the die is so helpful! As was the way to make the matching ‘enamel’ dots! Thanks for sharing!
Love the background you created!!!
I love that brick wall and how you created it.
I love this, Debby! Such a cool background! Awesome card! ♥
Wow, the bricks look amazing!
So creative, Debby! Your watercolored bricks are amazing & love the final card!
Wow, what a creative way to use your die! I love the brick background you created!