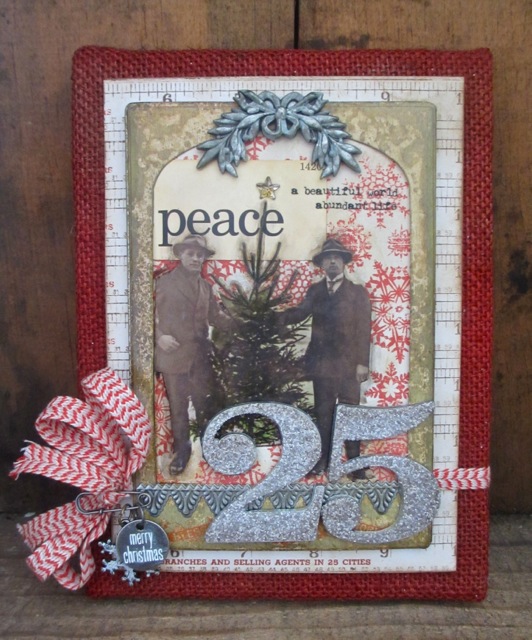
Christmas Burlap Panel + NEW Tim Holtz Distress Inks
Hi readers! Happy Tuesday to you! We’re pleased to welcome back Paula Cheney as a guest on our blog today!

New! Distress Spray Stains!
The same fluid, water reactive formula crafters have come to love in the Distress Stains is now available in a spray format. The bottle features a quality mist sprayer. Use for quick and easy ink coverage on porous surfaces. Spray through stencils, layer colors, spritz with water and watch the colors mix and blend.
Did you hear that 24 NEW Distress Spray Stains were released by Ranger last week? Well they were, so I could not pass up the chance to use them in todays Burlap Panel project! It is amazing how Festive Berries sprayed over the burlap, creates a great background for a Christmas inspired collage (and so easy!). Follow along as I show you how to use Distress Stain Sprays to make your Christmas just a little more special! Shake Spray Stains before use. Always clean nozzle after use to prevent clogging.

1. Spray Burlap Panel with Festive Berries Distress Stain Spray. Dry with Heat It tool.
2. Darken edges with Frayed Burlap Distress Stain Spray. Dry with Heat It Tool.
3. Gather – Cabinet Card, Forest Moss Distress Stain Spray and a few paper towels. Cabinet Cards have a slick surface which can resist Spray Stain. We’re going to use that “resist” to our benefit by spraying and then drying with the Heat it tool to create an cool effect.
4. Lay the Cabinet Card on the paper towel and spray Forest Moss over the top. Don’t worry that it is welling up in the middle.
5. Quickly begin to dry the Cabinet Card with the Heat It Tool for 1 – 2 minutes. It will not be fully dry.
6. Spray the Cabinet Card a second time, and repeat the drying process. Again, it should not be fully dry.
7. Once you have dried it for 2 – 3 minutes, blot off excess Stain with another paper towel.
8. You can see here that you can get different effects depending on how many layers of the Spray Stain. The Cabinet Card
on the left has only one layer (don’t you think the center looks like a marbled book?) And of course the Card on the right has two layers. This is a fun technique to try – no two will be alike, but each has a great finished look! I am saving the card on the left for another day, so this project will continue with the card on the right.
9. Cut a piece of Merriment paper to fit into the Cabinet Card. Ink with Gathered Twigs Distress Ink.
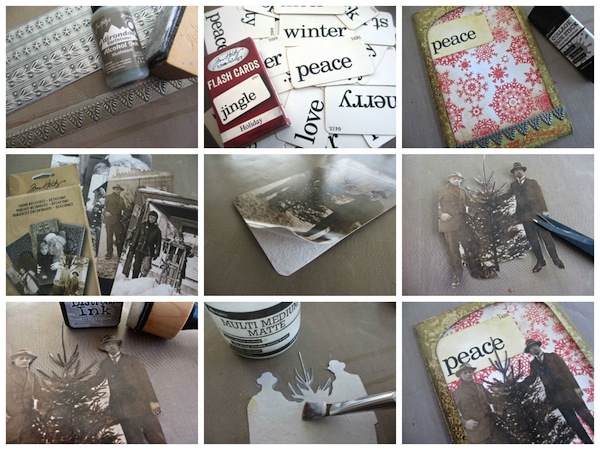
10. Cut a decorative strip from the Industrious Stickers – Borders. Color with Mushroom Alcohol Ink. The Industrious Stickers can be colored with any color of Alcohol Ink you wish!
11. Choose a Holiday Flash Card from the pack.
12. Use a Collage Glue Stick to add the Merriment paper and Flash Card. Add the border strip at the bottom.
13. Choose a Christmas Found Relative from the Occasions pack. There are at least 5 cards representing Christmas in this pack. The rest of the 24 occasion cards represent Valentines Day, Easter, 4th of July, Summer, Halloween and Thanksgiving.
14. I choose one of two men holding a pine tree. A Found Relatives card is sturdy, so I peeled off the backing to make it thinner and easier to cut out and collage.
15. You can see that even though my cuts are pretty close to the image I still get a white “halo” on the cut edge where the core paper is exposed.
16. I have found that the “white core” problem can be easily fixed buy using a Mini Blending Tool and Pumice Stone Distress Ink. It colors the core without changing the color of the image.
17. Add Multi Medium to the back of the image.
18. Add image to the Cabinet Card.
19. Adhere a small Mirrored Star (colored with Mushroom Alcohol Ink) to the top of the tree.
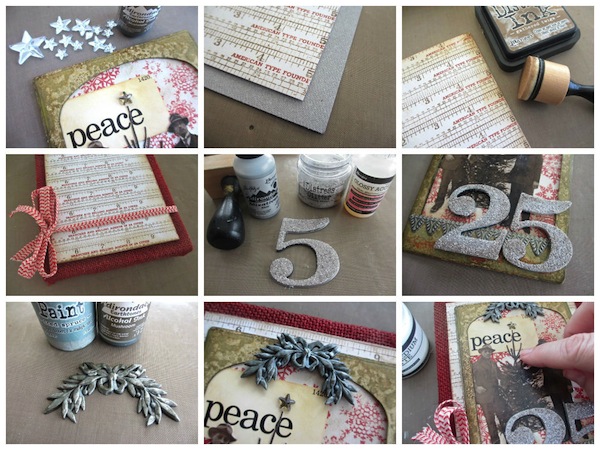
20. Cut a 5 x 7” piece of Grunge Board and Merriment Paper.
21. Use Multi Medium to add paper to the Grunge Board. Ink the edges with Gathered Twigs and Mini Blending Tool.
22. Use Foam Tape to add Grunge Board to Burlap Panel. Wrap read and cream Trimmings around the panel and tie a bow.
23. Use Silver Alcohol Ink to color the Alpha Parts #25. Add a thin layer of Glossy Accents over the top of the number. Add Pumice Stone Distress Glitter over the top. Shake off excess. Set aside to dry. *Remember: Distress Glitter is totally inkable once dry!
24. Secure #25 to Cabinet Card with Muti Medium on the bottom and thin foam tape on the top.
25. Color laurel wreath from the Nature Adornments with Iced Spruce Distress Paint and Mushroom Alcohol Ink.
26. Add to the top of the Cabinet Card with thin foam tape.
27. Use your finger to add a thin layer of Multi medium over the paper and Flash Card. Let it dry. Do not skip this step: This will seal the surface so the Distress Marker ink can be manipulated in step 28.
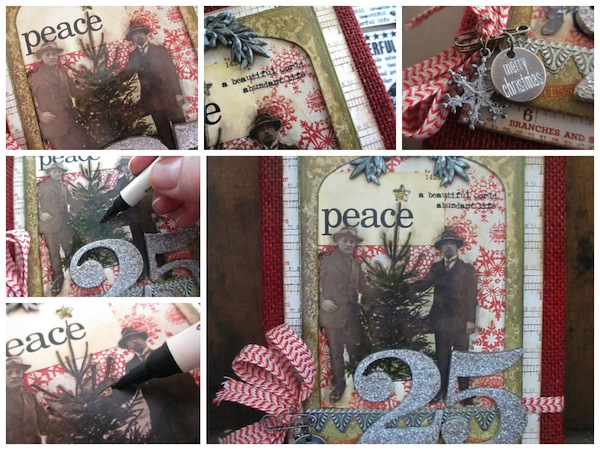
28. Once dry, use a Walnut Stain Distress Marker to outline the image, smudge with finger tip or a small piece of paper towel.
29. Color the Tree with Mowed Lawn, rub away most of the color with a paper towel leaving just a hint of color over the tree.
30. The finished result creates a great vintage look to the Found Relative image.
31. Add Remnant Rubs over Flash Card for additional detail.
32. Add Picket Fence Distress Paint to a Tidings Token and Snowflake. Once dry, add to jump rings and then onto a Wire Pin. Add Wire Pin to Crinkle Ribbon Bow.
Well I hope you like today’s Christmas Panel enough to try one yourself. Change the colors to suit your taste…because there are now 48 Distress Spray Stains to choose from!
SUPPLIES:
 |
 |
 |
 |
 |
 |
 |
 |
 |
 |
 |
 |
 |
 |
 |
 |
 |
 |
 |
 |
 |
 |
 |
 |
 |
 |
 |
Blog Candy Alert!! Follow our blog via email and comment on this post for a chance to win a special blog candy!


Great tutorial! Oh that spray stain does wonders on the burlap panel and cabinet card. Thanks for the inspiration.
I am now coming down with a definite case of inspiration overload. I am never going to be able to keep up with my wish list at this rate!!! Oh well at least I’ll never be bored I have to many things to do!!! Thanks for sharing!!!
I can’t get enough of sprays, that looks like a really fun project!
Have to get some of that distress spray stain!! Great project!
Paula always does such exceptional projects…this is beautiful!
So excited about the new Distress Sprays. Great project Paula =0)
Wow!!! A great job!!!
So many interesting techniques and embellishments! Love the vintage look and feel.
Love this project and the step by step instructions!
Such a beautiful card! Can’t wait to try the new distress sprays.
I haven’t tried the new Distress Spray Stains but looking forward to it. Love this Paula
Love Paula’s tutorials! And I love the new sprays.
Wow that is one AWESOME CHRISTMAS CARD! Love the techniques thanks for sharing I can’t wait to try these products!
Just beautiful and a perfect holiday gift for that someone special. Thanks for sharing your great tips and ideas.
AWESOME!!
Another great tutorial by Paula!