Botanical Notes Altered Notebook Encore by Emma Williams
Hi friends! Happy Sunday! It’s always such a treat to have special guest Emma Williams on our blog! Please read on to learn details of this gorgeous project in case you missed it!
Happy Sunday everyone, it’s Emma here and I’m really happy to be back on the Simon Says Stamp blog to share my latest project with you all ~ an altered, vintage style notebook, created using some wonderful products from Tim Holtz, Sizzix and Ranger.
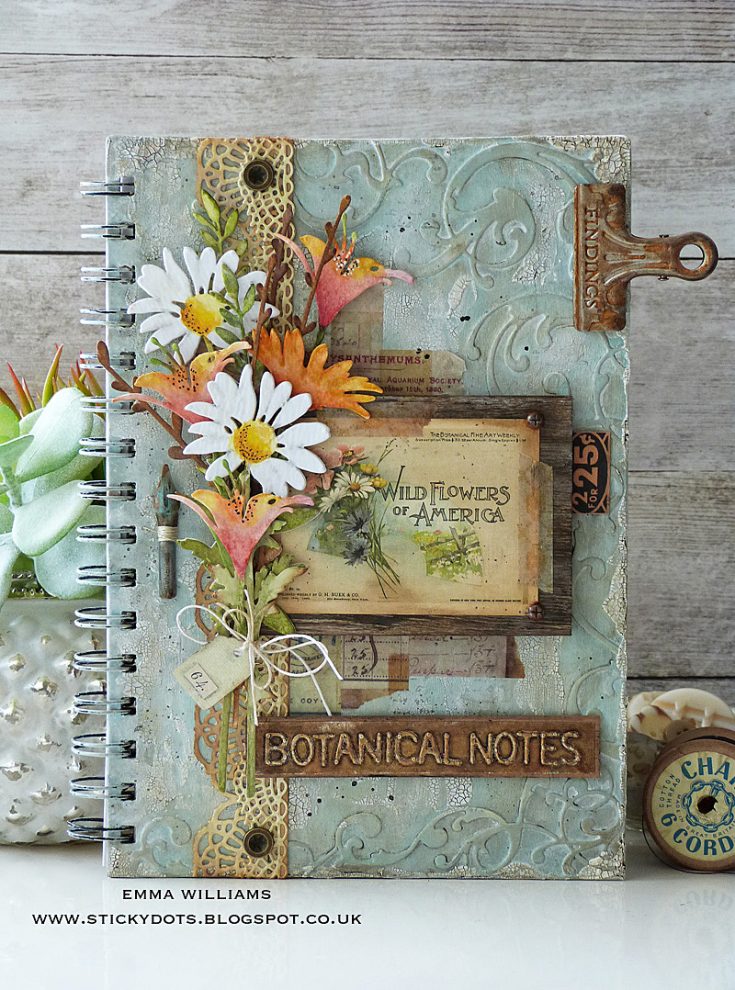
I must admit I’m a bit of a stationery addict ~ ever since I was a child, I’ve loved notebooks, pens, and all things paper and over the years I’ve collected so many pieces but the one thing I love most is taking a plain notebook and decorating it myself, creating something really special and unique. So, with this in mind and combining it with another love of mine, the garden ~ I bought a plain kraft notebook from my local £1 shop and transformed it into a vintage-style botanical notebook, perfect for my garden notes and sketches.
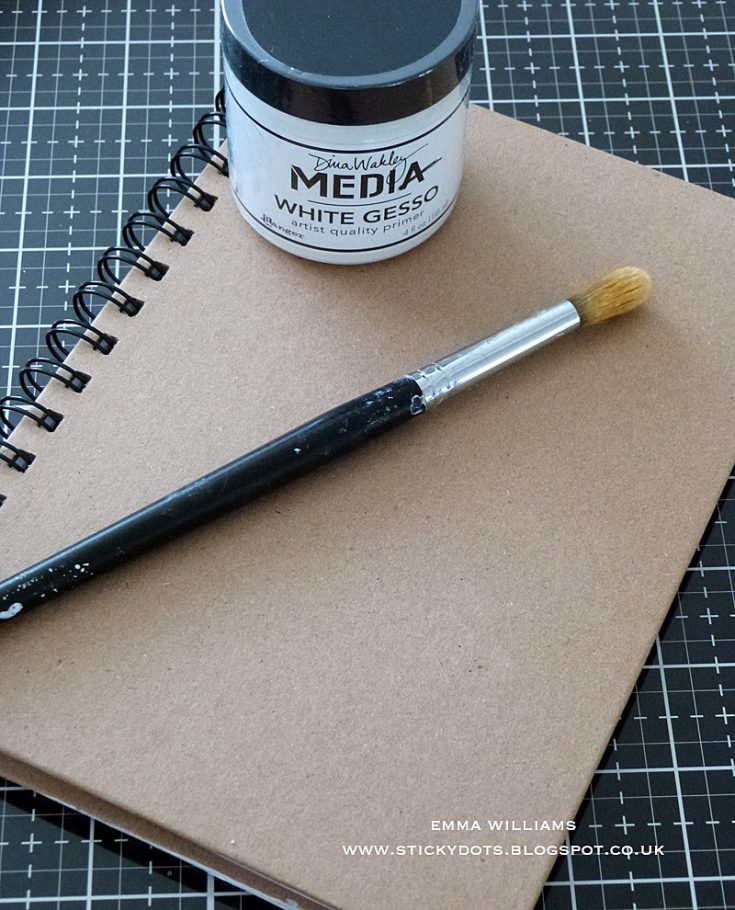
So, let’s get started and to begin with I primed the cover of my notebook with a coat of gesso and allowed it to dry.
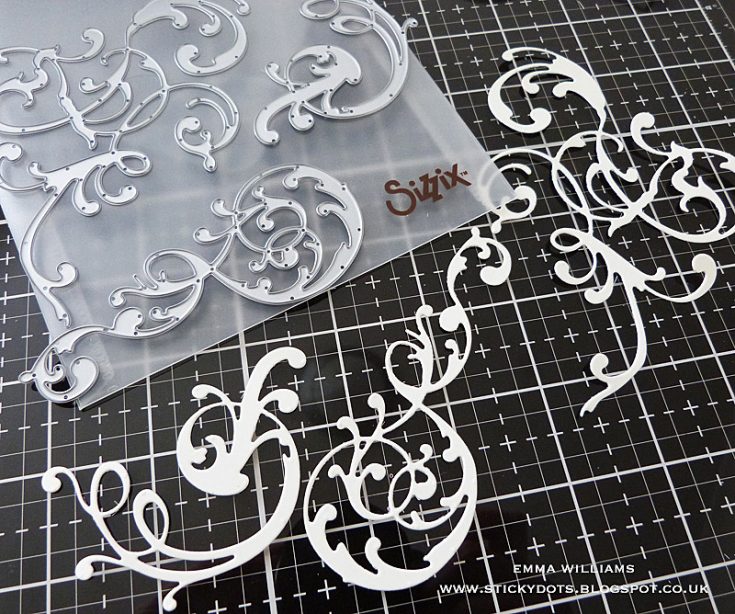
I wanted to add some texture to the cover and for this, I used die cuts that will create the look of embossing and I used the Adorned die to die cut some Tim Holtz Mixed Media Heavystock Card, cutting a selection of the swirls.
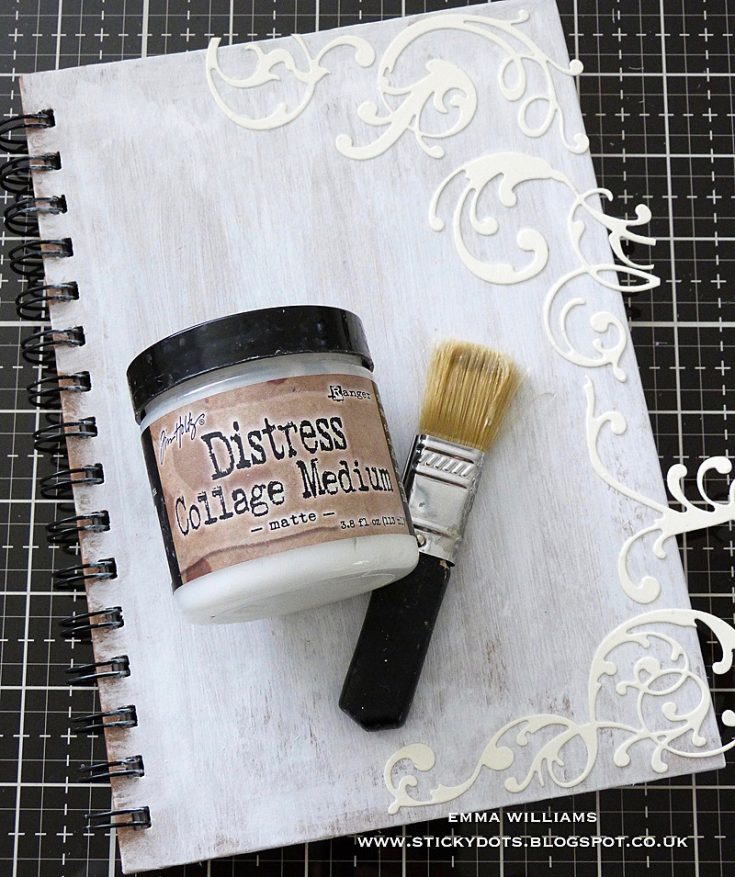
I arranged and adhered the Adorned die-cut pieces onto the front of the gessoed cover using Matte Collage Medium and a Collage Brush and once again allowed the medium to dry. Snip away any excess pieces that hang over the edges.
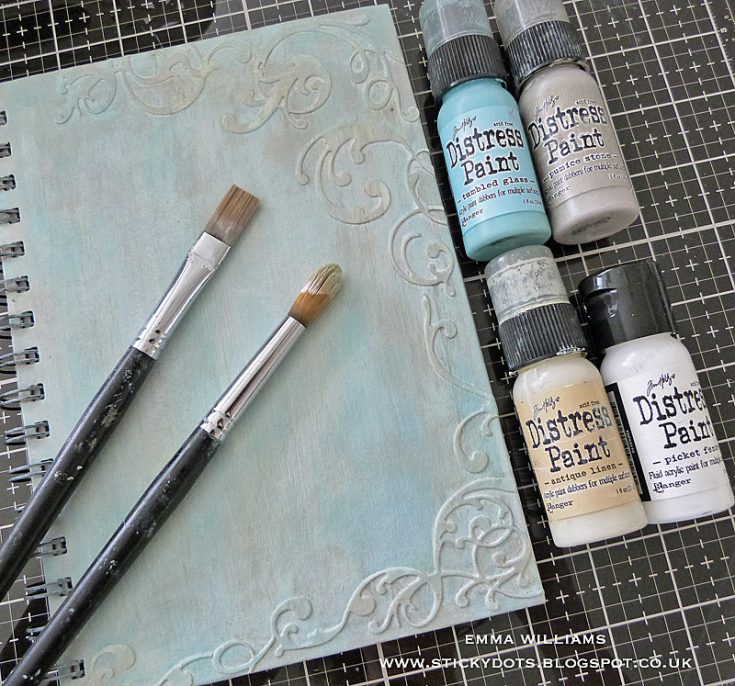
To add color to the cover, I used a combination of Distress Paints, layering each color over the top of the previous layer. To begin with, I covered the entire notebook cover with a coat of Tumbled Glass and heat dried this layer. I then took a dry paintbrush and dipped the brush into a small amount of Antique Linen Distress Paint before removing the majority of the paint on a cloth, leaving a tiny amount on the brush. I then dry brushed the paint over the surface of the blue cover, just allowing the brush to kiss the surface. Heat dry and then repeat with the remaining two colors, Pumice Stone, followed by a final layer of Picket Fence. If you feel you want to add more of any color, just repeat the process of dry brushing but remember to always dry each layer in between applications as you don’t want to end up with a muddy mess.
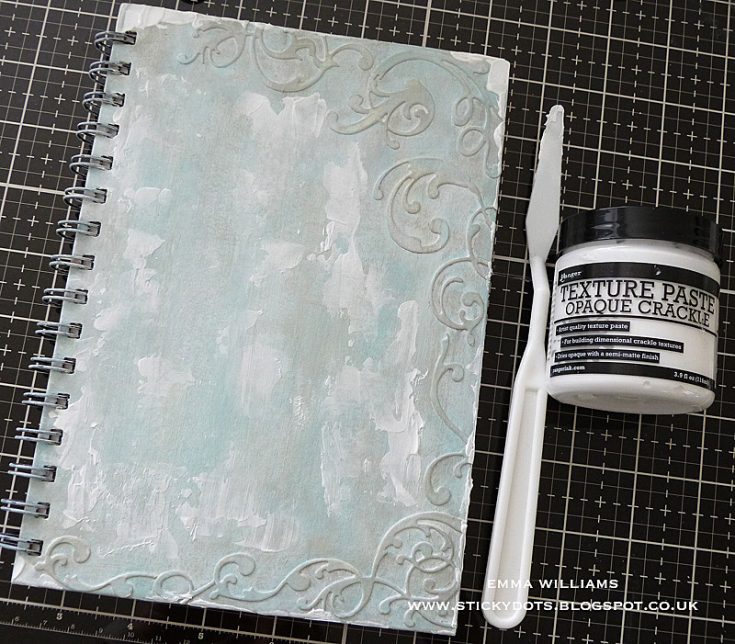
Once I was happy with my cover, I then added some more texture using a palette knife to apply Ranger Ink Texture Crackle Paste. You can apply as much, or as little paste as you want, you are completely in control of how much crackle you would like on your cover.
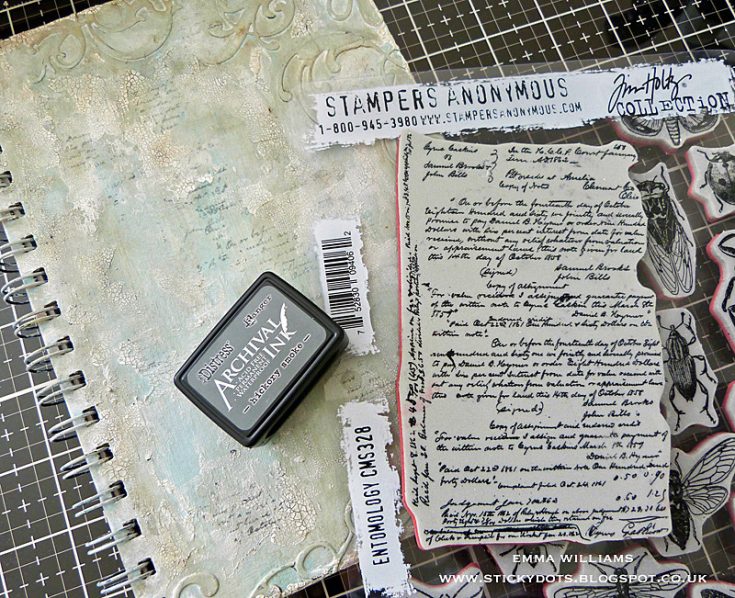
Allow the paste to dry and the crackles to appear before adding a final layer of stamping in Hickory Smoke Archival Ink, stamping the text over random areas of the cover. I usually use a text stamp for this process and I personally love the stamp in the Tim Holtz Entomology set but you can use any text stamp you have to hand.
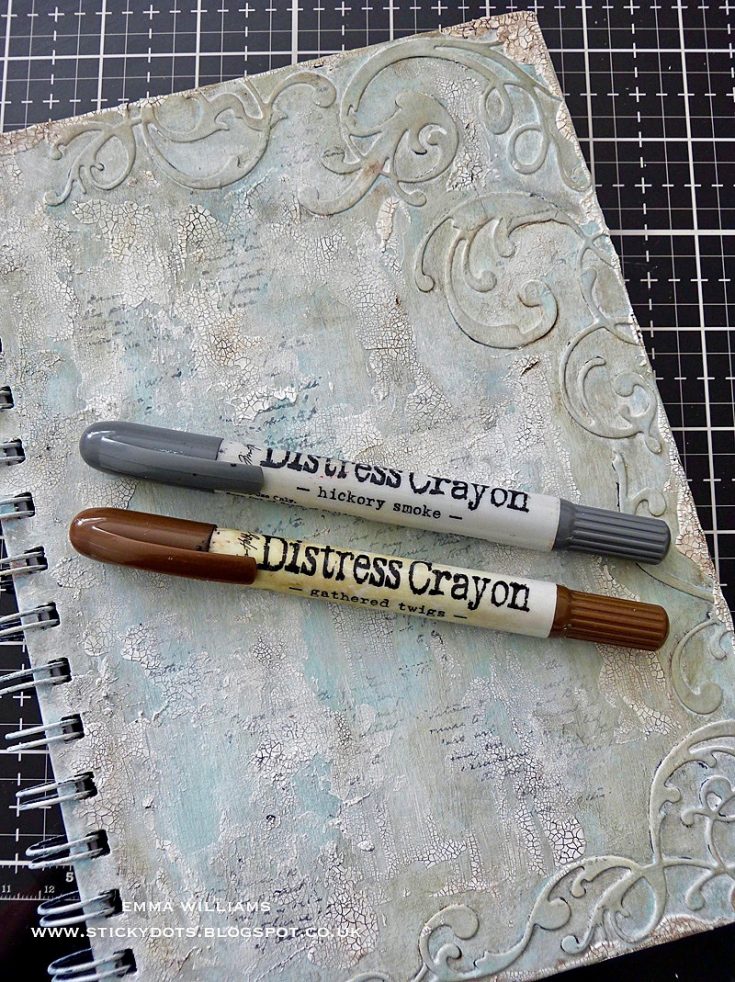
Using Hickory Smoke and Gathered TwigsDistress Crayons, I scribbled the individual colors onto my glass mat before picking up each color with a water brush and applying them directly onto the crackles, Hickory Smoke, to begin with, followed by the Gathered Twigs and just allowing the color to sink in and accentuate the crackles. Remove any excess water or color with a cloth.
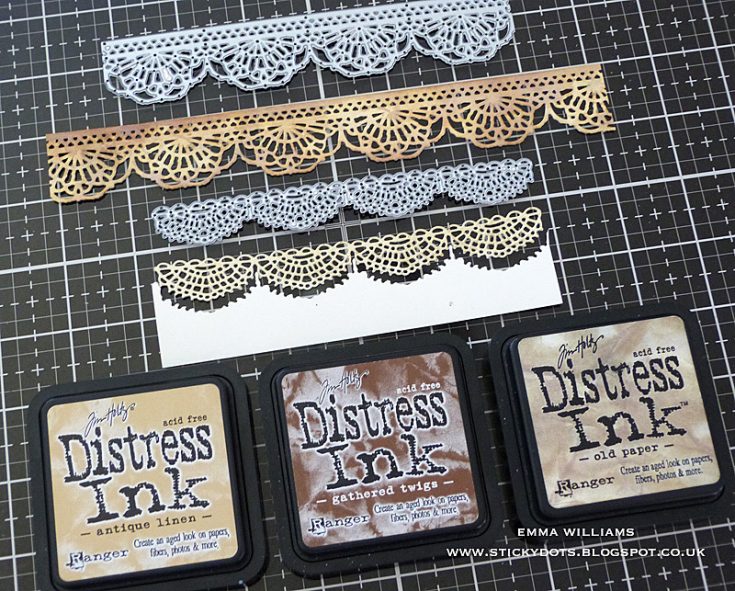
I now have my basic cover ready to decorate and bring to life and the first part of the decorating process is the crochet border that runs down the side of the book cover. For this I used the Crochet Thinlits die to die cut Mixed Media Heavystock card. This die is perfect to create borders as you can extend the length by die cutting your first section and then removing the die, lining it up with the previous cut and then passing it through the die-cutting machine to create one longer length of crochet lace. Ink the die-cut crochet lace with Antique Linen and Old Paper Distress Inks before adding a light inking of Gathered Twigs to the edges.
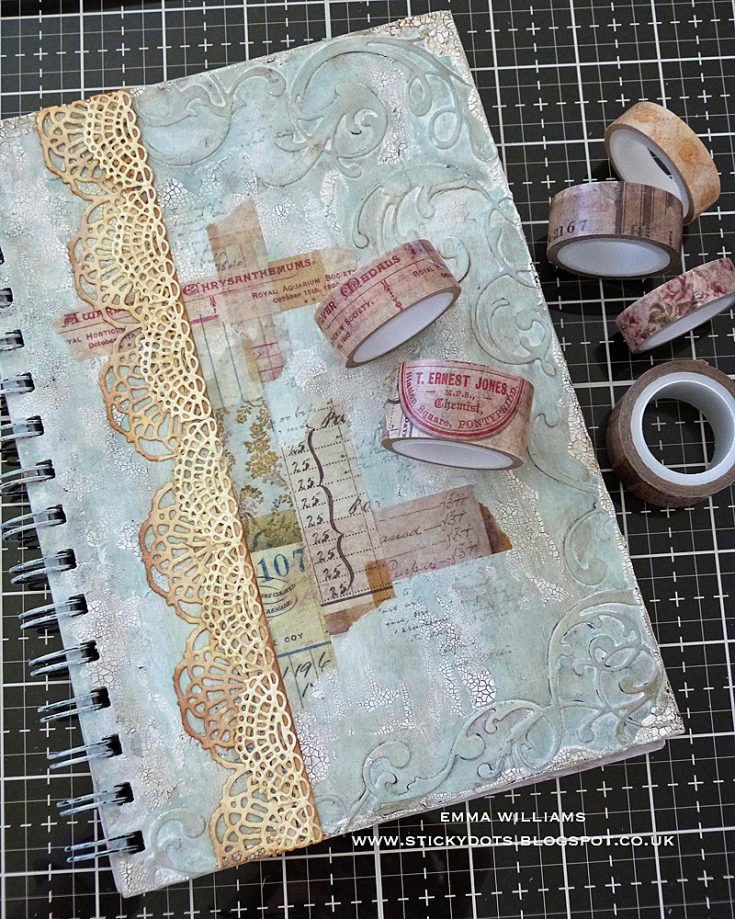
Attach the lace down the side of the cover, together with randomly torn strips of Remnants DesignTape. It might not look pretty at the moment, but don’t panic!
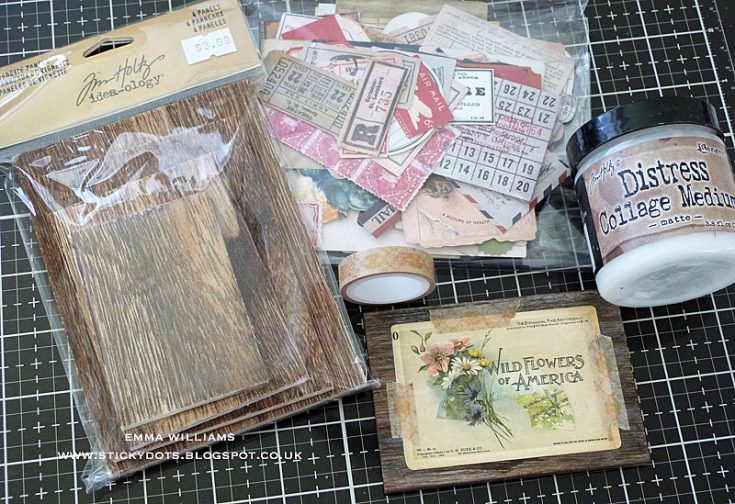
To create the panel that sits on the front, I used the smallest Vignette Panel from the set and using Matte Collage Medium, I adhered the Wild Flowers of America ephemera piece from the Keepsakes Ephemera pack directly onto the wooden panel. I then took torn pieces of Remnants Design Tape and applied these around the edges of the ephemera piece.
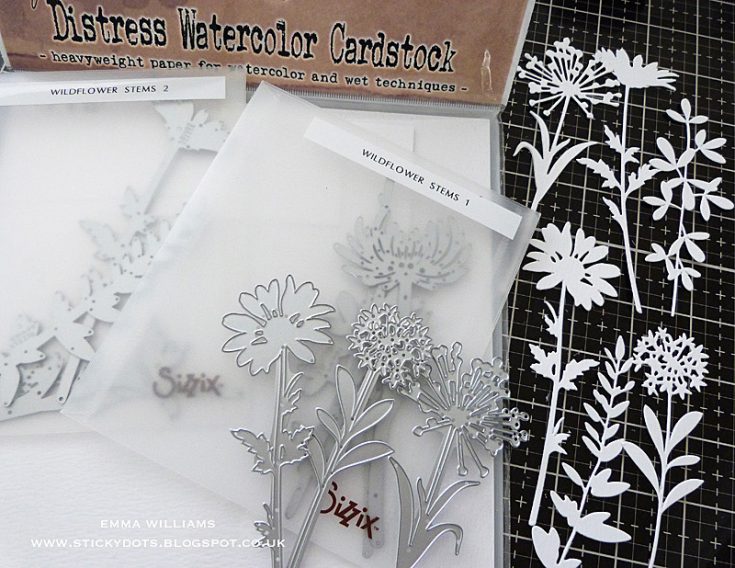
Setting the wooden panel to one side, I moved onto creating that beautiful bunch of WildflowersStems. I used stems from both of the Tim Holtz Wildflower Stems 1 and 2 die sets to die cut a selection of flowers from Distress Watercolour Card, but it’s entirely up to you which ones you choose, this is your book ~ choose the flowers you love the most.
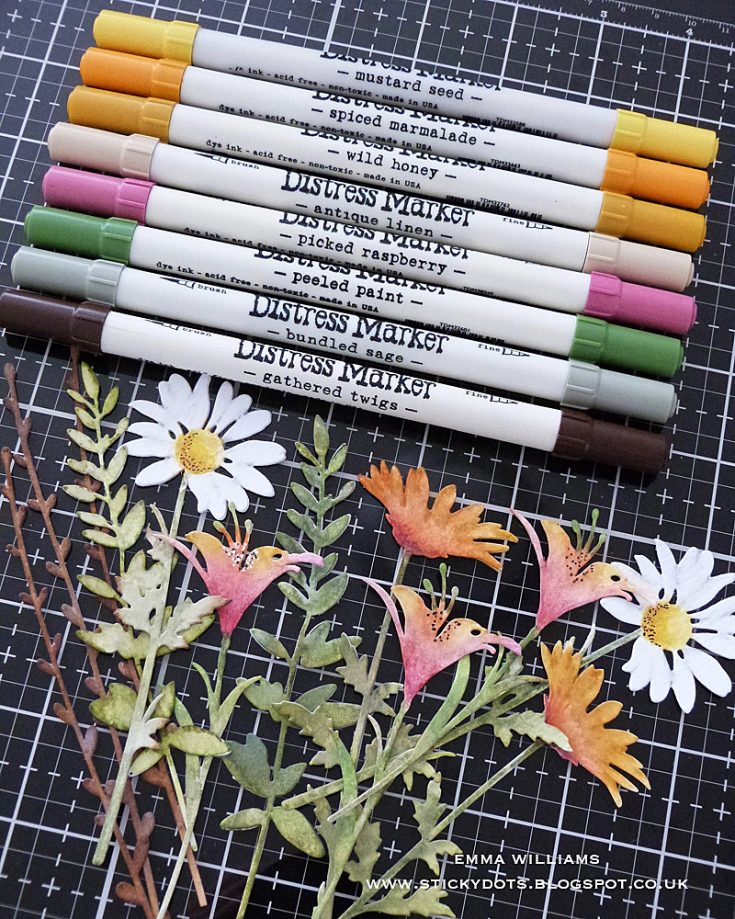
To color the flowers I used Distress Marker Pens, (colors are shown in the photo above) and a water brush, applying the colors to each individual stem. Once again, the colors are your choice, you don’t have to use the same colors as I used if you don’t want to.
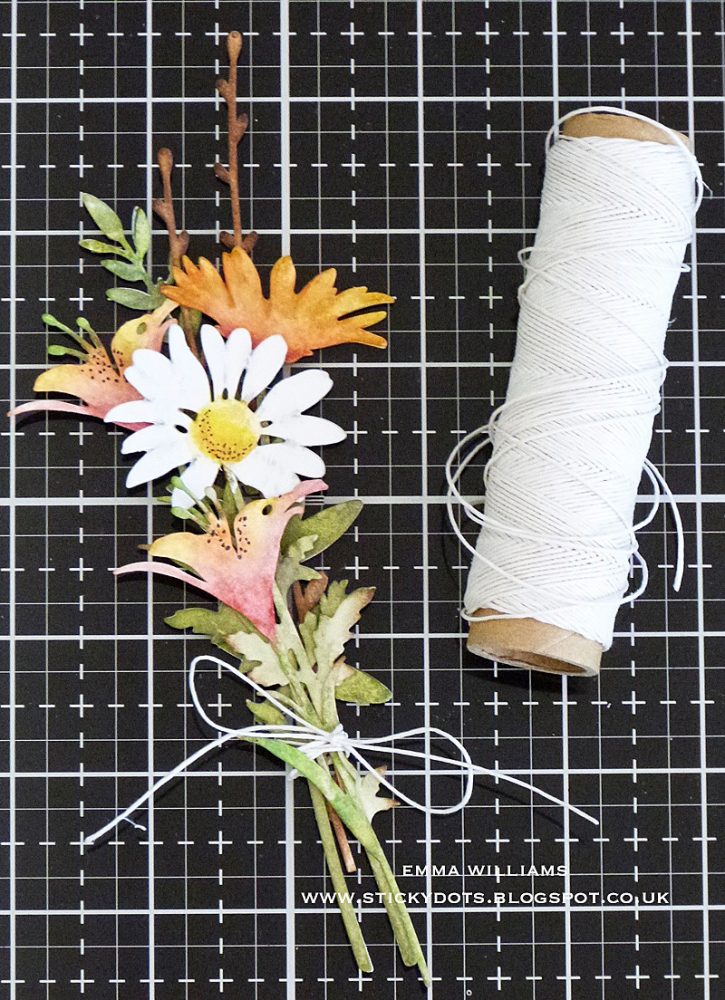
Arrange the flowers into a bouquet ~ I used a small dot of Matte Collage Medium behind each flower to attach them securely into place before tying them together with some twine.
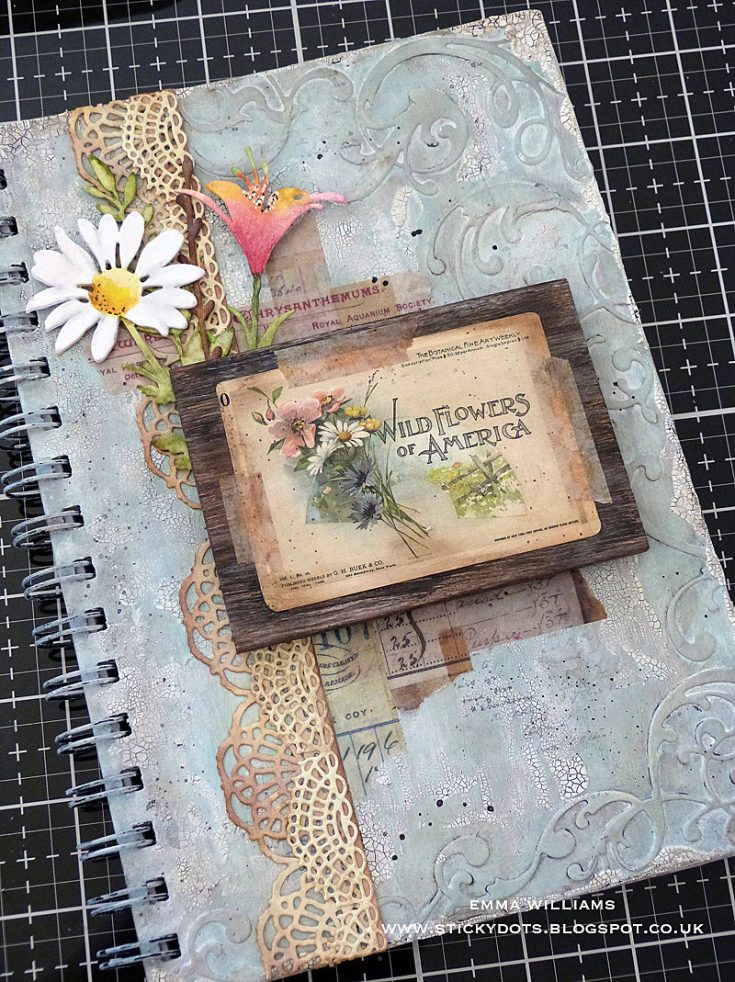
Using Matte Collage Medium, attach your wooden panel to the front of the notebook, placing some leftover wildflower stems that weren’t used in the bouquet, behind the panel.

Attach the wildflowers bouquet down the left-hand side of the notebook. I also added a small tag to the bouquet.
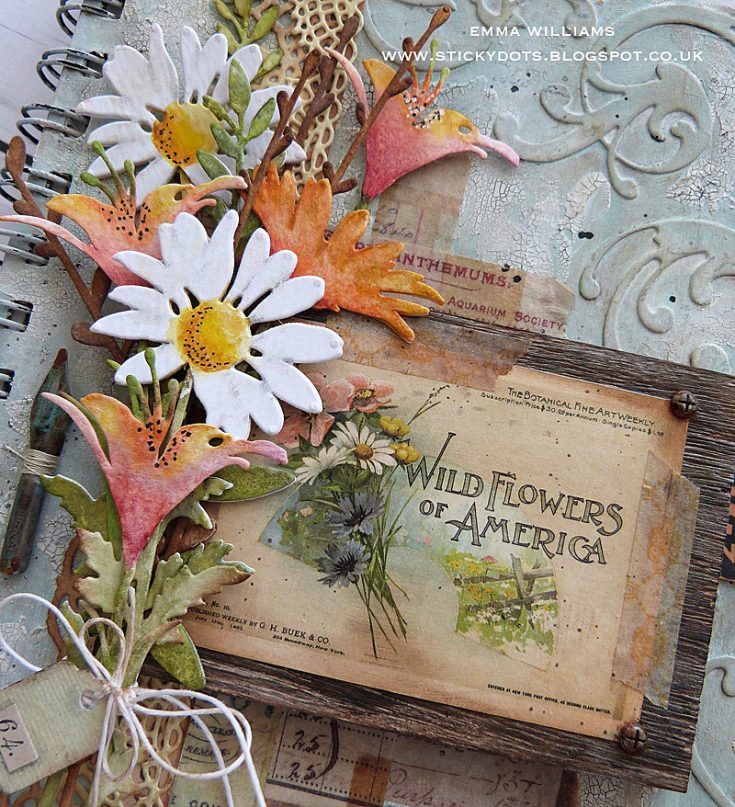
At this stage, I also added a Pen Nib to my arrangement, altering it with a little Evergreen Bough and Antiqued Bronze Distress Paint to create that vintage patina effect and then attached it to the cover with Matte Collage Medium.
I attached a couple of Hardware Heads to the top and bottom right-hand corners of the Ephemera piece, again altered with Evergreen Bough and Antiqued Bronze paint to create a rusty effect.
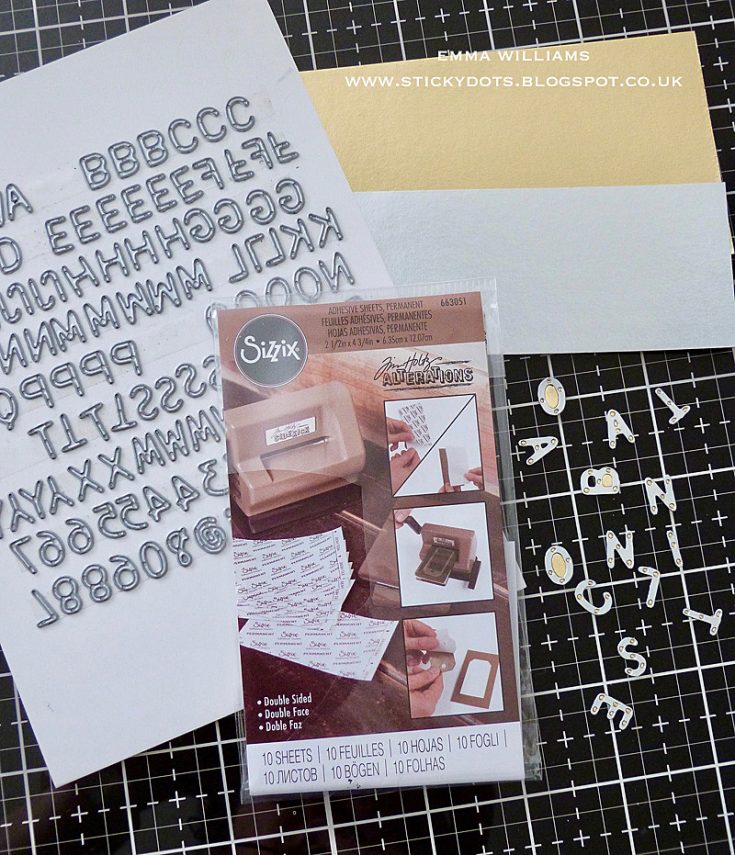
We’re nearly there and all that’s left is the Botanical Notes metal effect plaque. For this, I cut a panel of gold metallic kraft stash, 10 x 2cm. I then cut my lettering from silver metallic kraft stash using the Alphanumeric die to spell out the wording, Botanical Notes which I attached to my panel. When using these letters, I would recommend adding Adhesive Sheets to the back of your card as this will be your best friend when attaching the letters to your panel.
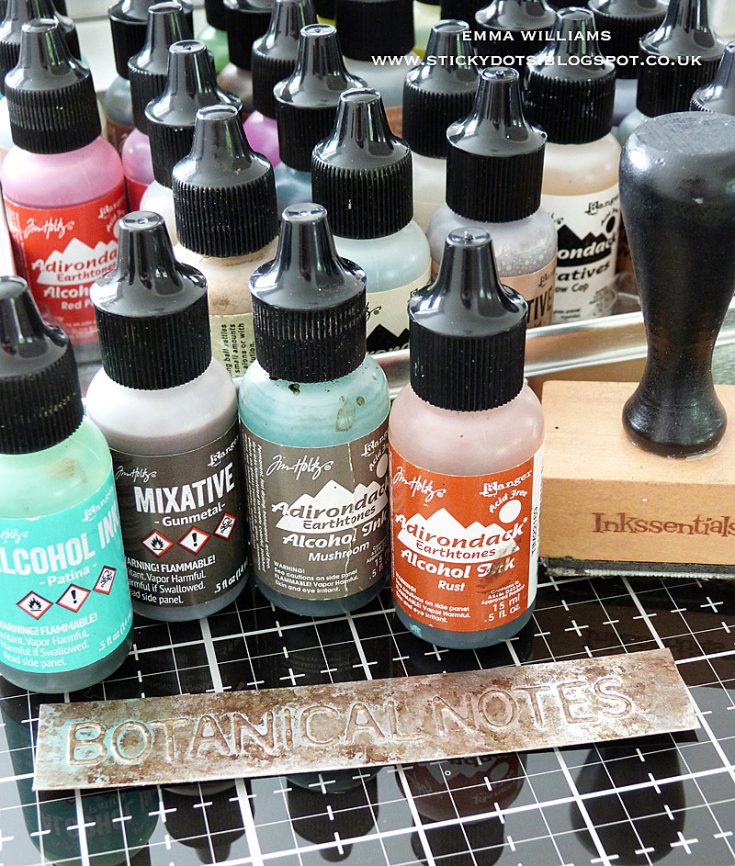
Using the Alcohol Ink applicator tool, ink the panel with a combination of Patina, Gunmetal, Rust and Mushroom Alcohol Inks to create an aged look to the metal.
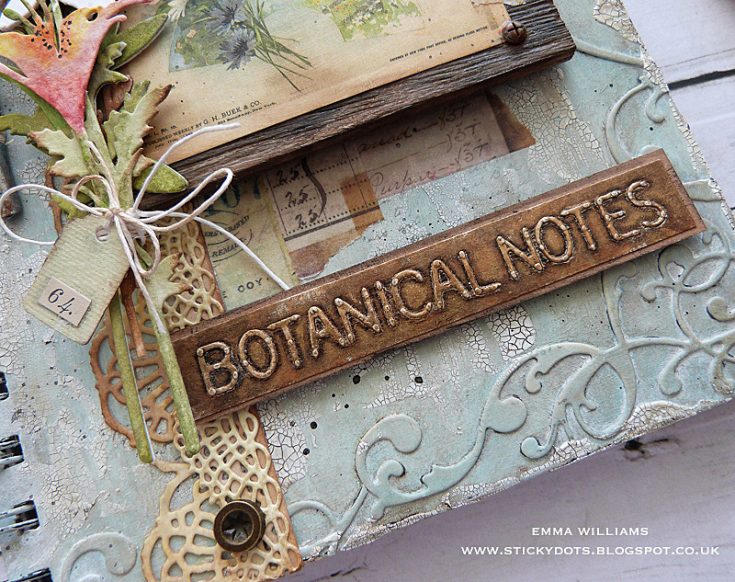
Attach the finished plaque to your notebook cover. I also added some Hardware Accents to the top and bottom of the crochet border strip
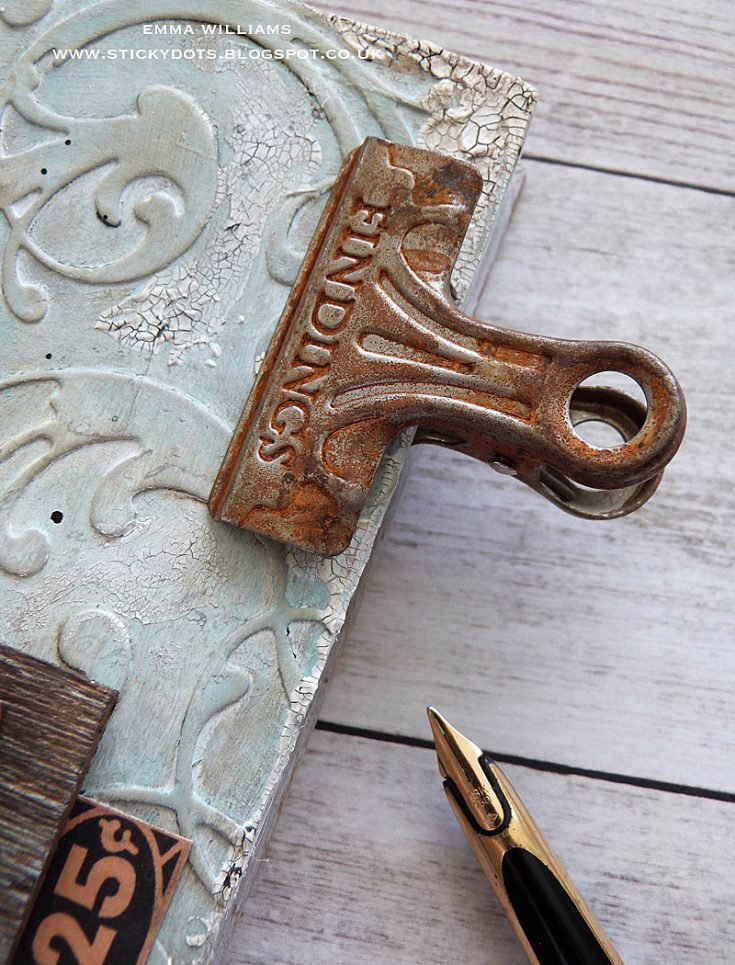
Finally, I added a Rusty Clip, clipped onto the corner….
…and that is how I created this vintage style notebook, which is ready to use!
Thank you so much for stopping by today ~ it’s been fun taking you through the creative process of this piece and I hope I’ve given you some tricks and techniques that will inspire you with some ideas of your own.
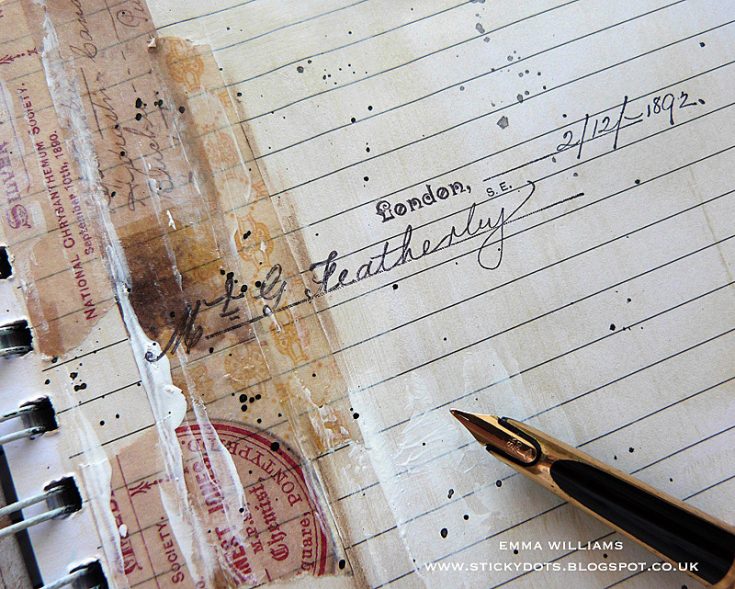
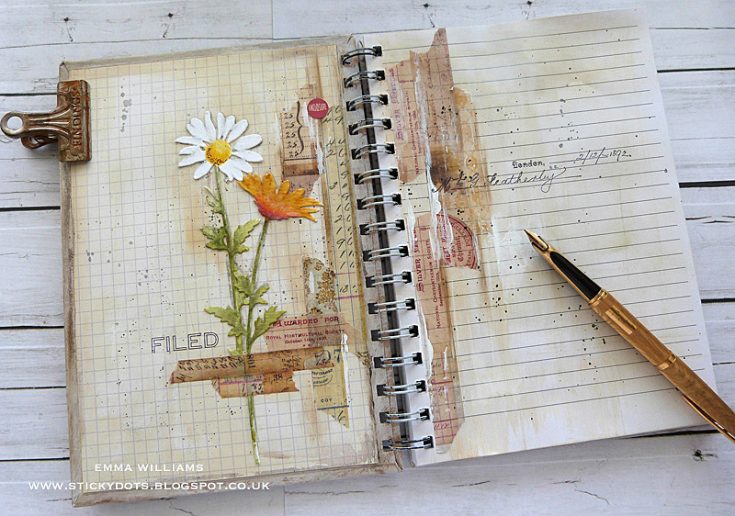
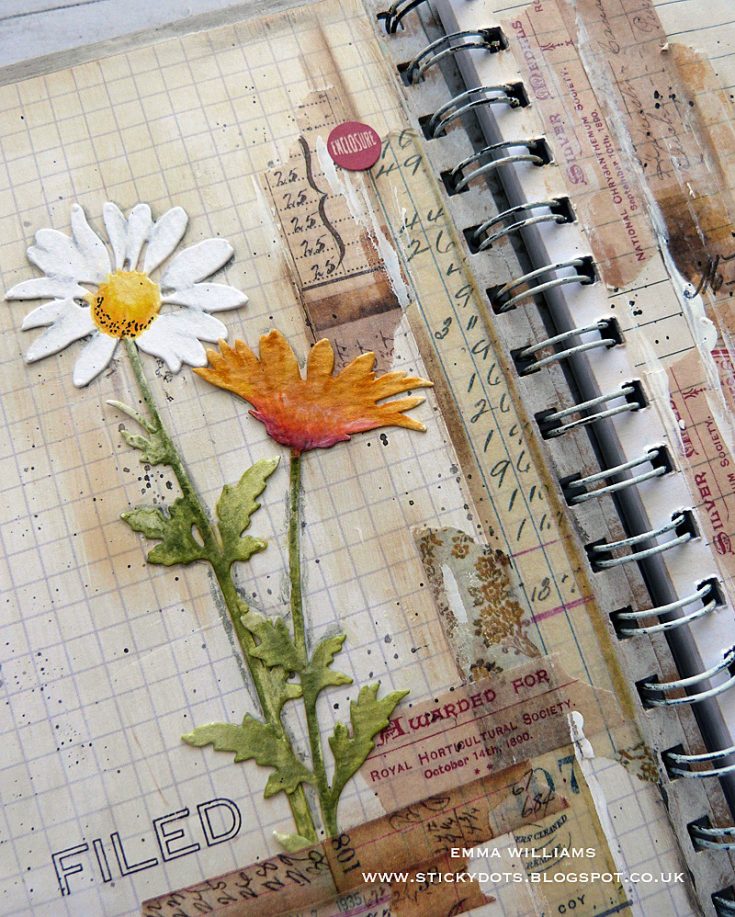
And before I say goodbye, I also wanted to show you how you can add decoration inside the book too…using some of the leftover Wildflower Stems, torn Design Tape strips, a little bit of paint and a few stamps from my collection.
See you again soon…
Emma x
SUPPLIES:
|


Thanks so much for stopping by and thanks to Emma for being our guest!


This is such a stunning project. Wow, wow, wow
Stunning!
A stunning work of art! Thanks for sharing the process.
Absolutely gorgeous project!!
This is such a gorgeous altered notebook. I love it!
I love, love, love this notebook you made Emma from the first time I saw it on this blog (2019).
Always great to see this kind of projects again.
Thank you so much for sharing it again, stay safe and have a wonderful day,
Wow!!!! Emma this is Amazing!!!! Absolutely GORGEOUS!!!
Absolutely Beautiful!
I absolutely LOVE this Stunning Notebook. I really appreciate your step-by-step tutorial. This will be my first attempt at a multi media project but I am going to give it a try and create a beautiful (hopefully!) notebook for myself!
Happy Sunday indeed ! Always love Emma’s work so much inspiring details and techniques. Definitely makes you want to grab your stash and play !! Those Tim Holtz wildflowers have become one of my favorite dies ( I love everything Tim… what can I say ) !
WOW … this is absolutely stunning! Love it!
This is a work of art … just gorgeous
So, so beautiful!! Gorgeous textures, colors, and composition! Very inspiring and artistic! Thanks for sharing your process!
Beautiful notebook! I love it!
Beautiful piece!! Love this project Emma, always love your work!!! Love the flowers and your colouring of them!
so beautiful!!
Absolutely beautiful!!
AMAZING tutorial! So rich of tips and details. Thank you Emma!