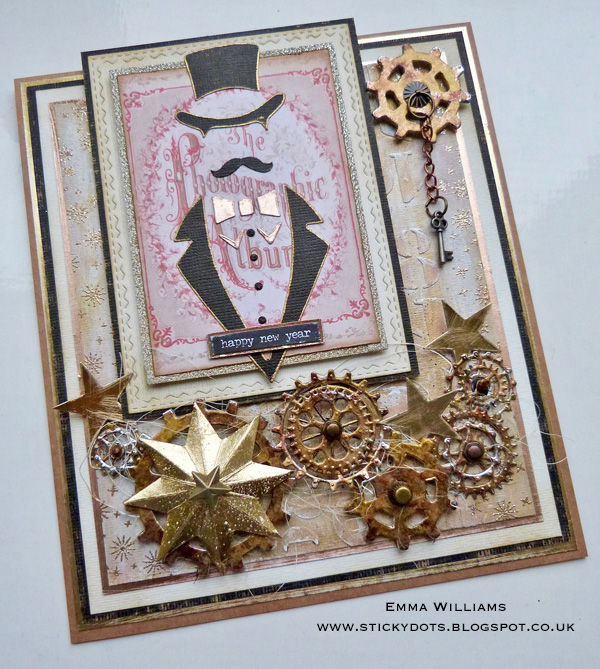
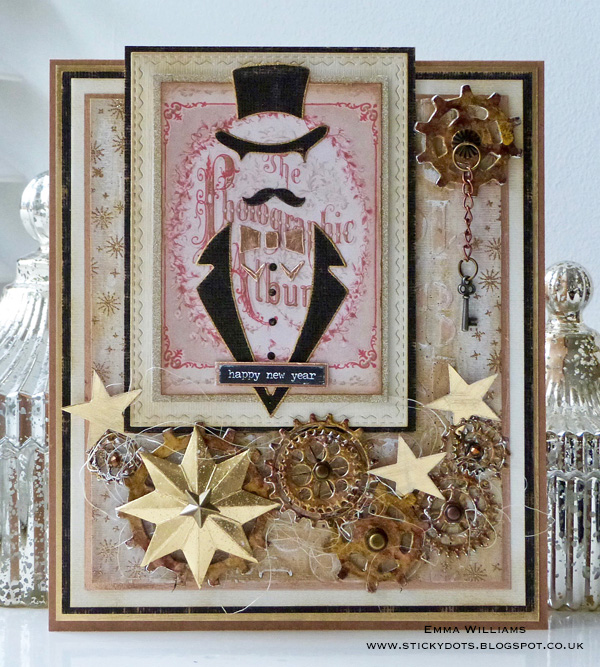
A Dapper New Year
Hi friends! Happy Thursday! Thanks for stopping by today! Please join me in welcoming the super talented (and design team member on our Monday Challenge), Emma Williams! Check out this cool layered piece inspired for the New Year. I hope you take note of a couple of her techniques and give them a try! Check out some cool detail shots with full text instruction. Enjoy!
Hello everyone, it’s Emma here!
I hope you’re all having a wonderful festive season and looking forward to 2017! Today, I’m thrilled to have been invited back to the Simon Says Stamp Blog to share a New Year card that I created using Tim Holtz dies. The card is packed full of ideas and techniques and it doesn’t only have to be used for new year ~ by adding a different message, it would also make a really special card for those men in our lives…

1. I started by creating my background and cut a piece of Mixed Media card to measure 14 x 16.5cm and applied a coat of Picket Fence Distress Paint over the surface. The reason I do this is so that I have a white surface to work on, ensuring the colours are true when I apply them. I’ll also be using Distress Crayons and found that by adding this layer of paint, it creates a surface that I can easily blend my crayons onto. If you don’t have Distress Paint, you can always use gesso.
2. Heat dry the painted surface and then start to apply the Distress Crayons, Victorian Velvet from Set 6, Vintage Photo and a touch of Pumice Stone, scribbling small amounts of colour onto the card and then applying more colour to build up the intensity, each time blending them with a semi dry baby wipe using light, downward strokes. Once I was happy with the background, I then wanted to add some texture and for this, I used a palette knife to apply Ranger Ink Texture Paste through the Numeric Layering Stencil, which was placed on the right hand side of the crayon coloured cardstock. Remove the stencil carefully and leave the paste to dry thoroughly. Once dry, I used the same colours of Distress Crayons to add colour over the top of the stenciled numbers.
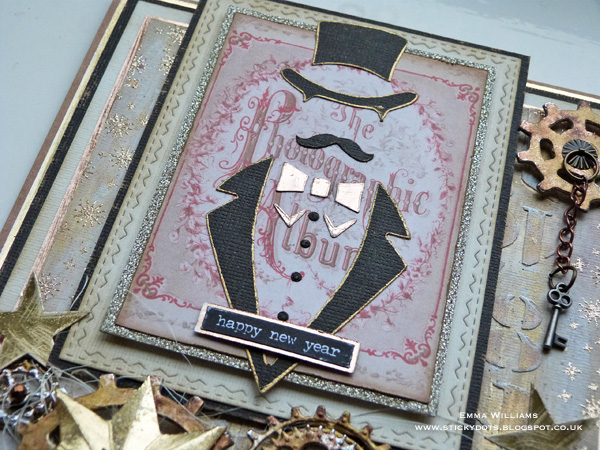
3. Use a Versamark Watermark Ink Pad to ink up the Sparkles stamp by Tim Holtz and stamp the pattern on both the left and right hand edges of the background. Sprinkle with Gold Tinsel Em-bossing Powder, tap away the excess and heat emboss until molten. Ink around the edges of the background card with Frayed Burlap Distress Ink and matt and layer onto a piece of copper foil metallic card stock.
4. For added opulence and luxury, I then mounted these background layers of card onto a piece of white textured card, measuring 15.5 x 18 cm in size and inked around the edges with Frayed Burlap Distress Ink, followed by a layer of Black Soot Kraft Core cardstock and a final layer of gold foil card. Mount the matted layers onto a kraft card base, 17 x 19.5cm with the fold at the top.
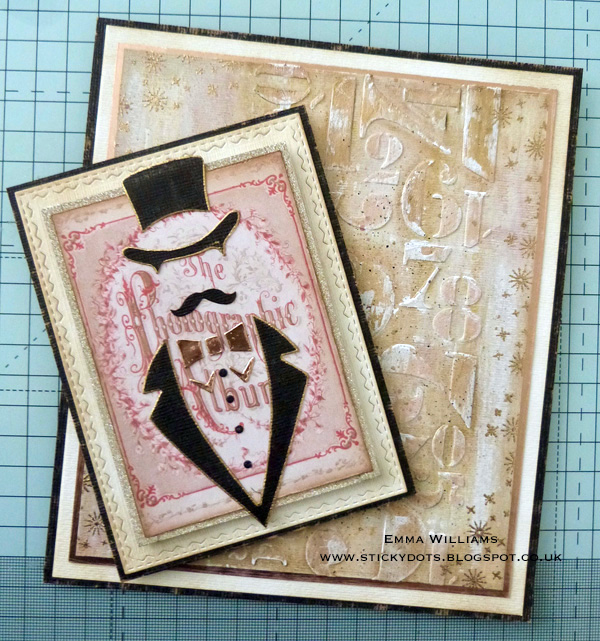
5. Now for the fun part of creating all those wonderful embellishments and to start with, I used the Dapper die to create my “gentleman”. Die cut the individual pieces from Black Soot Kraft Core card and then, die cut the bow tie and shirt collar pieces from Gold Metallic Kraft Core Card or any similar gold foil card which you might already own. (Tip: When using metallic card, I always lightly scratch the surface of the card with fine sandpaper to create a more vintage, worn feel). Run a gold pen around the edge of each of the black die cut sections to create an outline.
6. Using an Ephemera piece from the Thrift Shop pack, ink around the edges with Frayed Burlap Ink and attach the die cut Dapper pieces with Collage Medium, attaching them directly onto the Ephemera piece recreating the Dapper image.
7. Cover a piece of cardstock with a Gold Deco Sheet and cut a panel of the covered card slightly larger in size than the ephemera piece. Mount the ephemera piece onto the deco sheet.
8. Using the largest die from the Stitched Rectangles set, die cut a piece of Mixed Media card. Ink the edges with Frayed Burlap and matt onto Black Soot Kraft Core card.
9. Using adhesive foam, matt the layered Ephemera piece onto the centre of the stitched rectan-gle and then attach the entire section onto your card, using foam pads and placing it to slightly overlap the top folded edge of the card base.
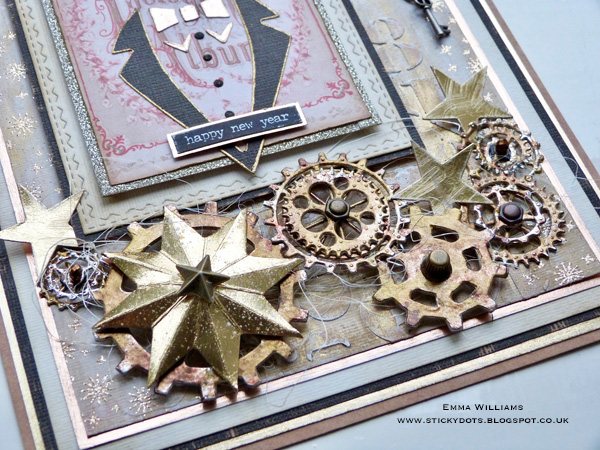
10. Attach a Happy New Year Small Talk Sticker onto a piece of gold card, leaving a border around the outside of the sticker and mount the sticker across the bottom of the Dapper Gentleman.
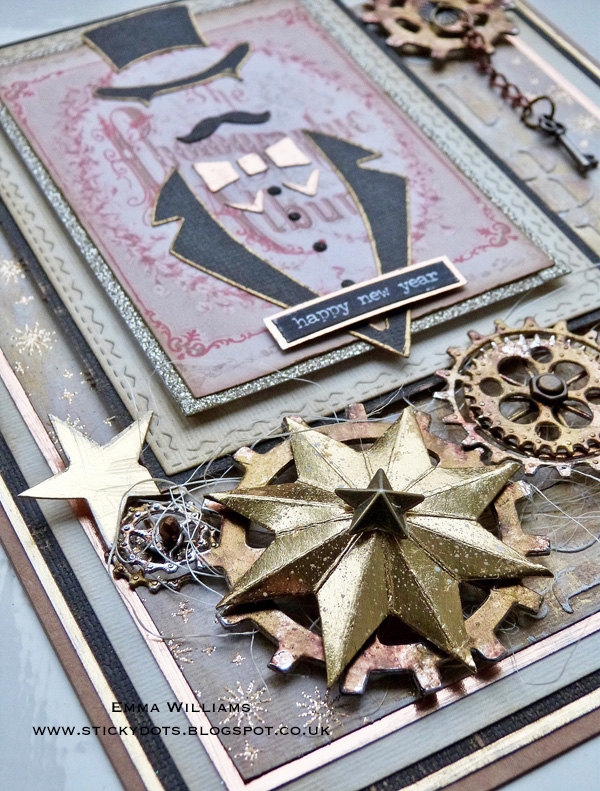
11. To create the gears, cover any piece of thick card with the metal foil tape. Using both the Gadget Gears 2 die and the Gearheads Thinlits die, die cut a selection of the gears that will eventually create six layered gears.
12. Apply Gold Mixative, Rust and Pitch Black Alcohol Ink to the Alcohol Ink Applicator Tool and pounce the tool over the top of the die cut pieces, transferring the ink to create a rusty look.
13. Layer the inked gear pieces over the top of one another, mixing sizes and styles and use a hot glue gun to attach all the gears across the bottom section of your card, mixing them with floris-try fibres and threads.
14. Die cut one of the Dimensional Stars from a further piece of Gold Metallic Kraft Core card and by folding along the scorelines of the die cut, create the star.
15. Attach the large dimensional star over the top of the gears, placing it on the left hand side of the card and adding a mini star metal embellishment to the center.
16. Using the Stacked Stars die (or any star shaped die or punch in your collection), die cut three of the smallest stars from the Gold Metallic Kraft Core cardstock. Place them into the gear arrangement.
17. Attach Hex Fastener pieces and Mini Knobs to the centers of the die cut gears.
18. Using the Gadget Gear 2 die, die cut a final gear from the card that you previously covered with Metal Foil Tape. Once again, ink the die cut piece with alcohol ink to create a rusty effect and then attach a Ring Fastener to the centre. Attach a short piece of chain to the fastener and add a key to the opposite end. Attach the gear to the top right hand corner of the card using foam pads to secure it into place.
I really hope you’ve enjoyed the creative process for this card project and that some of the fun techniques I’ve used will inspire you to create projects of your own using some or all of these gorgeous products!
Thank you so much for stopping by today and I wanted to wish everyone a very happy new year and I hope 2017 brings you all you wish for…
Happy Crafting!
Emma
Supplies:
 |
 |
 |
 |
 |
 |
 |
 |
 |
 |
 |
 |
 |
 |
 |
 |
 |
 |
 |
 |
 |
 |
 |
 |
 |
 |
 |
 |
 |
 |
 |
 |
 |
 |
 |
 |
 |
 |
Thanks for reading today and thanks to Emma for the inspiration!

Blog Candy Alert!! Follow our blog via email and comment on this post for a chance to win a special blog candy!
Congrats! Blog Candy Winners:
From: What Would Kelly Make? 3rd in the series!: Susie Sonnier!
From: Miss You by Laura Bassen: Kirsty Vittetoe!
From: Recycling Wrapping Paper for Cards + Merry Christmas From Simon Says Stamp!: Raquel A Jackson!
From: Weekender with Wanda – Welcome 2017 with Simon Says Stamp!: Jackie Hedlund!
From: Mixed Medium: Christmas Tree with Shari Carroll: Lisa Ayala!
From: Magic Slider Card (Color Slider): Amy Cooley!
From: Tons of Hearts: 4 Ways!: Susan Pezza!
From: Landscape Floral One Layer Wonder Card!: Rhonda Miller!
From: January 2017 Card Kit Snowflake Inlay Border Card: Maureen Reiss!
Please email [email protected] with your mailing address (if applicable), the name of the blog you won from, and the prize you won to claim your prize!


Very neat project. Love all the T. H. products you used too.
WOW! WOW! WOW!
Wow… Beautiful!
Very fancy card , love the steak punk influence ?!
This is Awesome!!! I Love all the texture!!!
Thanks for the blog candy win!!
Wow…fabulous card! Love that style.
Wow – so very cooL!
This card is so fabulous! I just love the dapper die cut layered onto the ephemera. Each time I admire this piece I notice another awesome detail! The number stencil is just perfect for the happy new yer sentiment. I always love your creativity and this card is tops! Happy new year!
There is so much detail on this card – you have so many great ideas!
Adorable card!! And congrats to the lucky winners!
Super cute steampunk card!Lots going on and versatile too! Love it!
So cool! Love it!
Wow! Great project!
Wow, this is simply fabulous! All the details are
just amazing. getting into mixed media style is
something I’d really love to do.
The card is so steam punk and need to be framed and hung on the wall.
How clever and fun!! I love this idea
I love the steampunk elements of this cool card!
I love this card and I love Tim Holtz!! This is such a neat 3 dimensional card using Tim Holtz products!! I always think of using his products in a journal, but this is really cool and gives me ideas of using his products more on a card, thanks for sharing.
Loving all the fabulous texture and layered gears with that oh so clever focal point! What a great masculine card
Dapper and delightful – LOVE IT ALL!!!
Wonderful creation!I particularly like the layered gears!Very creative and artistic!
What an amazing steam punk and mixed media piece!!!
That is a very dapper card. Love it.
Cool embellishments on this project!
So creative. I would still be scratching my head trying to figure what to do.. I love this and all the elements. Brilliant.
Awesome details on this project!
Emma is so inspiring. This is another marvelous work of art. Absolutely amazing! Love you Emma!
Wow, look at all this detail! Fantastic!
Extremely creative and such incredible detail!!!
Pretty spectacular, I gotta say :)
What a great masculine project packed with so many great techniques to try or rediscover! Thanks for sharing!
Awesome mixed media project! I love it!
Wonderful project – so dapper.
I love the steam punk feel to this card! What a great gut card for any occasion!
Oops! Guy card!
This is very beautiful!! Wish you all a very happy new year!!
Love this card perfect for any man in your life.
Great card! :)
Love the metal embellishments. Great project.
Dapper and dashing. What a wonderful creation. Hugz
SQUEAL!! I LOVE LOVE LOVE the Card!! such a FUN Design and Techniques!! Have a FABULOUS WEEKEND!! =)
What an amazing project.
Welcome Emma, your card is wonderful!
Congratulations to all of your winners.
I love the cool suave masculine vibe!
Wow, that’s quite an intensive project! So many different elements and techniques involved. It turned out wonderfully well!
Awesome project!
WOW!! This is so great. I’m a big fan of both Tim Holtz and steam punk so I love all the elements of this card. The background is fantastic and the Dapper die and gears makefor a great masculine card.
Loved the project! Really a gr8 idea for masculine projects! Thanks a lot for sharing!
Cool project! It reminds me of the Monopoly guy.