Studio Monday with Nina-Marie: 5 Craft Room Organization Quick Tips
Hello friends! It’s Nina-Marie here with you this week sharing five tips that you may find helpful in organizing your craft room and supplies!
Organization is something I love. I am constantly coming up with new ways to reorganize my studio! Organization is important to me because it is one of the things my workflow relies heavily on; if my studio is messy and no easy to navigate, I am less productive. I also am a person that likes things to be fresh and new, so I update my organization methods within my studio often, just to give myself a fresh environment.
In today’s video I am going to focus on 5 tips I find helpful in organizing my own studio and supplies. In the video, I also mention the previous Craft Room Organization Tips video that I posted here a few months back; you can find that post and video HERE.
TIP #1: BUTTONS
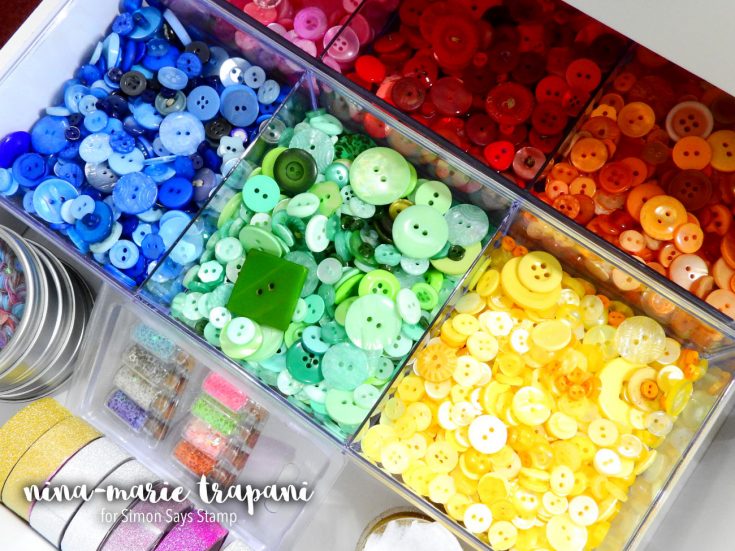
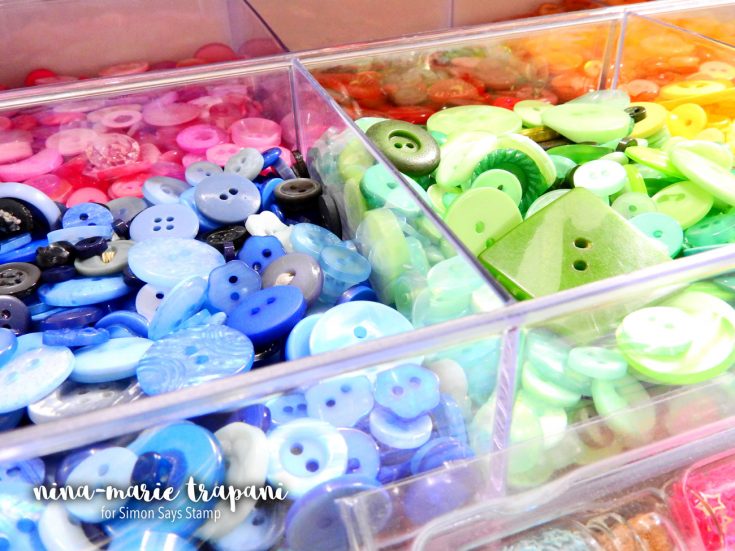
Buttons are a great embellishment for cards, scrapbooks, mixed media, DIY projects and more. I find it very handy for me to store them in divided containers, such as the InterDesign Clarity Tray. I sort the buttons by color hue and I can fit four of these trays in a 12×12 draw (two side by side and another two trays stacked on top).
By having the buttons organized in color (like pretty much everything else in my studio!), I can easily reach for what matches my card best and keep on creating!
12×12 BINS
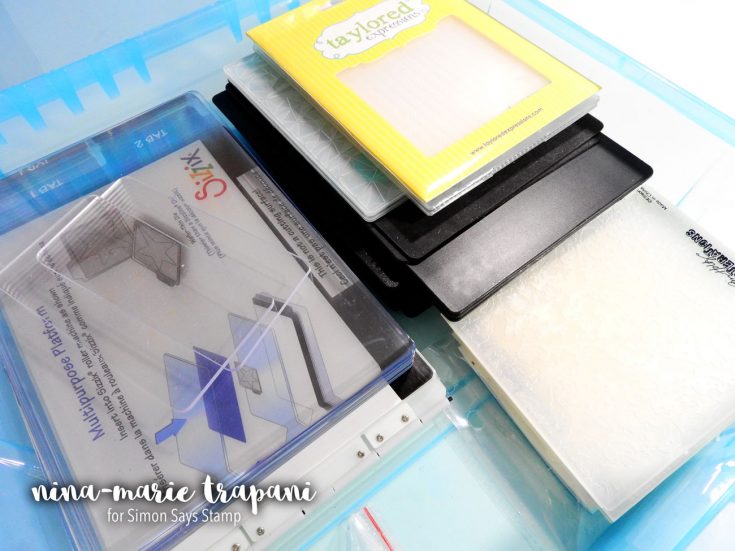
Plastic storage bins such as the Alvin Stow and Go, are perfect for tucking away supplies you don’t reach for as often. I can fill these with quite a bit of product and then tuck them on a shelf to keep my supplies clean and ready to use.
Some examples of how I use these bins include:
- Foam sheets: I can fit a huge stack of 8.5×11 inch foam sheets inside these bins. In the space leftover in the bin. I can also tuck my scraps of foam that I end up with from projects.
- Die cutting supplies: In another bin I store my extra cutting plates for my Big Shot, as well as platforms, impression plates and embossing folders. All of these can get tucked away until I need them.
- Donations (not shown in video): I have another bin I keep with supplies I no longer need and plan on donating to charity. This keeps them protected, clean and in one place for me to go to when I am ready to donate them to someone that could use the supplies. I like being able to give back to others and help spread the “crafty bug”!
TIP #3: MAGNET SHEETS
Dies are something I think pretty much all of us have some of in our crafty stash! I love using magnet sheets to use as an organizational option for my dies. We carry a variety of different magnetic die storage option here at Simon Says Stamp, such as:
- DoCrafts magnetic sheets
- Tonic Ringbinder with Magnetic Sheets
- We R Memory Keepers Magnet Zipper Pouches
- Art Bin Magnetic Storage Case
- or even magnetic storage trays like this one from Tim Holtz!
I personally like using simple magnetic sheets and storing the dies in stamp storage sleeves.
TIP #4: BAKER’S TWINE
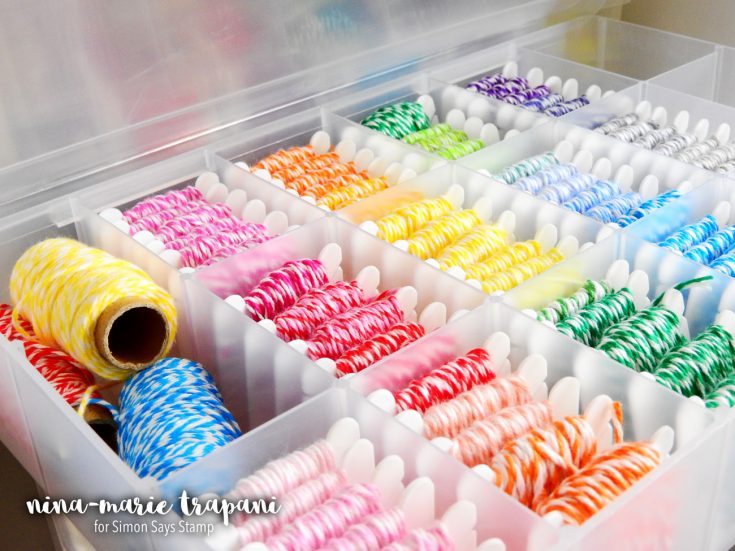
Baker’s twine for me was ALWAYS an issue. I love the cute spools that they come on, but I always ended up having my draw of twine a mess. If you know me, I cannot stand having a mess! I tried a few different ways of storing the spools in hopes that finally I might be able to keep the twine corralled. One of my ideas that I fell in love with once I tried it was organizing it like my embroidery floss. For those of you that are needlepoint and sewing enthusiasts, this storage solution might seem familiar to you!
I used embroidery floss cards and wrapped the twine around the cards; most spools of twine fit on a single card. For larger spools I needed two or three cards. After winding all the twine onto my floss cards, I was able to then fit them into the Darice Floss and Needle organizer. This bin is inexpensive and comes with floss cards! For me, it is a must have.
TIP #5: MINI TINS
My final tip for today is for organizing mini ink cubes. I personally use mostly large ink pads in my studio because I like the larger size. However, I do have a few minis and I know they are all the rage right now in the crafting world. Because of that, I wanted to share this tip with you in today’s post.
For my small collection of mini ink cubes, I have a Tim Holtz Mini Distress Ink tin. This is perfect for storing my minis and tucking the container on a shelf with other inking supplies. If I were someone that used the minis over the full size ink pads, I definitely would make sure that I had these to store all of them. One of my favorite feature of the tin is that it is “lockable”, which is very handy for klutzy crafters like me! ;)
So I hope you will check out the video below to see all these tips in action! Thanks for stopping by and visiting me today. I will be seeing you again very soon! Bye!
WATCH THE VIDEO
SUPPLIES
BLOG CANDY




Good tips, always try to get organized but feel like I never quite get there.
Thank you Nina! My husband was just telling me I needed to find a way to store my dies. LOL I WAS THINKING about using the magnet sheets! YOU just pointed them out to me! LOL ;) (((HUGS!)))
Great tips for organizing Nina. Thanks for sharing with us.
Great storage ideas, thanks for sharing!
can’t live without those 12×12 bins :D
Thanks for the tips Nina! I already use the magnetic sheets and mini ink tins, but never thought about the embroidery floss caddy. You learn something new everyday!
Terrific tips…thanks very much. I especially like the idea for storing your bakers twine. I do needlework and have lots of those little cards around but never thought of using them. Great idea. Cheers.
Really good ideas!
I admire your love of organizing! Whenever I reorganize, I can’t find anything. :D
I can always use organizing tips, especially for my craft supplies. My latest challenge is organizing kids craft supplies, which seem to multiply over night!
Great, practical ideas! I put my baker’s twine on floss cards but not in a box…I like that idea.
Thanks for these tips! :)
I love reading tips and ideas! Thanks!
Thanks for the great tips! I like to keep my craftroom organized too!
Good tips. Coincidentally I have been organizing a few items in my craft room today. I created ink swatches and tidied a few idea/technique binders.
Thanks for your tips! I hope I can be as organised one day!
Thanks for the tips. I am always on the look-out for organizing ideas.
Thanks for sharing your organizational tips and solutions with us. Your buttons look so beautiful. My twine needs to be wrapped like yours to prevent tangling vs. the tin where mine are stored.
Thanks for the tips. Love the twine box idea.
Can you talk more about those tiny cutting pads? You said they were for ‘partial die cuts’? Thank you!
Great tips. Last week I got the magnet binder recommend. My dies are in order. Now I can see my dies layed out on the pages. I won’t have to dig thru a bag anymore.
Thank you for the wonderful organization tips! I wish I could get a bit more organized. I have such limited space so it would really benefit me to get things tidied up a bit.
Such wonderful ideas!!! Thank you so much:)
I love the color-coded organization, just lovely!
Thanks for the great tips. I sure need some of them!
Thank you for the tips. Very useful! TFS
Thanks for sharing your great organization tips.
Great ideas! Now I have a use for my neglected floss box.
Thanks for the tips! I love using magnets with my metal dies. It helps keep them in place.
I love the idea for baker’s twine. I’ve been looking for a solution for awhile and this one looks perfect.
Was busy organizing today with new IKEA storage units. One new to me that I noticed was with the mini tin – I have Tim’s Distress, Hero Arts cubes and Altenew in mine. Saw you also had a Memento Tear Drop; didn’t know those fit in them, too. Might have to invest in more of the tins. Thanks for all the storage tips.
Thanks for all the great storage tips!
Thanks for doing a segment on organisation. I think it is something we all like to discuss and see other options. I love the mini tins too for storing all my small square ink cubes – they fit other brand minis as well! I mostly use large size so it is nice to have my random small cubes organised and able to see the colour instead of placed in drawers haphazardly.
Today’s video on organizing has given me several new tips and inspiration to organize my workplace this winter.
I love all the colors in your button bins. I am a fan of lots of colors and I love buttons. Where did you get all those buttons? I’m making leggings decorated with fun, funky, colorful buttons and crystals and those buttons would be so cute! I will have to check out your ideas closer because I could use some of them. Thanks for all the info.
Awesome ideas! My favourite is the bakers twine. I must do this as mine is in a drawer and it’s disastrous!
Always fun to see ideas of how others store their crafty supplies! I, too, have found that re-spooling twine as well as ribbon on embroidery cards is a fabulous solution.
great tips. . . I use the 12 x 12 plastic stroage for seasonal products, too, for example Halloween papers, stickers, washi, ephemera, etc. all in one bin. . . Easter, Valentine, Christmas, calendars….
Thanks a ton for these precious tips. I end up being messy with craft supplies at times. These tips will be very handy and yes will inspire me with new ideas to organise better! Thanks again!
i always luv storage ideas thank u
Great tips! Thanks for sharing!
Fabulous tips! I need to look in to the 12×12 bins!
Great tips. I am forever organizing. I do a lot more organizing than actual stamping.
Storage is always a challenge. Thanks for the tips.
Thanks for your tips for stamp room organization. I too use tim holtz tins for mini ink pads. I never thought about organizing twine on embroidery floss cards. I would ove to see a tour of your whole room !
Love the tip to keep twine on embroidery cards – what a great idea!
Thanks for the organizational inspiration – my work space is just SCARY right now!
THANK YOU for sharing :)
… I NEED to get my stash SORTED!
Great tips! TFS!
Cristina
thehouseoftheblackbirds.blogspot.it
Great tips! Thanks for sharing :)