Framed with Kindness: An Encouragement Card Full of Texture
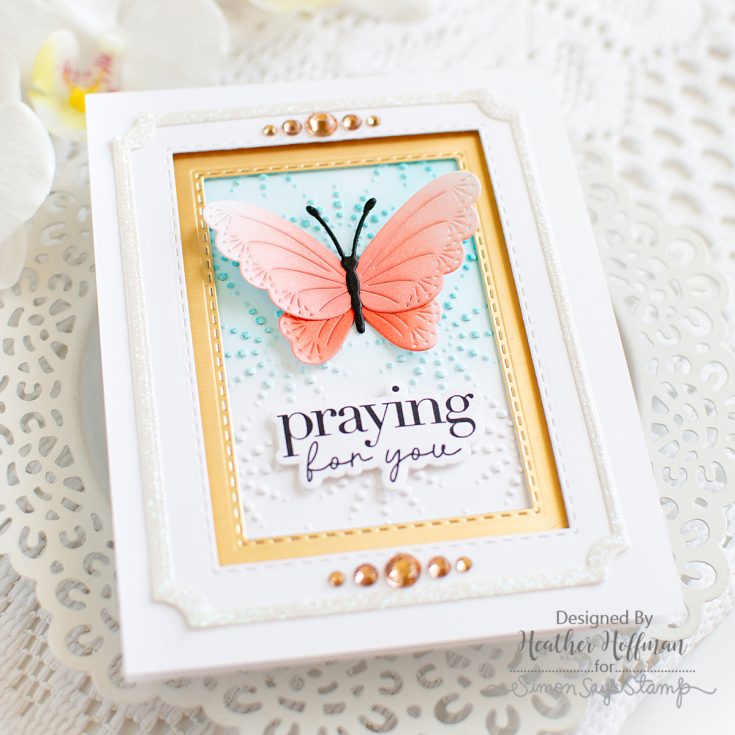
Hi friends! Heather Hoffman here today with a bright and airy card featuring lots of die cutting and building up layers and textures that frame up the lovely butterfly and sentiment on this card!
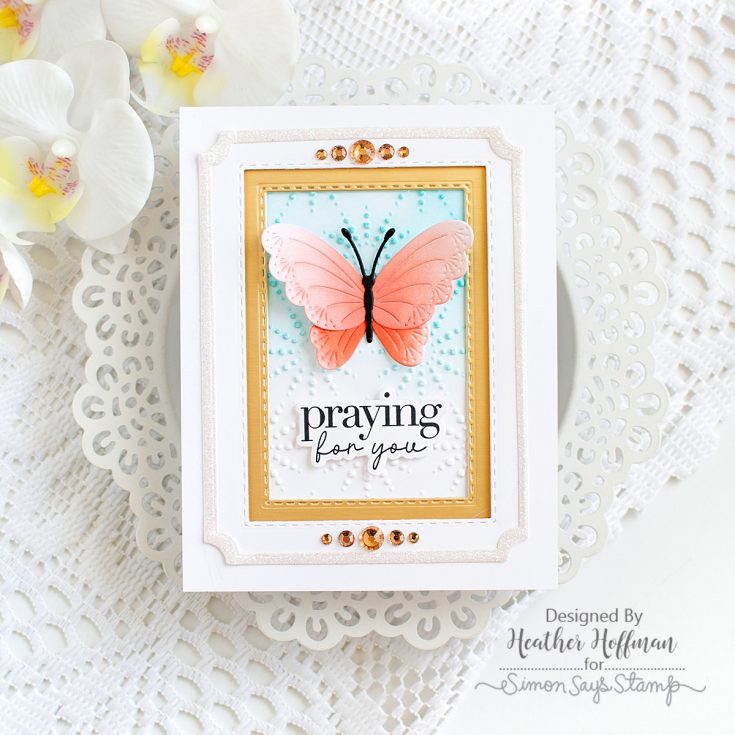
The new Dewpierce Butterfly is so stunning – I love all the texture on it! I die cut it from white cardstock, and ink blended Blush ink on the larger top portion, and Pucker ink on the lower portion, holding it in place on my Craft Tacky Mat. I cut the center from Black cardstock, and assembled it all together, then set it aside to dry while I worked on the rest of the card.

To frame everything up, I started off with Nested Stitched Rectangles, and die cut a window from an A2 panel of white cardstock, then cut a slightly smaller window from Honey Gold cardstock to layer behind, adhering with foam adhesive. Behind the frame, I used the fun Dotty Circles embossing folder on white cardstock, then ink blended from the top down with Surf ink, allowing it to fade to white somewhere around the middle. I added the frame over that with more foam adhesive to make sure I had lots of dimension, then used liquid glue to adhere a White Glitter frame created with two sizes of the recently released A2 Notched Rectangles die.
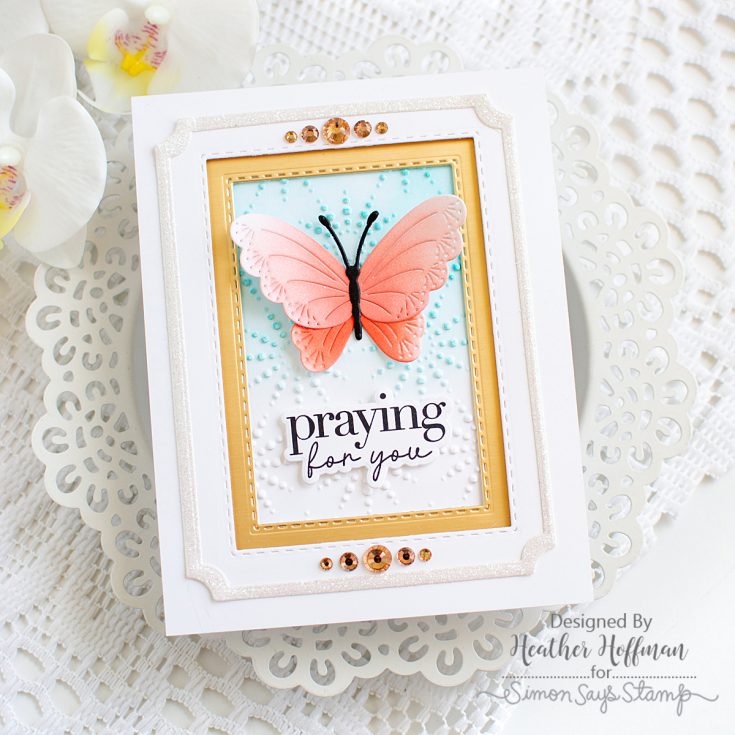
By this time, the butterfly was ready to go, so I adhered it just in the center with liquid glue, leaving the wings to float free for lots of extra dimension! I chose a sentiment from Inside Greetings 1 (which now has coordinating dies that recently released – yay!), and stamped and adhered that with foam adhesive under the butterfly.

Finally, I spent time playing with different arrangements with my Dazzling Peachy gems, but finally settled on a couple simple rows of them on the top and bottom of the frame. I felt like that added the perfect touch of elegance to finish this card off!
What is your favorite way to frame up a card? Die cutting, ink blending, or maybe stamping? Drop your favorite ways in the comments – I’d love to hear!
SUPPLIES:
|


Thanks so much for stopping by!


Super pretty and almost serene! Great work, HH!!
Lori S in PA
How Beautiful!!!!
What a beautiful card design! The layered windows with texture create such a lovely depth effect. I recently started exploring AI tools for creative projects and found some amazing video generation capabilities at sora2aivideo.io that could pair nicely with handcrafted designs like these. The combination of traditional crafting with AI-generated backgrounds opens up so many possibilities for unique greeting cards. Thanks for sharing this inspiring tutorial!
What a beautiful encouragement card design! The layered window technique creates such gorgeous depth. I’ve been experimenting with similar layering approaches for AI-generated image compositions and this gives me great inspiration. The texture adds so much character to the framed sentiment.
Such a beautiful card design! I love how you used the layered window technique to create that sense of depth and texture. The encouragement message is so timely — we all need more kindness in our lives right now. I actually use AI image tools like pictro.ai to help brainstorm similar card layouts and color palettes for my own crafting projects. Would love to see more of these layered designs in the future!
This framed card design is absolutely gorgeous! The way you layered the window dies with different textures creates such beautiful dimension. I have been experimenting with layered die cuts lately and this gives me so much inspiration for my next project. The color palette you chose is so calming and elegant. Really appreciate you sharing the step by step photos too!
THis is so so pretty – a work of art
What a beautiful encouragement card design! The layered window frame technique creates such wonderful depth, and the added texture really brings it to life. I have been experimenting with similar layering ideas for video content backgrounds recently, and this kind of dimensional approach is so inspiring. The color palette is warm and inviting too. Thank you for sharing such a thoughtful project!
Beautiful card; I like the texture & color in the background. The Butterfly is loverly, Framework such a nice touch, & embellishments at top & bottom is perfect. TFS your wonderful creativity.
What a beautiful encouragement card! The way you layered the die-cut frames with the texture paste creates such lovely depth. I have been making card tutorials with AI video tools recently – vidglory.com has some great features for showcasing craft techniques in motion. The color palette you chose is so warm and inviting too. Love this design!
This encouragement card design is absolutely beautiful! The layered window technique creates such a wonderful sense of depth and dimension. I recently started using AI music tools to generate background ambiance while crafting and it really enhances the creative flow. The texture you achieved with the framing is so elegant. Thank you for the detailed tutorial and inspiration!
This card design is absolutely stunning! The layered windows create such a beautiful sense of depth and dimension. I love how the frames showcase different textures and patterns, making it such a versatile technique for card making. The encouragement message adds a personal touch that would brighten anyone’s day. Truly inspiring work!
so gorgeous!!
What a beautiful card, Heather! I love how you used the layered frame technique with the Dewpierce Butterfly — the ink blending from Blush to Pucker creates such a gorgeous gradient. As someone who works with AI image generation at pictro.ai, I appreciate how handcrafted cards like this still have that personal touch that makes them so special. The Dotty Circles embossing folder in the background is such a clever way to add subtle texture without competing with the focal point. Really inspiring work!
What a stunning card design! The way you layered those window frames creates such beautiful depth. I have been exploring how AI music tools can complement creative projects like this — imagine generating a custom melody to accompany a handmade card gift. The texture combinations you chose are perfect for an encouragement card, and the color palette really makes the sentiment pop. Thanks for sharing such detailed layering techniques!
What a beautifully layered card design! The way the frames and windows create depth is really clever. I have been working with AI image enhancement tools lately for my photography projects at pictro.ai, and seeing handmade techniques like this gives me fresh ideas for combining digital and physical art. The texture details here are just gorgeous. Thanks for the wonderful inspiration!
Such a beautiful card design! The layered windows and frames technique creates such wonderful depth. As someone who works with image editing tools daily, I really appreciate the attention to texture and dimension here. The way you combined different patterns reminds me of how layering effects in digital design can transform a simple composition into something truly special. Thanks for sharing this inspiring project!
I absolutely love the layered window technique here — it creates such beautiful depth and dimension. The way you combined die-cut frames with texture is so clever. I’ve been experimenting with AI music generation tools recently, and I find that the same creative layering principles apply — building up textures and elements to create something rich and engaging. musicgpt.pro has been my go-to for experimenting with layered sound compositions. This card design really inspires me to bring more depth into my papercrafts!
What a gorgeous card design! The layered window technique creates such beautiful depth and dimension — it really draws your eye into the scene. I appreciate how you combined different textures to add visual interest without making it feel too busy. The color choices are so harmonious and calming. This is the kind of project that makes me want to clear my desk and start crafting right away. Beautiful work, thank you for the inspiration!
The way you layered these frames and textures creates such a beautiful depth effect! This technique would translate perfectly into video editing where layering visual elements is key. I have been using VidGlory to create content with similar dimensional framing effects, especially for tutorials and how-to videos. The concept of building up layers gradually is so universal across creative mediums.
What a beautiful card design! The layered window frames create such a lovely sense of depth. I have been experimenting with AI photo enhancement tools recently at pictro.ai and it is amazing how technology can help refine even handmade card photographs for sharing online. Your color choices here are so soothing – really captures that feeling of kindness and warmth. Thank you for the detailed tutorial!
This encouragement card design is so thoughtful. I really love how you layered the frames and added all that beautiful texture — it gives the card so much depth without being overwhelming. The color palette you chose is warm and inviting. I have been getting into card making as a creative outlet and this is exactly the kind of project that inspires me to try new techniques. Great work sharing such detailed steps!