Butterfly Window Card tutorial with Anna-Karin
Hello everyone! Anna-Karin here with a fun tutorial for an interactive card, with several different techniques, which can be used on many types of projects. I love dies; they are so versatile and can be used for many different things. Here we are going to use dies to make an interactive card, but also to make our own stencils and masks.

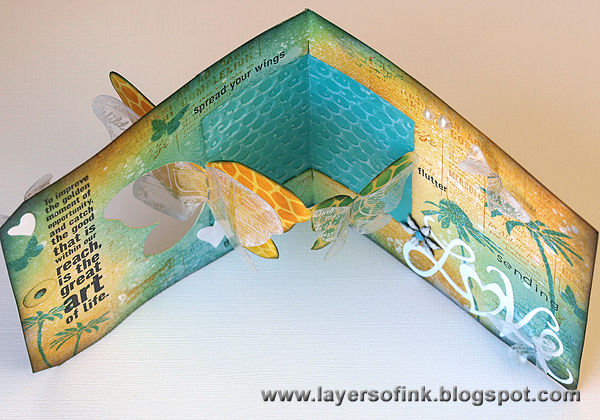
This is the inside of the card, die cut with the Karen Burniston’s Sizzix 3-D Butterfly Window Pop ‘n Cuts insert die. For a different twist I used a giant Ranger tag as my card base. The background is inked, stamped and misted. Let’s start!

Normally I would use a pop ‘n cuts’ base die to place my insert die in, but in this case, the tag is a bit wider than the base die, so it would have been die cut too. Instead, I used a Tim Holtz base tray. To make sure the paper didn’t move during cutting, I attached it to the insert die with masking tape. All the pop ‘n cuts dies have a little mark where the centre will be, so it is easy to line up the paper.
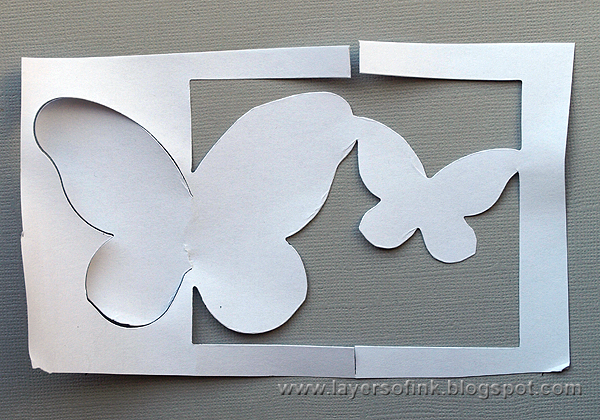
I die cut the Butterfly Window once more from Eclipse tape, to use as mask. Eclipse tape works great for this since it is low-tack and made specifically for masking. Cut the butterflies away with scissors, carefully, because we are going to use both the frame and the butterflies.

Apply the frame around the large butterfly, the small one is easy to ink without a mask, but the large one would have been trickier. Ink with Squeezed Lemonade using and ink-blending tool.
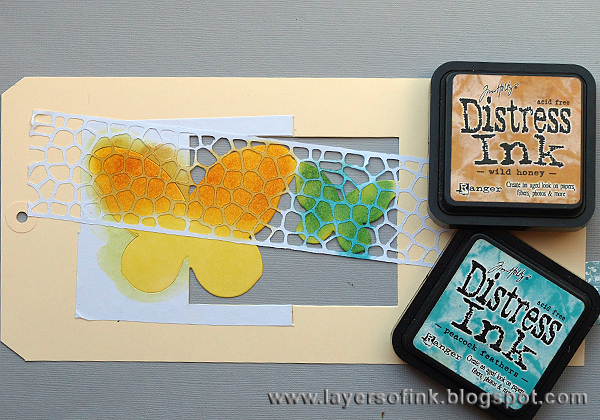
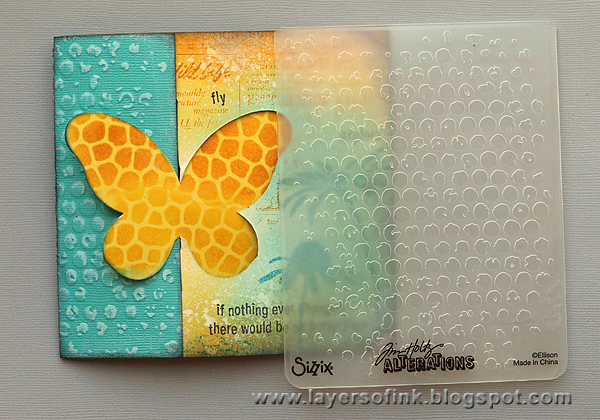
Leave the mask in place. Die cut the Cobblestones from Eclipse tape and place it over the butterflies. It is very easy to make your own stencils with dies and it is a great way of getting more out of your dies. Ink the large butterfly with Wild Honey and the small one with Peacock Feathers.

Move the stencil and complete the large butterfly, with Mustard Seed. Cool pattern isn’t it?
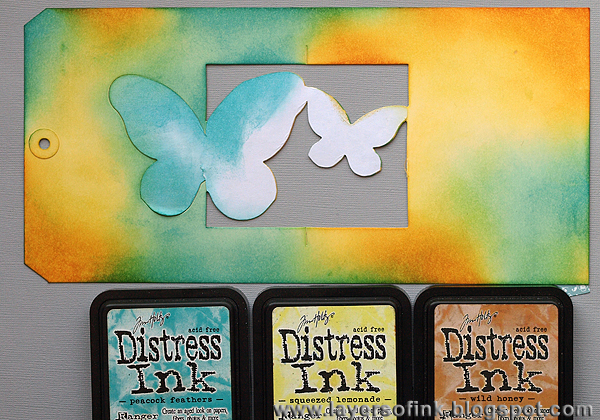
Place the butterfly masks on top of the butterflies, to protect them from the rest of the inking, misting and stamping. Ink the card with Peacock Feathers, Squeezed Lemonade and Wild Honey.

I wanted a chalkier look and misted with White Linen Dylusions ink spray, still leaving the butterfly masks on. Loved the result. This step also makes the butterflies stand out more against the background. Leave to dry.
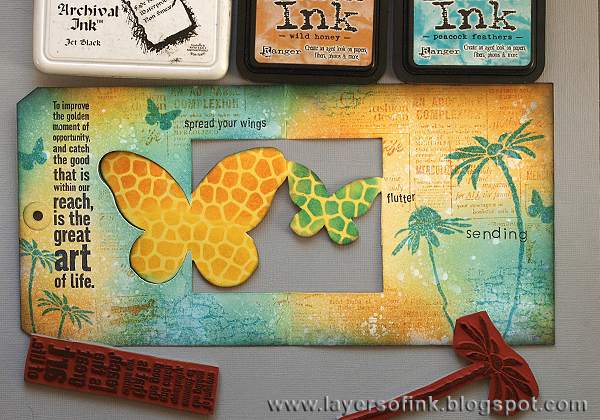
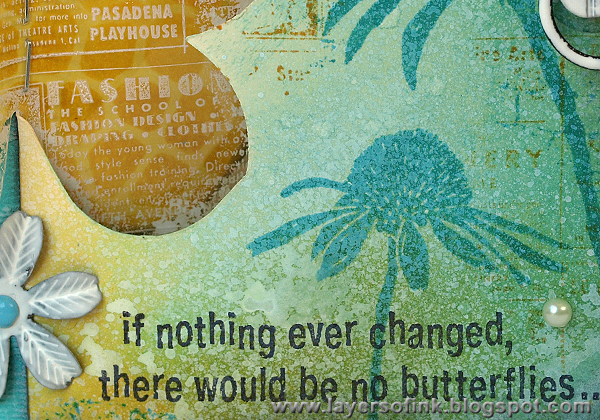
I left the masks on while I stamped the background (but had taken them off when I took this photo). I used Darkroom Door stamps. First, the great sentiment from New York Vol. 2 was stamped with Archival Jet Black ink, with the help of a stamp positioner for exact placement. The gorgeous carved flowers were stamped with Peacock Feathers and so was the Stone Background, to mimic the pattern on the butterflies. I stamped the Gazette background with Wild Honey, holding the cling stamp in my hand for a random impression. Finally, two sentiments from Wildflowers Vol. 1 were stamped with Jet Black. The edges were inked with Black Soot.

The front of the card was inked, misted and stamped in the same way as the inside.
The Butterfly Window cuts away a rectangle around the butterflies, and this can be left as is, but I wanted a spine on this card, and cut one from Core’dinations cardstock. It was embossed in the Bubble folder, sanded and inked with Black Soot.
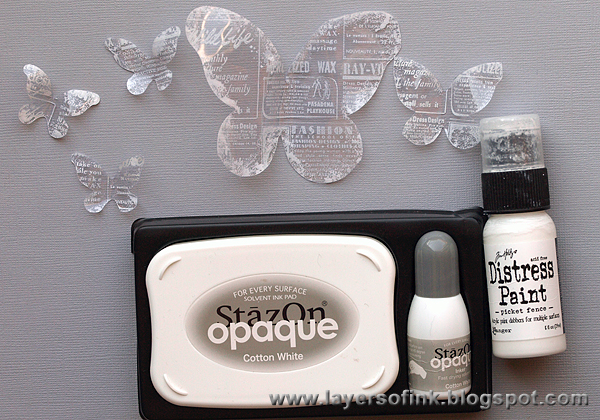
Bigz dies can cut through many different materials, and here I decided to use another favourite of mine, Wendy Vecchi’s Clearly for Art Modeling film. Die cut both butterflies with the Butterfly Window, as well as three smaller butterflies. Stamp them with the Gazette background stamp using Stazon Cotton White ink. When the ink is dry, place one butterfly at a time on a craft sheet, and heat with a heat gun. Shape the wings to give dimension to the butterflies, be careful so you don’t burn yourself. The film keeps it shape perfectly. You need to trim the large butterfly a little bit with scissors, so that it doesn’t get stuck in the mechanism of the card. Paint a little bit of Picket Fence Distress Paint around the edges.
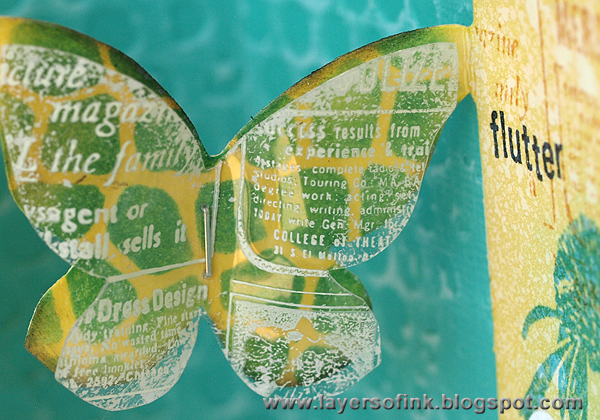
Attach the butterflies with a tiny attacher.

Die cuts can also be used for sentiments, and here I used the sweet Love set. It also cuts two additional small hearts, which I used on the card too.

The finished outside of the card. I painted a Prima flower and Special Screw with Picket Fence Distress Paint and attached to the card.
A close-up of the chalky effect of the white misting.
This is what the card looks like from above, it is sure to make the recipient happy and looks great displayed on a shelf.
I hope you enjoyed this tutorial!
Happy die cutting!
Anna-Karin
Supplies:
Surfaces: Ranger Manila Tag #12; Stampers Anonymous Wendy Vecchi Clearly for Art Modeling Film; Core’dinations Tim Holtz Color-Core cardstock
Dies: Sizzix: 3-D Butterfly Window, Cobblestones, Butterflies, Love Set
Embossing folder: Sizzix: Bubble & Honeycomb
Stamps: Darkroom Door: Carved Flowers, Gazette Background, Stone Background, Wildflowers Vol. 1, New York Vol. 2, New York Vol. 1; Hero Arts: Basic Lowercase Letters
Ink: Ranger Archival Ink Jet Black; Distress Ink: Squeezed Lemonade, Mustard Seed, Wild Honey, Peacock Feathers, Black Soot; Tsukineko: Stazon Cotton White
Mist: Dylusions ink spray: White Linen
Paint: Distress Paint: Picket Fence
Embellishments: Prima: Sunset Sunrise Mini Flowers, Junkyard Findings Special Screws
Adhesive: Judikins Eclipse Art Masking Tape; Ranger Glossy Accents
Tools: Sizzix: Big Shot, Base Tray; Tim Holtz Tiny Attacher; EK Success Stamp-a-Ma-Jig Stamp Positioner

Thanks to Anna-Karin for her awesome project tutorial! I love seeing these dies in action, and how she used the die in so many ways! This is a fantastic card and I love all of the colors and techniques that she used.
Want to join in with some fun with die cuts? Then join us in this week’s challenge! For the full rules, read the “challenge rules” posted in the side-bar here on our blog, and be sure to enter your challenge in the post below this one.
Challenge Badge

Spotlight Badge


Ohh wow, anna-karin! Love the die cut card! So many beautiful techniques you done with it! Just love the stunning color combo! Hugs, Sandra
What a fabulous project! I love the colours and all of the techniques! Thanks for sharing Anna-Karin :)
Hi Anna-Karin fabulous tag card, wonderful colours and design and I love the techniques too. I particularly love the embossing and the Clearly For Art added for further depth. Gorgeous colours and stamping. Tracy x x
This is a fantastic tutorial, Anna-Karin! Love the idea of using the large tag for the card. All of your textures and sentiments are perfect.
Wow, it’s very beautiful. Thanks for sharing the process!
Gorgeous, gorgeous card! I am in awe of your talent and creativity. Thank you for the detailed
tutorial.
This looks gorgeous Anna-Karin! Thanks for the detailed steps.
One more fabulous card from you ! Loved the stamping n masking ,the colors and the twist of using acetate !
Love Karen’s dies and love what you have done with this one – gorgeous colours and brilliant techniques. Thanks so much for the step by step.
Wow! What an amazing piece of artwork. It’s gorgeous!
Wow… this is cool! What a beautiful creation! Love the brilliant way to make the butterflies pop. The colors are just gorgeous! Great tutorial! :)
This is just gorgeous. The colors are wonderful. Thanks so much for sharing the techniques. I hope I can try this with a bit of success.
I’ll have to give this a try when I have time. (Time? What is that?)
Great tutorial. It’s also introduced me to some new products. Thanks for sharing.
Fantastic card and great tutorial!!
Gorgeous beyond words, and what a great tutorial.
Anna-Karin…your card is absolutely gorgeous. So many wonderful tips and techniques. Thanks so much for an awesome tutorial. I love the colors, the dimension and texture you’ve given to this very sweet card. <3 Candy
Beautiful colors & chalky look. Clever use of the special screw. Thanks for showing all steps in your pictures.
Wonderful, fun card! Terrific tutorial! Thanks so much for sharing your technique. Have a great day! :-)
An absolute stunner of a tag-card, and as always a brilliant tutorial, full of details, tips and fabulous photos of the process. I love the white stamping on the film, as well as the amazing background stamping around those gorgeous inky butterflies – just wonderful, Anna-Karin. Thank you so much for sharing it.
Alison x
Sometimes I despair of my little brain. I have the inks and I love the white Dylusions spray but I have never used them together. The effect is awesome!! What a great piece this is, and your tutorial is spot on. Thanks so much for a truly AH-HA moment for me, and a beautiful inspiration.
this is just so gorgeous! Thanks for the awesome tutorial!
beautiful!
Sandra ltb
This is really interesting, You’re an overly skilled blogger. I have joined your feed and stay up for searching for extra of your great post. Also, I have shared your site in my social networks
Awesome and inspiring thanks for the outside the box thinking.