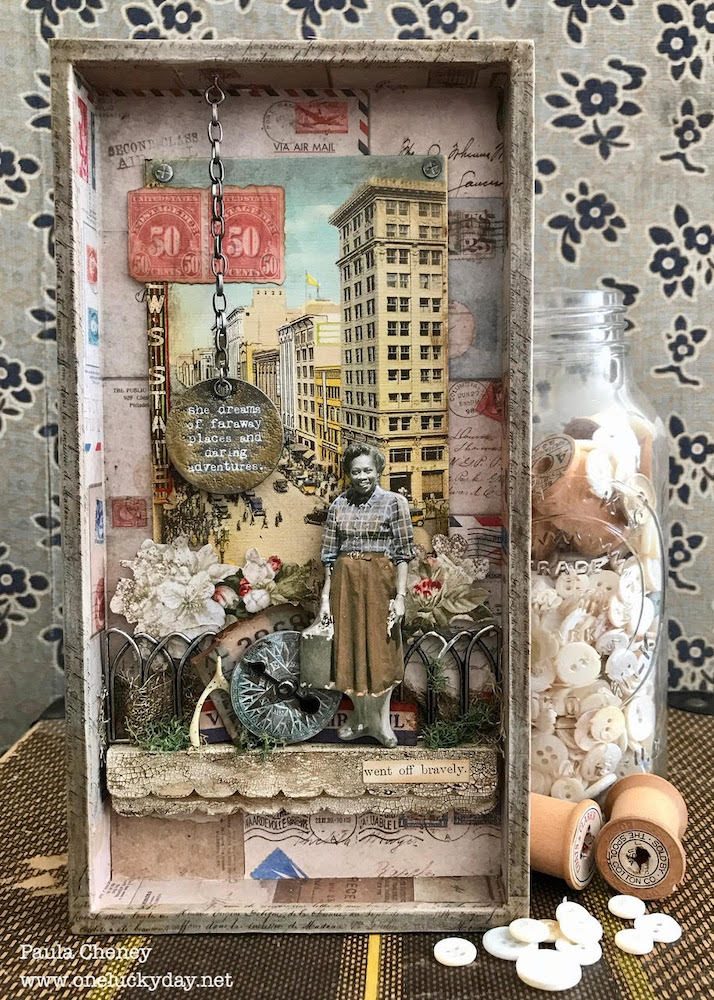
She Dreams of Adventure by Paula Cheney
Hi friends! Happy Tuesday! Please join me in welcoming extra special guest Paula Cheney to our blog today! She’s made a super fun project to share with us today! So sit down in a comfy chair, grab a yummy beverage, and read on to learn more!
Hi friends I’m glad to be back at Simon Says Stamp sharing a project all about the spirit of adventure. This is the time of year when many people set goals and travel plans for the upcoming months. I hope you will catch the message of this project and begin a path to get out there and do something you have always dreamed about! Now follow along as I show you all the layers to create this project.
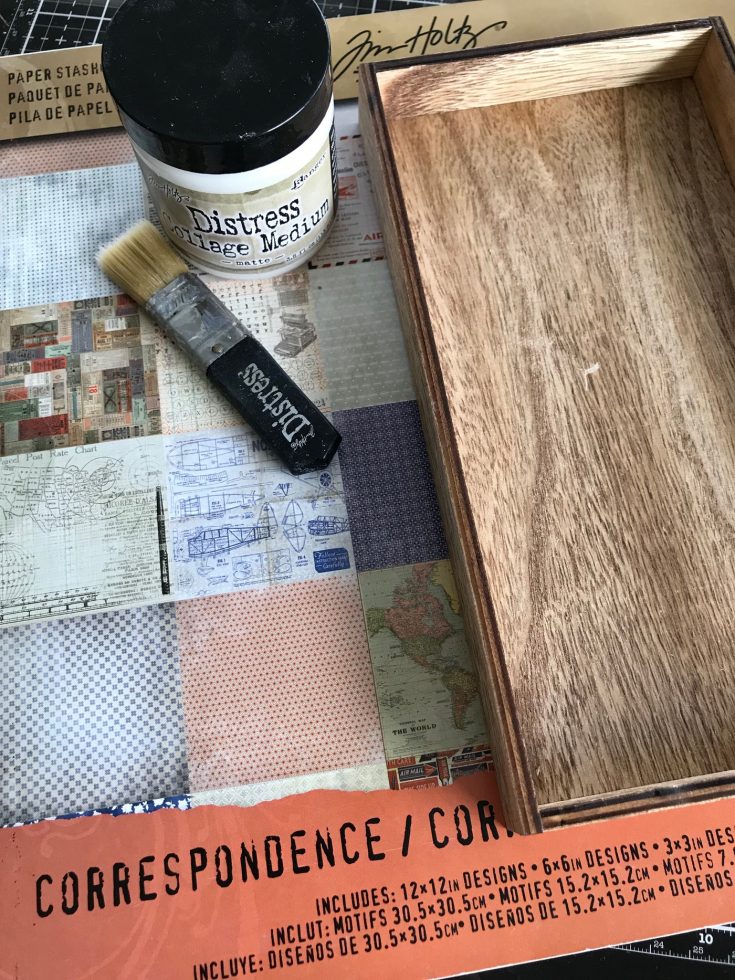
Gather supplies: Correspondence Paper Stash, small Vignette Tray, Collage Medium and Collage Brush.
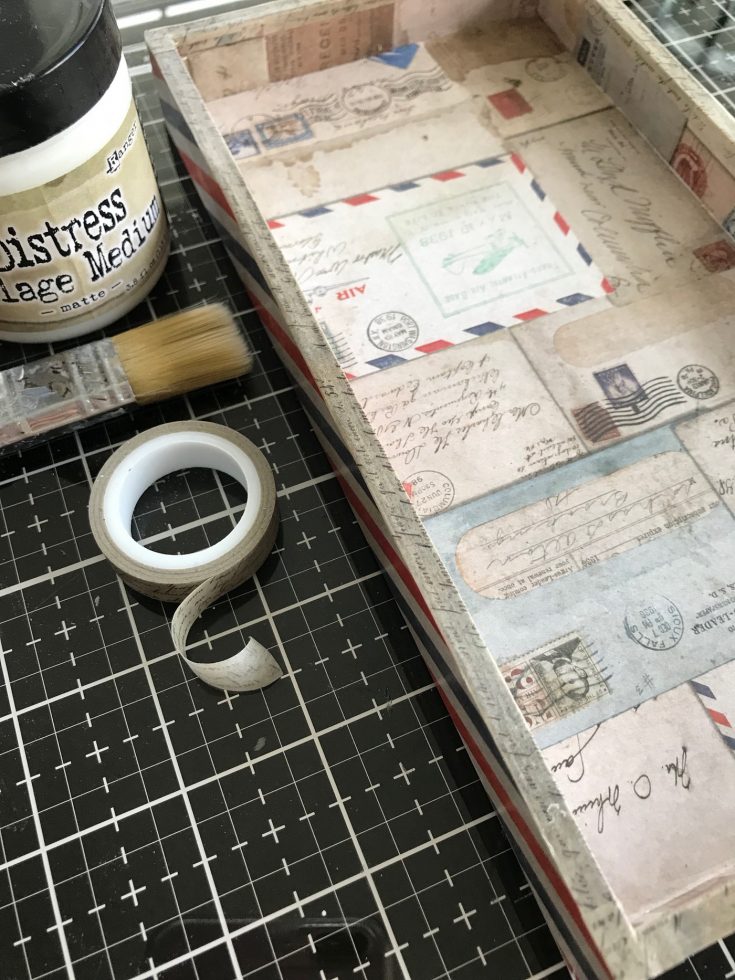
Cut paper to fit the Vignette Tray. I used envelope paper on the inside of the tray and the red and blue mail stripe on the outside. Collage Medium will work perfectly to adhere the paper to the wood. I also like to add a thin layer of Collage Medium over the surface to seal the paper. Once dry, add Design Tape to the edge of the tray. I like this one from the French pack because it has very small script that fits with our travel theme. You might need to add a bit of Collage Medium on the corners. Design Tape sticks to the wood tray but it does not like to stick to itself, so I added a bit of glue where the tape is layered at the corners.
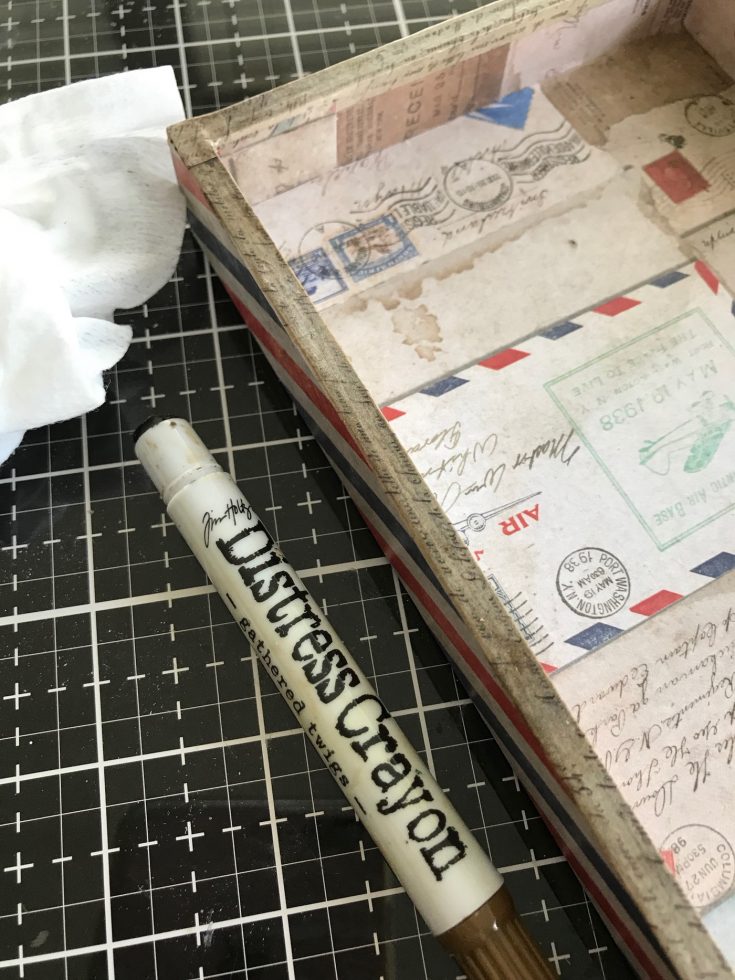
Scribble Gathered Twigs Distress Crayon over the Design Tape and rub with a damp finger to smudge. Set aside.
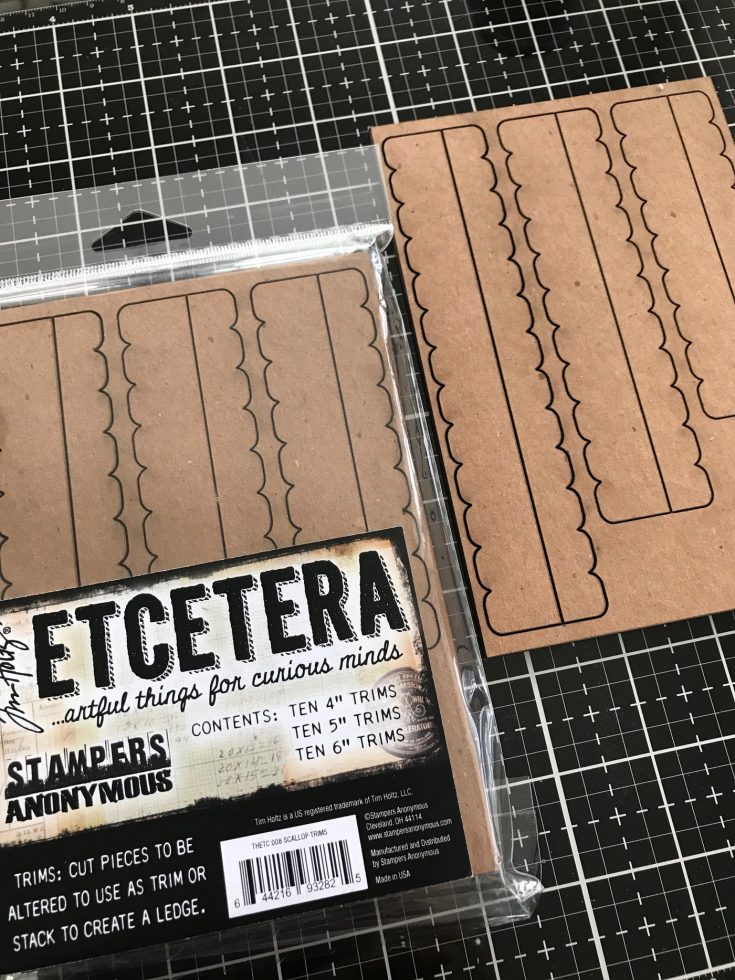
Did you know there are new trim packs from Stampers Anonymous? Each package comes with 4”, 5” and 6” trims in two different widths. They also come in three different styles – Scallop, Pinked, and Bracket.
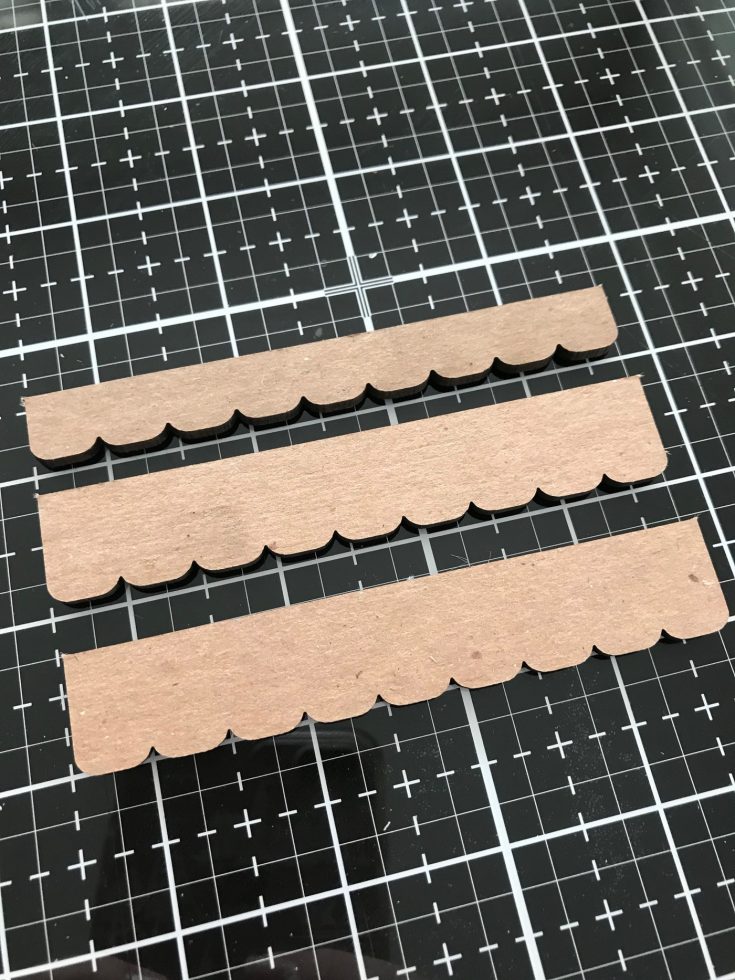
I am using three pieces of the scallop trim. Two that are the same size and one that is narrower.
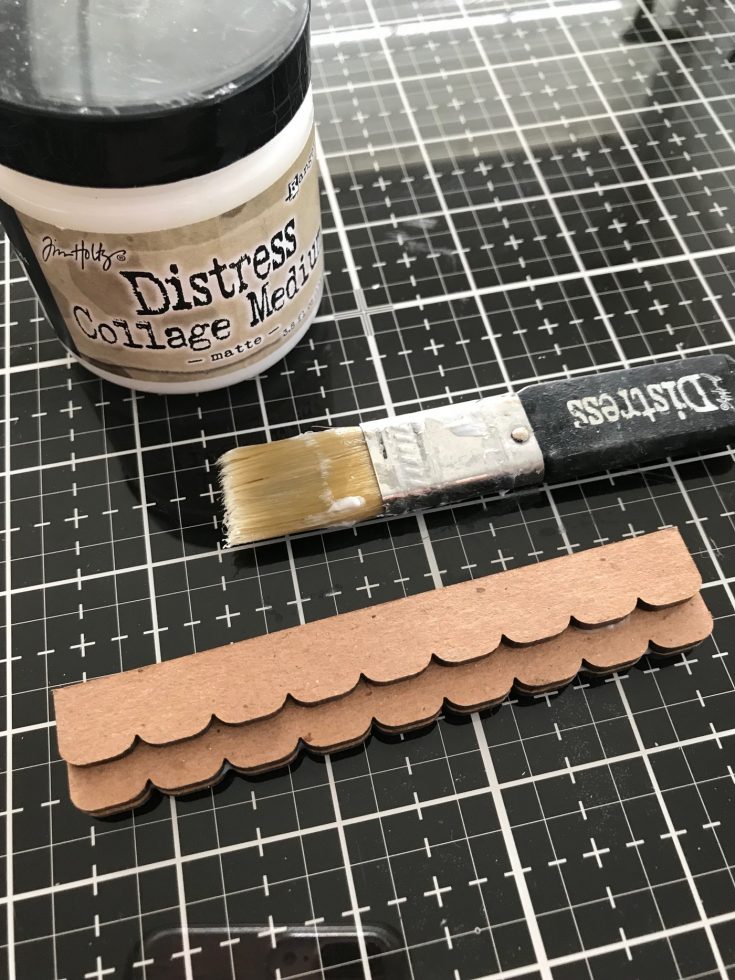
Use Collage Medium to glue the pieces together to create a small shelf.
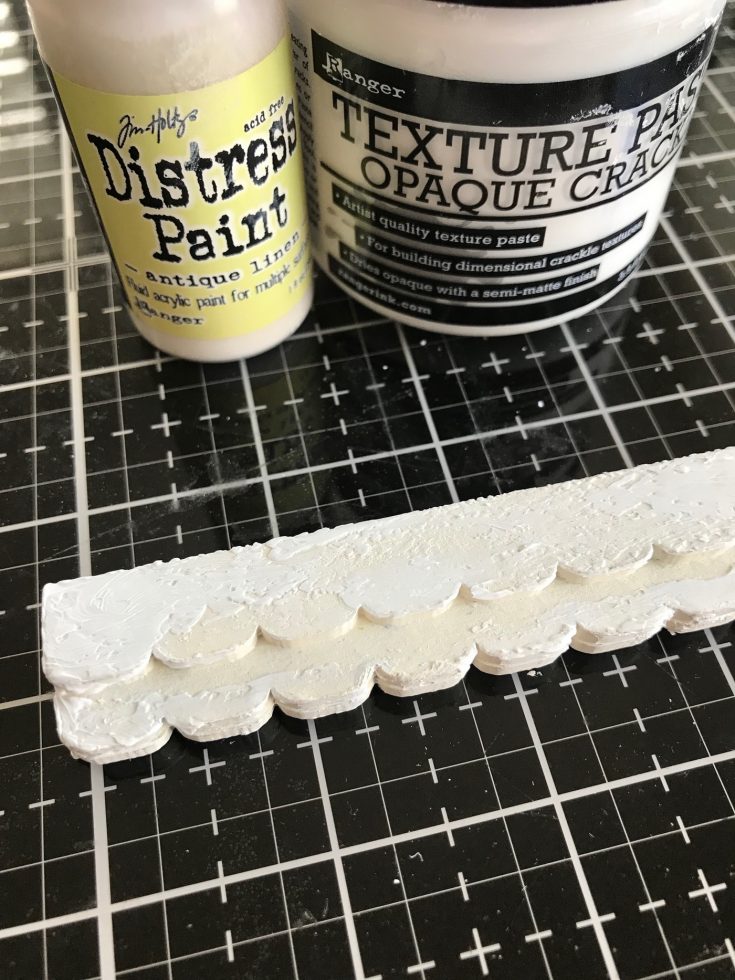
Paint the shelf with Antique Linen Distress Paint. Once dry, use your fingertip to smear Opaque Crackle Texture Paste over the surface. Ranger Opaque Crackle dries quickly and adheres to the surface like glue. I have never had an instance of flaking when I color the crackle after it is dry. In my opinion it is a vast improvement from the crackle paste we have all used in the past. Set it aside to dry for least 30 minutes before moving on to the next step.
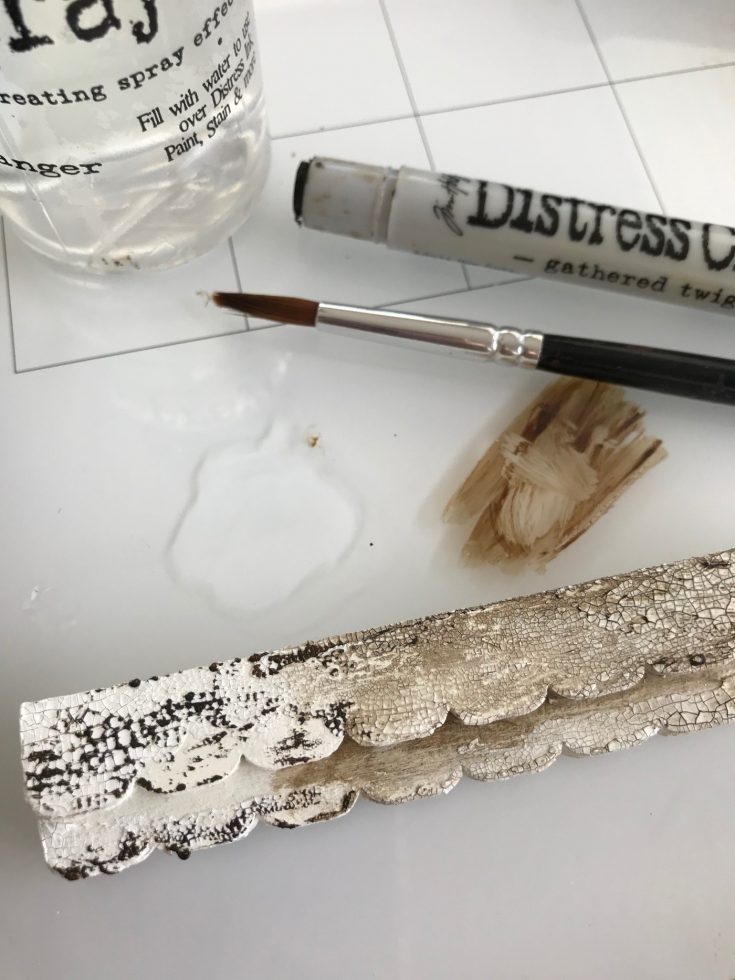
Scribble the crayon over the crackled surface. Dip your fingertip into water and rub over the crayon so that it flows in the all the cracks. Now because this shelf has a stair-step, I used a paint brush to pick up some crayon from my Glass Media Mat so I could work it into the scallops. If you get too much, just pounce with a wet wipe.
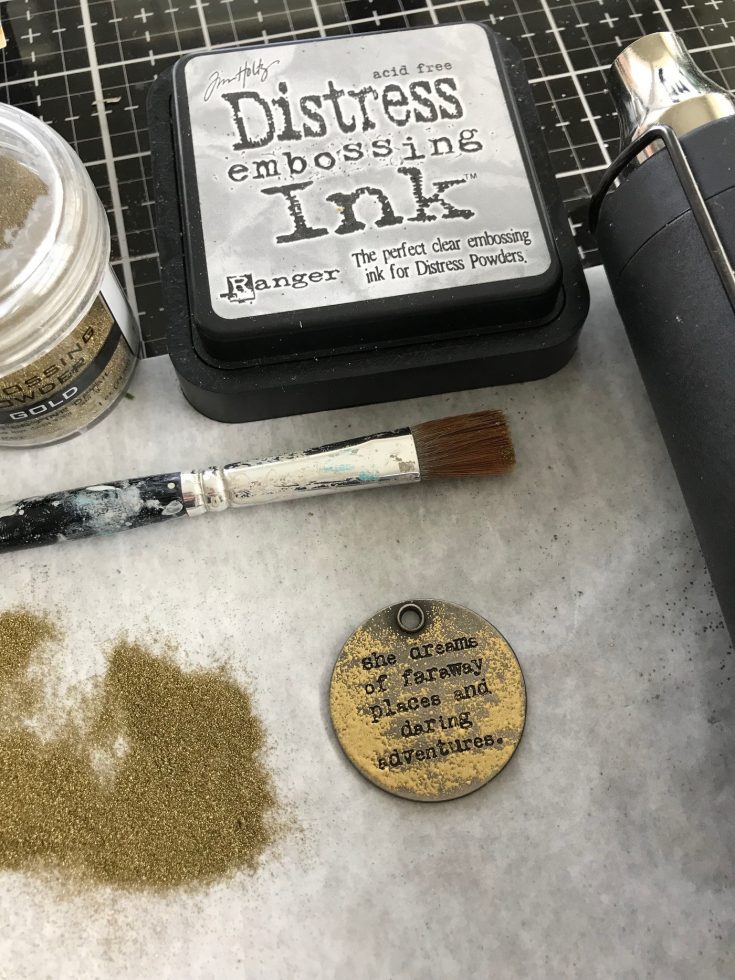
Pounce Distress Embossing Ink over the SURFACE of a Quote Token (try not to squish the pad into the recessed words). Place token onto a paper surface and pour Embossing Powder Super Fine Gold over the token. Tap the back of the token to knock off the excess powder. I used a soft brush to gently brush away powder that was covering the words. Use an embossing gun to melt the powder. Do not touch the token till cooled.
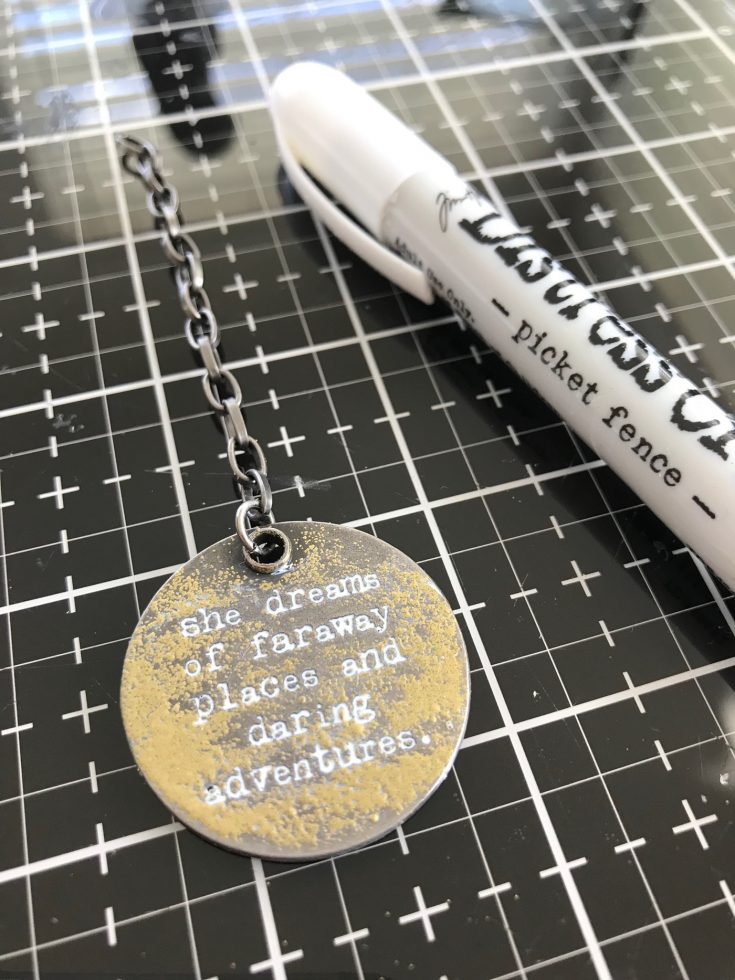
Use Picket Fence Distress Crayon to fill in the words of the token. Wipe away any excess with a wet wipe. Add jump ring and chain to the Quote Token.
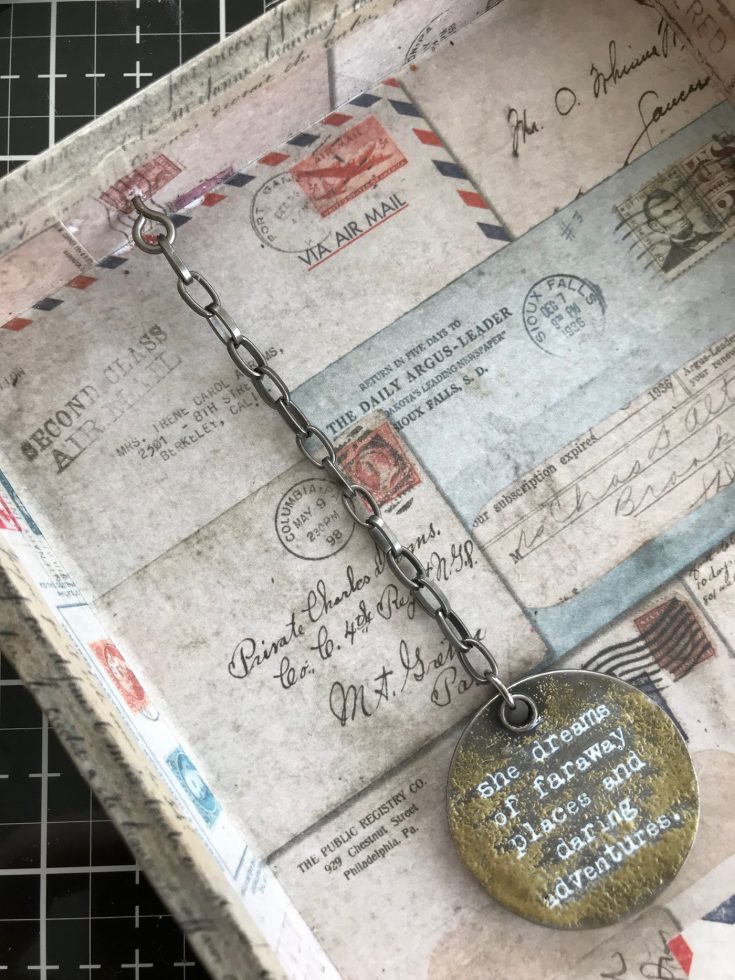
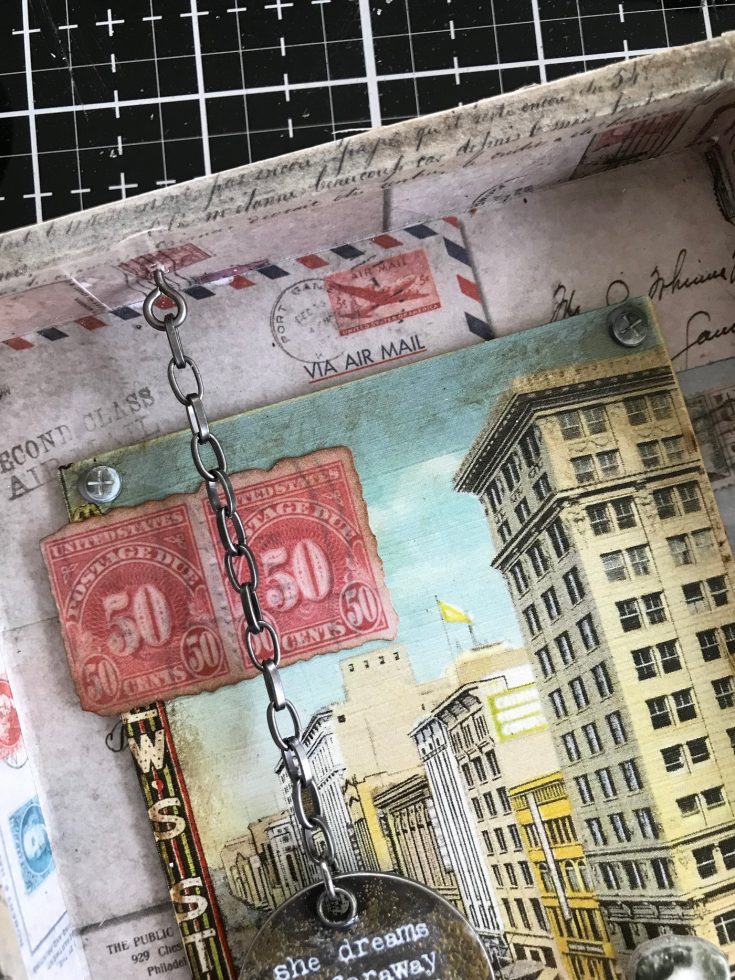
To hang the Quote Token, add a screw eye (from the Vignette Hardware pack) to the Vignette Tray. It’s easiest if you make a hole in the wood with an awl and then add the screw eye, twisting until secure.
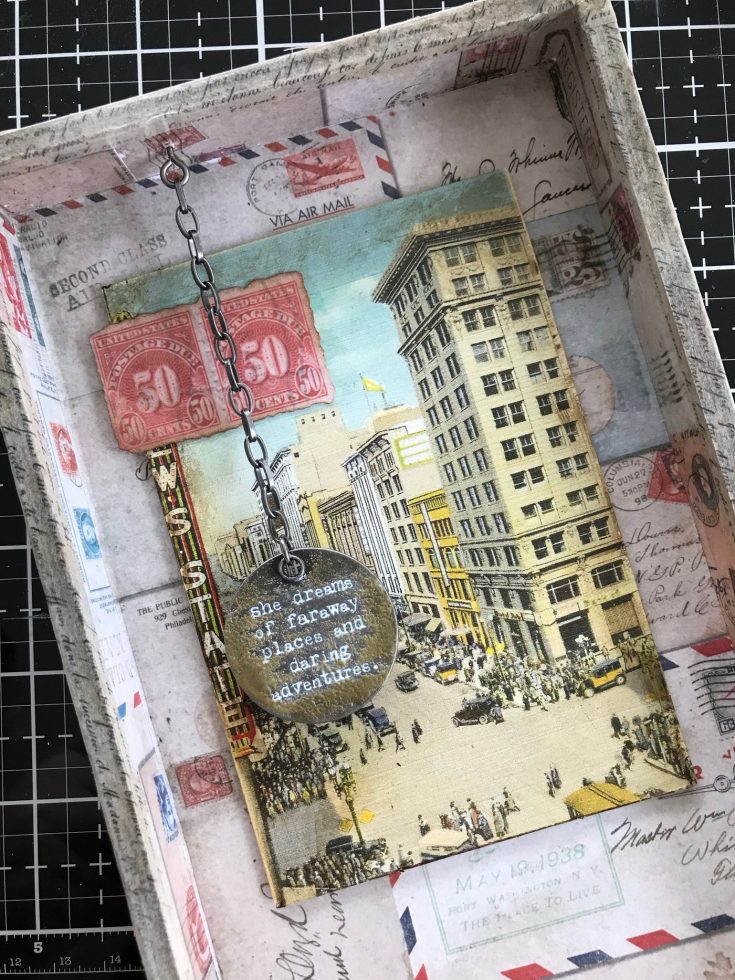
Add 3D foam squares to the back of postcard from the new Layers Remnants pack, centering in the top portion of the tray. Adhere two red stamps from the Keepsakes pack to the postcard behind the chain. I also added foam squares to the back of the Quote Token to keep it from swinging.
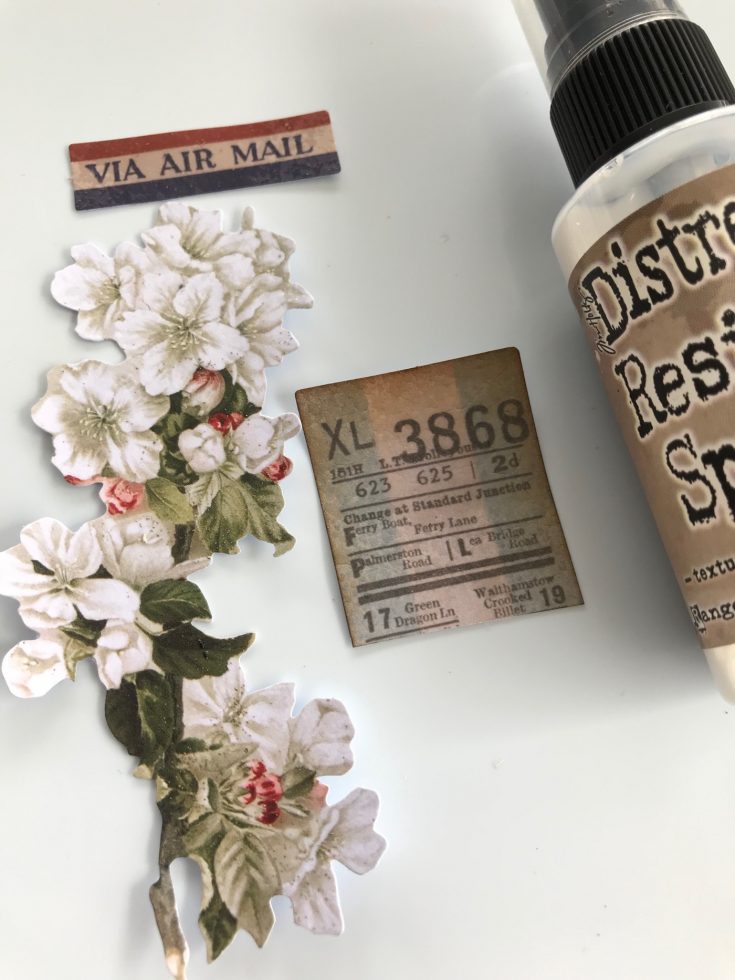
Spray a few pieces of ephemera from the Keepsakes pack with Distress Resist Spray. The Resist spray will coat the surface and leave a shiny finish once dry. NOTE: you will need to use a Splat Box when spraying Distress Resist Spray because it sticks to any surface!
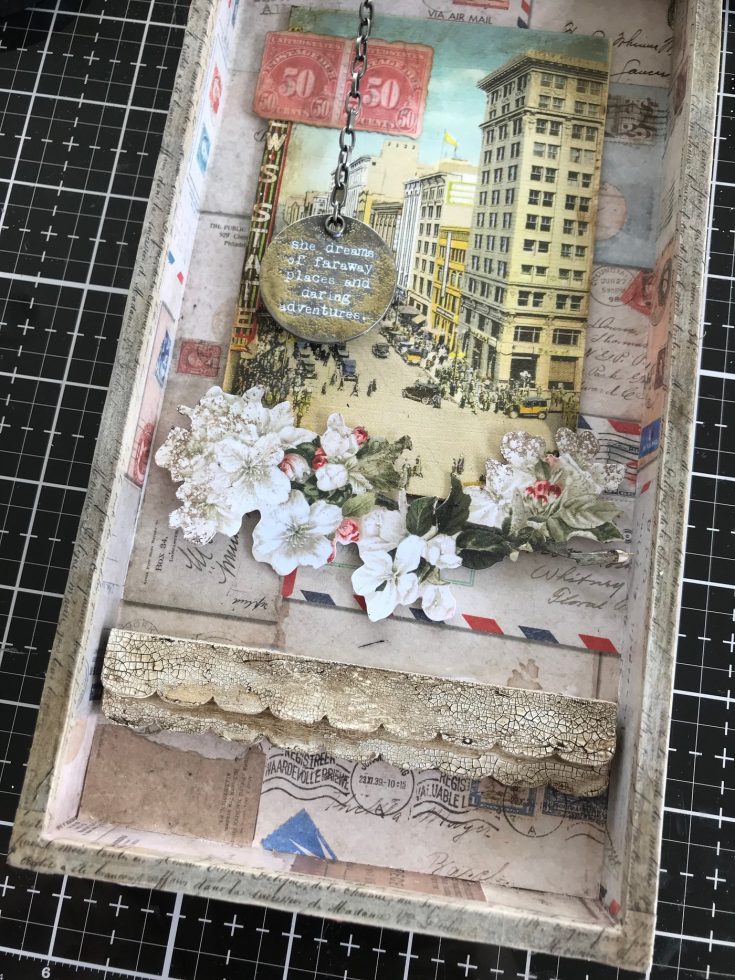
Adhere the shelf to the tray with 3D Foam Squares. Add the flower ephemera with thin 3D Foam Squares (they are 1/2 the thickness of the the standard 3D foam square).
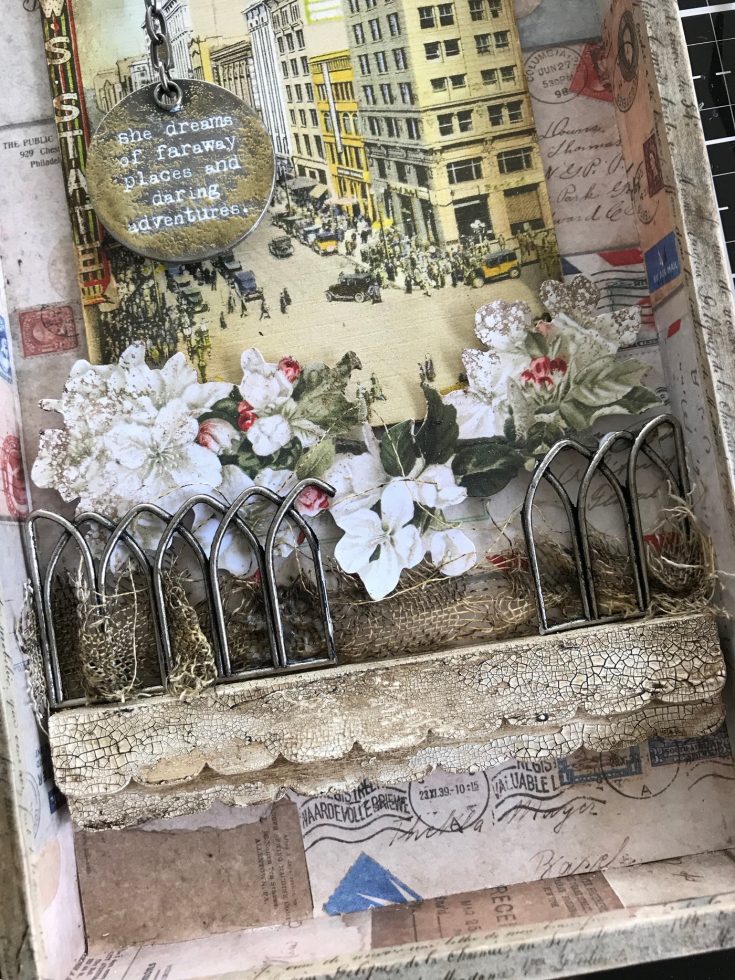
Bend a Metal Gate until it breaks. Weave dyed idea-ology Mummy Cloth (this was a Halloween product that I should have bought more of!) through the Metal Gate and glue into place. Make sure the ends of the gate are touching the sides of the tray, leaving a gap between the two pieces.
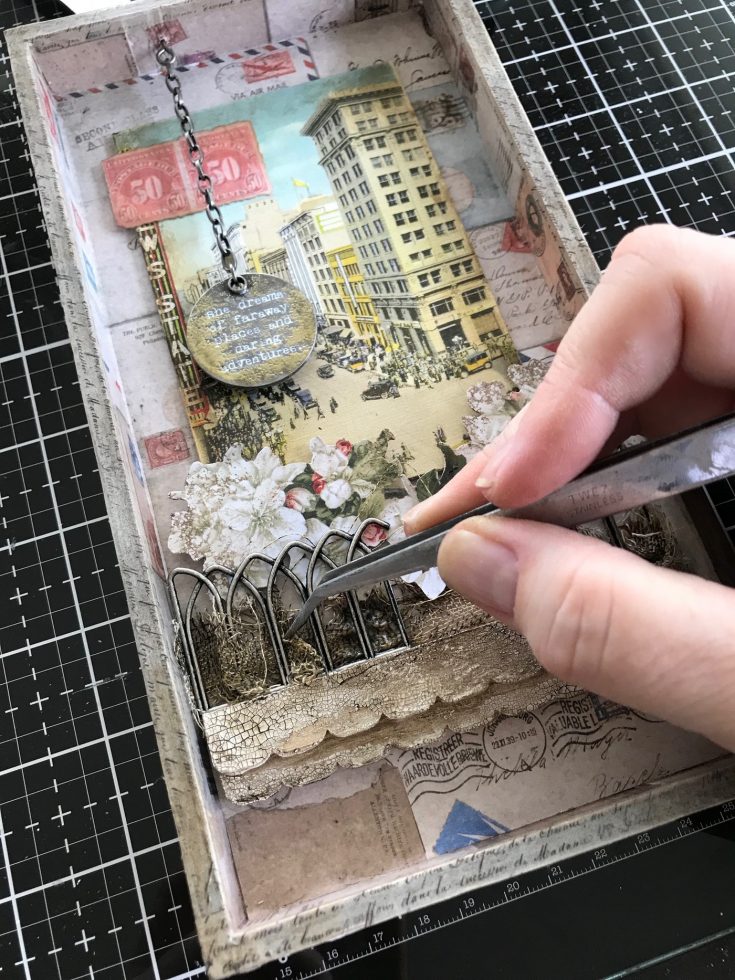
Use tweezers to manipulate the Mummy Cloth in and out of the gate. Add additional Collage Medium in small areas to keep it in place. Set aside to dry.
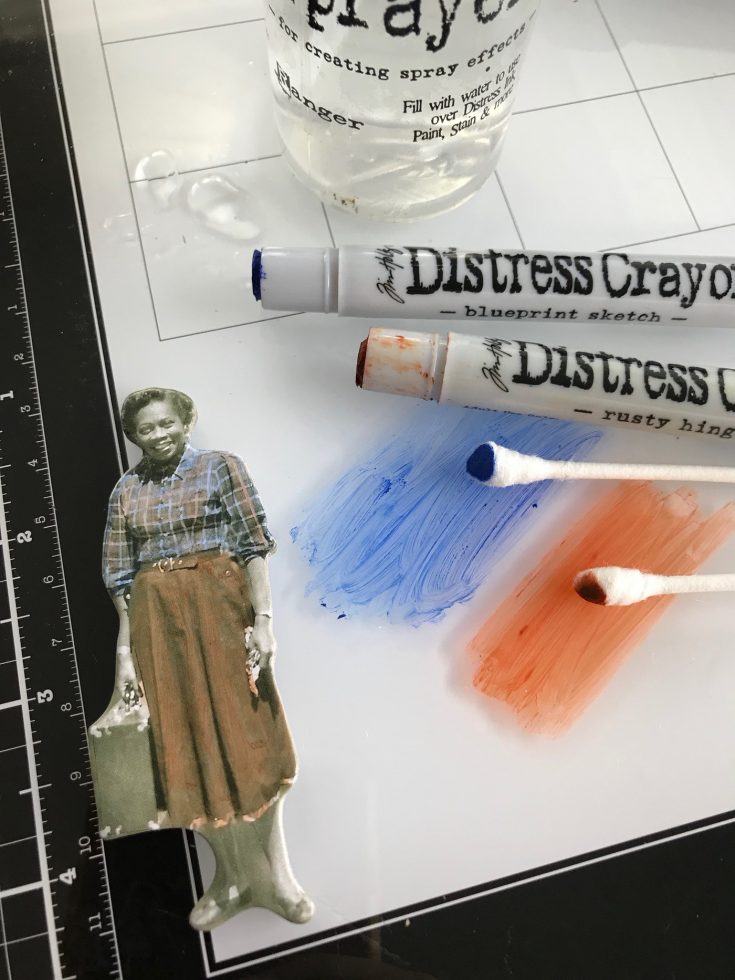
Color the clothes of a Baseboard Doll with Distress Crayons. The new Baseboard Dolls look like Paper Dolls but they are mounted on heavy chipboard so they do not bend. I like to scribble the crayons onto the Glass Media Mat, then pick it up with a damp (not wet) cotton swab. The crayon goes on easily and the color does not fade.
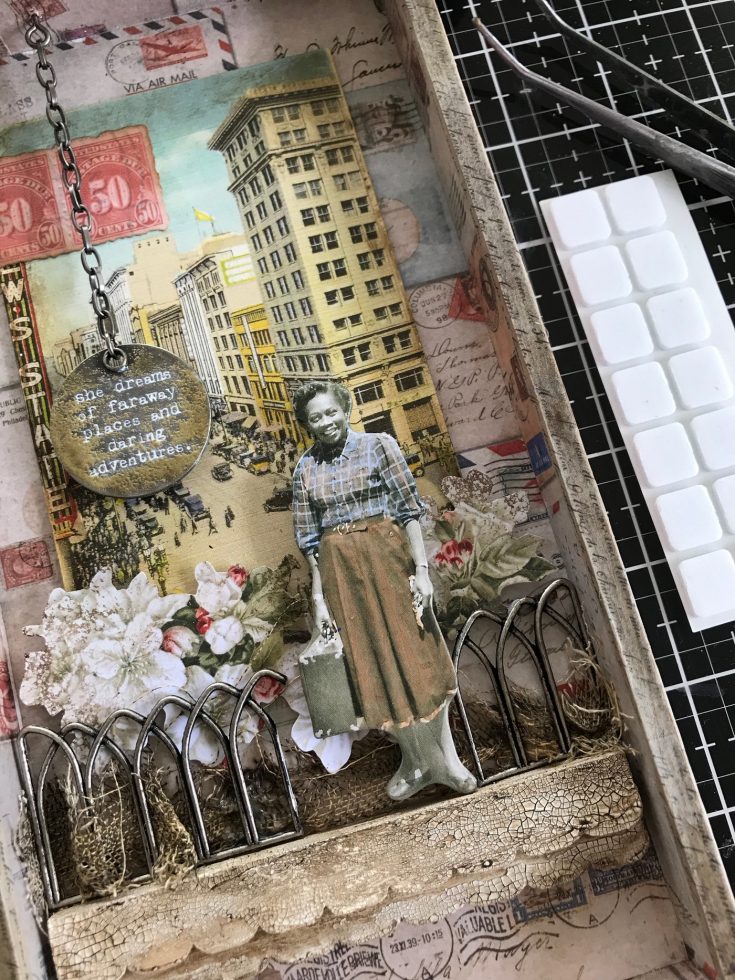
Use a double stack of 3D foam squares to add the Baseboard Doll to the scene where the gate is broken. She has her suitcase and she is ready to travel the world!
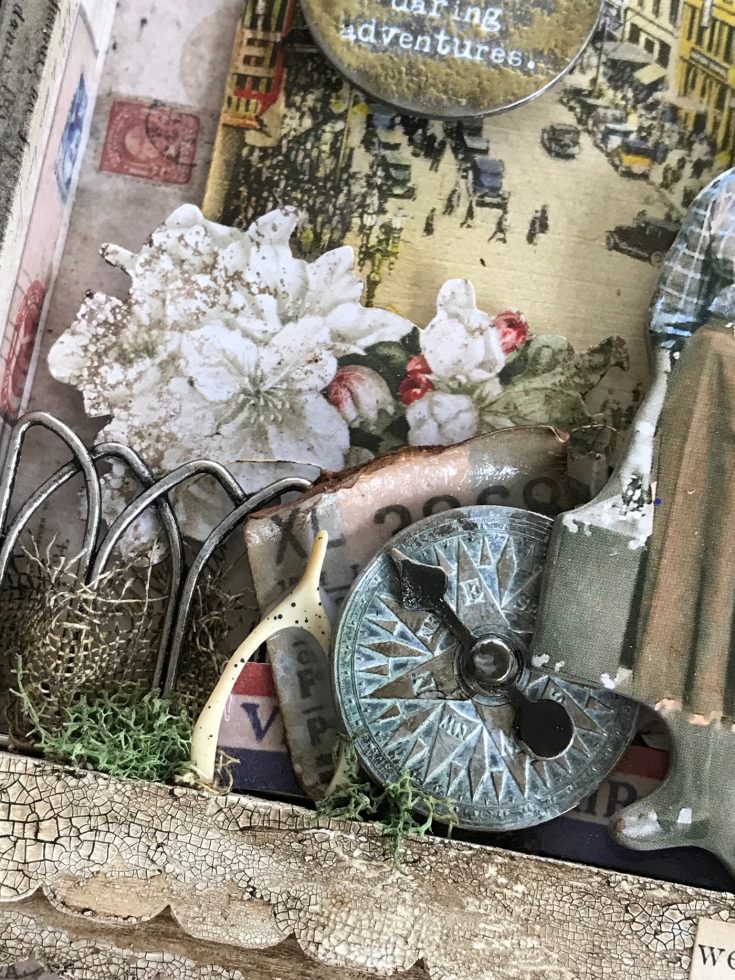
Add a Compass Coin with spinner to show her the way, a train ticket from the ephemera pack, and a wishbone. The wishbone is placed so all her wishes run out the bottom and into the universe!
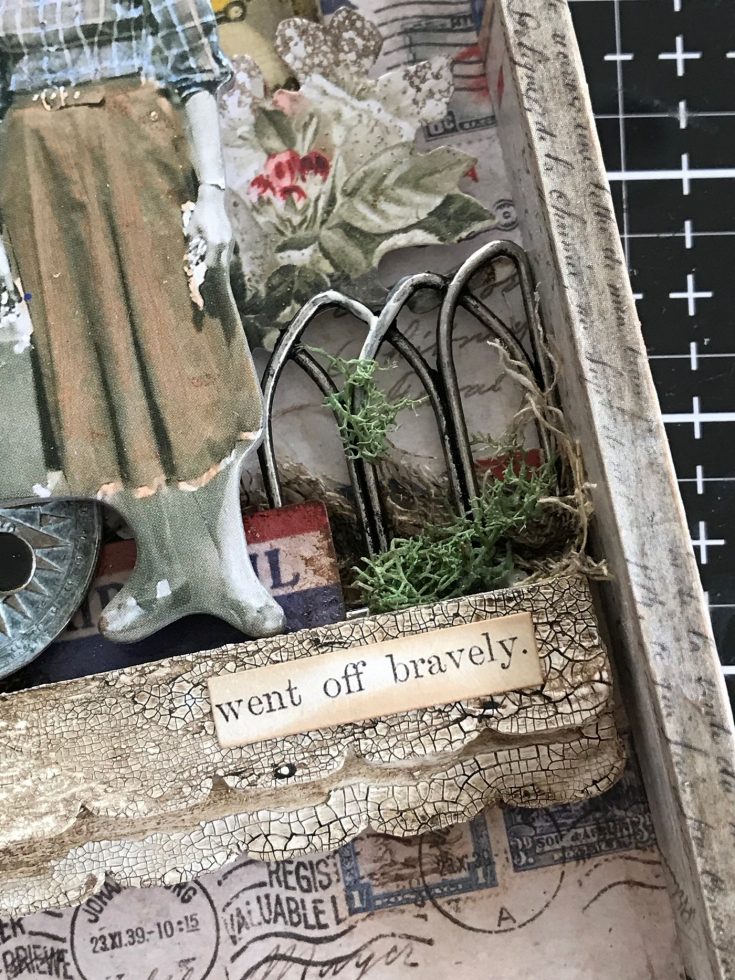
I added a sentiment from the Clipping stickers to the shelf because it was just the perfect words for the project. I am convinced you will always find the right words on one of the four sheets in the package!
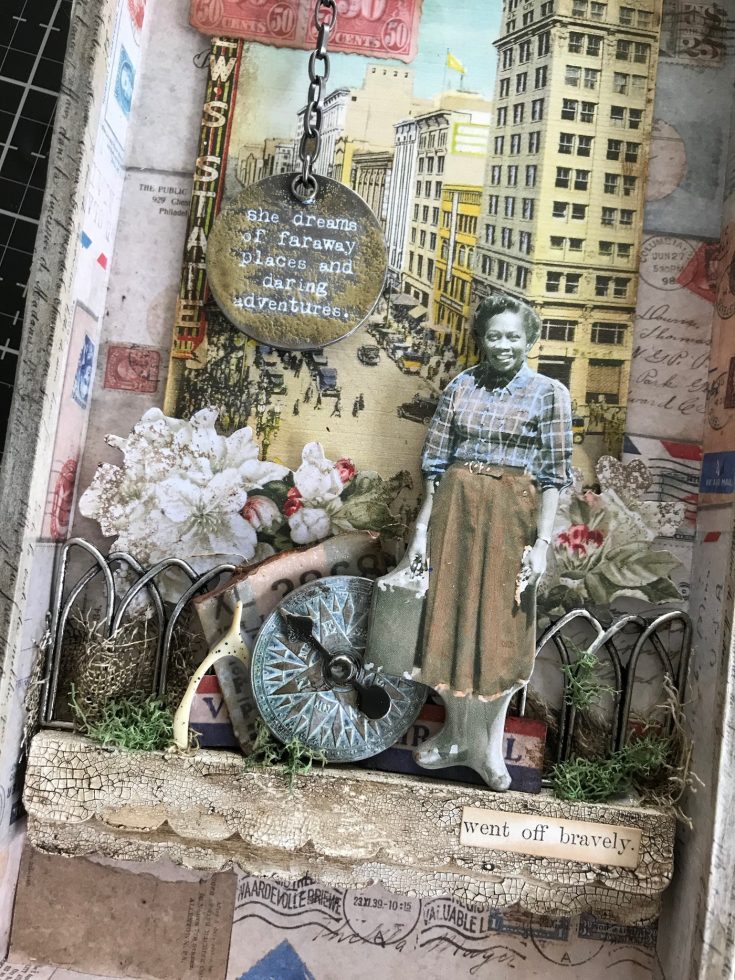
I did add a bit of moss but not under her feet because there is no moss growing there…she’s on the move!
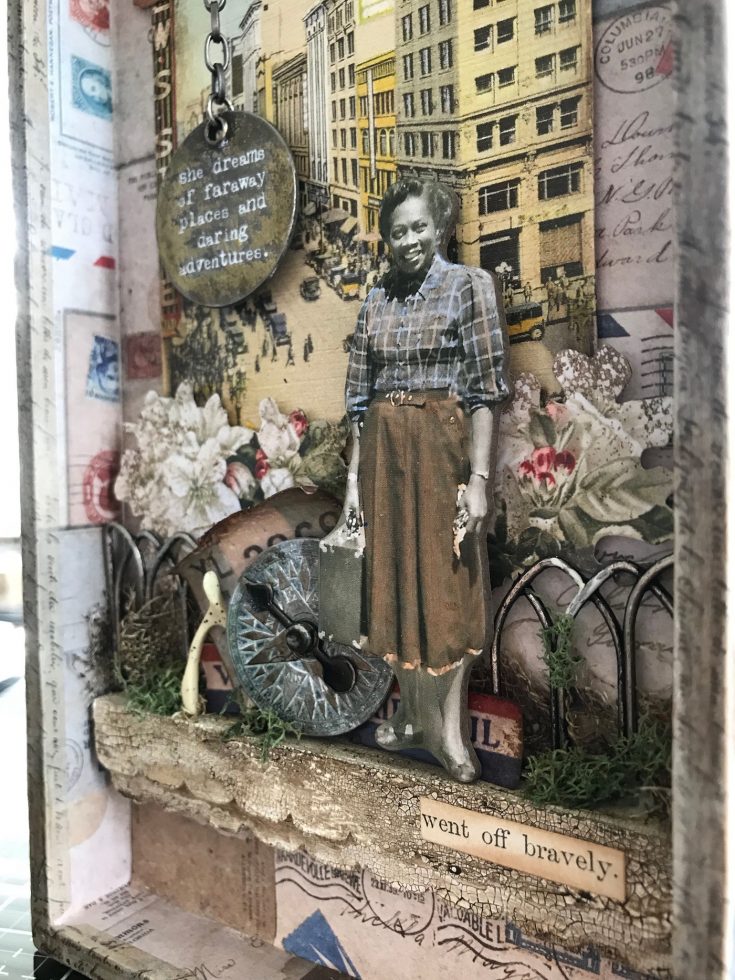
You can see more of the dimension at an angle (the secret is always foam squares).
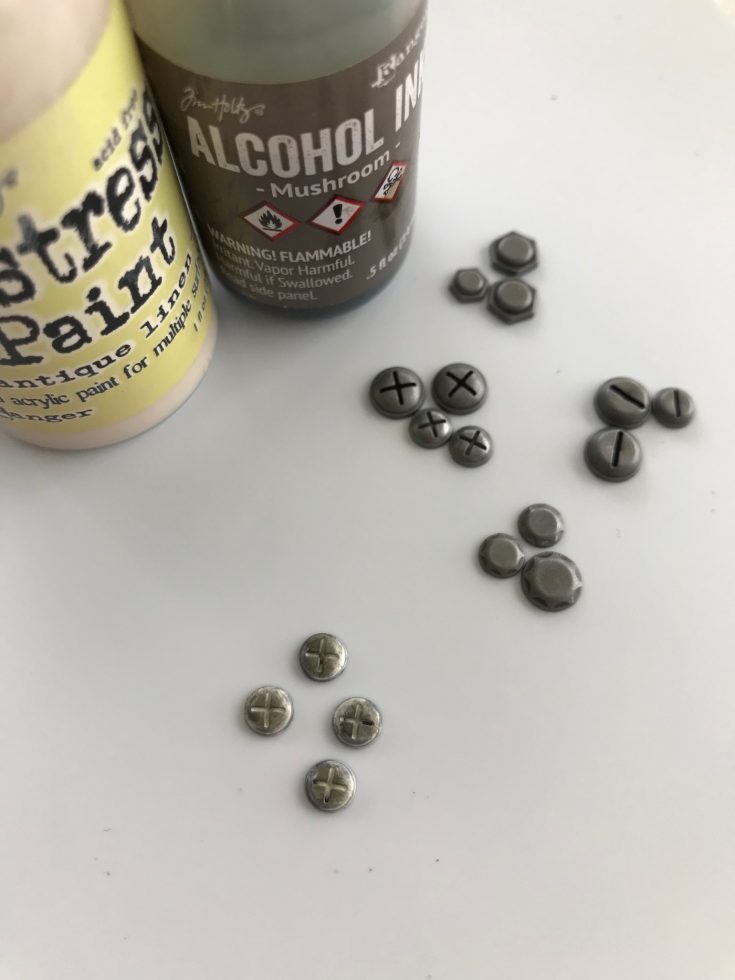
The last thing to ‘age’ is the new Hardware Heads. They come in two sizes and in four designs. And you might as well just buy a boatload now because you are going to need a lot of these. I tapped the top with a bit of Antique Linen Distress Paint and then once they were dry I pounced Mushroom Alcohol Ink over the top. Just one quick pounce was enough.
I added two Hardware Heads to the top of the postcard. No more brad legs to punch a hole and bend back..just glue these in place!
Thank you for following along today! I hope this project has inspired you to move forward with a long held dream and make it come to life.
Now carry on, paula
SUPPLIES:
|


Thanks so much for stopping by and thanks to Paula for being our special guest!

Blog Candy Alert!! Follow our blog via email and comment on this post for a chance to win special blog candy!
One Stamp Five Ways: Cosmos Background
Hi friends! Happy Monday! We hope you had a fabulous weekend! As the month draws near a close (where did February go?!) It’s time for the latest edition of our much beloved “One stamp five ways” with Suzy Plantamura. Read on for more information and enjoy!
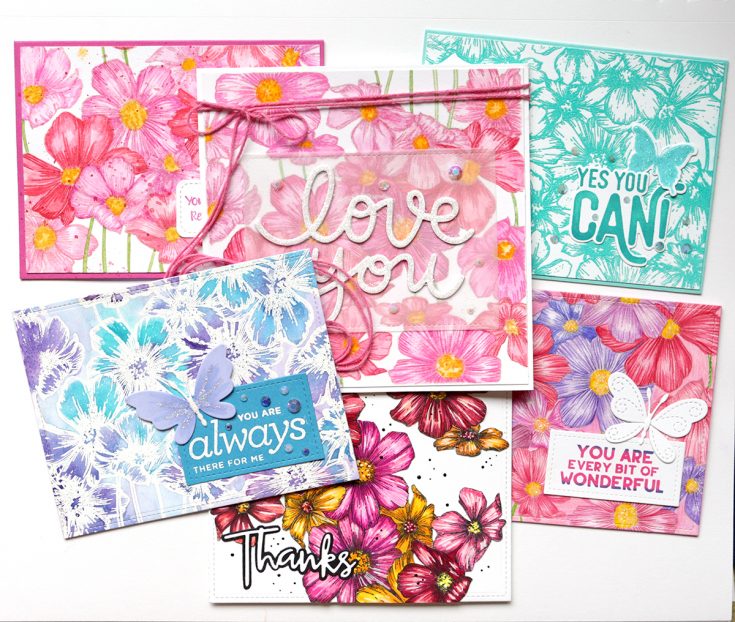
Hello SimonSays Stamp friends! Today I have a “One Stamp, Five Ways” post to share with you using a cling background stamp. This is very different than what I usually pick for these posts as it only has one design, but I thought it would be a fun challenge to try to use it in 5 different ways. For today’s post, I am using the Cosmos Background stamp as I love the flowers on this one! Here are all of my cards together:
I actually ended up making 6 cards as I used a technique to colorone of my backgrounds that I wanted to try two different ways. Now let’s getstarted with the details on each card!

This first card is watercolored using a no-line stampingtechnique. This image has so much detail and so many fine lines in the flowers,that I decided to add colored pencils over the watercolor. After I completedthis step, I decided I liked it better with just watercolor as it gave theflowers a softer look, so I made another one that way.
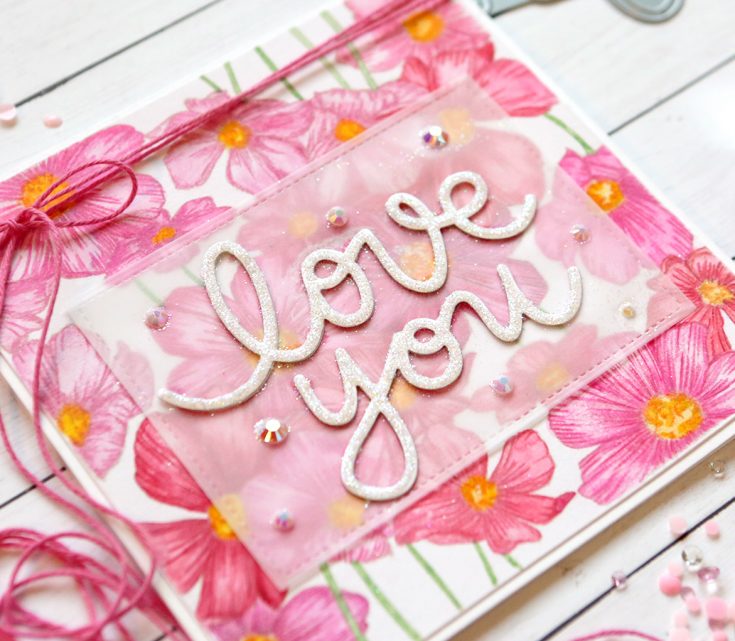
I left the stamped image the full size for this card. I hated totrim any of that gorgeous background off! I attached it to a 6×6 card base asit is a little smaller when trimmed. I used the Big Love You Wafer Die for thegreeting by die-cutting them twice out of white cardstock and gluing the twotogether so it is thicker. Then I covered it with White Blizzard Tonic NuvoDrops to add sheen and glitter. I wanted it even more sparkly, so I poured morewhite glitter on top of the Nuvo Drops. I attached the greeting on top of adie-cut rectangle from vellum so it wouldn’t cover up any of those prettyflowers I spent so long coloring!. I then added some Pretty Pink Posh jewels around the sentiment and some bright pink twine to the top of the card.
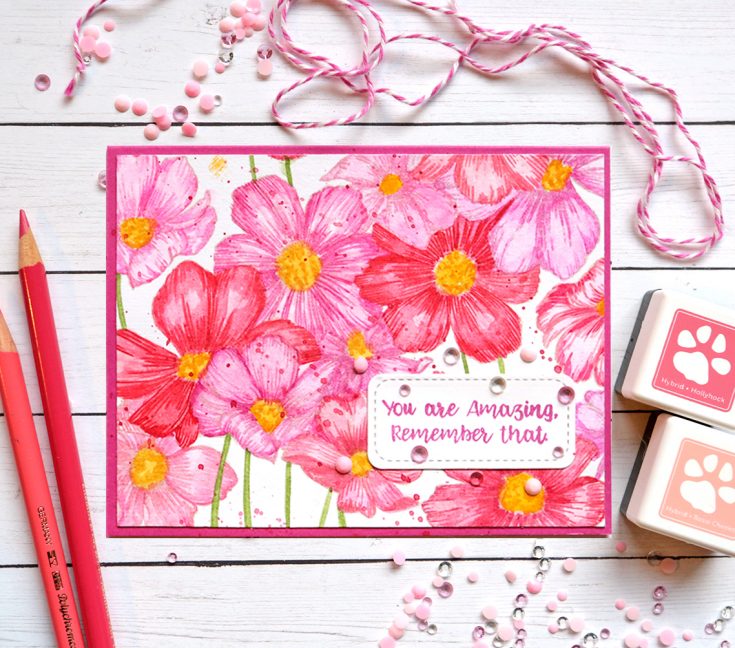
This is my second version of this technique with JUST watercolorthis time for a softer look. I used a very fine brush (2) for all of the linesin the flowers. After watercoloring it, I splattered some splotches ofsaturated paint over the card. I die-cutthis one into a rectangle (before I painted it so I didn’t waste time paintingthe extra part!) and attached it to a fuchsia card base.
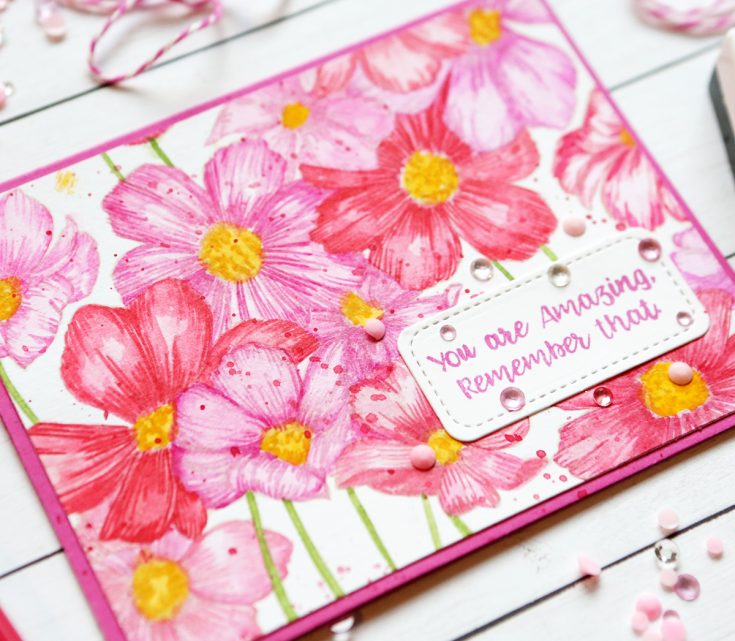
I stamped the sentiment using the Simon Says Stamp Sketch Lotus Flowers stamp with Hollyhock ink on a stitched rectangle from the Pretty Pink Posh Stitched Pieces die. I attached that to the front of the card. I added some PPP Sparkling Clear Jewels.
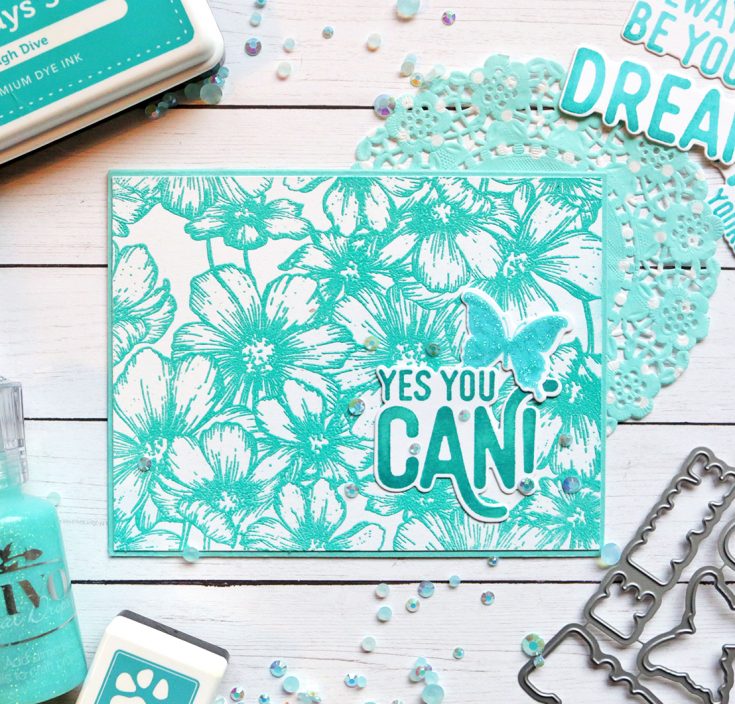
This card is a totally different look with the stamp and probablythe easiest card I made! I embossed the Cosmos Background Stamp on a whitecardstock rectangle using Wendy Vecchi Garden Patina embossing powder. I wasgoing to color in the flowers with Copic markers, but I thought they lookedgood just like this (like I said, easy!).

I used the CZ Yes You Can stamps and dies for the sentiment and the butterfly. I stamped them with two colors of SSS inks – Audrey Blue for thelighter shade and High Dive along the edges. I covered the butterfly with Aquatic Mist Tonic Nuvo Drops. I attached the sentiment and butterfly to thebottom of the card and added some PPP Sea Glass Jewels around them.

I stamped the entire Cosmos stamp with black ink this time onwhite cardstock. I’m not a big fan of black outlines, but I had to do it on atleast one of my cards to show you how it looked. I colored the images in withcolored pencils. I then cut the flowers out and attached them over a white cardbase. I added some white Uniball marker over them to try and balance out allthat black.
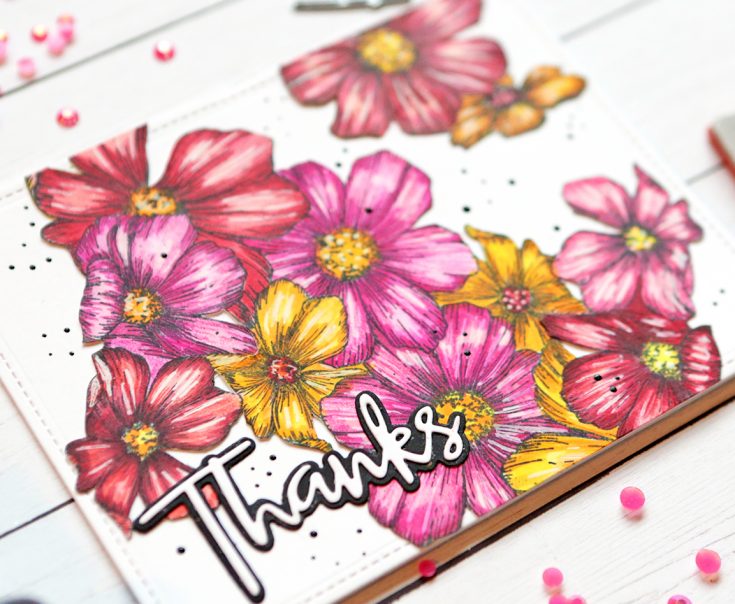
I die-cut the Script Thanks Wafer dies from white and blackcardstock and layered them on the bottom of the card. I then used some small droplets of Ebony Black Nuvo Drops around and on the flowers. Flicking black paint over the card would have given me a similar look, but I was too scared! haha
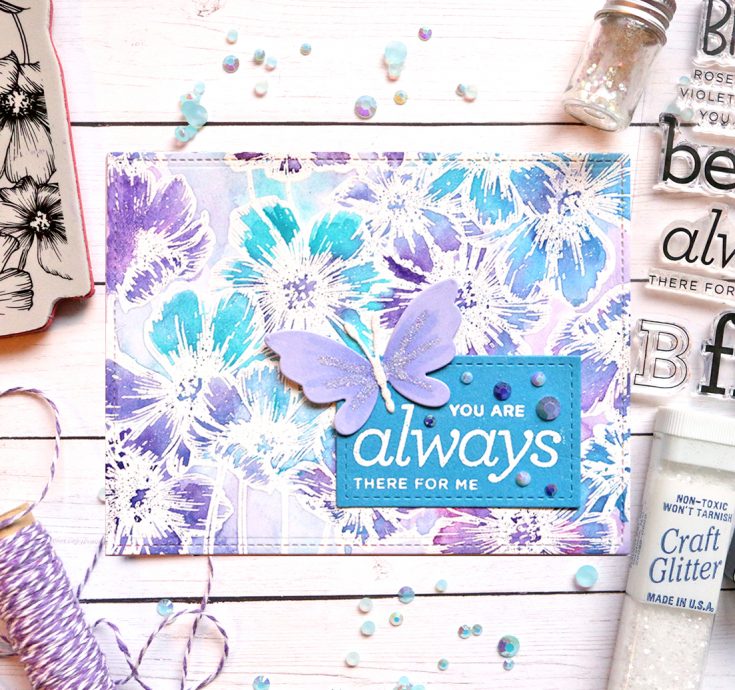
This is my favorite card as I just love the colors and prefer white images to black images. I embossed the Cosmos stamp with white embossing powder on Ranger Watercolor paper (because it is so white). I then watercolored inside all of the images with Daniel Smith watercolors.
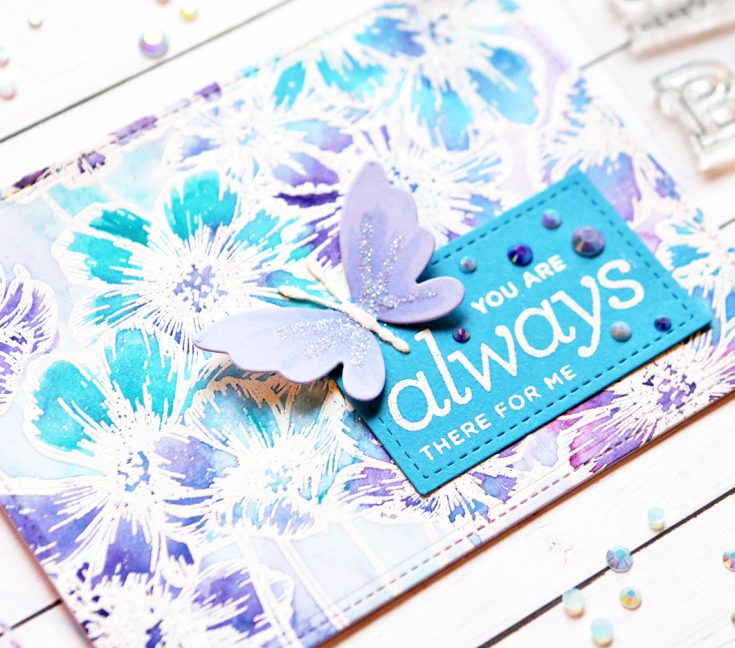
I die-cut a stitched rectangle from the PPP Storybook 1 die out ofteal cardstock. I embossed the sentiment from the CZ Design Besties stamp. Idie-cut a butterfly from the Adeline Butterfly Dies from white cardstock andcolored it with Copic markers. I used white glitter on the inside of the butterfly and on his wings. I attached both of those to the bottom corner ofthe card and added some PPP Sugar Plum Jewels Mix around the sentiment.
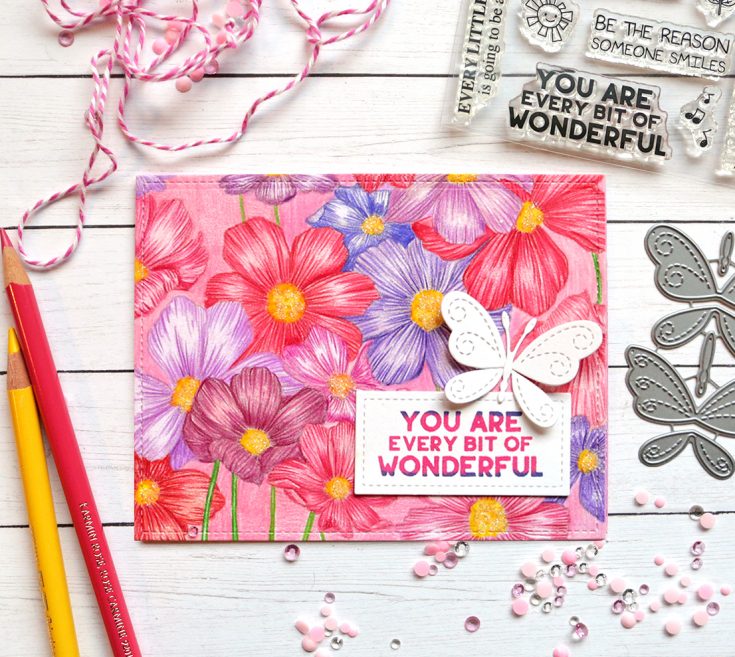
This was definitely my most time-consuming card from this group! Istamped the image on white cardstock with a light color of ink. I then coloredthem in with colored pencils. I did love the challenge of adding depth to theflowers by outlining all of those lines in the flowers. I colored thebackground with pink pencils as well.
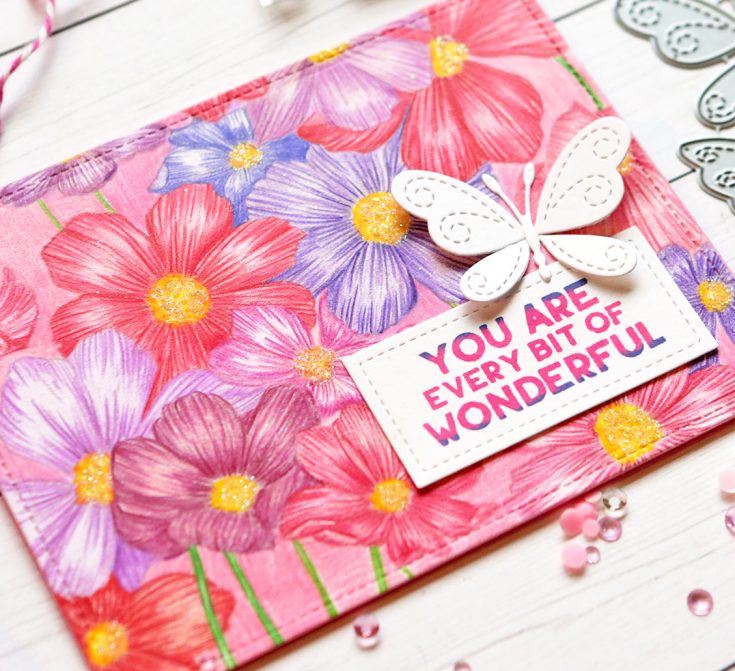
I added some glue and white glitter to the center of the flowers. I stamped the sentiment using an older stamp set in my stash called uplifting thoughts. I stamped it with Hollyhock Ink first and then added some Blue Violet ink on the edges for a two-toned look. I also added a white Stitched Butterfly Die above the sentiment.
I challenge all of you to challenge yourselves to try and use one stamp set in many different ways. Thick out of the box and try different techniques to get the most use out of your stamps. I loved seeing how
SUPPLIES:
|


Thanks so much for stopping by, and thanks to Suzy for being our guest!

Blog Candy Alert!! Follow our blog via email and comment on this post for a chance to win special blog candy!
Interactive Cards by Jess: Magnetic Slider Card

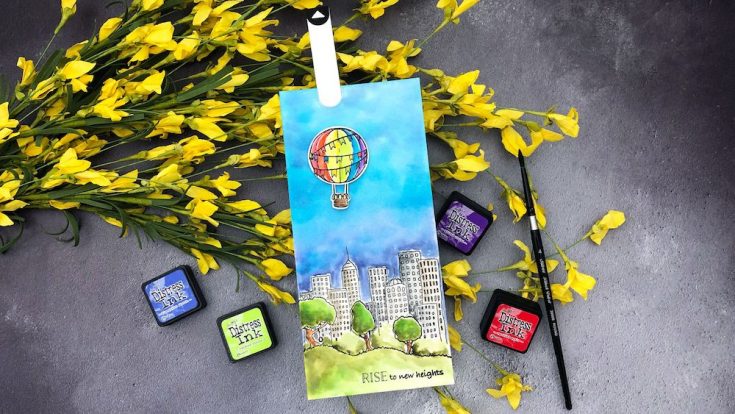
Hi friends! Happy Sunday! Please join me in welcoming Jessica Frost-Ballas back to our blog for the latest installment of Interactive Cards by Jess! She’s using Hero Arts’ Sky’s the Limit clear stamps and Concord & 9th’s City Stacks clear stamps to build this fun scene with a fun magnetic surprise! Read on to learn more about this technique and enjoy!
SUPPLIES:
|


Thanks so much for stopping by and thanks to Jessica for being our guest!

Blog Candy Alert!! Follow our blog via email and comment on this post for a chance to win special blog candy!


