Simon Says Stamp Card Kit Reveal and Inspiration: Hello Darling
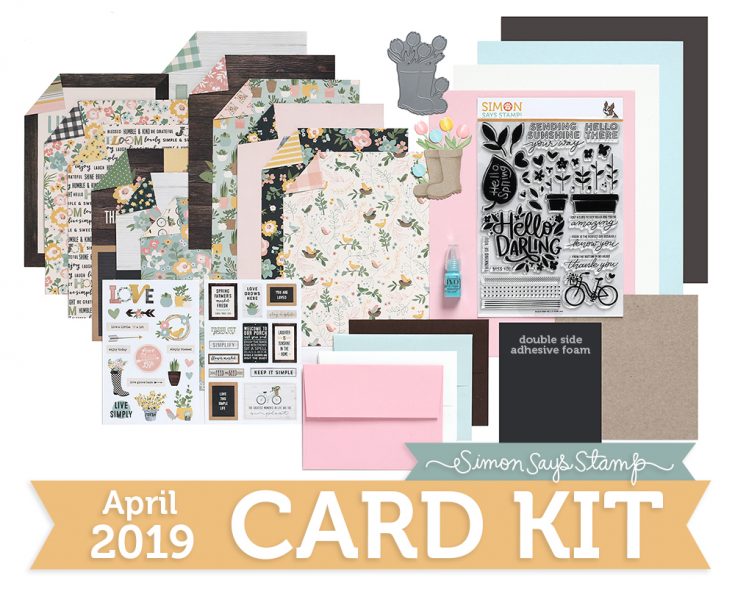
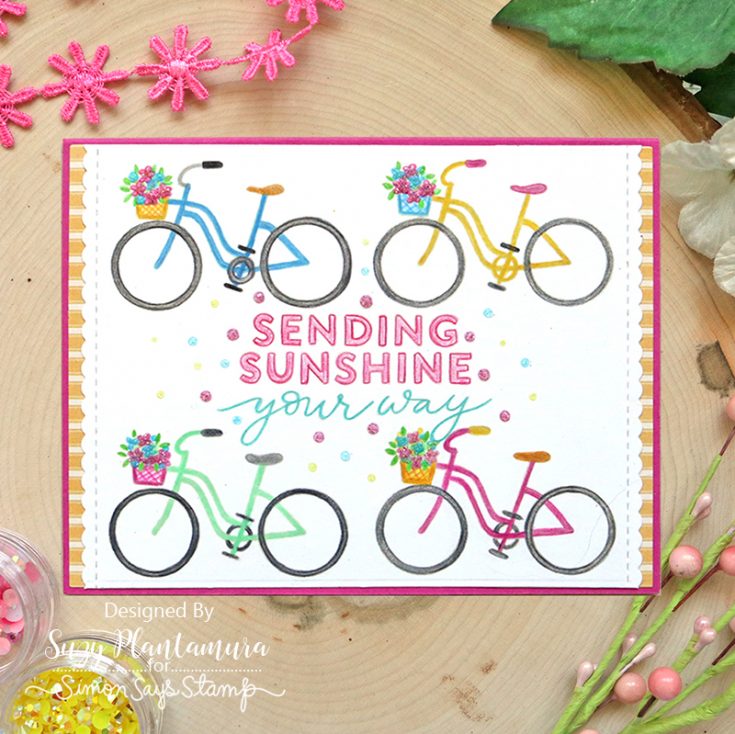
Hello Darling, our April 2019 Card Kit, is as fresh as a spring garden!
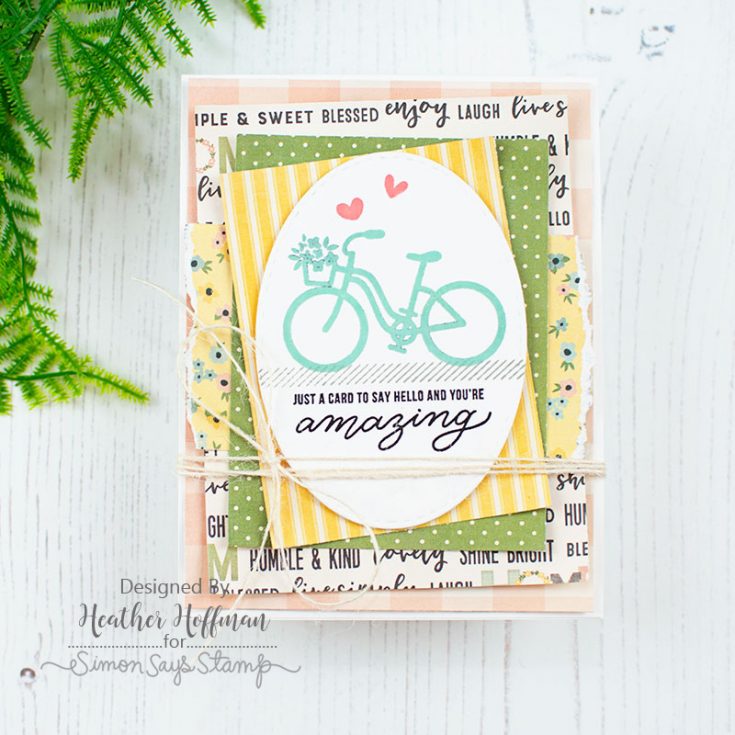
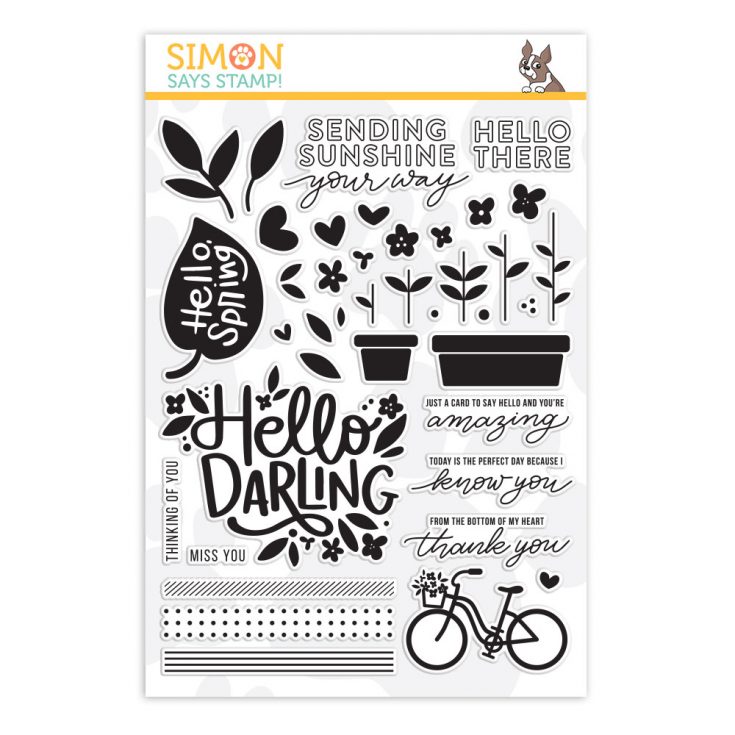
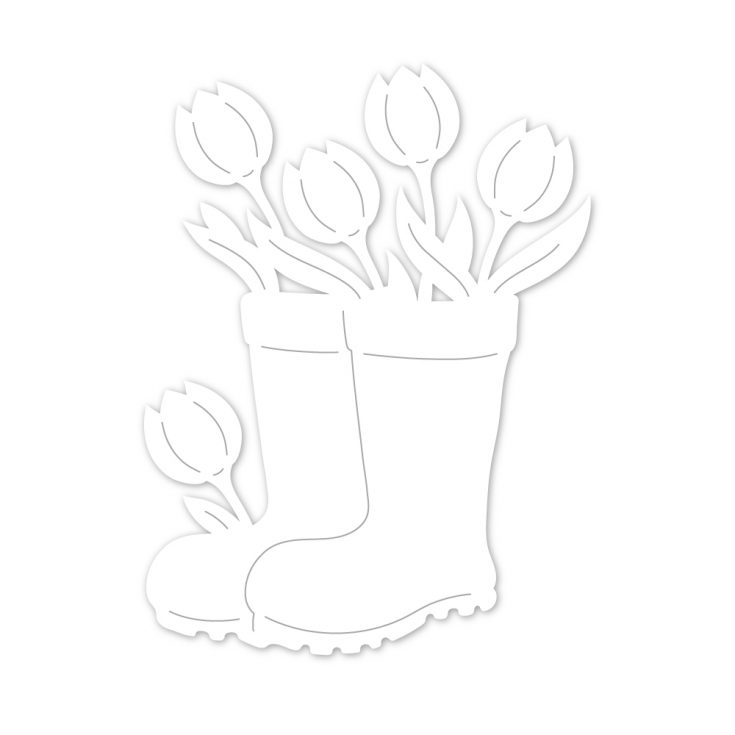
You’ll adore the charming 6×8 Simon exclusive, Hello Darling stamp set with gorgeous sentiments, refreshing flowers and pots, and even a cheery bicycle. The Simon exclusive Rainboot Planter die is a sweet way to add springtime flair to your designs, too!
This kit features an array of fresh and pretty Simple Stories Spring Farmhouse patterned papers, along with 2 custom sheets of coordinating stickers. We’ve also included a bottle of Tonic Bohemian Teal Vintage Drops, a 4×6 sheet of Sizzix black foam adhesive, and four Simon envelopes! Everything is complemented perfectly with coordinating Simon brand cardstocks.
Our April Card Kit, Hello Darling will inspire you to create a bouquet of springtime greetings!
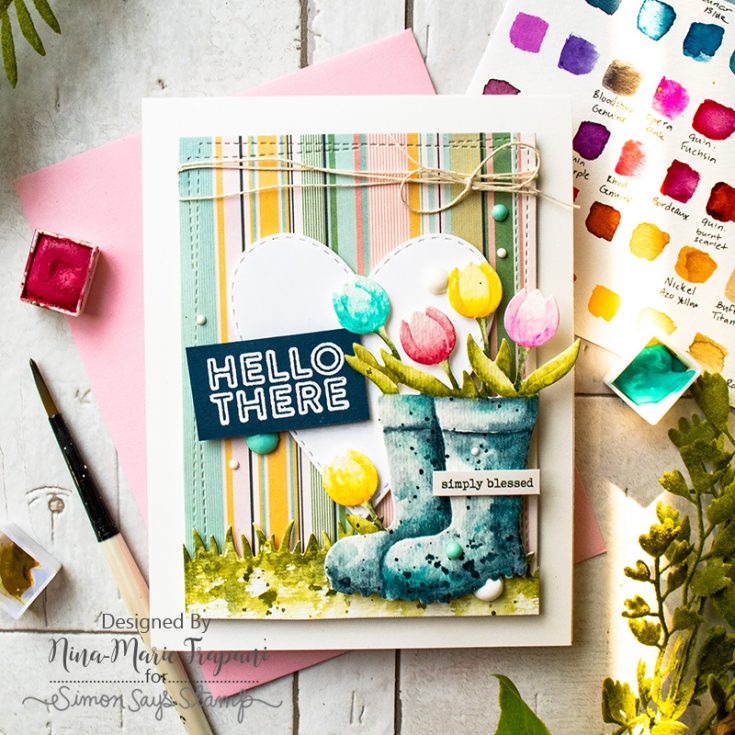
The NEW Hello Darling 6×8″ clear stamp set and Rainboot Planter Die are available for individual purchase in our store!
Don’t forget! We have LOTS of gorgeous card kit inspiration to access and add to in our Card Kit Galleries!
You can purchase the kit at $34.99, or you can subscribe to our kit of the month program for just $29.99 (plus S&H) per month to have our kits delivered right to your door each month!
If you are a subscriber who used Paypal to purchase your subscription, please be sure to pay the invoice that we send you within 3 business days. We have a limited number of this card kit in stock and don’t want you to miss out. For easier and quicker monthly processing, please contact us via email or telephone and we will put your credit card on file as a courtesy for you. Card kits bill and ship anytime between the 16 – 30 of every month.
Fresh Bloom ? Blog Hop WINNERS!

Hello friends! Have you seen our Simon exclusive Fresh Bloom release? Our Simon Says Stamp exclusive Fresh Bloom product lineup is filled with lots of ways to celebrate spring! There are flowers galore, Easter products you’ll love, and beautiful ways to share handmade kindness! You’ll also find some cool new designs from CZ Design, and there’s a fresh new set of watercolor cards from Suzy Plantamura. We are so excited for you to play with all of these awesome new products!
To celebrate this phenomenal release, we hosted a two-day blog hop! The hops featured many talented designers and each one created wonderful projects to inspire you. If you missed the hops, you can find the direct links here: DAY ONE and DAY TWO.
A BIG thank you to all of YOU who joined us for the hops! We enjoy hearing from each of you, and your words of encouragement and appreciation to each of the designers mean so much to us here at Simon and to them. It’s our tradition to give away gift certificates to random commenters on each blog stop, and today we are revealing all of the winners! So without further ado, I present to you our winners!
DAY ONE HOP WINNERS:
from Simon Says Stamp’s blog: Sheila Bacon!
from Jennifer McGuires’s blog: Tracy Timm!
from Kristina Werner’s blog: Retta Lutte!
from Cathy Zielske’s blog: Lauryne Cunningham!
from Nina-Marie Trapani’s blog: Angie Cammack!
from Nichol Spohr’s blog: Jeannie Boudet!
from Jessica Frost-Ballas’s blog: dpglasser!
from Suzy Plantamura’s blog: kre8tivekate!
from Lisa Addesa’s blog: hippymom83!
from Amy Rysavy’s blog: Shari Czerwinski!
from Lea Lawson’s blog: Cheryl Rigney!
DAY TWO HOP WINNERS:
from Simon Says Stamp’s blog: Jennifer Petersen!
from Laura Bassen’s blog: Becky Green!
from Debby Hughes’s blog: KELLY HUNSAKER!
from Amanda Korotkova’s blog: Darlene Gabriel!
from Heather Ruwe’s blog: Jenrescuemama!
from Gayatri Murali’s blog: Mary Jo Stewart!
from Heather Hoffman’s blog: Lynne Dillard!
from Bibi Cameron’s blog: Linda Towill!
from Anna Kossakovskaya’s blog: Surekha Galagoda!
from Barb Engler’s blog: Brenda in IN!
from Kristina Pokazenieva’s blog: BeverlyBL!
from Yoonsun Hur’s blog: Eva N!
If you see your name listed above, CONGRATULATIONS! Please email [email protected] and let him know that you are one of our Fresh Bloom ? Blog Hop winners! You’ll receive a $25 Gift Card. ???
Thanks again for hopping along with us! We hope you enjoy our Fresh Bloom release and that it gives you creative enjoyment for months to come!
Winning ROCKS, and so do you!
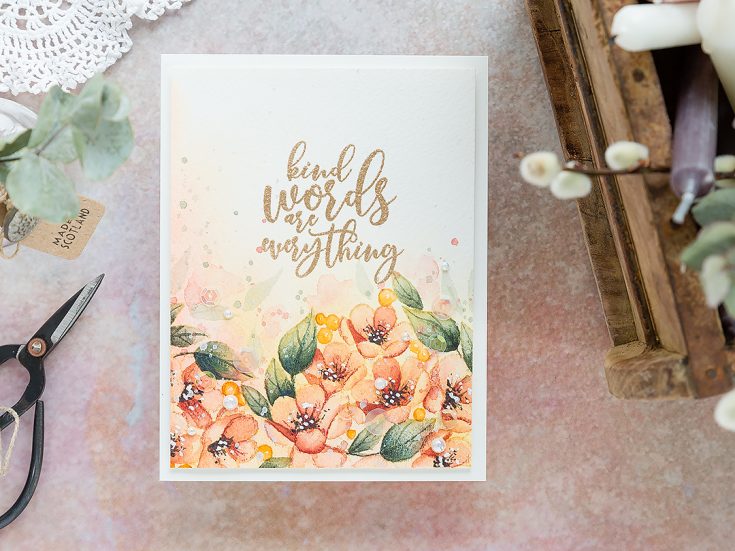
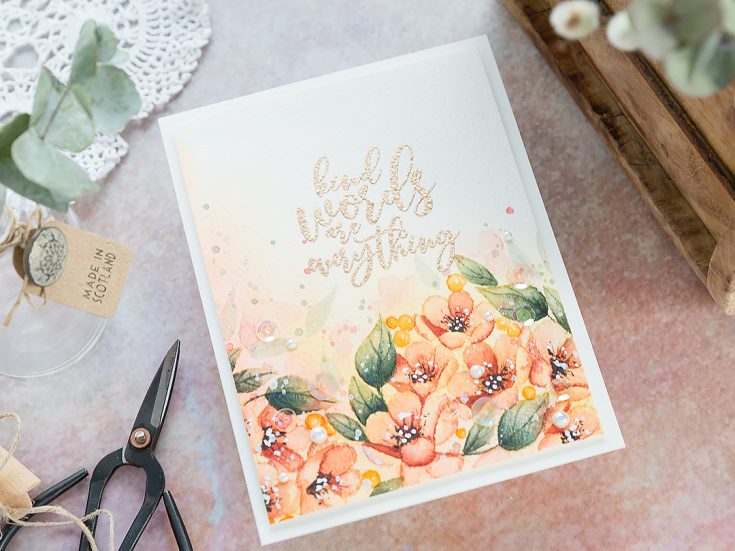
Doodling with Debby: Watercolored Flower Border
Hi friends! Happy Wednesday! Welcome to the latest edition of Doodling with Debby with the always fabulous Debby Hughes! Be sure to watch the video and read on to learn more! Enjoy!

Hi it’s Debby here and for my Doodling With Debby video feature for Simon Says Stamp this month I’ve been inspired by the changing seasons to dig out all my flower stamps recently and today I’ll be combining the Center Cut Flower background stamp with a sentiment from the So Loved set, both by Simon Says Stamp.

The Center Cut Flowers stamp has two elements, a frame, and a centerpiece and they can be stamped together or separately. I’ll be using just the centerpiece today to stamp and watercolor a border along the bottom of a piece of Arches Cold Pressed watercolor card, but before I stamped the border, I gave the watercolor card a wash of color first. I often paint my backgrounds after stamping and coloring the focal points, but this stamp has lots of detail going on, and the gaps between the flowers are quite small. To get a cohesive background, I thought it best to do the background first and then paint over the top. So, having given the
Having stamped the image once on the bottom right, I moved the card and lined up the stamp again but this time in the bottom left. I tried to nestle the image into the first impression so that there were minimal gaps between the two. I think one leaf overlaps, but that is OK as the ink reacts with water I can choose which part of the overlapping images to paint and you’ll not know they ever overlapped afterwards. I taped the watercolour card to a board, I did this when painting the background too, and the reason for it is to prevent the card warping when using a lot of water. I certainly needed it when I painted the background as I liberally applied water then but possibly less so when painting the flowers as much less water was involved.
OK, so for the background and painting the focal point flowers I used Daniel Smith watercolors. For the background wash I mainly Quinacridone Gold and Quinacridone Coral. For the leaves I used in the main Undersea Green, Jadeite Green and a little Lunar Black to deepen the mix for the shadows. For the flowers, I used Quinacridone Coral, Pyrrol Scarlet, and Alizarin Crimson. The benefit of having the warmth of the Quinacridone Gold as the background wash is that anything you paint over the top will pick up that warmth and glow. It is one of the reasons I chose to paint the flowers in similar colors to the background to get that warm tone on tone look.
Now I have to say that for a long time I wasn’t impressed with where this painting was going. It was a bit of a mess at times, to be honest, and that is why I think there is a lesson in perseverance to be learnt. Because quite often watercolour paintings look pretty rubbish before they start to improve and by sticking with them and working at it then the result is so worth it. This painting may not be my most favourite ever, but I certainly love how it came together in the end.
With the background wash lending, a warm glow to everything, I painted a base layer first moving around the image so that I wasn’t painting two areas next to each other until they were dry. This prevents the colors mixing and blending and can help to separate the two areas. So, for example, if I painted two petals next to each other at the same time, the paint would likely pool and gather as one puddle with the colors mixing together, and you’d lose the definition where one petal ended and the next started. However, if one petal is dry when painting the petal next to it, then the paint won’t spread over to the dry area, and each petal will be more defined. Having got a base layer down I simply went back in with more layers deeper in colour, keeping these deeper areas to where shadows would naturally occur – at the base of petals or where they overlap or butt up against one another – those would naturally be where you would find shadows and so that’s where I kept the deepest shades.
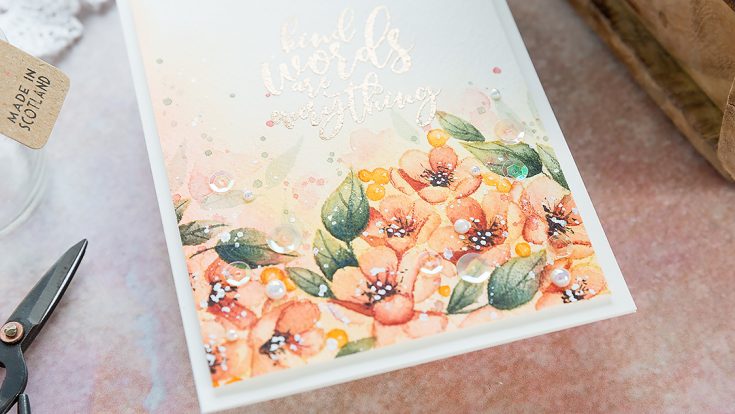
To finish the flower centres, I added black dots and a few flicks radiating out from the centre with more dots on the end to represent flower anthers. I speeded up the drying process for this part with a preheated heat tool and then added dots of white gouache on top. Gouache is an opaque watercolour, and you get lovely bright white highlights with it.
I like to add the impression of more flowers and leaves in the distance to fill out the area more. To do this, I used the same colours I had been for the flowers and leaves but diluted them down with more water. Things in the distance are paler and so painting these leaves and flowers with the diluted mixtures will automatically make them appear as if they are further away. For the leaves, I used the shape of the brush to pull a few leaf-like shapes. Starting with light pressure, then increasing the pressure slightly to get the width of the leaf and then lifting again to trail off to the leaf tip. I also added some vague flower shapes too. The great thing about painting like this is that the shapes don’t need to be precise, the impression of a flower is interpreted by the eye, and so a faint pink blob really does read as a flower in the distance in this context.
I finished off the painting with a liberal splatter of Perfect Pearls solution and some of the leftover paint. To give more definition to the petals and leaves, I used Faber Castell pencils to deepen the shadows and define the shapes more.
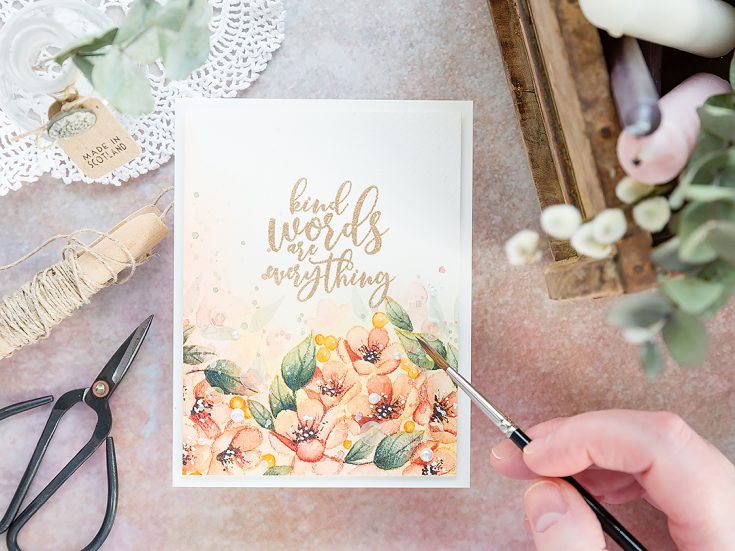
For the sentiment, I used the So Loved set which has some gorgeous sentiments. Now the safest thing to do with a finished painting would have been to stamp the sentiment on a separate piece and add it to the card in some way. However, I really wanted the sentiment stamped above the floral border, and so I took a gamble and went for it. To give me the best chance for clean, crisp embossing on this textured watercolour card, firstly I treated the card with an anti-static powder bag to help prevent embossing powder randomly sticking everywhere. Then I stamped the sentiment several times in clear embossing ink to ensure a good impression. I then sprinkled with Antique Gold embossing powder from Simon Says Stamp and heat set. And actually, considering I was stamping on a textured surface, I was pleased with how this came out.

I trimmed the watercoloured panel down to be just slightly smaller than an A2 card base, added foam adhesive to the back and then adhered it to a card base cut and scored from Simon Says Stamp Ivory card. This is my favourite card as I think it is the closest colour match to the slightly creamy colour of the watercolour card. To finish the card, I added a sprinkling of sequins and pearls from Little Things By Lucy’s cards snuggled in amongst the flowers and help in place with Gina K connect glue.
Thanks for joining me today, and I’ll see you next time for Doodling With Debby.
Watch below or in HD on YouTube.
SUPPLIES:
|


Thanks so much for stopping by and thanks to Debby for being our guest!

Blog Candy Alert!! Follow our blog via email and comment on this post for a chance to win special blog candy!


