Pssst. A NEW Brand of the Month will be announced tomorrow…
Hi friends! Stay tuned! We’re starting a brand new monthly spotlight series on brands that we love! Tomorrow will reveal our May 2019 brand of the month! Any guesses??

One stamp, five ways: Outline Butterflies
Hi friends! Happy Tuesday, and happy last day of April! (Whoa… how did that happen?!) Please join me in welcoming back the always creative Suzy Plantamura who has cooked up FIVE smashing ways on how to use our Outline Butterflies cling stamp! Scroll on and BE INSPIRED!
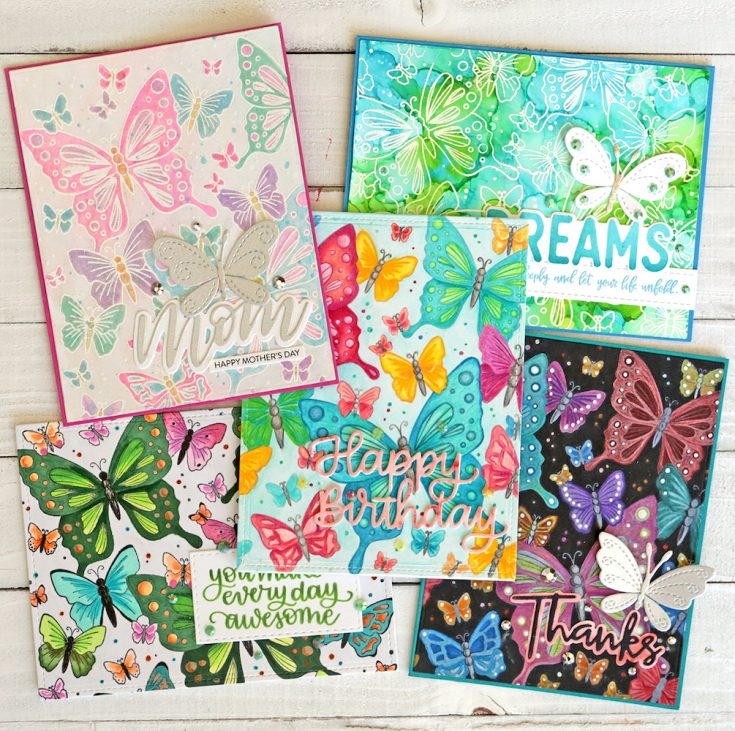
In the last Simon Says Stamp release, they had a few new cling stamps that I just loved. I decided to use one of those today for my “one stamp, five ways” post. I’ll be showing you the beautiful Outline Butterfly cling stamp used on five different cards. Cling stamps are so fun to do these posts with as they are my favorite stamps to color. I call them my adult coloring book – I just have to pull out my pencils and take them on the road everywhere I go. Best anxiety meds around haha.
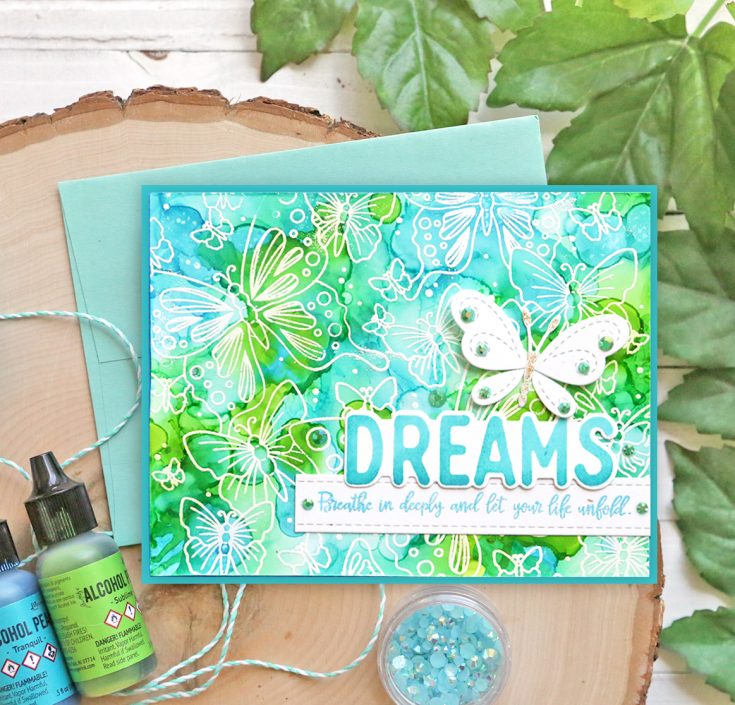
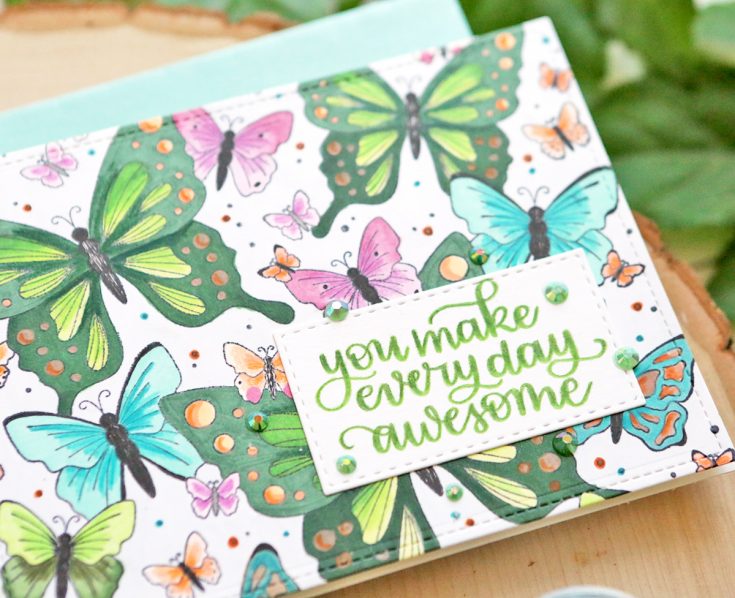
For this card background, I started with the Alcohol Pearl Inks I received in my last SSS Card Kit – Tranquil and Sublime. I also used the Yupopaper that was included in that kit. I applied the ink directly to the paper and used some of the Alcohol Blending Solution to make splotches in the color. Honestly, I have no idea what I am doing with alcohol ink, but the great thing is you can fix any mistakes you make. I might have used my entire bottle of blending Solution, but I finally got a background I liked! After it dried, I stamped the Outline Butterflies Cling stamp with Embossing Ink and embossed it with Ranger White Embossing Powder.
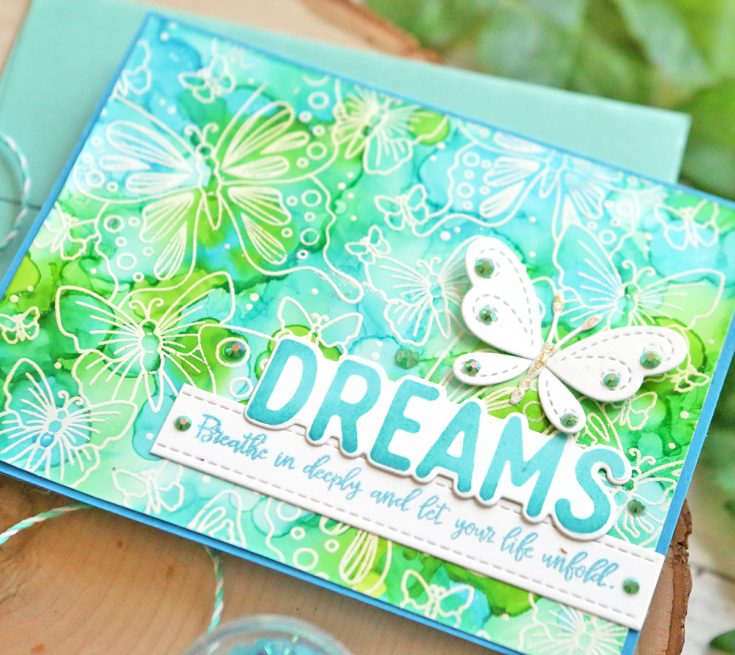
Next, I stamped the word DREAMS using the CZ, Yes You Can stamp set and SSS Audrey Blue and High Dive Inks. I applied the lighter shade to the entire word and then inked just the bottom of the word with the darker shade. I stamped the second part of the greeting using the “Your Greatest Dreams” stamp set and Forget-Me-Not embossing powder. I attached those to the bottom of the card and used a die-cut butterfly from the SSS Stitching Butterflies dies above it. I used some Gold Coast Glitter Nuvo Drops on the butterfly body and some PPP Shamrock Jewels around the sentiment.
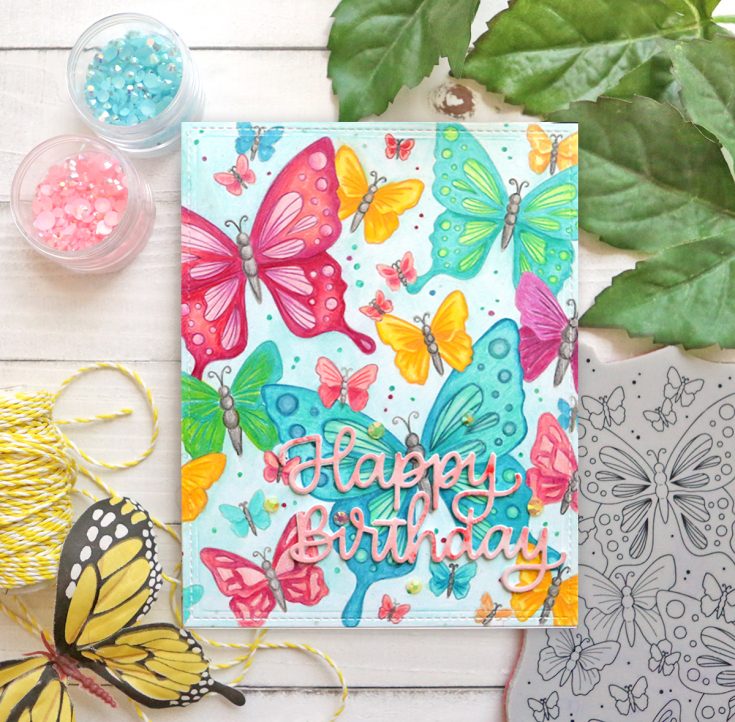
For this card, I stamped the Outline Butterflies cling stamp with MFT Natural Ink for a no-line coloring look. I then die-cut it with a Lawn Fawn large stitched rectangle that is the size of an A2 card front. I colored the images with colored pencils (yep, on the road!). I also colored the background with a light blue pencil. Most pencil sets have a blender pencil that I use to smooth out large areas like the blue on this one.
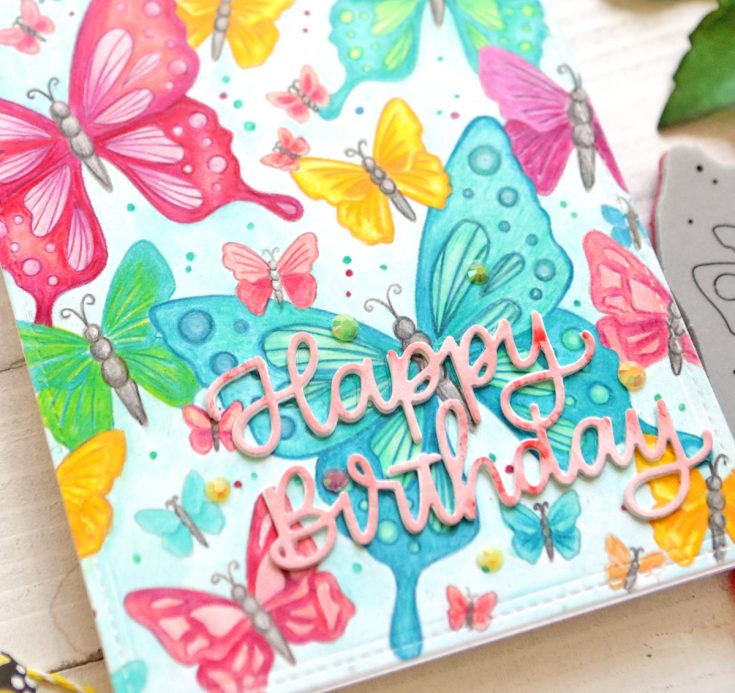
Once it was all colored, I attached it to a card front and die-cut the Happy Birthday Script die three times. I watercolored one with a light red finish and then glued the three together. I attached them to the front of the card and added some PPP Marigold Jewels around the sentiment.
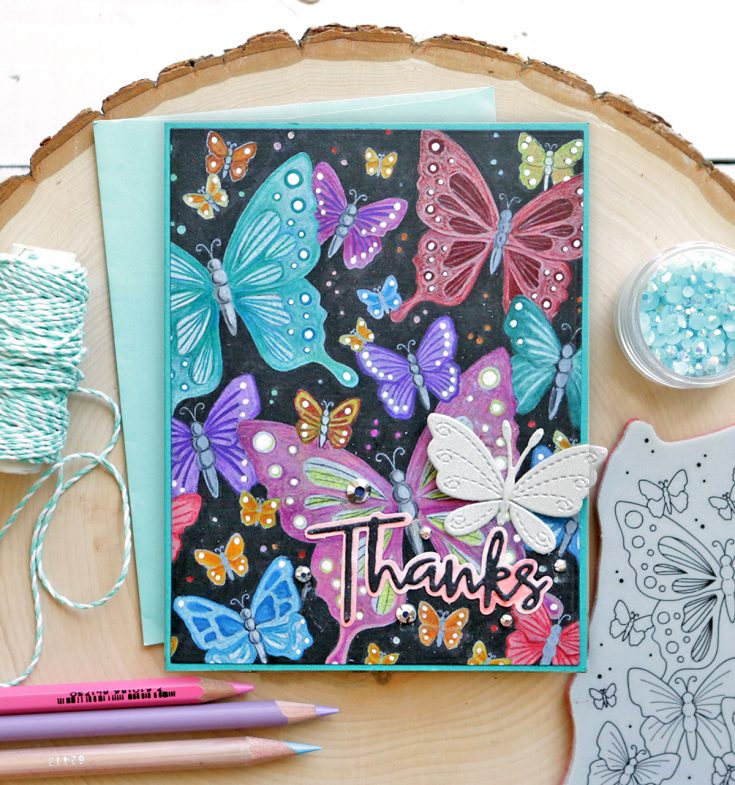
I gotta be honest – I’m not loving this card. I wanted to try out my new Caran d’Arche Luminance colored pencils as they work really well on dark cardstock. I stamped the image with Hero Arts Unicorn White ink – it is the best for stamping on black paper as it does not smear and you can color over it with no problem (I have tried quite a few white inks). I then colored the images in with the colored pencils. I found that a lot of the pencil dust got on the black, so I ended up coloring over the back cardstock with a black colored pencil. Yep, this technique got a little high maintenance…
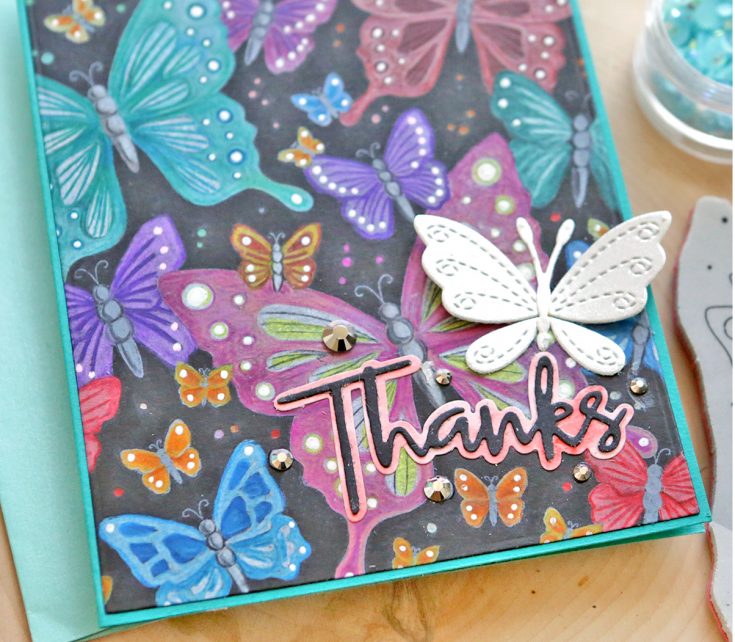
After it was all colored, I attached the piece to a turquoise card base. I then used the Script Thanks die and watercolored the frame with Scarlet watercolor. I die-cut the word from black cardstock and layered the two pieces on the front of the card. I die-cut another one of the Stitching Butterflies die-cut from Ranger Silver Sparkle card stock. I attached it above the sentiment and added some PPP Silver Jewels.
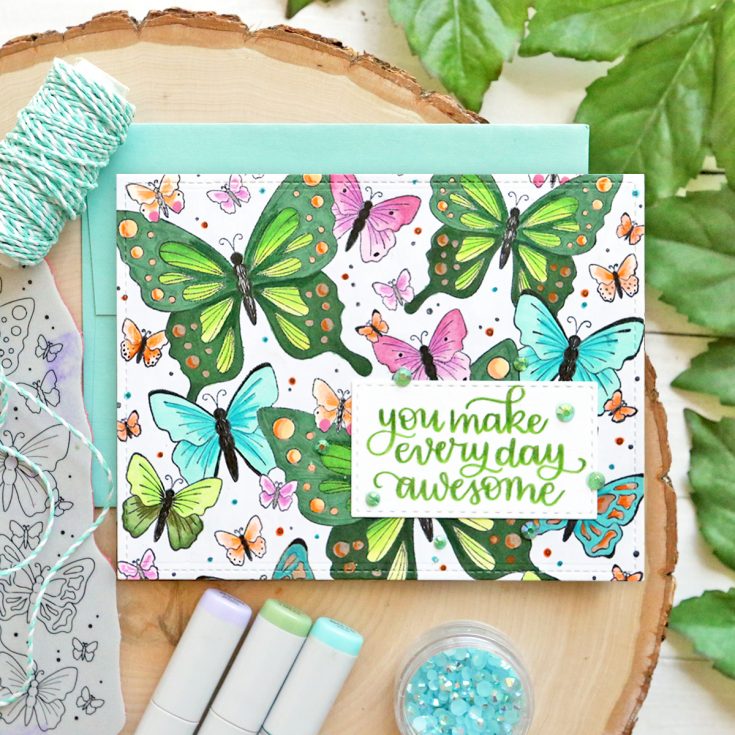
I wanted one of my cards to use Copic Markers for the coloring, but they aren’t my favorite to color with, so I always enlist the help of my oldest daughter (she is an artist). She picked the color scheme and colored them in and I added some shading with colored pencils. I loved her color choices as I wouldn’t have used these types of colors and they are so pretty!
I stamped a sentiment on a SSS Stitched Rectangle die using green ink. I then colored over it with colored pencils so it would look more hand done. I attached that to the front of the card and added some PPP Shamrock Jewels around it.

This card is my favorite and if you could see it in person, I think it would be your favorite too! I stamped the cling stamp with white embossing powder on Ranger Watercolor Paper. I then painted the images in with the new Brutus Monroe Metallic watercolors. I recently discovered these at the Create event while I was teaching students to watercolor my cards. THE Brutus Monroe was there and I used some of the paints in my make-n-take. I fell in love and so did all my students! They are very shimmery and go on just perfectly! I don’t use water with them, but I do use a wet brush.
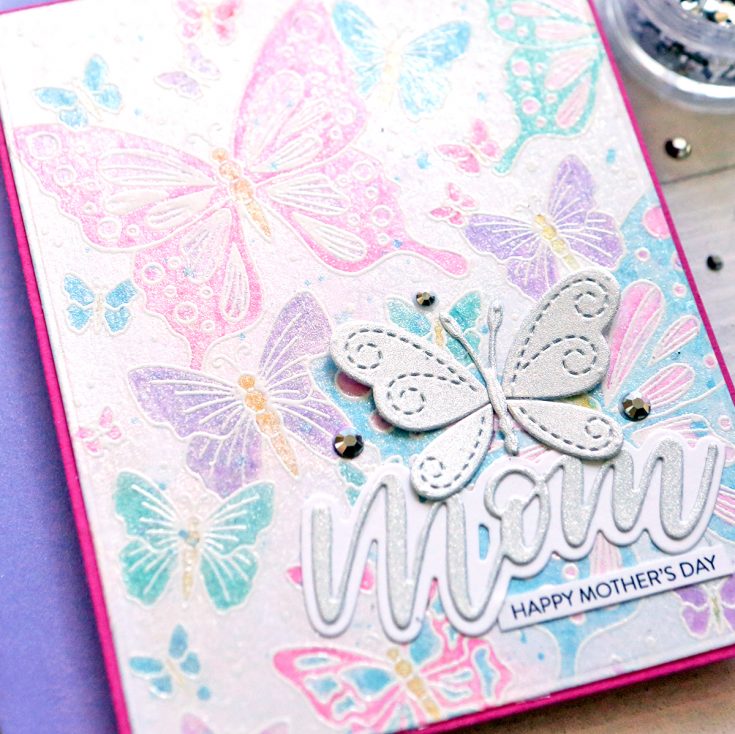
This isn’t a well-lit photo, but I wanted to try and capture the sheen on the card. After I painted all of the butterflies with the colors listed in the supply list, I added another favorite new product discovery at Create. It is called Liquid Pixie Dust and it is a bottle of pure sheen! It reminds me of the pens with a sheen in them that you add over colored items, but this is a way to use all that sheen in abundance! You can add it directly to your watercolors (mix it in) or you can add it after as I did. I painted the entire surface with it and you can see how much sheen is on the background around the butterflies. I finished the card with a die-cut Mom out of silver paper and a silver butterfly die. I added a pre-stamped sentiment from my Special Edition Mother’s Day Card Kit.
Isn’t it amazing how different a cling stamp can look just by changing your color palette or coloring medium? They are some of my most utilized stamps in my “arsenal” because of all the ways you can use them and combine them with other stamps. I hope this post motivated you to pull out some of your cling stamps and get to coloring! Just stamp a few for the road and color every time you get anxious and I promise it will make you happy! Xoxo Suzy
SUPPLIES:
|


Thanks so much for stopping by and thanks to Suzy for being our guest!
Blog Candy Alert!! Follow our blog via email and comment on this post for a chance to win special blog candy!
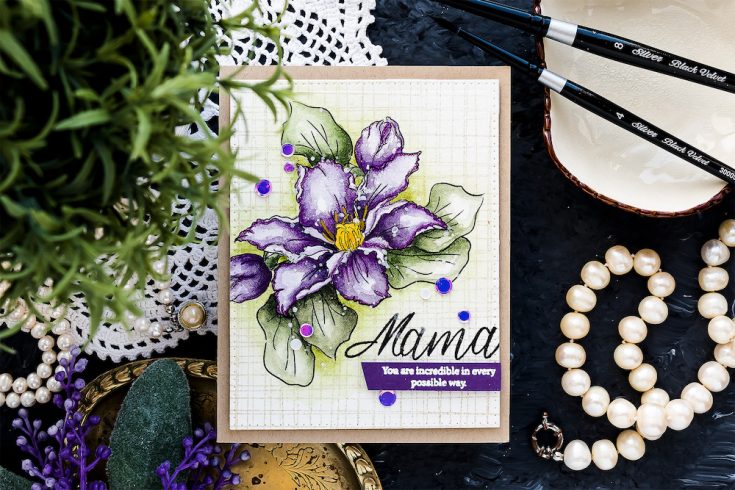
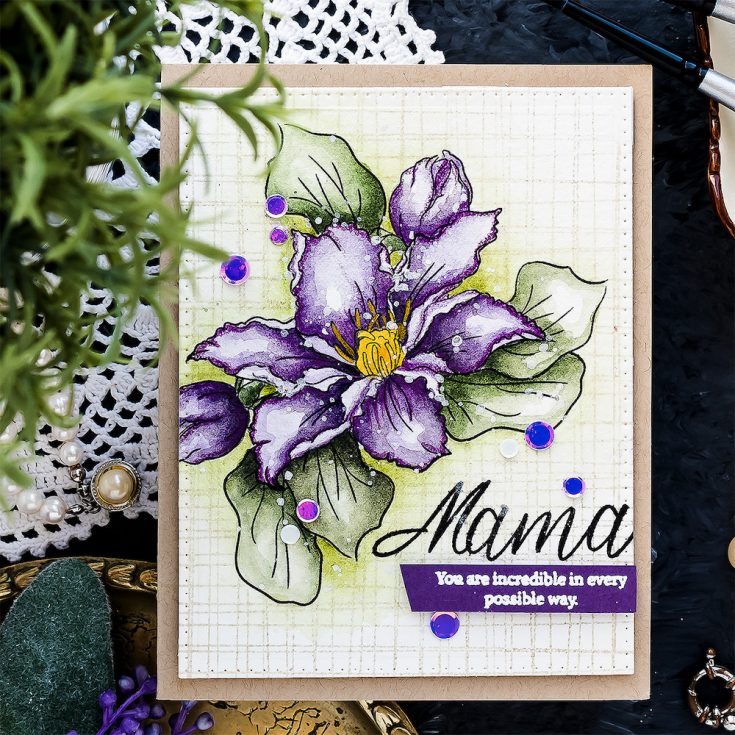
Yippee for Yana: Watercolor Clematis Card for Mom
Hi friends! Happy Monday! If you’re anything like me you’re ECSTATIC to see that the amazing Yana Smakula is BACK as a guest on our blog after a short traveling hiatus. Read on and enjoy!!

Hi everyone, this is Yana Smakula and welcome back for another Yippee For Yana video!
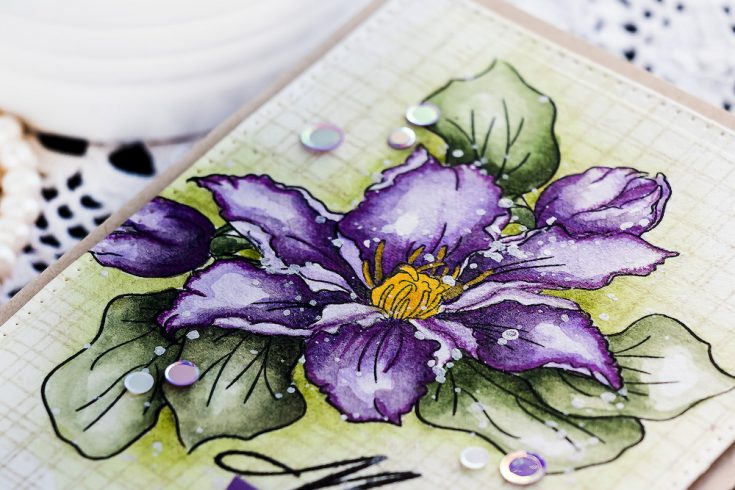
Today I’m sharing a watercolor floral card I made for my Mom using some new and old products from Simon Says Stamp.
It has been ages since I last picked up my watercolor supplies and did some water coloring. I’m always fascinated by Debby Hughes and her watercolor masterpieces so I decided I would channel my inner Debby and try to watercolor this clematis. My watercolor skills are far from being the best, but it doesn’t stop me from trying and practicing and we all know that practice makes better.
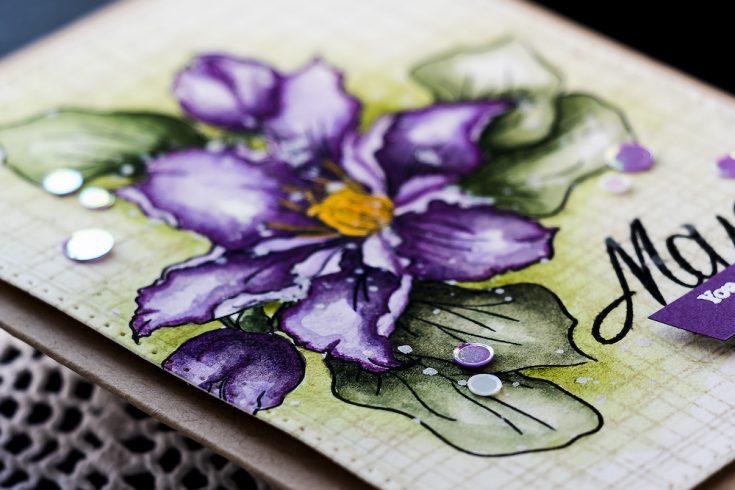
I stamped images from the Mom’s Clematis stamp set on watercolor paper, I am using Arches Cold Pressed watercolor paper, and I stamped everything in Versa Fine Onyx Black ink using my mini MISTI stamping tool. It’s handy to stamp these using some sort of stamp positioner watercolor paper is usually textured and you do need to apply a fair amount of pressure to get good impressions on this paper. I also did some masking by stamping images on masking paper, cutting them out and applying them over the original to be able to stamp additional leaves and flower buds next to the main flower.
Once my stamping was done I moved onto coloring. I went with the easiest method for me – and that’s using my Daniel Smith watercolor and a water brush. I opted to use purples for this card and used mostly Imperial Purple color from my palette. I colored one petal at a time, this is not something I typically have the patience to do, but it is the right way to do it, and also I painted in layers, coming back to each of the petals as the previous layer of color had dried.
I also used green for the leaves and this is Undersea Green, also from Daniel Smith. To add some color variation to this image I added a lot of shading using a different color, Shadow Violet, and I think that’s what made all the difference and made this image more lifelike.
My biggest takeaway from this project is patience. A good watercolor piece requires a lot of patience and layers. This is not something I have so I often struggle with having great watercolor results.
I also decided I’d do a simple watercolor wash in the background and for this, I used same Undersea Green color and simply diluted it more to have a lighter, softer green around my Clematis cluster.
Next, I took this piece back to my MISTI and stamped a sentiment for this card, it reads “Mama, you are incredible in every way”.
At this point, I reached for my colored pencils, Polychromos by Faber Castel and used them to add finishing touches. Next, I splattered some Hero Arts White Irridescent Shimmer over the image to give it more of a messy look. I love using this product for an effect like this.
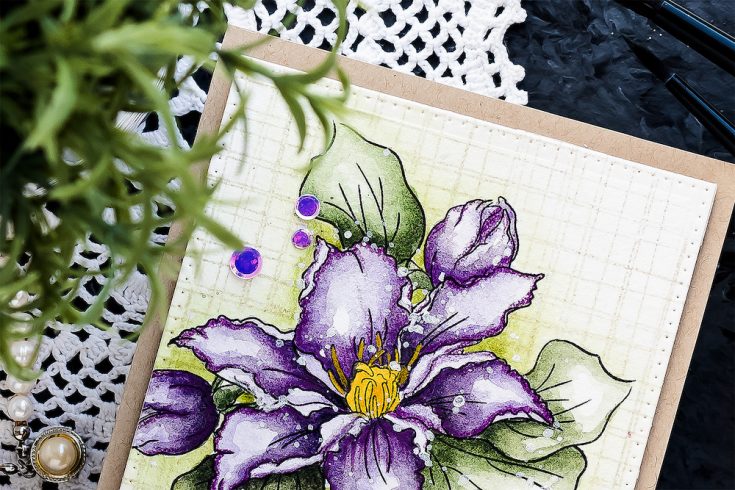
I decided to add some simple stamping to the background and this is where Simon’s new Sketchy Lines background stamp came in. I created additional masks to mask the entire image cluster, positioned the stamp over my image, inked it up with Simon’s Fossil ink and stamped adding some interest to my background. The masks protected my flowers and leave and allowed the sketchy lines to be stamped on the background only.
I also decided I wanted to add more purple to this card to tie together with the flowers, so I white heat embossed a part of the sentiment on purple cardstock. To put everything together I created an A2 kraft side folding card base, used a piece of fun foam to adhere my watercolor panel over it. Finally, I foam mounted the skinny sentiment strip and embellished this card using several sequins in purple from the Birthday Cake sequin mix.
Have fun stamping!
SUPPLIES:
|


Thanks so much for stopping by and thanks to Yana for being our guest!

Blog Candy Alert!! Follow our blog via email and comment on this post for a chance to win special blog candy!


