Prehistoric Home Decor Vignette Box
Hi friends! Happy Sunday! Feast your eyes on this GORGEOUS project by Emma Williams! I’m constantly blown away at her talent and artistry. She’s amazing! Want to know more about how she made it? Read on and enjoy!
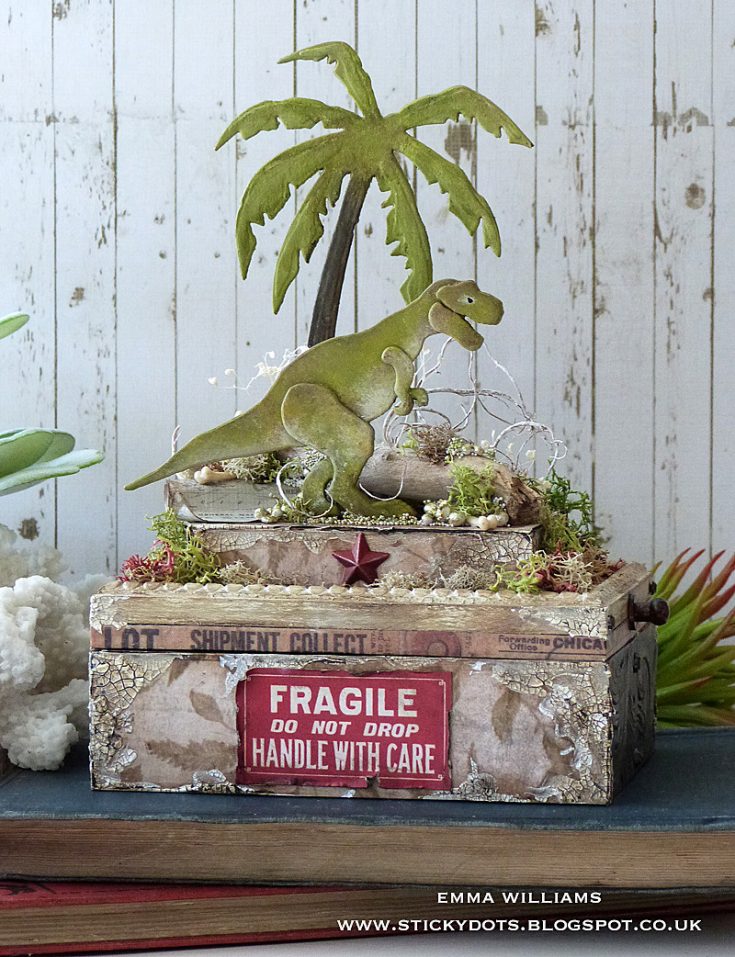
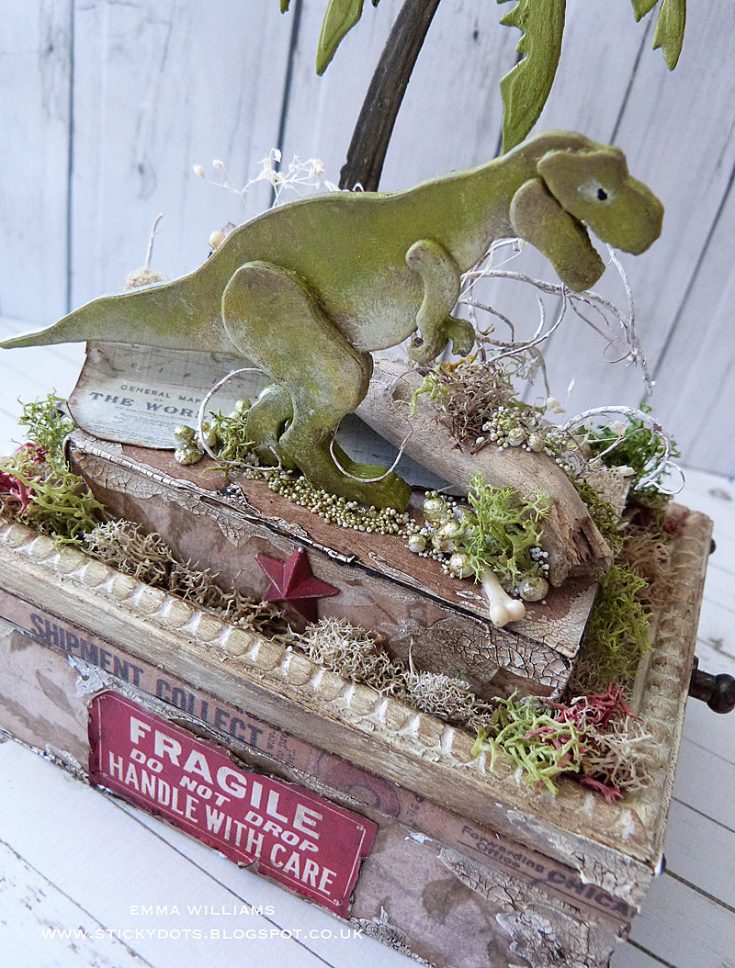
Hi everyone, it’s Emma here and I’m so happy to be back on the Simon Says Stamp blog to share my latest project with you all ~ my Prehistoric Dinosaur Vignette Box, created using some wonderful products from Tim Holtz.
I just love this Prehistoric Sizzix die set by Tim Holtz so much, the detail of the die cut images is mind-blowing and they make such stunning focal points for any project that you design. So, with this in mind, I decided to take you all for a walk on the wild side and created this piece of home decor that would be perfect for anyone who loves dinosaurs ~ young or old.
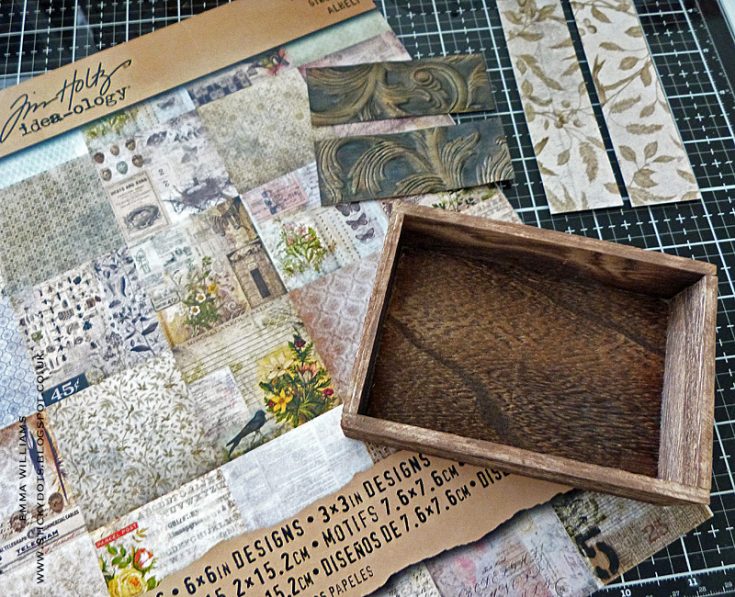
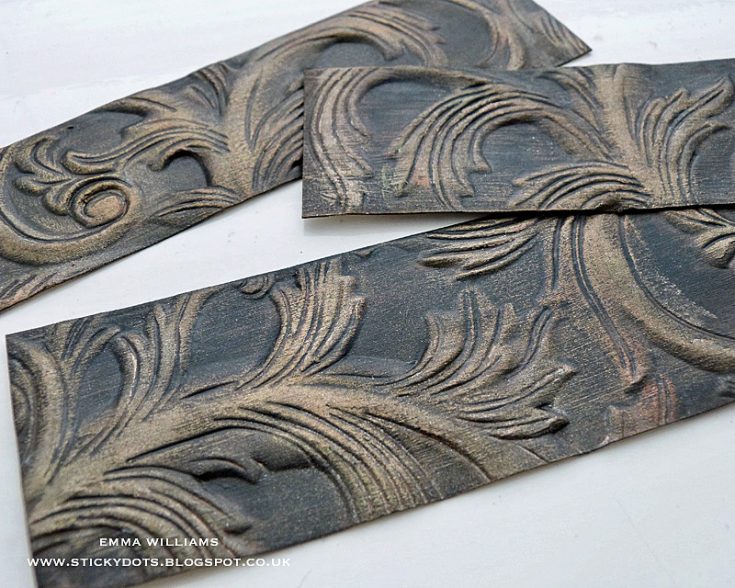
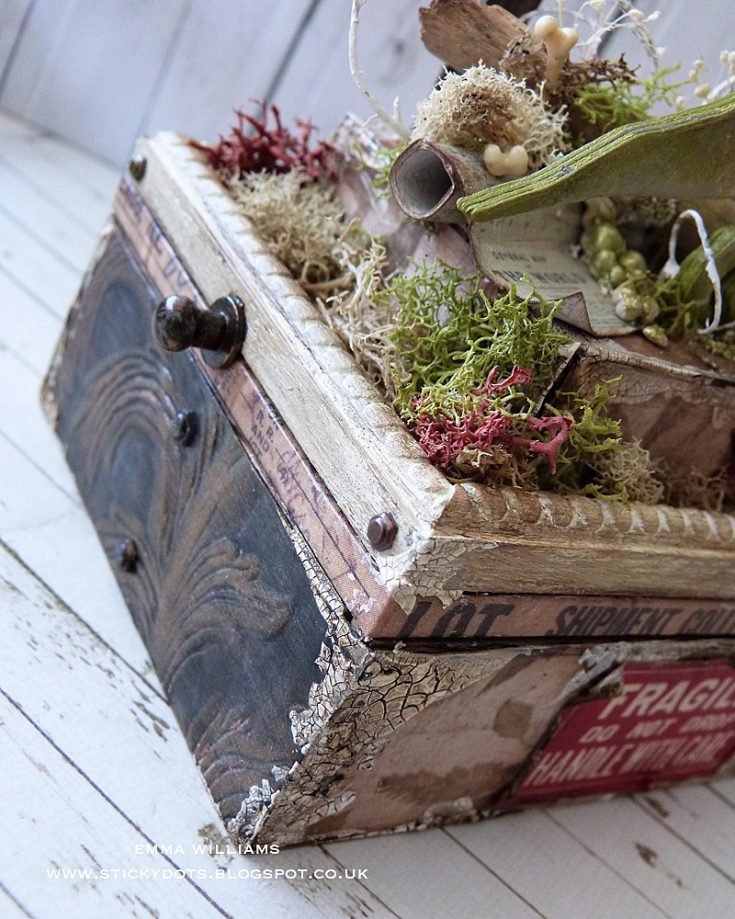
I started by covering the second largest Vignette Box from the set and covered the box using a combination of Wallflower Paper Stash on the front and back and some embossed card on the sides.
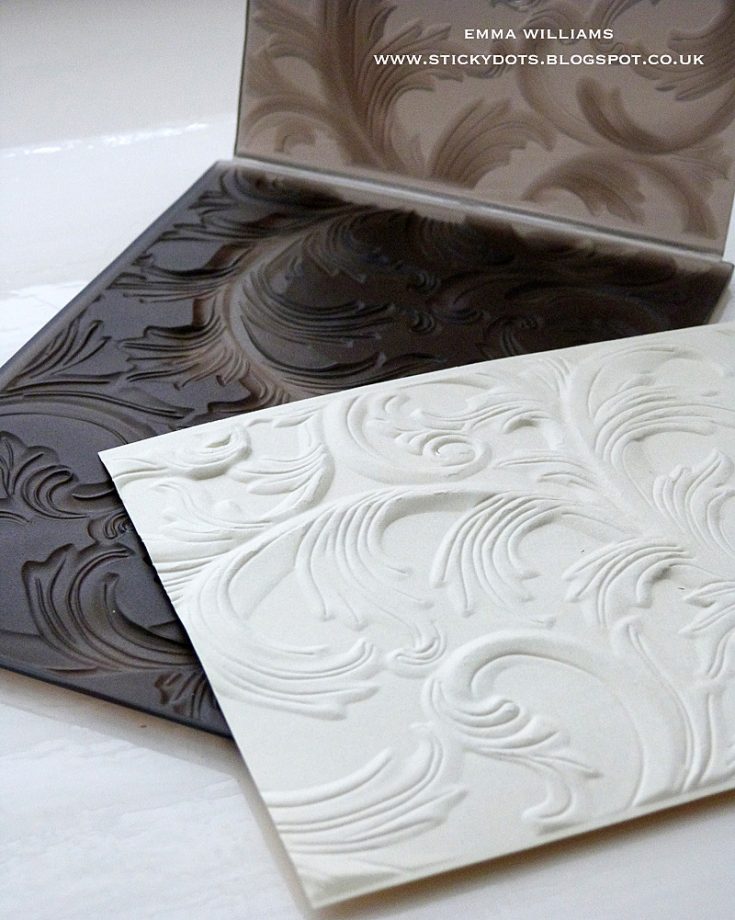
To create the embossed card, I took a piece of Mixed Media Heavystock card, misted the card with a very light spritzing of water and then placed it into the Elegant 3D Embossing Folder. Run the folder through a die cutting machine to reveal the gorgeous detail of the embossing.
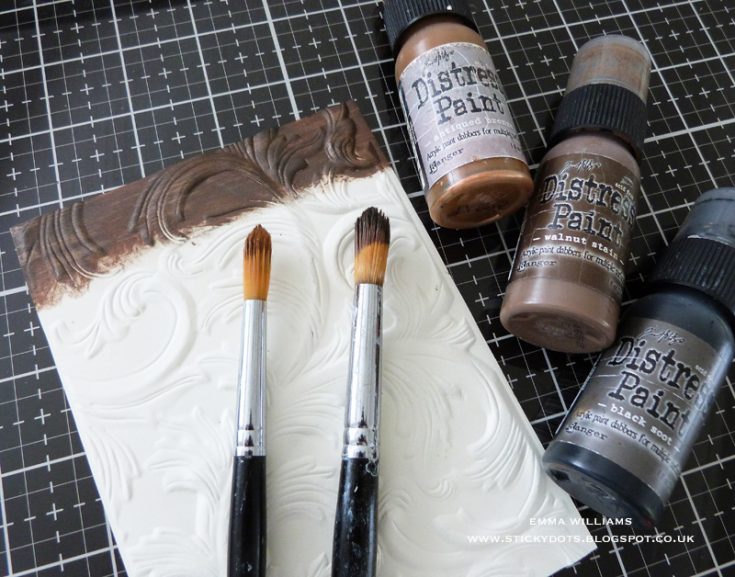
Using a combination of Distress Paints, apply a layer of Walnut Stain directly onto the card. At this stage, it’s important to heat dry the paint between each layer as you don’t want the colors to become muddy in appearance. Take a dry paint brush and dip the brush into a small amount of Black Soot Paint. Remove any excess paint as you want the smallest amount left on the bristles and dry brush the color over the top of the first layer. Heat dry and repeat with a clean brush using AntiquedBronze paint. Once happy with the color, allow to dry thoroughly.
To accentuate the embossing on the card, I used Tarnished Brass and Antiqued Bronze Distress Crayons and applied the crayon over the top, blending the color with my fingertip. Once I was happy with the finish on the card, I cut two panels that will fit the sides of the box.

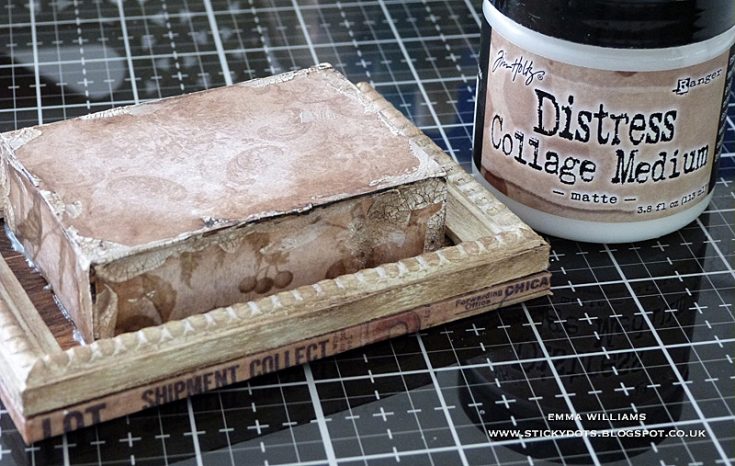
Using Matte Collage Medium and a collage brush, adhere the Wallflower paper and the embossed card to the box before moving on to create some texture on the box. For this, I used a palette knife to apply Opaque Crackle Texture Paste on each of the four sides. Set the box aside to allow the paste to dry and the crackles to appear.
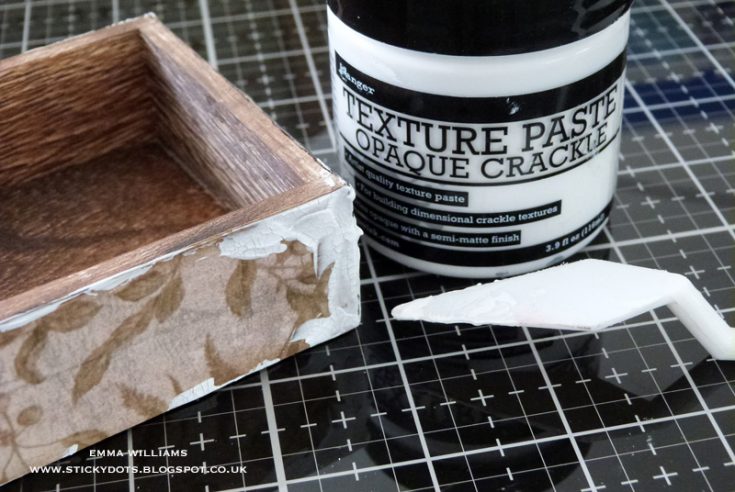
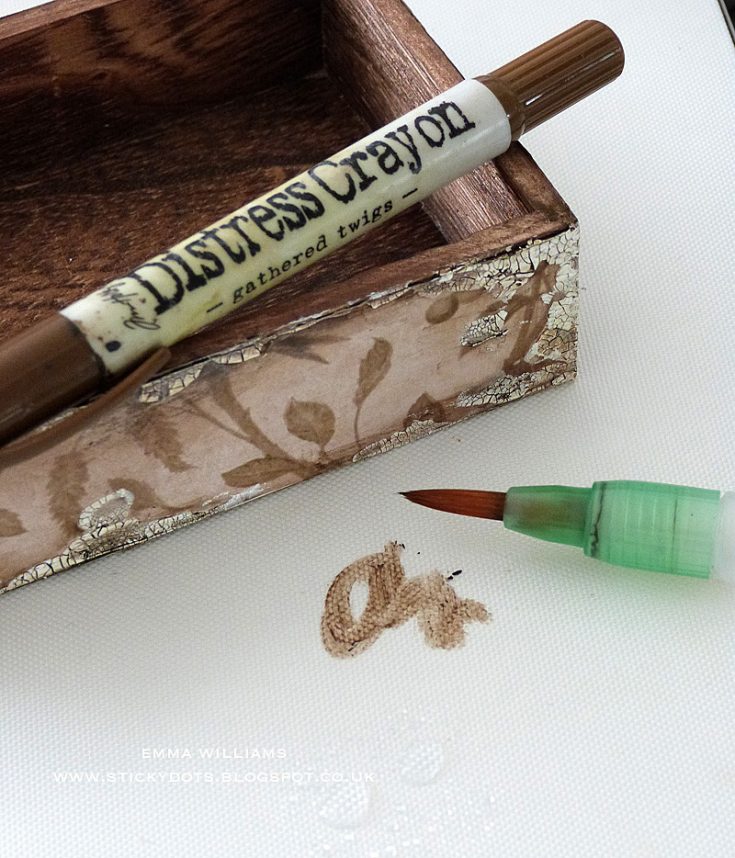
I scribbled a small amount of Gathered Twigs Distress Crayon onto my mat and using a water brush I picked up the color and applied it over the crackled areas, ensuring that the pigment seeps into the cracks to accentuate them. At this stage, I also ran the Gathered Twigs Crayon around all of the edges on the box, blending out the color with a semi-dry baby wipe.
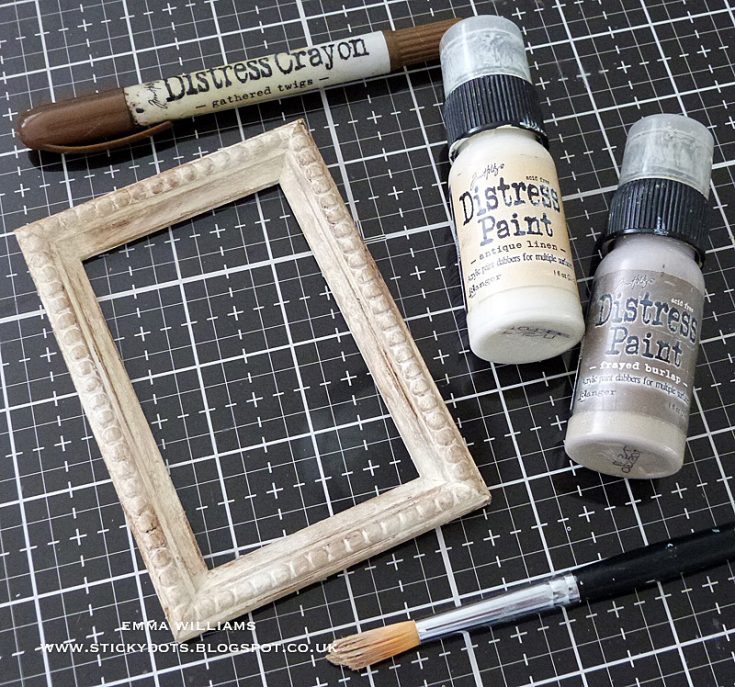
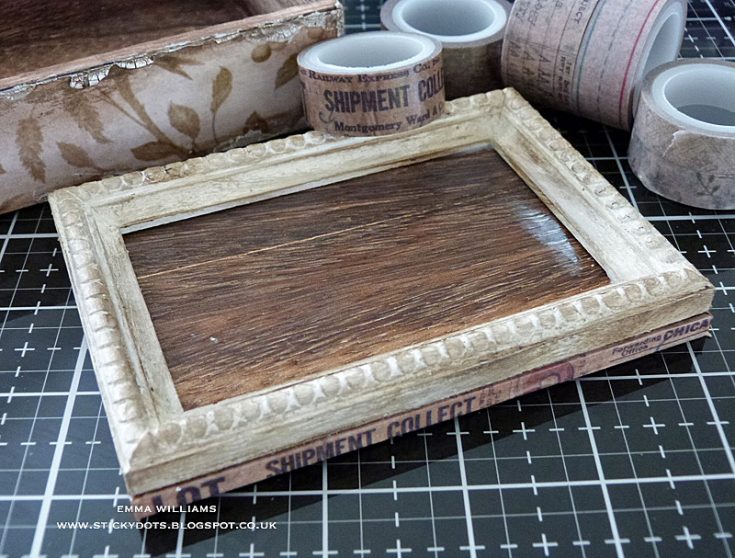
Moving onto the lid, I used the matching size of Vignette Panel and Vignette Frame. I primed the frame with a coat of gesso and once dry, I added color ~ applying a layer of Antique Linen over the entire surface of the frame and once this layer was dry, taking a clean paintbrush and dry brushing Frayed Burlap Paint over the top. To complete the frame, I used Gathered Twigs Distress Crayon, applying the crayon onto random areas of the frame and blending out the color with a semi-dry baby wipe.
Using one of the designs from the Elementary Design Tape set, I applied the tape around the four edges of the Vignette Panel before attaching the painted frame to the top of the lid, using Matte Collage Medium to secure it into place.
To create the platform on the top of the lid, I flipped the smallest Vignette Box upside down and used Matte Collage Medium to adhere Wallflower paper to all four sides of the box. Attach the covered box onto the lid with Collage Medium, placing it centrally inside the framed area. At this stage, I also applied some more of the Crackle Paste to the edges, applying it the same way as in step 5.
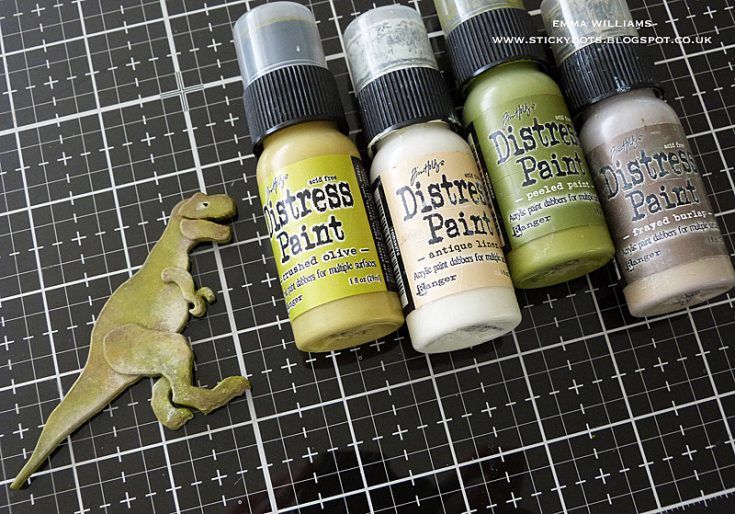
Setting the finished box to one side, I moved onto the fun part, creating the prehistoric scene and started with my dinosaur, cut from chipboard using one of the three dinos in the Prehistoric Thinlits die set. You will notice from the photo that I cut all the pieces that I needed to create my dinosaur multiple times to create one solid figure that will eventually sit on my box. I cut three layers of each component from chipboard and one from Mixed MediaHeavystock card.
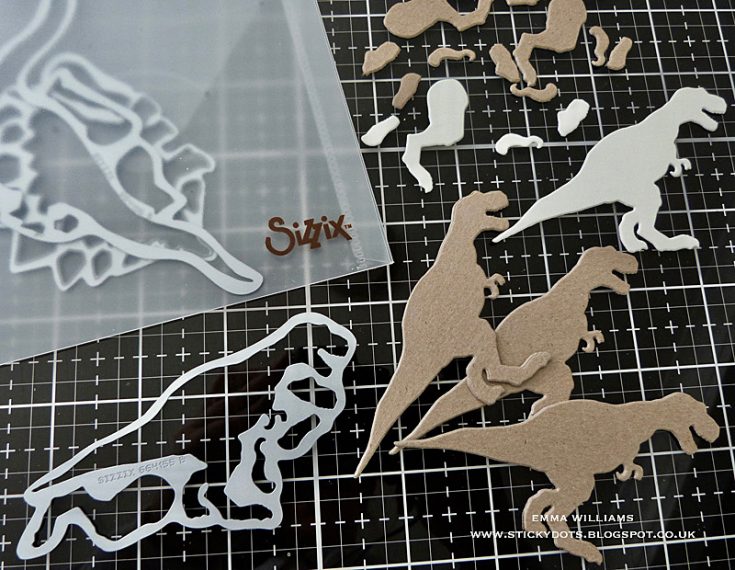
Layer all the chipboard die cut pieces over the top of one another, attaching each layer with Matte Collage Medium and ending with a top layer cut from heavy stock card.

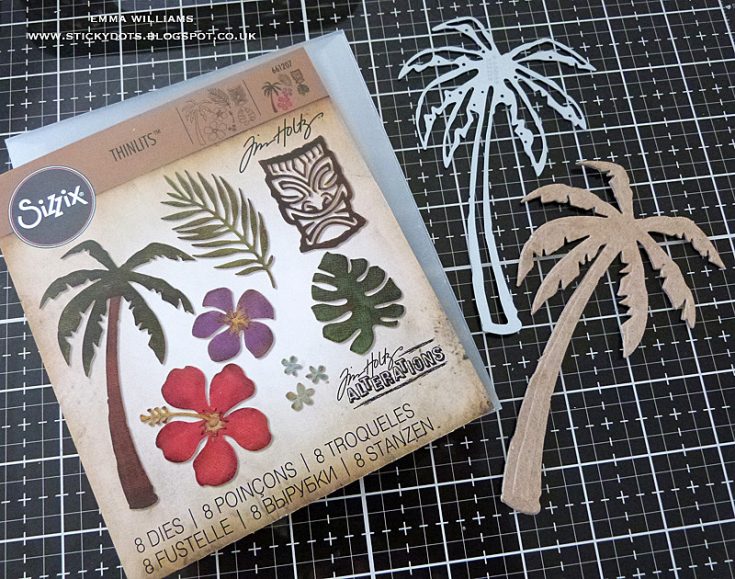
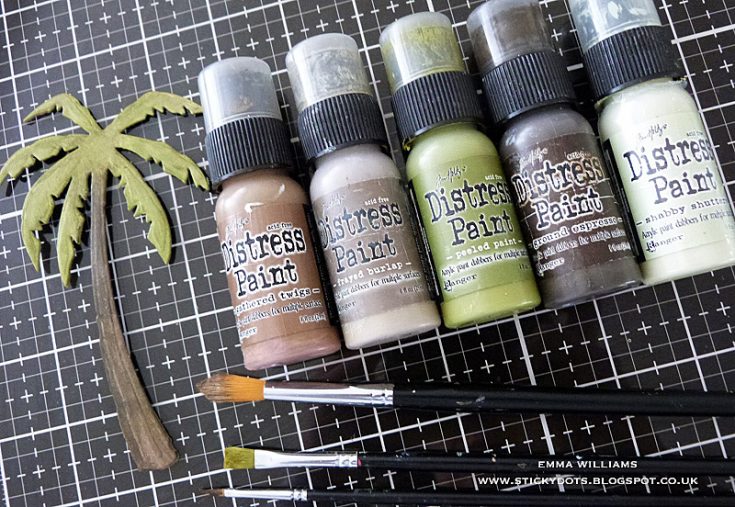
Using more of the chipboard, cut three layers of the palm tree from the Tropical die set and layer each of the pieces to build one substantial tree.
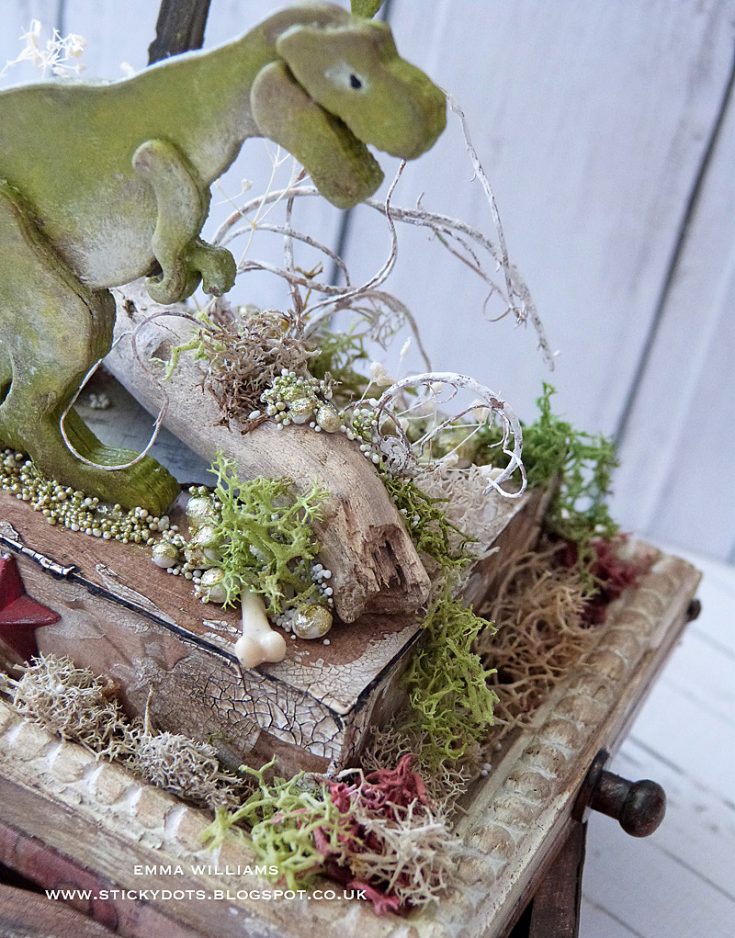
Taking the dinosaur, I painted him with Distress Paints, using a combination of Peeled Paint, Crushed Olive, Antique Linen, and Frayed Burlap, all of which create the shading to his body.
For the palm tree, I used a combination of Gathered Twigs, Ground Espresso and FrayedBurlap on the trunk and Peeled Paint, Shabby Shutters and a touch of GatheredTwigs on the leaves. On both of the die cut pieces, I also painted the back of the images, so that it would look great from any angle!
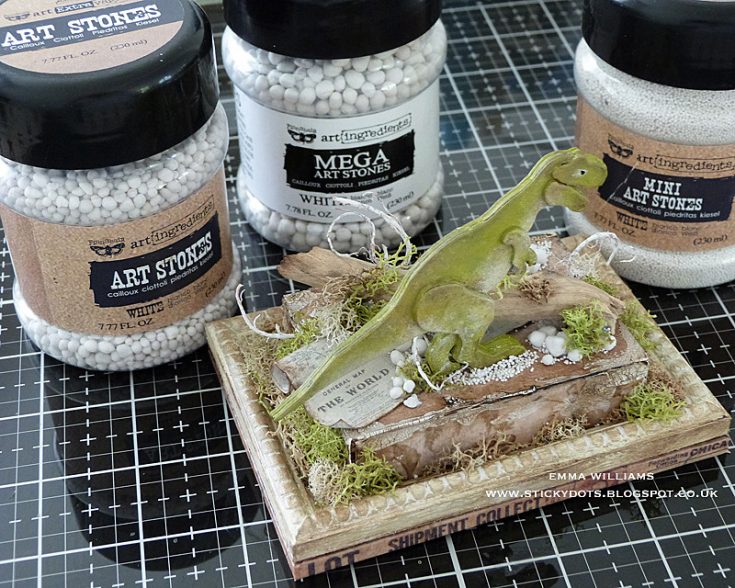
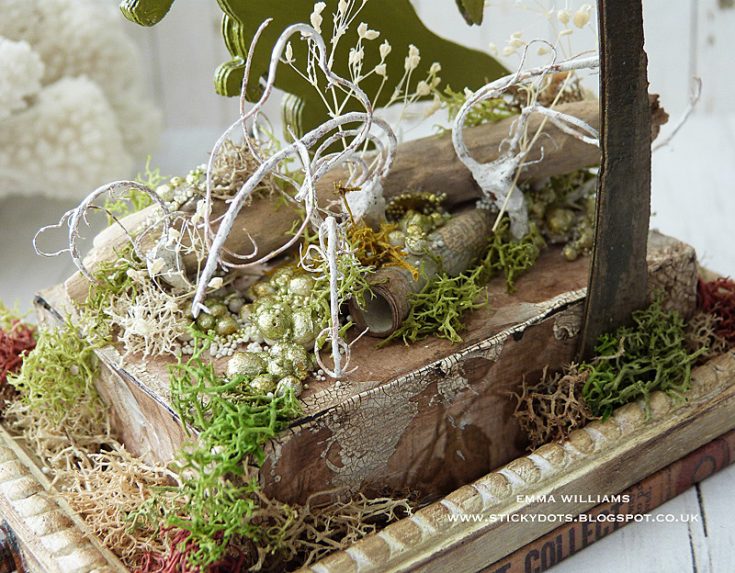
Placing the lid of my box, complete with the vignette box platform in front of me, I started to build my scene. I attached everything with Matte Collage Medium which includes a map scroll of paper, cut from the Correspondence Paper Stash and just rolled around a pencil to form the scroll, the dinosaur and a small branch from my garden. I then surrounded the elements with moss and with three different sizes of Art Stones. The Art Stones are all attached using Matte Collage Medium that I applied directly onto the lid with a palette knife, before sprinkling the stones over the top and tapping away the excess.
I attached the palm tree into place, again using Collage Medium to secure.
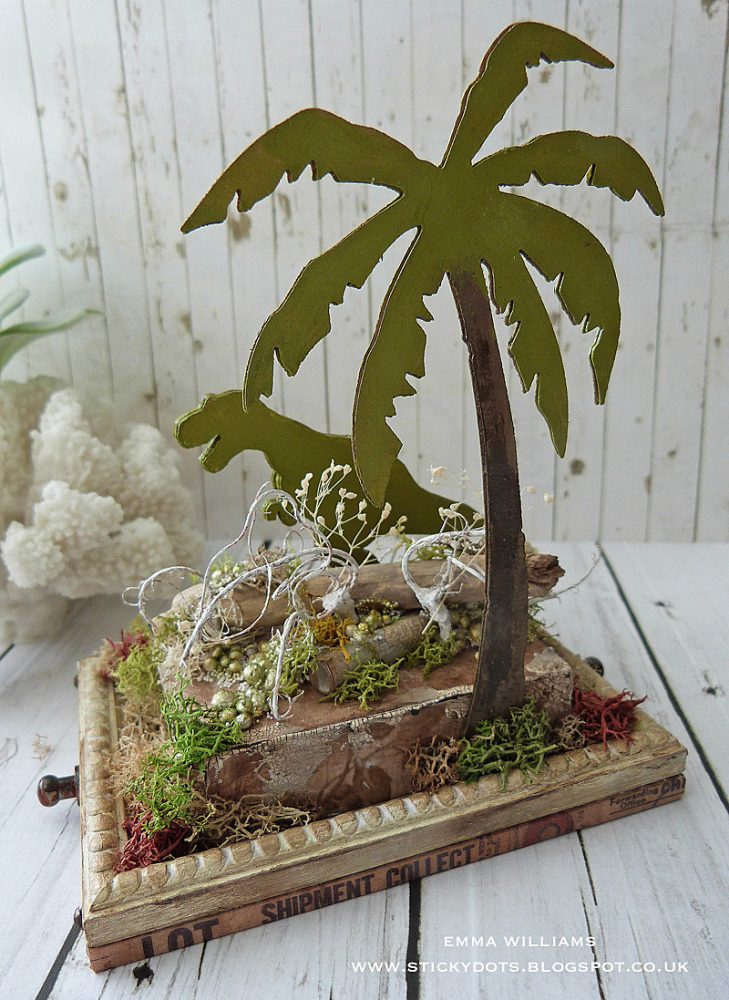
Add some Boneyard Findings and some dried flower stems into the arrangement, before leaving everything to set, ensuring that all the elements were secure.
When the Art Stones have set and the medium is dry, apply some Peeled Paint and Frayed Burlap Distress Paint over the stones. I allowed the paint to dry and then added a touch of shimmer using the Unicorn’s Hair Sparks Acrylic Paint.

Age the Fragile label, taken from the Keepsakes Ephemera set, by scuffing the edges of the paper, creating small rips and tears and then inking them with Frayed Burlap Distress Ink. Attach the label to the front of the box with MatteCollage Medium.

On the embossed sides of the box, I added Hex Fasteners, just snip away the wings of the fastener before attaching them to the box, Hardware Heads and placed a Hitch Fastener onto either side of the lid. All the metal embellishments are aged using Black Soot, Antiqued Bronze and Rusty Hinge Distress Paints.
As a finishing touch, I added a star adornment to the center of the platform on the lid, which I painted with Candied Apple Distress Paint.
So my dinosaur box is complete and all that remains is for it to be put in pride of place on the shelf and displayed.
Thank you so much for stopping by today ~ it’s been fun taking you through the creative process of this piece. This was one of those projects that was such a joy to create and I really hope it will inspire you with ideas of your own.
See you again soon…Emma x
SUPPLIES:
|


Thanks so much for stopping by and thanks to Emma for being our special guest!

Blog Candy Alert!! Follow our blog via email and comment on this post for a chance to win special blog candy!
Blender Pen Coloring & Mail Art Lettering – June 2019 Card Kit
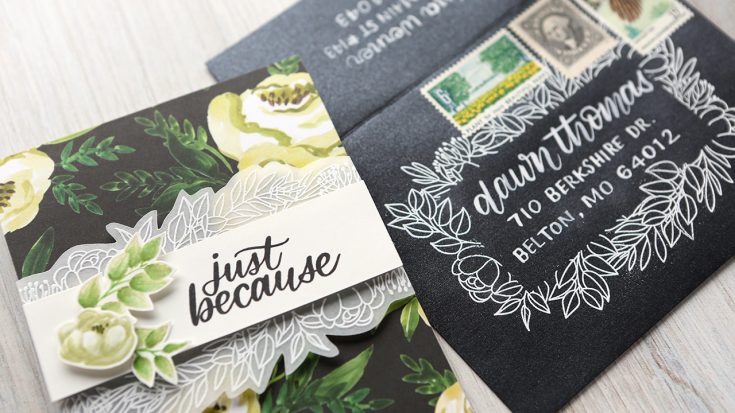
Hi all! Kristina here. Today I’m playing with the June 2019 Card Kit and the Leafy Frames stamp set. I thought it would be fun to do an envelope as well!
I started out with the card by cutting one sheet of the patterned paper in the kit (from Carta Bella’s Botanical Garden 6×6 pad) and adhering it to a card base. I then stamped the “just because” greeting in Simon’s Intense Black ink on Ivory cardstock (also included in the kit).
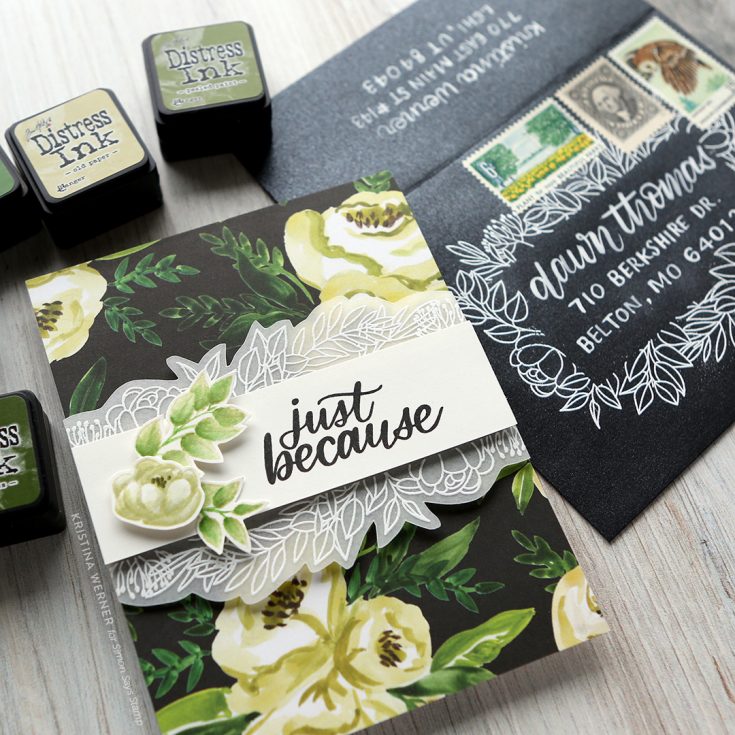
To create a lacy border, I stamped the leafy border from the stamp set on on vellum and heat embossed it with white embossing powder. The vellum wasn’t quite as opaque as I needed, so I applied adhesive to the back of the border pieces using the Xyron Sticker Maker and pressed it onto another piece of vellum. The two layer of vellum was perfect!
I trimmed out the borders using scissors and adhered them to the back of the greeting piece and then adhered the greeting to the card front.
To create flowers similar to the patterned paper, I stamped images from the stamp set on the Ivory cardstock in Antique Linen Distress Ink and colored them using a blender pen and various shades of Distress Ink (see supply list below). I used the N00 Tombow marker which can be found in all the Tombow sets, however I’ve also used the Dove Blender Pen in past as well.
I adhered the flowers and leaves to the front of the card and then moved onto the envelope.
NOTE: Dawn’s address is used with permission. Thanks, Dawn!
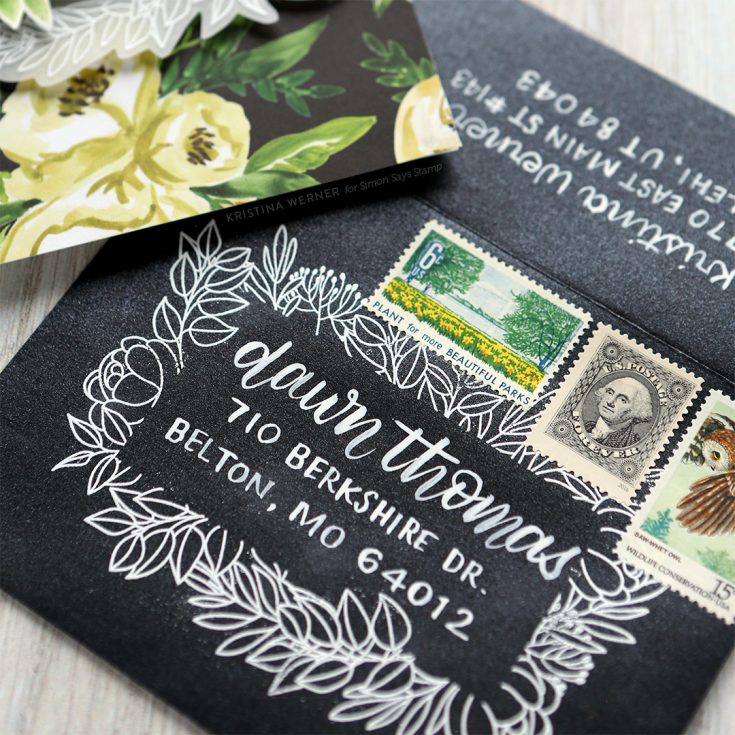
For the envelope, I used one of the envelopes from the card kit–the Metallic Black envelope. I stamped and white heat embossed the large rectangular leafy frame and then lettered Dawn’s name and address using a brush and white gouache (you can also use a white gel pen).
Thanks for stopping by today! You can pick up the June 2019 Card Kit HERE, or you can subscribe to receive this card kit and future kits HERE.
Supplies
|


National Scrapbook Day 2019 Giveaway WINNERS!
Hello friends! Earlier this month we hosted a special National Scrapbook Day giveaway; we were so amazed by all of the beautiful scrapbook layouts and memory keeping projects that you shared. If you missed seeing the inspiration, make sure you check out the original National Scrapbook Day link up and Facebook post!
Today we are so excited to share the two randomly drawn WINNERS of the $100 gift cards that we were giving away in honor of National Scrapbook Day! Are you ready to find out who won? Drum roll please…
Jo M.! (from our Simon Says Stamp Blog linkup)
Kimberly Asman! (from our Simon Says Stamp Facebook page)
Ladies! Congratulations! Please email [email protected] and let him know you were the lucky winners of the National Scrapbook Day giveaway! He will get your gift cards emailed to you right away so that you can enjoy your shopping sprees! :)
And a BIG thank you to all of you who shared your projects for the giveaway; keep up the amazing work!


