A Summer Hello
Hi friends! Happy Wednesday! Please join me in welcoming back very special guest Elena Roussakis with this absolutely darling Summer card featuring an adorable Rhino from Neat & Tangled’s Beach Day set. Read on for more info and enjoy!
Hi there! My name is Elena, and I’m thrilled to be back on the SSS blog sharing a fun summer card with you! I love guesting on the Simon Says blog, because when I do, I have all the freedom to mix and match sets across companies – can’t do that on design team assignments!
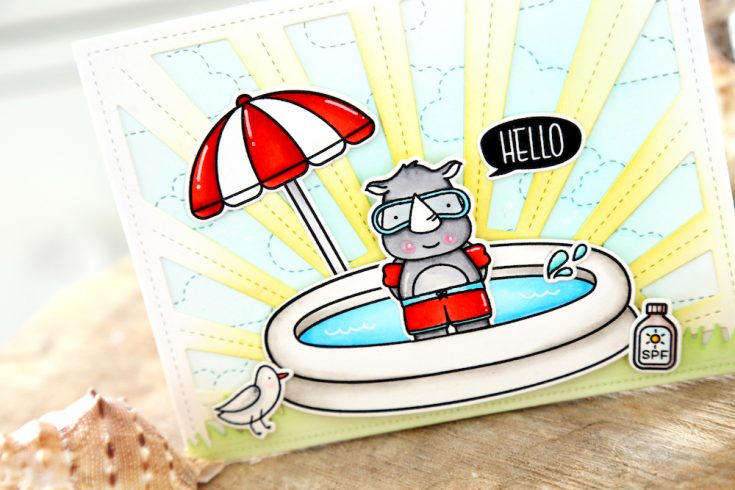
Have you checked out the new Avery Elle release? You should! I plan on putting a ton of critters in kiddie pools for the next little while. ha! On this card, I snipped the rhino’s legs from the knees down and stuck him into the wading pool. The rhino is my own illustration, so I’m a little biased, but I still think he’s so cute!
To complete the summer scene, I added a little beach umbrella and sunscreen bottle from the newest Lawn Fawn collection. I just love that little bottle of tanning lotion! I also used Lawn Fawn dies to create a gorgeous backdrop for the images. I layered the Sunrise Border over a stitched cloud backdrop, and added a strip of grass under the kiddie pool. All of the dies were colored using blending brushes and Lawn Fawn inks. If you’re not using these blending brushes, I can’t recommend them enough! I used to be very blender-challenged. Now, it’s pretty much fool-proof.
I hope you like what I created for you today, and thanks for stopping by!

SUPPLIES:
|


Thanks so much for stopping by and to Elena for being our special guest!
Blog Candy Alert!! Follow our blog via email and comment on this post for a chance to win special blog candy!
July 2019 Card Kit Inspiration with Kristina Werner
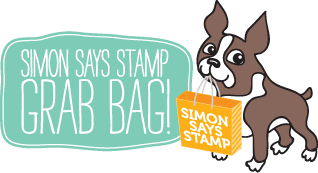
Hi all! Kristina here. Today I have a fun card for you made using the stamp set included in the July 2019 Card Kit. The Bee Yourself stamp set is included in the kit, or you can purchase it separately. The stamp set has fun bees and sentiments!
To begin, I stamped and gold heat embossed some of the honeycomb images and the “You’re the bee’s knees” greeting on Bristol cardstock. Then I used blue shades of Zig Clean Color Real Brush markers to watercolor the background.

I stamped one of the bees and the hearts in VersaFine Onyx Black ink and then painted them with the Zig markers and fussy cut them out.
To pull the card together, I adhered the watercolor background to a card base, and then adhered the bee and hearts using foam squares.
Thanks for stopping by! You can pick up the July 2019 Card Kit HERE, or subscribe to receive the kit and future kits HERE.
Supplies
|


Doodling with Debby: Distress Oxide Ink Blending
Hi friends! Happy Sunday! Thanks for stopping by the blog today! Please join me in welcoming back special monthly guest Debby Hughes in our Doodling with Debby blog series! Be sure to watch the video for more information and enjoy!

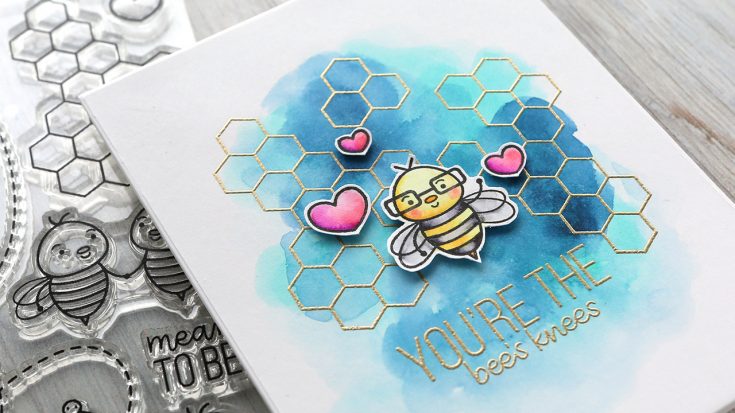
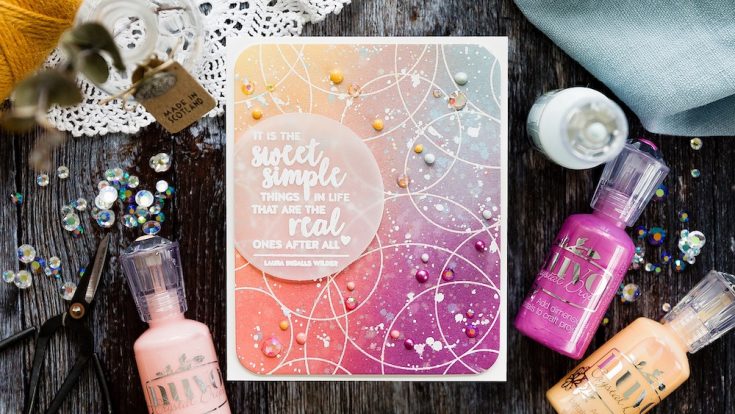
Hi, it’s Debby here, and for my Doodling With Debby video feature this month I’m ink blending Distress Oxides over a heat embossed background image. When I first saw the new Round & Round Background set my first thought was how stunning it would look with each of the circles watercolored so that the overlapping watercolored areas formed new colors as the transparent layers combined. I made this card just as the new release from Simon Says Stamp was coming out and I saw that Shari Carroll had made such a card and it does look stunning! You should check that card out, I’ve always loved Shari’s designs they are spot on. I still wanted to use the Round & Round Background set though, and so I put my thinking cap on as to how I wanted to use it. I remembered a combination of Distress Oxide colors that Kristina Werner used the other day and thought they would be fun blended over the circles if they were white heat embossed.
So to get this card started, I placed a 5.5 by a 5.5-inch piece of hot pressed watercolor card in the Misti, I treated the card with an antistatic powder bag to prevent embossing powder sticking where I didn’t want it to and then stamped the image in clear embossing ink. Even though I’m using a hot-pressed watercolor card for its smooth texture, I still stamped this several times to get a good impression before sprinkling with white embossing powder and heat setting. Next, I pulled out the Distress Oxide colors I wanted to use – Squeezed Lemonade, Abandoned Coral, Tumbled Glass and Seedless Preserves. As I blend these colors over the card they will combine to form new hues and most of these colors will be fine to mix together, red and yellow for example will make orange, but two colors I don’t want to combine are purple and yellow as these are complementary colors and combined they will go a muddy color.
To blend the colors onto the card, I’m used a Picket Fence blending brush. I like these brushes for smooth blending and tend to use the largest one from the set. To keep it clean as I swop from one color to another, I used a baby wipe and rubbed the color off the bristles with the wipe and then dried it on a microfibre cloth. And that gets the bristles lovely and clean and soft and ready for ink blending. If you’ve ever had trouble blending inks before then, please give this combination a go as it makes the inks go on like butter.
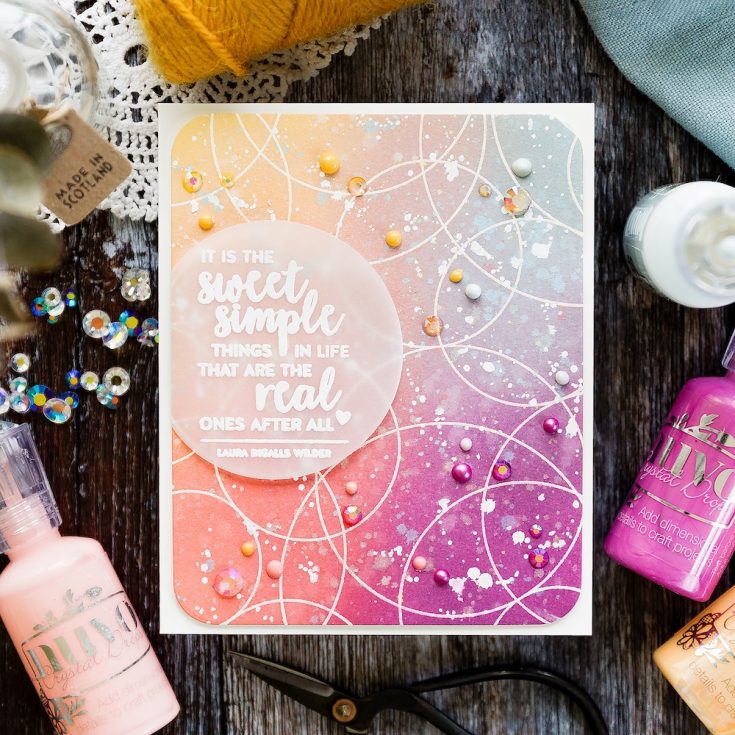
As I blended the inks over the heat embossed circles, the Squeezed Lemonade combined with the Abandoned Coral to give a beautiful orange where they overlapped. As I moved on to Tumbled Glass, my color theory was ringing alarm bells for me again because blue and orange are complementary colors and I’d blended the orange area right next to the area I wanted to use the blue. To make sure these didn’t combine to a muddy color, I kept the area where they overlapped to a minimum before moving on to the Seedless Preserves. I finished the blending with an extra going over with the yellow and blue as the stronger red, and purple colors had slightly dominated these colors, and then I gently rubbed over the whole of the card with the microfiber cloth to remove any of the ink on the white embossed lines and bring them back to their bright white color.
I spritzed the card with a mini mister filled with water. Distress Oxides are water reactive, and when they come into contact with water, they seem to come to life to me. The color becomes more vibrant and although the colors are well blended anyway this extra spritz of water, helps to combine them more. I had a heat tool continuously moving over the piece to dry the areas as I spritzed more water, and I kept going with this process until I have a seamless blend of colors.
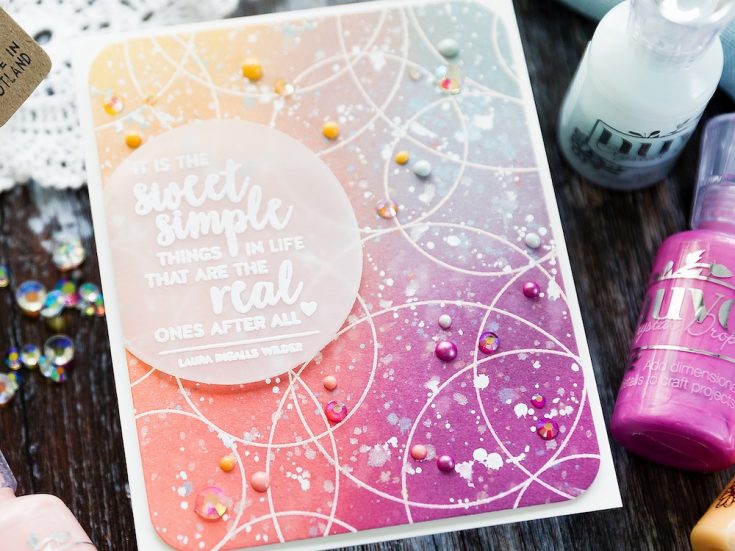
I liked this vibrant, smooth blend of colors, but if you know me, I also love the texture you get from splatters and so I started by splattered the card with the tube from the mini mister. I left the water droplets on the card for a moment to react with the Distress Oxides and then used a paper towel to mop up the liquid and the inks that it draws with it to leave lighter highlight spots. I then pressed each of the colors of Distress Oxide onto my glass mat and combined a little water on a brush and then splattered the mixture over the different areas. As Distress Oxides are opaque, the splatters sit on top of the background and still show up even if you have, for example, yellow over a darker red area. I also splattered with a mixture of Perfect Pearls for added sparkle and then finished off by putting a little white gouache on my mat and again adding a little water until the combination was of consistency to splatter but still being thick enough to be opaque and leave white splatters over the card.
I made sure the background was fully dry before using a Rounded Corner Rectangles die to cut a card front from the panel. I think the rounded corners go well with the circular design of the heat embossed background and I love the blend of colors and all that splatter over the top. So now with the background made it is time to turn this into a card.
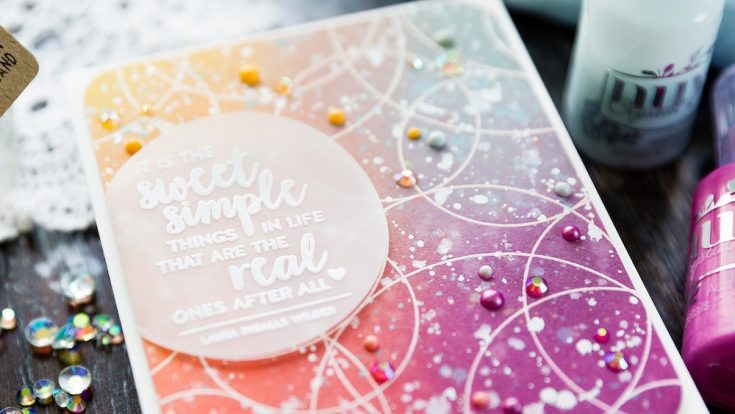
I picked a greeting from the Home Sweet Home set from Simon Says Stamp, and I thought this sentiment would work well white heat embossed on a circle of vellum to continue the circle theme of the background. I placed a piece of Simon Says Stamp vellum in the Mini Misti and stamped the greeting in clear embossing ink and sprinkled with white embossing powder before heat setting. Then I aligned a Nested Circles die around the greeting and ran it through my die cutting machine. This circle is more or less the perfect size of one of the heat embossed circles on the background and so I aligned the vellum over that circle and then folded the excess over onto the back of the card and secured with washi tape. I’ve often been asked how to adhere vellum to a card, and there are various methods such as folding it around the card, sewing it in place, using a clip or a staple and also as I did which was to hide adhesive behind the vellum by placing small pieces of foam tape behind the white embossed greeting.
I added foam adhesive to the back of the panel and adhered it to a side folding A2 card cut and scored from Ivory card. I find the color of Ivory card tones better with the white embossing than a stark white. I love to add accents to finish a card off and for this card I’ve picked a few colors from the Nuvo Crystal Drops range; Pink Orchid, Duck Egg Blue, Bubblegum Blush, and Sugared Almond as well as Nuvo Crystal Gems. I chose to concentrate the Crystal Drops in the areas where they coordinated with the Distress Oxide colors, so most of the Pink Orchid drops are over the SeedlessPreserves area, the Bubblegum Blush over the Abandoned Coral, the Sugared Almond over the Squeezed Lemonade and the Duck Egg Blue over the Tumbled Glass. I then finished off by adding in a few Crystal Gems of varying sizes for some added sparkle. I used a Crystal Katana tool to help me pick up the gems and then kept them in place with Gina K Connect Glue.
Thanks for joining me today, and I’ll see you next time for Doodling With Debby.
SUPPLIES:
|


Thanks so much for stopping by and thanks to Debby for being our special guest!

Blog Candy Alert!! Follow our blog via email and comment on this post for a chance to win special blog candy!


