Doodling with Debby: Watercolored Autumn Flower Border
Hi friends! Happy Monday! What better way to cure the Monday blues than some gorgeous inspiration from the one and only Debby Hughes?! Read on, don’t forget to watch the video for all the details, and enjoy!

Hi, it’s Debby here, and for my Doodling With Debby video feature for this month, I am back in my comfort zone with watercolours. I adore autumn, cosy evenings, woolly jumpers the lot but in particular the changing colours even the dark, damp days have appeal except for when trying to video. I had half a dozen lights on trying to get an evenly lit work-surface for today, but hey I’ll take a little video trouble for all that fabulous moodiness that nature is throwing at this time of year! You may know by now, but I love muted colours, and for me, autumn is an overflowing plate full of inspiration as flowers fade into shabby colours and leaves loose their bright greens for deeper hues. I absolutely love it and am in my element in autumn!
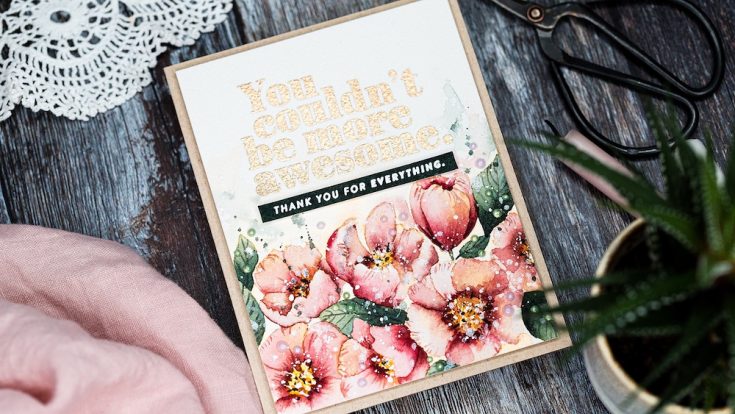
Today I used the Thankful Flowers set that came out in September as part of the monthly card kit from Simon Says Stamp. September is such a busy, full-on, inspiring month of STAMPtember® craziness that this gorgeous stamp set sort of fell through the cracks of my creative to-do list until now. When I filmed this, there were a few of the kits with this set still available; however, if the kit has sold out, then you can still get this stamp set separately.

One of my favourite ways to use a floral stamp set is to gather images to create a border – either along the top or bottom or perhaps around a corner. It creates a lovely frame to support the sentiment. And let’s talk about the sentiments in this set. I like the big, bold greetings and also that there are accompanying smaller sentiment strips to pair with them.
I laid out a rough arrangement on a piece of Arches cold pressed watercolour card in the Misti. Rather than stamping the flowers first, I started by concentrating on the sentiment, and that’s because I wanted to ensure I had a really good impression of this bold sentiment before moving on and spending time colouring. So I aligned the sentiment centre top of the panel and stamped it in clear embossing ink. I did this three or four times to ensure I had a really good impression on the textured card. Then I sprinkled with Simon Says Stamp Antique Gold embossing powder and heat set. With the sentiment done, I could relax and stamp the flowers along the bottom of the card. I stamped the large floral bouquet first in Antique Linen Distress Ink and then filled in with a few of the individual images. I didn’t mask the first layer but instead wiped away any ink with my finger that would overlap with the previous stamping. My aim with this card is not to go for a detailed botanical look. I find it interesting to see my style develop over time. I’ve never been one for the super detailed botanical look, and although I love the look of loose florals, I often find those too loose and so I hit the middle ground – not too detailed but not too loose either. I probably ere towards the looser side of the spectrum but I do like adding layers and the true loose florals done with one layer in the swoosh of a brushstroke. I have so much respect for people who can do that, but for me, I go slowly, slowly building up layers and a little detail until I’m happy.
When painting, I usually like to start with leaves. I love greens and leaves are one of my most favourite things to paint. I also feel they provide a solid structure for the more floaty florals to follow. I started with a light layer of a warm yellow as a base layer, and this will give a glow to all layers painted on top. That’s the beauty of transparent watercolours in that the layers play together to create the finished look. The first layer is a mix of Quinacridone Gold along with whatever was already on my palette. I’m not one for having a clean and tidy palette I love to see well used messy palettes where colours intermingle to give exciting results. Following on from the base layer, I added a green layer. This is a mix of Undersea Green, Indanthrone Blue and Lunar Black. The initial layer is quite dilute and then using the wet on wet technique, I dropped deeper colour into the base of the leaf, letting the colour move with the water. I think wet on wet is my favourite watercolour technique; the movement of the paint through the water is almost like a slow-moving wave rolling in on a beach, so beautiful to watch.
With the leaves done, I moved on to the flowers. I used mixes of Quinacridone Gold for the flower centres along with a deep rich mix of Alizarin Crimson and Lunar Black with a tiny touch of Undersea Green to knock the brightness back a little. For all the flowers, I’m concentrating on dabbing the yellow in the centre followed by the Crimson mix around the edges of the centre and then pulling the colour out from the flower centre over the petal with a damp brush. I aim to have deeper colour at the base of the petal then a highlight area over the body and finally just a hint of colour to the petal edges as they curl back. In places, I’m taking a little of the yellow mix and adding to the petals which mix with the crimson to give a range of hues from crimson, to orange to yellow.
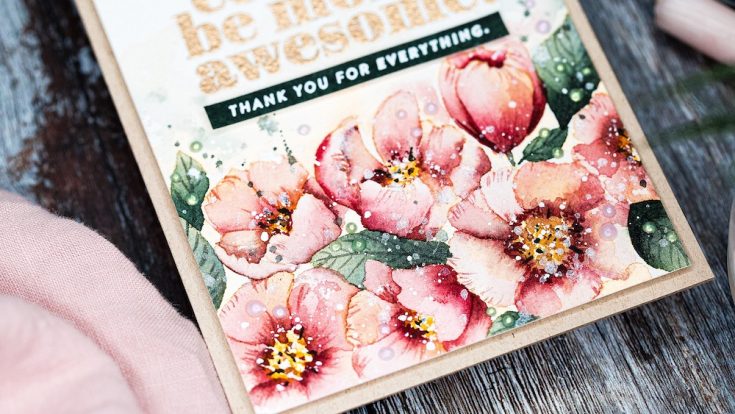
To paint the rest of the flowers, I’m following this same method. One thing to be aware of is to avoid painting areas which are next to each other if they are still wet. I mentioned above that paint moves with water in the wet on wet technique, and if you paint two areas next to each other while the paint is wet, then the colour will likely move between the two areas and blend and merge to form one area. So to keep the definition of the petals it is best to move around the flowers painting one at a time. Having finished the flowers, I added a light, loose background wash and then dots of white gouache followed by dots of a deep Sepia mix to the flower centres and the play of light and dark brings them to life.
Next up is some splatter and if you’ve followed me for a while, this will come as no surprise! I find a light splatter over a watercolored piece adds that ethereal look which suits florals so well. I like to use a solution of Perfect Pearls and then follow up with white gouache. You need to add a dot of gouache to your work surface and then a little water to get a mix which splatters nicely as it is too thick straight out of the tube.
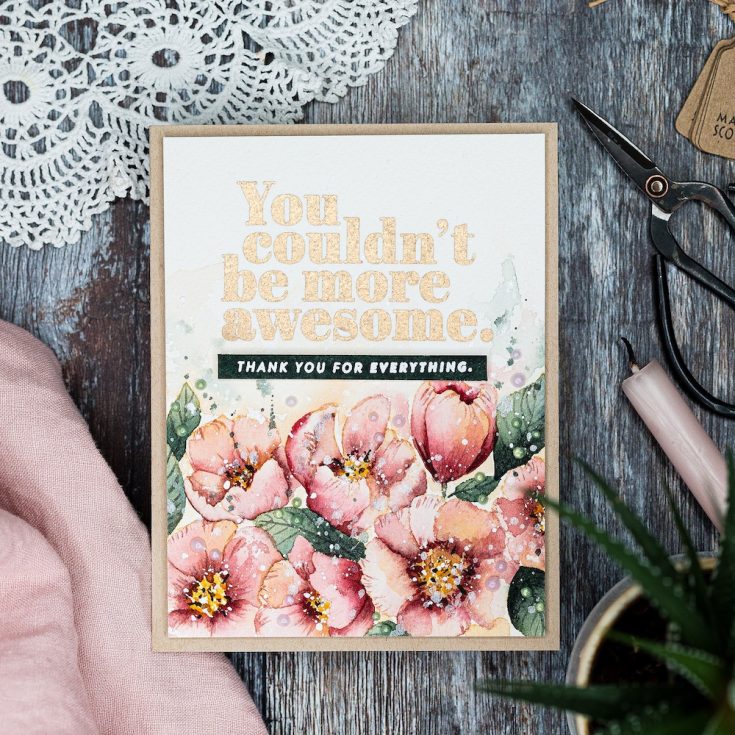
I trimmed off the edges of the piece to create a panel just smaller than an A2 card base. I added a generous covering of foam adhesive to the back and added the panel to a card base cut and scored from Neenah Desert Storm card in the 100lb weight for sturdiness.
I wanted to use one of the coordinating sentiments from the Thankful Flowers set, and so I used some of the green paint mix I used for the leaves on my card to paint a piece of hot-pressed watercolour card. I used hot-pressed as this is smooth and so will give a good stamped impression. However, I used cold-pressed card for my main panel despite having stamped and embossed on that, and that’s because I prefer painting on cold-pressed paper – I like the texture of the card and the way the paint behaves with the texture. So I’ll take a little extra effort on the stamping and embossing on the main panel to get the look I like on the watercoloring. However, for a simple sentiment strip, a hot-pressed card is the way to go. I stamped the greeting in clear embossing ink, sprinkled with white embossing powder and heat set before trimming to a skinny banner and adding to the card with foam adhesive. I used a T square ruler to ensure I had it on straight as I don’t have an eye for straight lines. Finally, I accented the card with Nuvo Dream Drops in Fairy Wings and Dragon Scales.
Thanks for joining me today and I hope you join me next time for Doodling With Debby.
Watch below or in HD on YouTube.
SUPPLIES:
|


Thanks so much for stopping by, and thanks to Debby for being our guest!

Blog Candy Alert!! Follow our blog via email and comment on this post for a chance to win special blog candy!
Believe in Christmas Magic Vignette Box: Brian Poteraj!
Mixed Medium with Shari Carroll: Believe: Patricia Wilson!
Funny Friday: Hidden Zinger: Loly Borda!
Yippee for Yana: Crafting with Coordinating Stamps & Stencils: Anne Sturgeon!
Studio Monday with Nina-Marie: Tags 5 Ways!: LaRae Prentice!
Please email [email protected] with the name of the blog you won from, your prize(s), and your address if applicable!
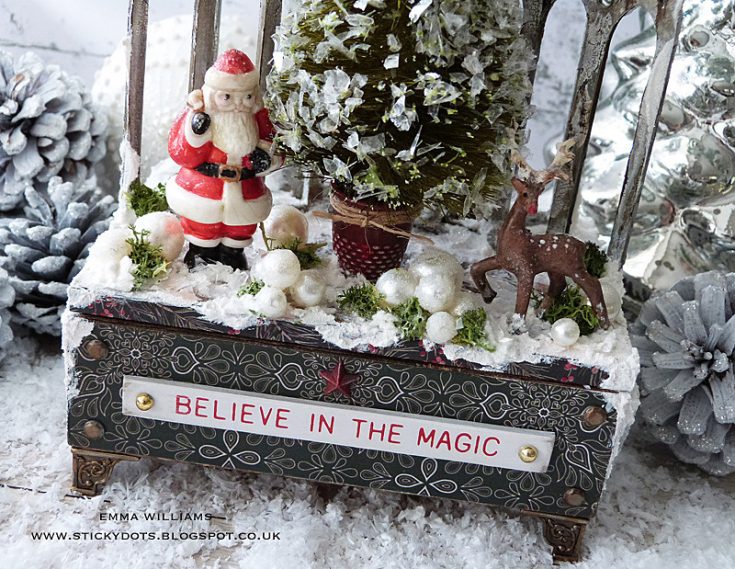
Believe in Christmas Magic Vignette Box
Hi friends! I hope you’re having a great weekend! We have quite the treat for you today with a gorgeous Vignette Box project by the super talented Emma Williams! Scroll on and be INSPIRED!
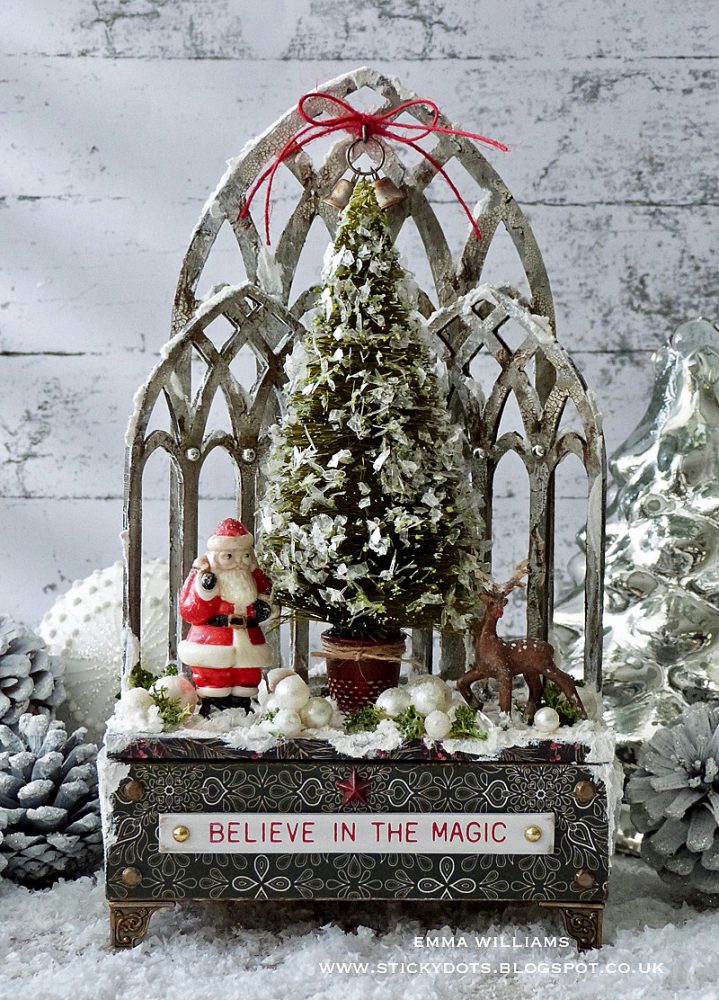
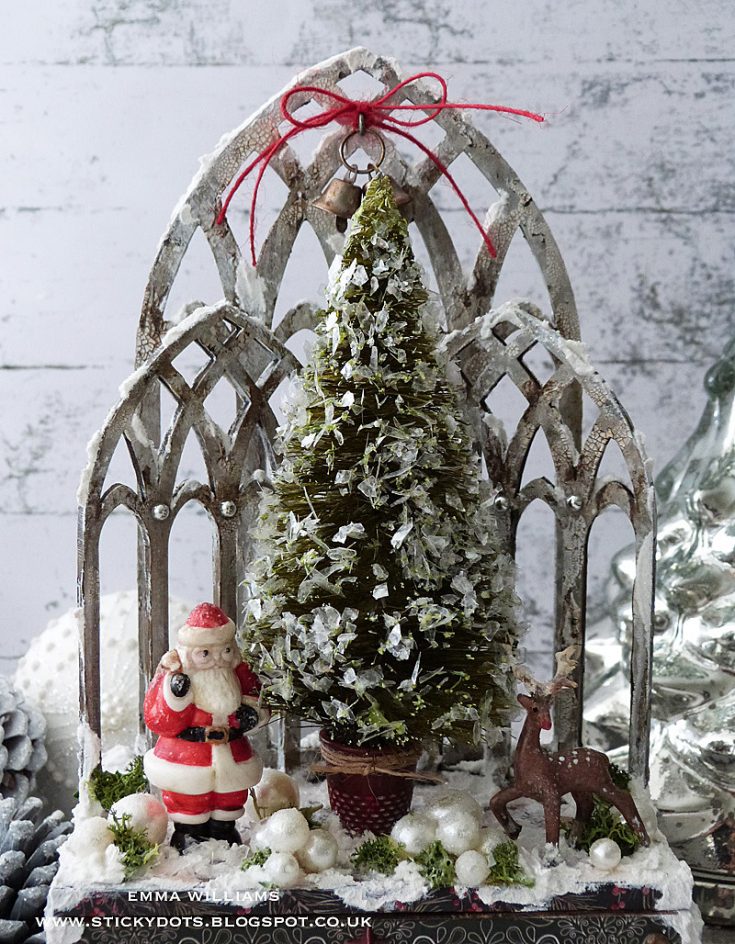
Happy Sunday everyone, it’s Emma here and I’m really happy to be back on the Simon Says Stamp blog to share my latest project with you all ~ a home decor piece that is perfect to display at Christmas time.
I must admit I love Christmas, it really is the most wonderful time of the year and every year, I try to create something that can be put on display in my home. So, with this in mind and with so many wonderful new products from Tim Holtz, I decided to make this decorated vignette box that would not only be useful at Christmas time but also take centre stage amongst all my other decorations and can be filled with festive treats.
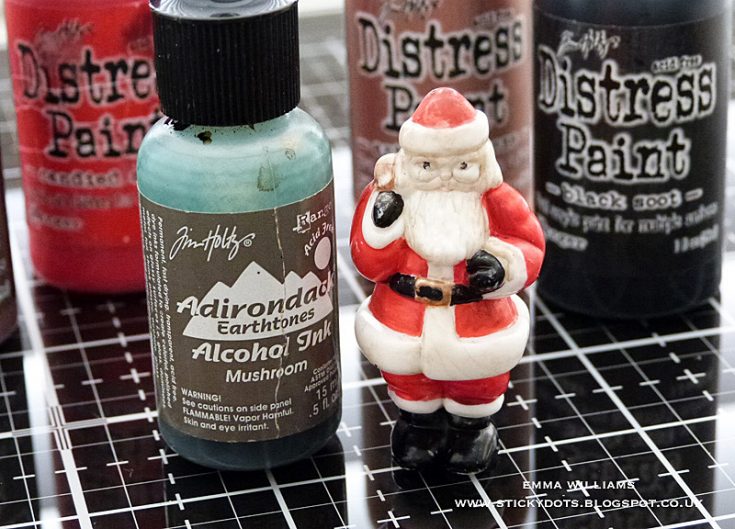
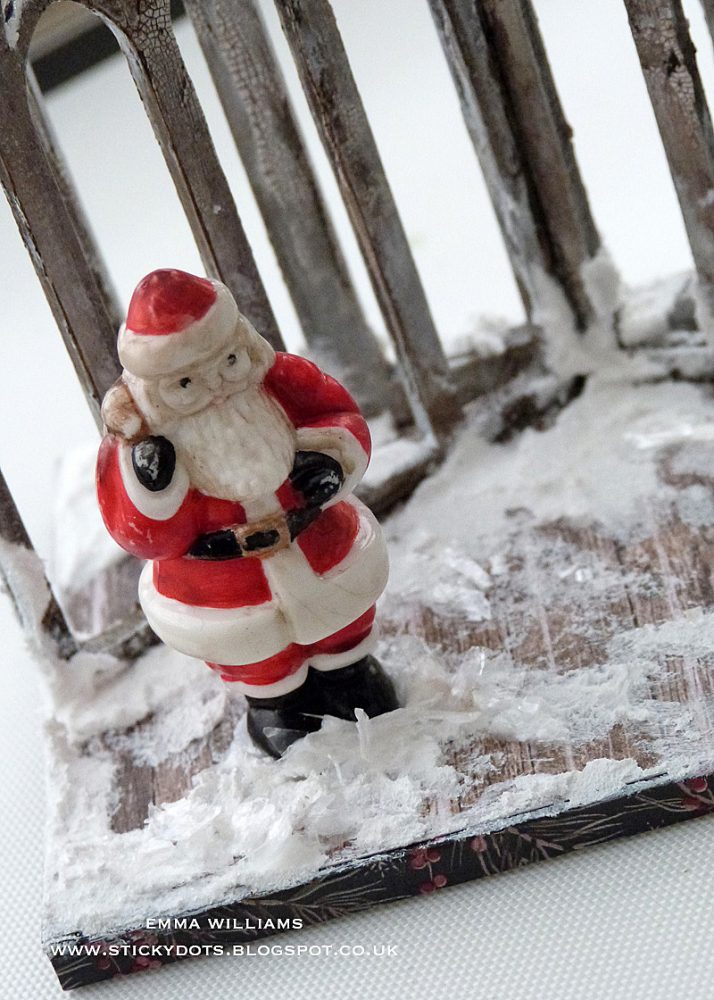
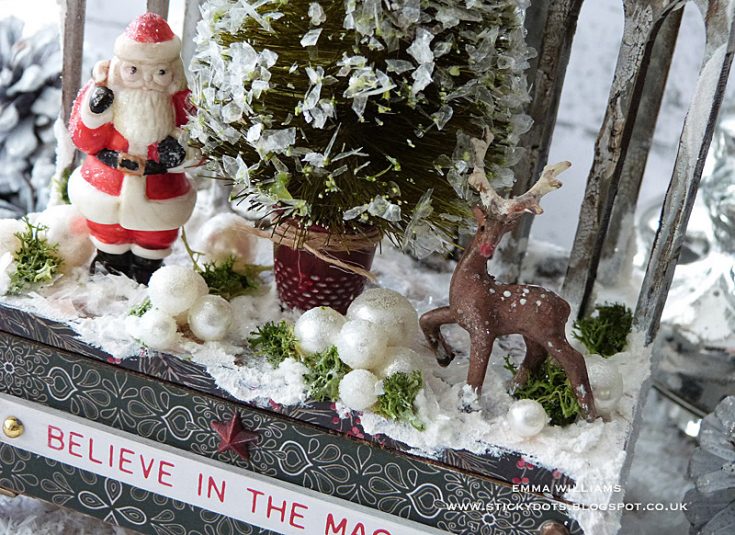
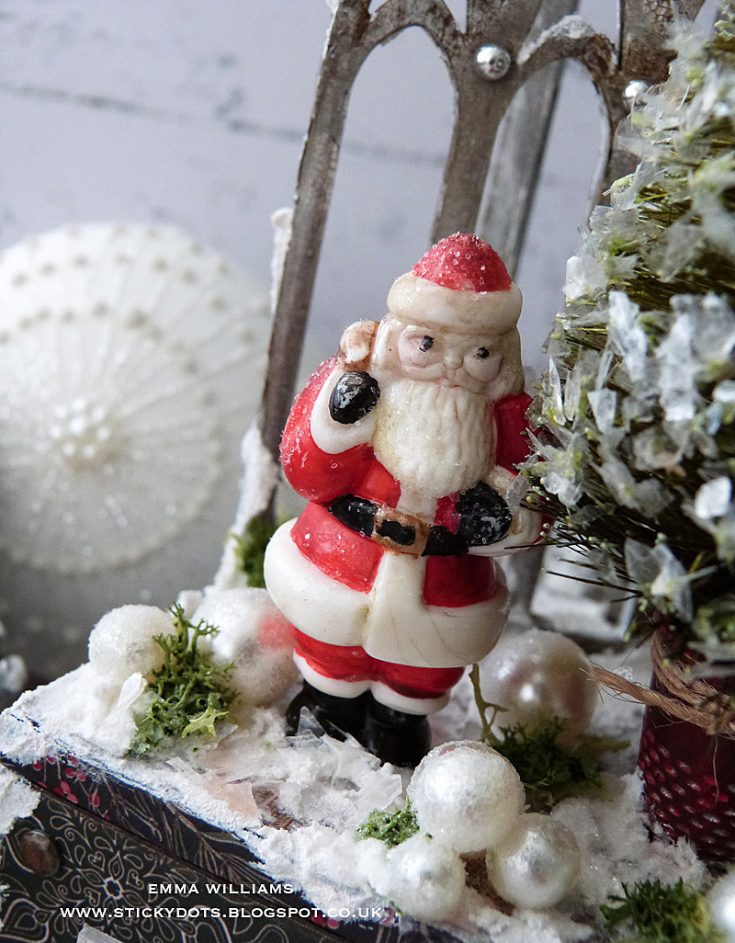
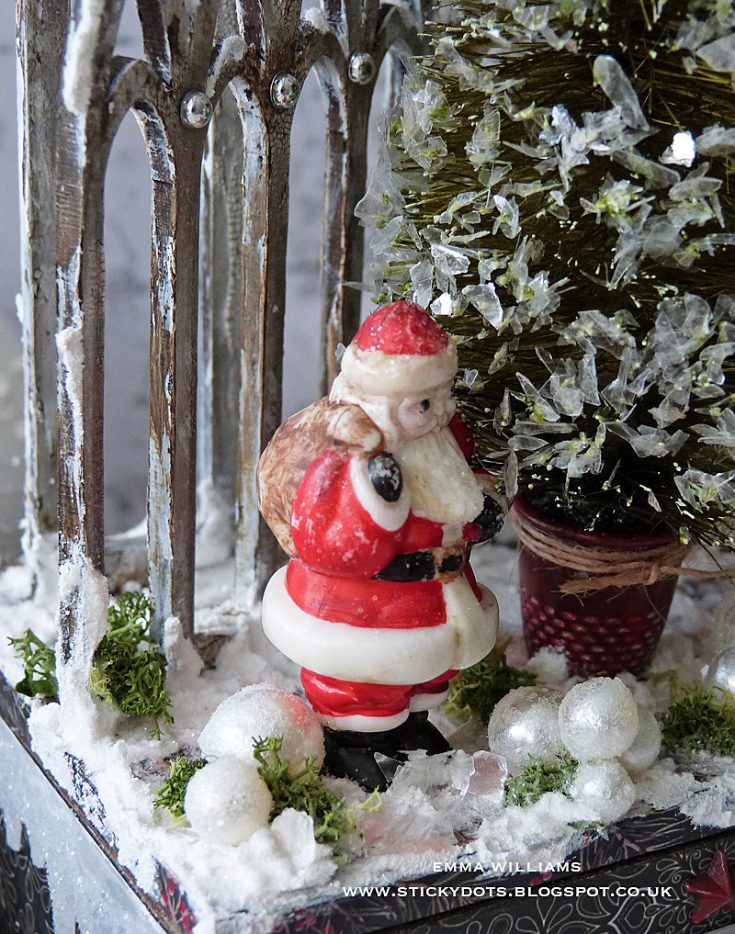
So, let’s get started and the first thing I did was to prep all my embellishments ready to arrange on the lid beginning with the cute little Salvaged Santa. Santa comes in a pack of two, together with a snowman and I coloured him with Distress Paints, painting directly onto the surface with a fine detail paint brush. Candied Apple for his suit, Black Soot for his boots and belt, Antique Bronze for the buckle and finishing with Walnut Stain for his sack.

Once the paintwork is complete and dry, I used an Alcohol Ink Applicator Tool to add a touch of Mushroom Alcohol Ink over the surface.
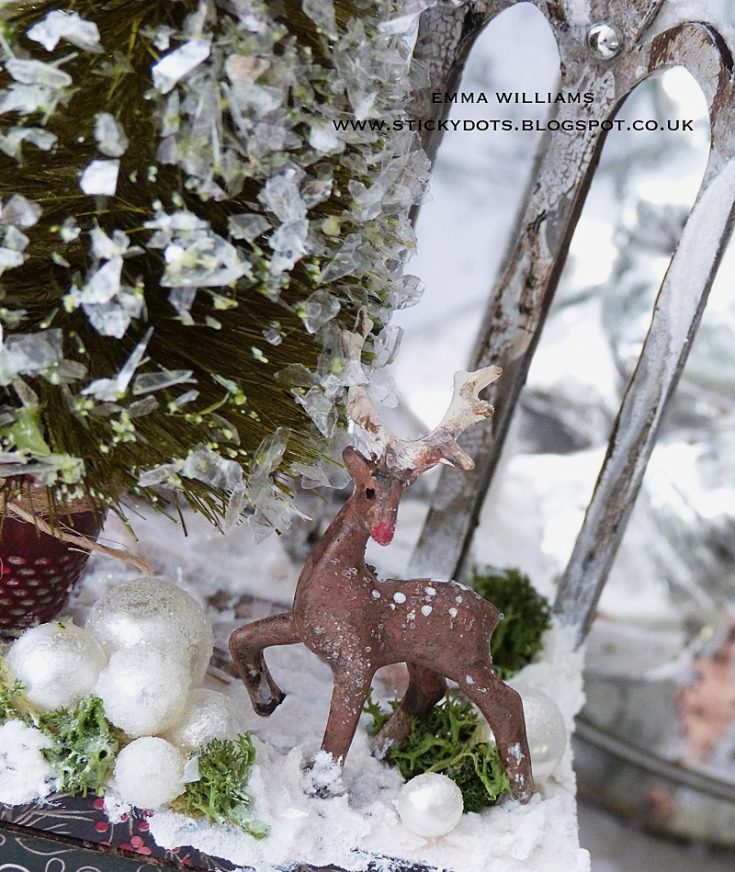
For Rudolph, and yes, if you look hard ~ he does have a red nose…I took one of the larger Decorative Deer from the set and used a combination of Antique Linen for the antlers, Vintage Photo and Ground Espresso for the body and then allowed it to dry. I added some white dots on his back using Gesso and for his little red nose, a touch of Candied Apple Distress paint.
Moving onto the Christmas Tree ~ I used a 5” Tim Holtz Woodland Tree that I had in my stash from last year ~ unfortunately these are discontinued, so if you haven’t got one of these in your stash, then I would recommend using the Tim Holtz Half Woodland Tree which can easily be cut down to 5” in height, so that the top half of the tree is used and will be perfect for this project, (or as an alternative you could also use a Prima Marketing Sisal Tree). With your finger or a paint brush, tip the ends of the tree with a touch of white Gesso and allow to dry completely before spritzing the tree with Peeled Paint Distress Spray Stain. Remove the wooden stand from the tree and then set it to one side to dry thoroughly.
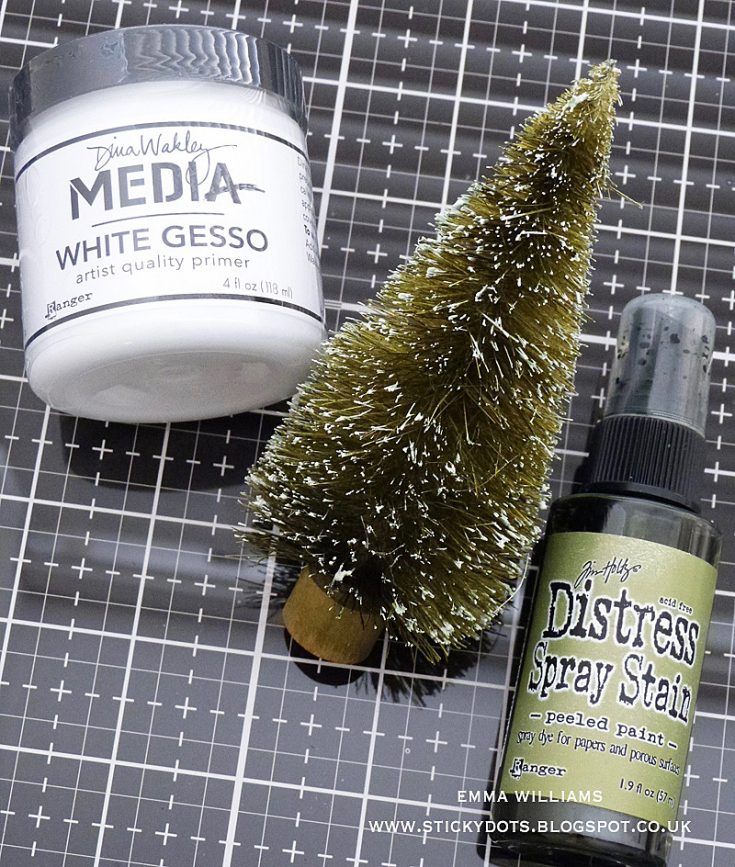
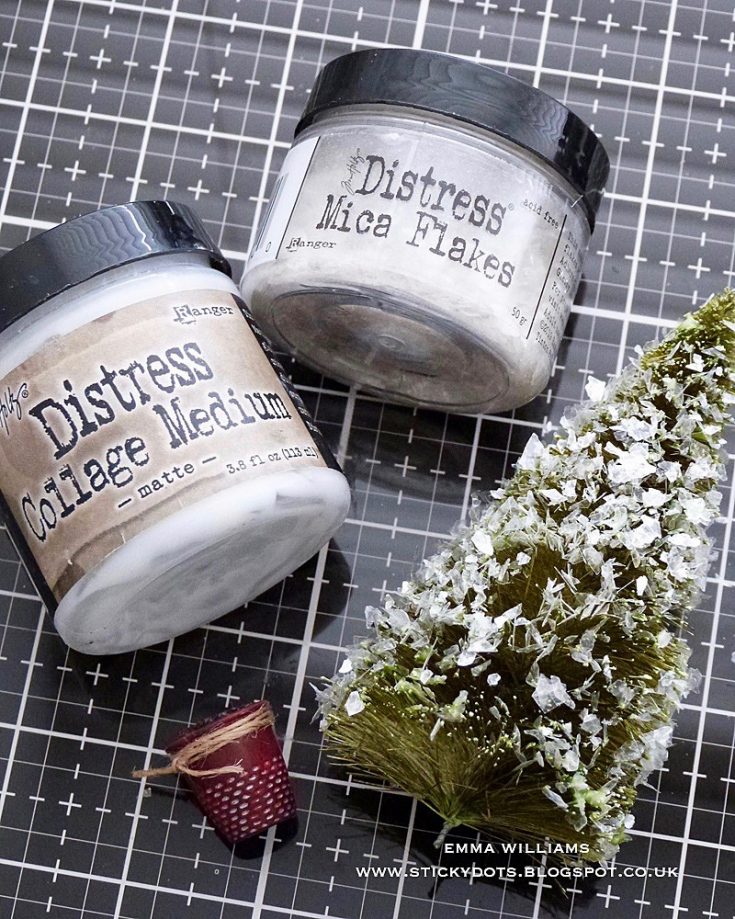
Once the tree is dry, apply a small amount of Matte Collage Medium to the tips and then sprinkle Mica Flakes over the entire tree. Tap away the excess flakes and pop them back into the jar. Allow for the Mica Flake covered tree to dry. To create a pot for the tree, paint a Tim Holtz idea-ology Thimble with Candied Apple Distress Paint and tie a piece of twine around the pot. Add some foam inside the thimble, (I cut a piece from some wrapping that I had in a parcel) and then, place and attach the green tree into the foam inside the thimble, adding a small amount of adhesive to secure it into place.
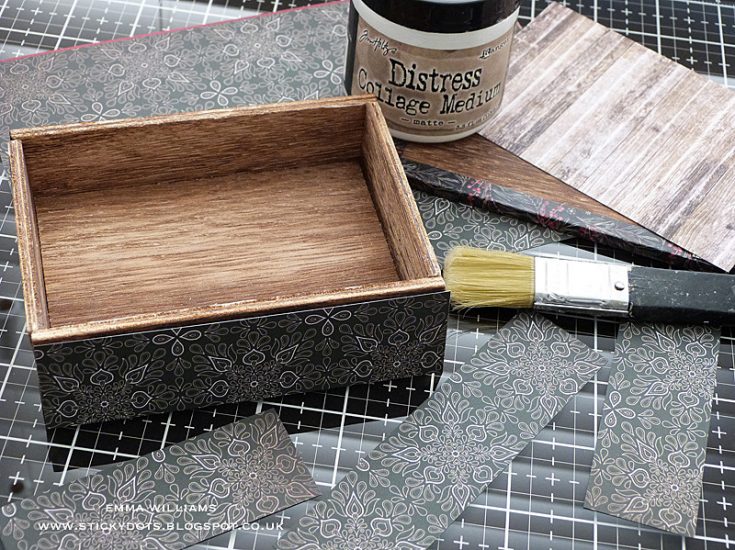
Cover the sides of the second largest vignette box with patterned paper from the Tim Holtz Christmas Paper Stash and adhere each panel with Matte Collage Medium, adding a coat of the medium over the top and allow to dry.
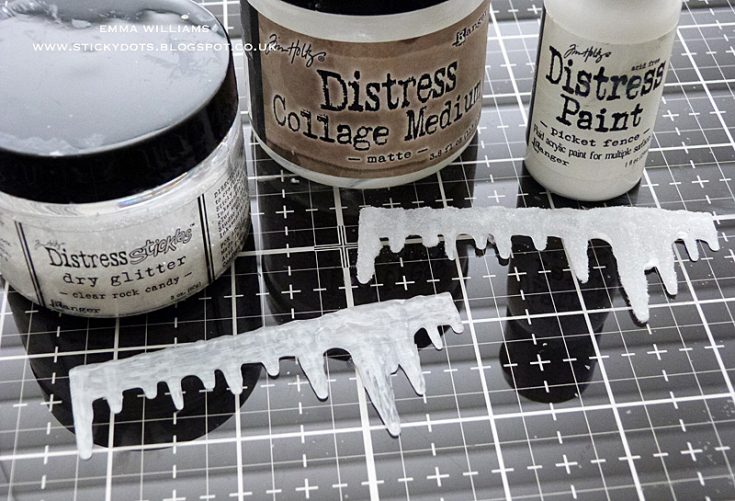
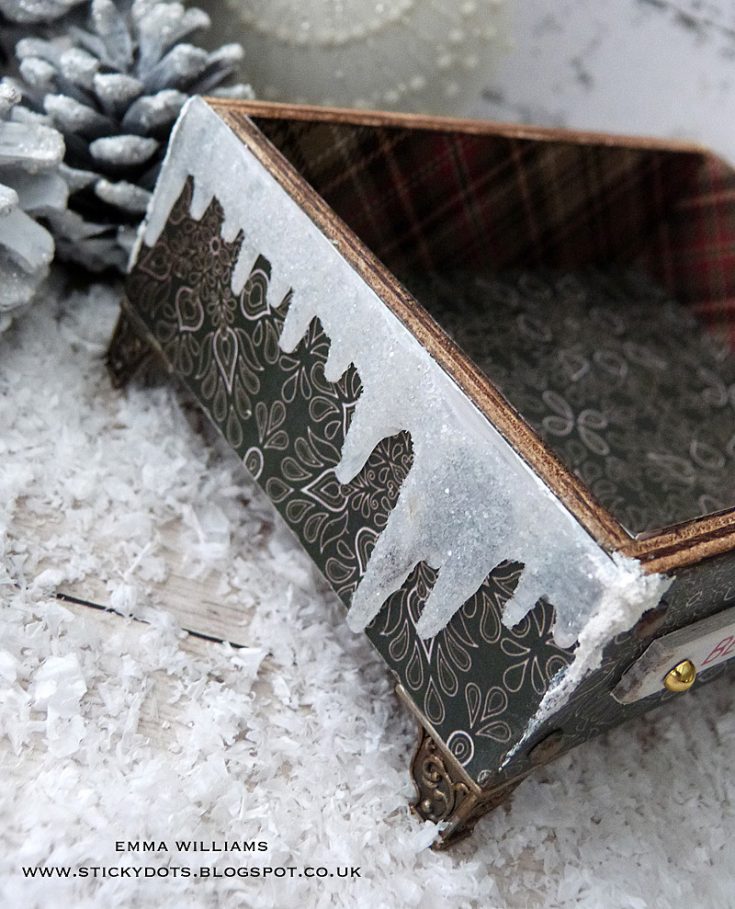
On each side of the box, I added some icicles and took the two smallest icicles in the set and painted the back of each with Picket Fence Distress Paint. Flipping the icicles over, I then applied some Matte Collage Medium to the fronts and sprinkled Rock Candy Dry Glitter over the top. Tap away the excess and leave to dry.
Attach the icicles using Collage Medium, placing them on either side of the box. Add a small amount of Grit Paste to the corners of the box and allow to dry.
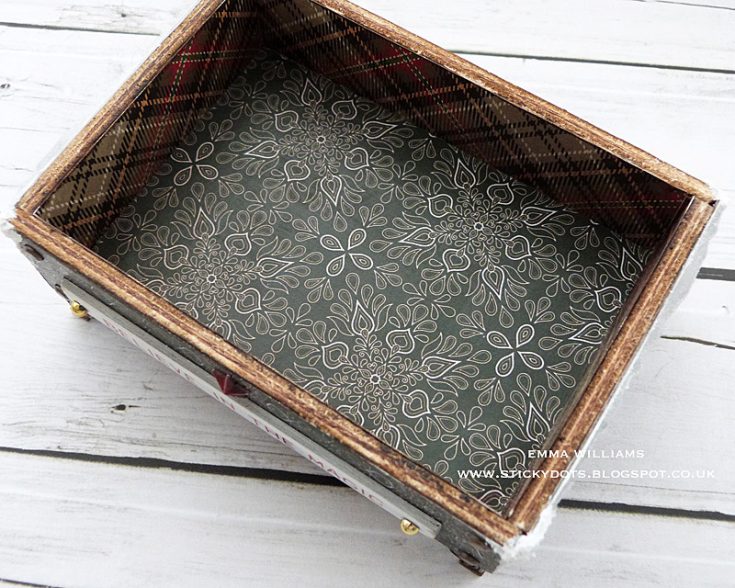
I lined the inside of the box with coordinating papers from the Christmas Paper Stash.
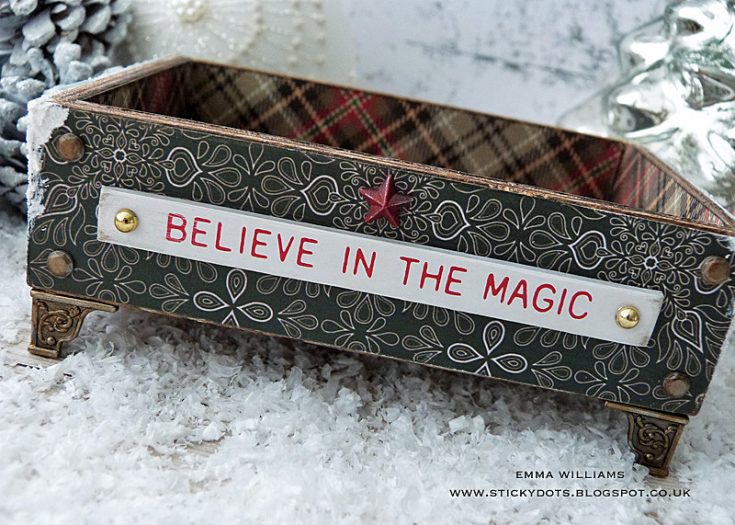
On the base of the box, I added some feet and used four Mini Foundations, one on each corner and attached them with collage medium and then attached the Believe In The Magic Quote Chip to the front, before attaching a Gold Metallic Droplet to either side of the chip. To complete the box, I added some Hardware Heads to each side of the quote chip and then painted a star adornment with Candied Apple Distress paint and attached this above the quote chip.
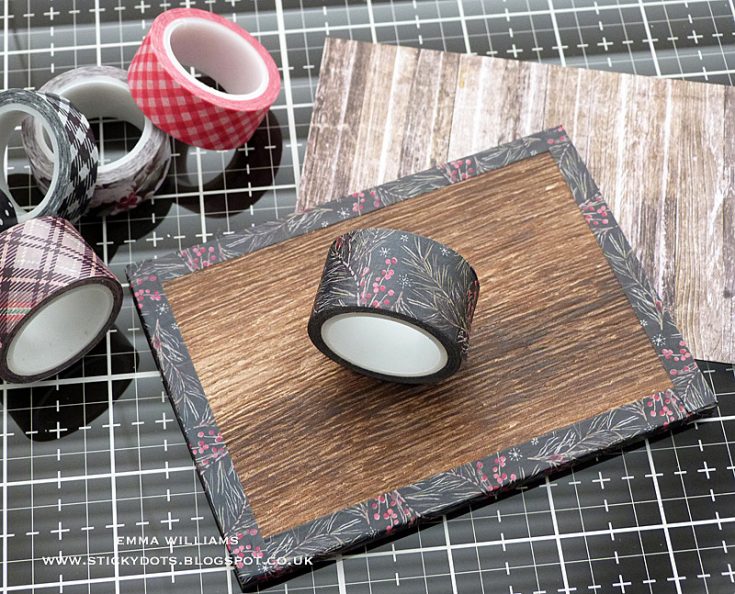
For the lid of box, I used the corresponding size of Vignette Panel and covered the edges with Christmas Design Tape, before adding a layer of wood effect paper from the Christmas Paper Stash and attaching it to the top of the lid, again adhering the paper into place and sealing it with a layer of Matte Collage Medium.
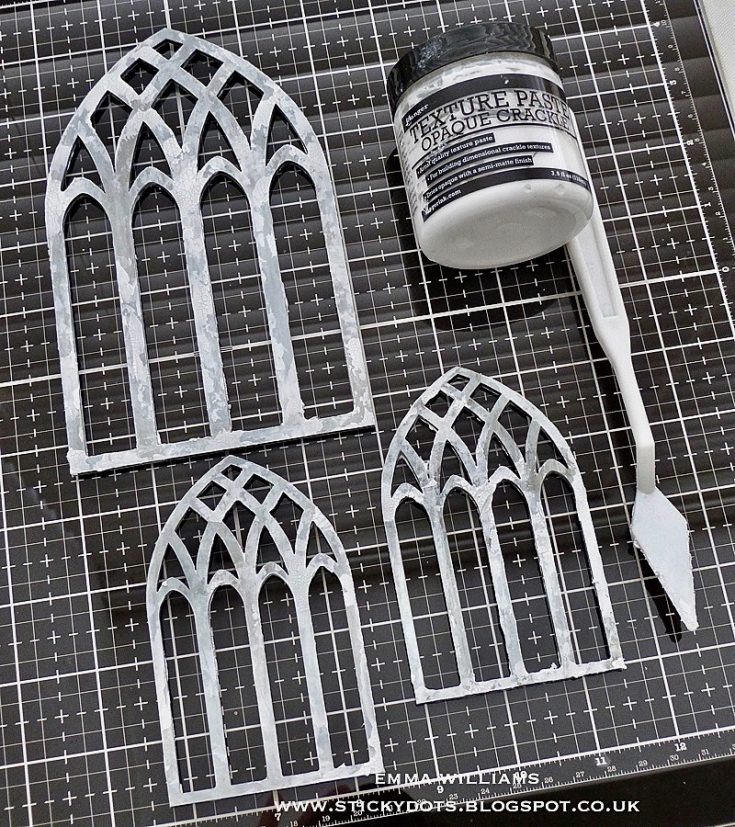
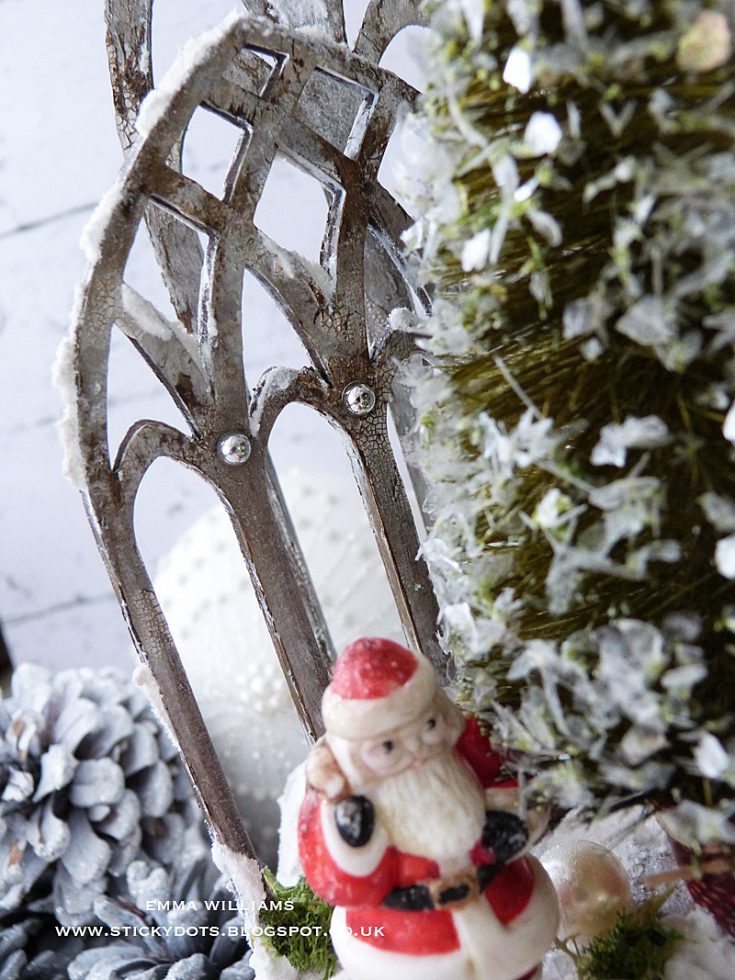
To create the Cathedral frames I took two of the small windows and one of the large windows and prime the surface of the frames with gesso, front and back because this piece will be seen from all sides, so you want to make it look perfect! Once the gesso is dry, add the paint layers to all three frames ~ paint the entire surface with Weathered Wood and gently heat dry the paint. Then using a dry paint brush, dip it into Pumice Stone Distress Paint and then remove the majority of paint from the brush onto a paper towel. With the remaining paint, dry brush the surface of the painted Cathedral Frames with the Pumice Stone paint. Once dry, apply a final paint layer of Picket Fence Distress Paint, stippling the paint over the frames using a paint brush.
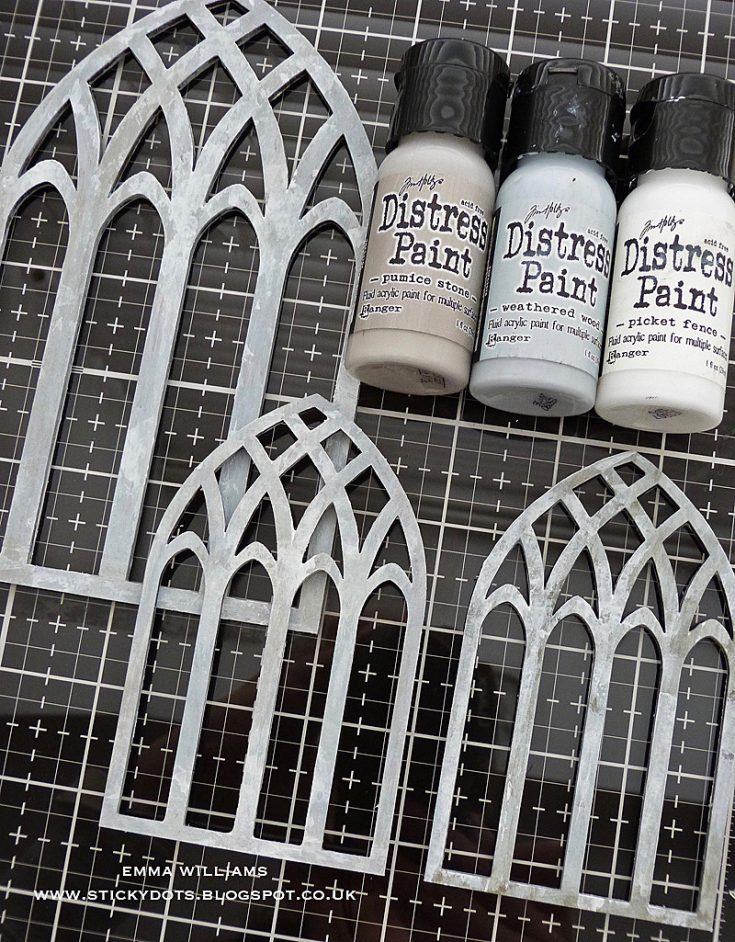
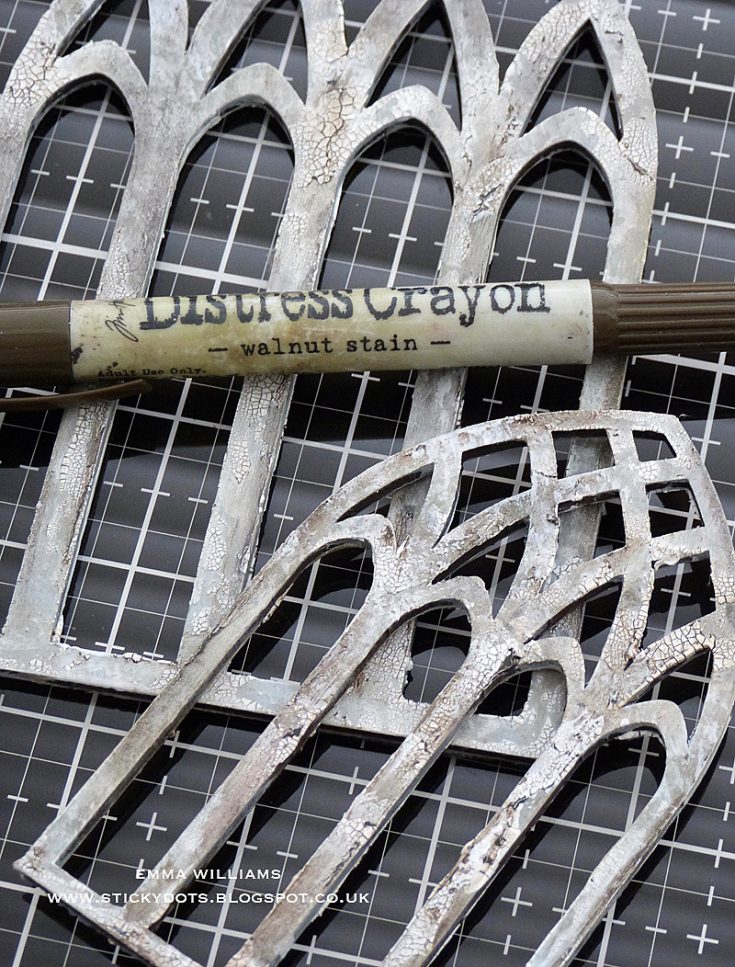
To create the crackle effect, use a palette knife to apply the Crackle Texture Paste to random areas of the frames and set aside to dry.
Once the crackles have appeared and the paste is dry, apply Walnut Stain Distress Crayon to the surface and using a water brush, blend the crayon into the crackles, wiping away any excess colour.
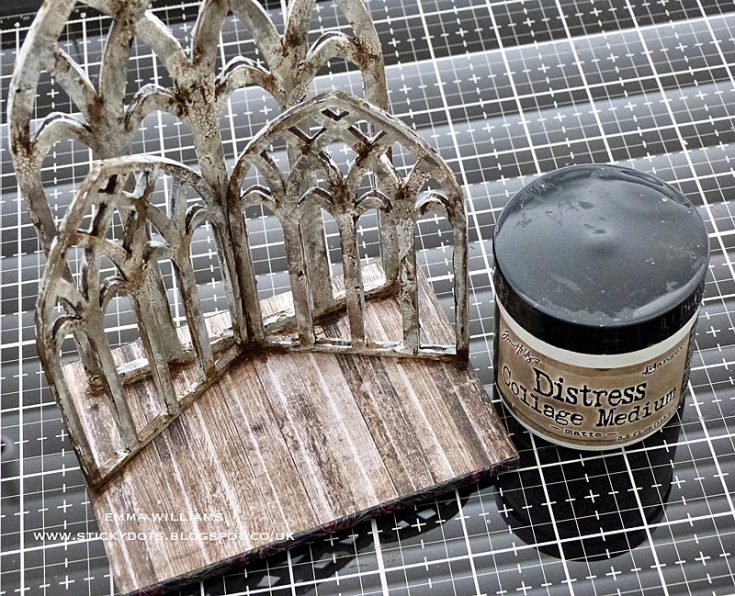
Attach the frames to the covered Vignette Panel lid using Collage Medium applied along the bottom edge of the frames and position the largest frame at the back, with the smaller frames placed in the centre of the large frame but positioned at an angle. Set aside to dry.
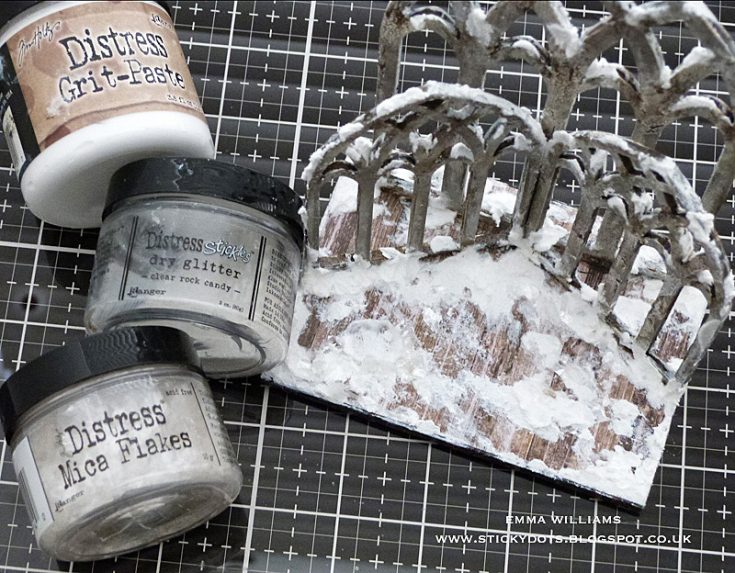
Once the frames were secure on the lid, I added the snow and for this I used Grit Paste which I applied to the covered Vignette Panel lid and also, on the frames itself. Whilst the paste is still wet, sprinkle Rock Candy Dry Glitter over the top. Also sprinkle some Mica Flakes over the top of wet paste.
I then attached my painted Santa to the arrangement…
…before attaching some Silver Metallic Droplets onto the frame, attaching them to the back of the large frame and the fronts of both the smaller frames.
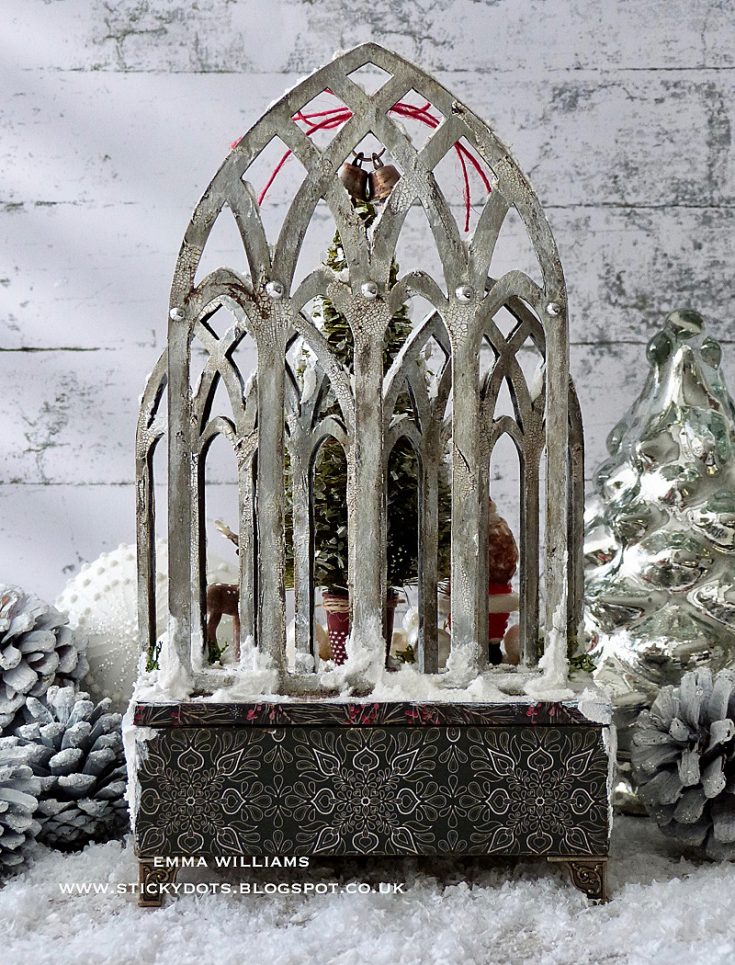
I adhered the tree in the centre of the Cathedral frames using Collage Medium, placed the decorative deer to the right and to complete the scene, I added small pieces of florists moss, tucked between the Grit Paste before moving onto to make all those snowballs.
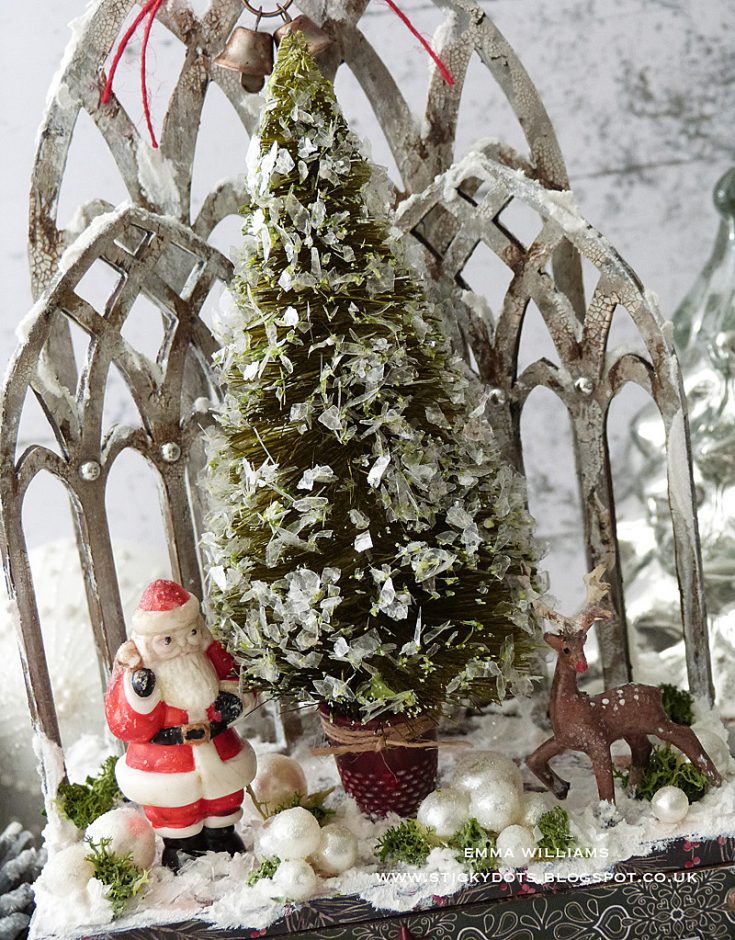
For these I used various sizes of idea-ology Baubles and smeared each bauble with Matte Collage Medium before dipping them into Rock Candy Dry Glitter and coating each bauble to create a snowy effect. Once the baubles were dry, I arranged them on my lid in clusters, placing and attaching each ‘snowball’ with collage medium and adding them in and around the tree, Salvaged Santa and Rudolph.
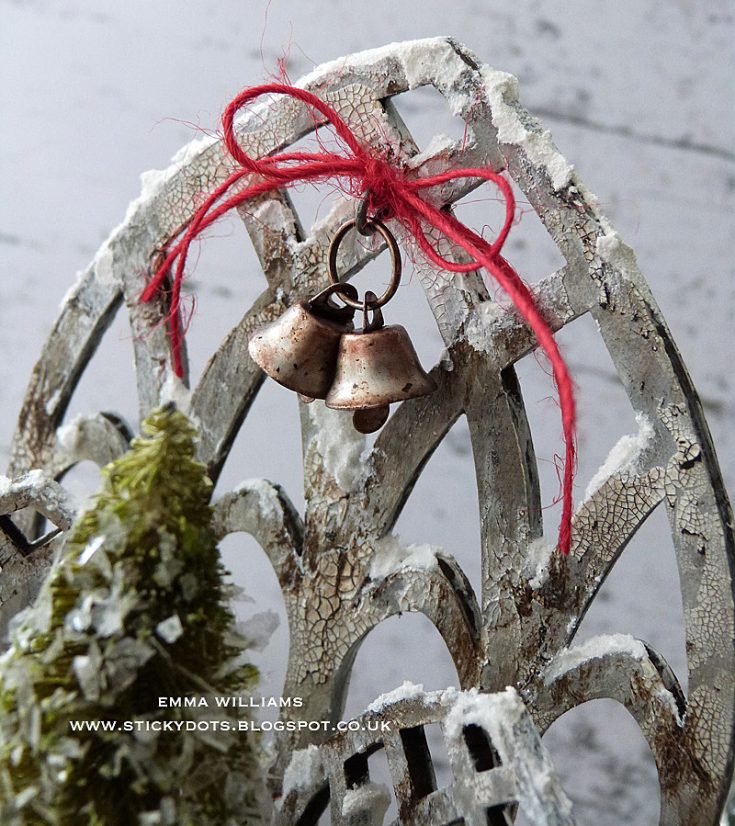
Finally, I added the tiny bells at the top of the Cathedral frame. I used two bells and attached them onto a Jump Ring. To create a rusty effect on the bells, I used an Alcohol Ink Applicator Tool to apply a combination of Mushroom and Rust Alcohol Ink to the metal. I then attached a screw eye fix from the Vignette Hardware Findings set which is screwed into the top of the tallest Cathedral Frame. Attach the bells and jump ring onto the screw eye fixture and as a finishing touch, I tied a piece of red twine onto the fixture.
Thank you so much for stopping by today ~ it’s been fun taking you through the creative process of this Christmas project and I hope I’ve given you some tricks and techniques that will inspire you with some ideas of your own! – Emma x
SUPPLIES:
|


Thanks so much for stopping by, and thanks to Emma for being our guest!

Blog Candy Alert!! Follow our blog via email and comment on this post for a chance to win special blog candy!
Mixed Medium with Shari Carroll: Believe

Welcome everyone, it’s Shari here with a mixed medium project. I’ve pulled out all the stops on this one and I enjoyed the process so much!
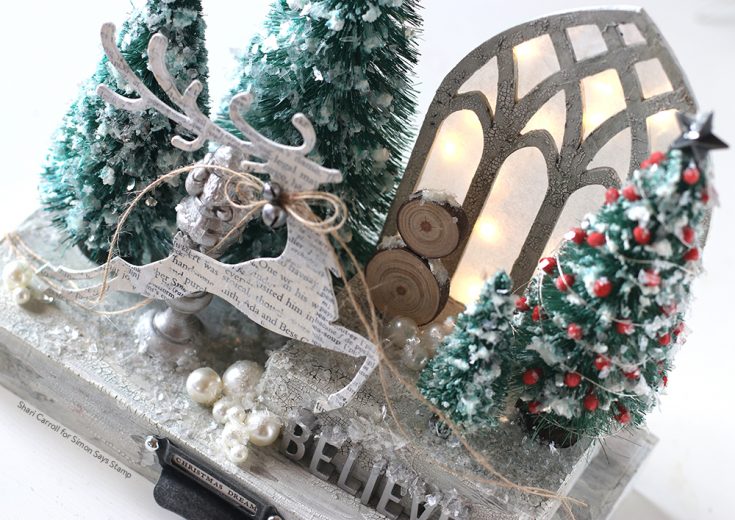
I’m inspired to start some Christmas decorating and wanted to make a memorable piece. I started off with two sizes of Tim Holtz Vignette Boxes stacked on top of each other.

I’ve colored the Woodland Trees with Evergreen Bough Distress Spray. Then adorned one of them with Coral colored Beaded Berries, Silver Metallic Thread, and a star on top!
I added tissue paper to the back of the Cathedral Thickboard and created a pouch from a storage sleeve to hold the Tim Holtz Tiny Lights in place behind.
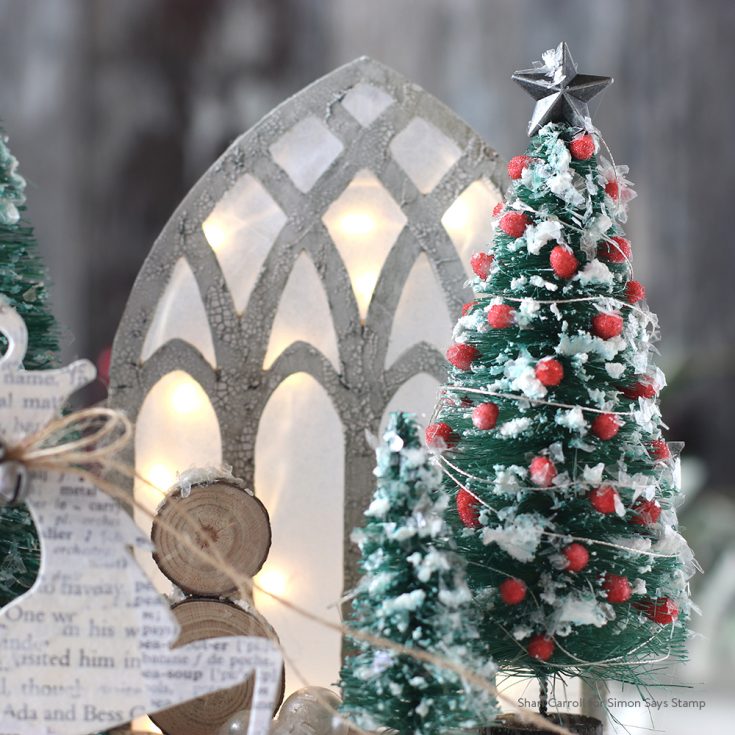
Tim Holtz Grit Paste makes the perfect snow, I applied it to the trees with a palette knife then sprinkled Rock Candy Distress Glitter to add some sparkle.
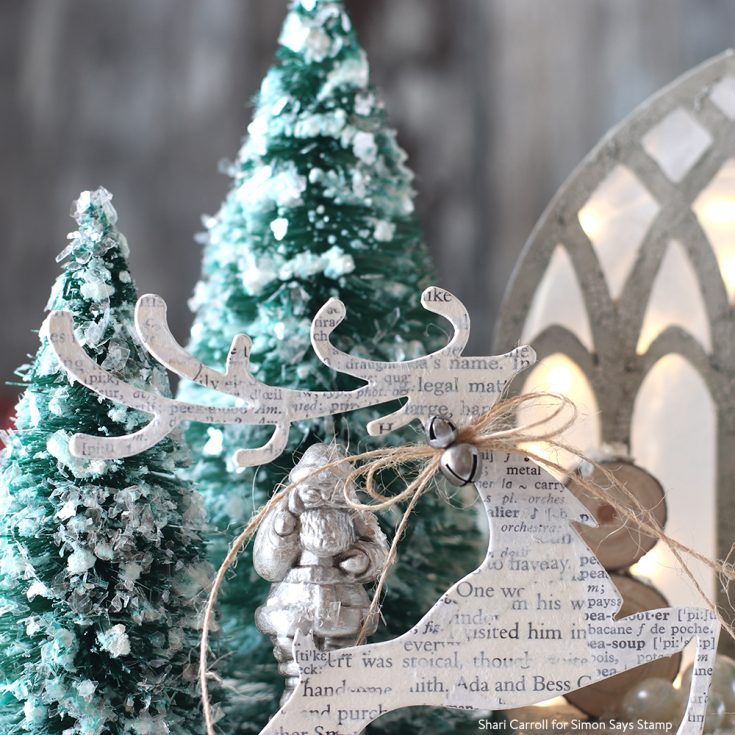
I collaged some book text onto some heavy cardstock and once it was dry, I die cut the Reindeer. I added a twine bow with a couple Jingle bells to finish it off.
Brushed Pewter Distress paint was used to paint the Christmas Typography Findings the were glued in place on the base. I filled in areas with Baubles Findings to help transition the boxes.

I created a snowman by stacking up two Tim Holtz Wood slices and finished off the entire project with some Tim Holtz Mica Flakes which was a game-changer for a beautiful snowy effect.
I filmed the entire process and have compiled snippets of each step and technique for you. Enjoy!
Thanks for stopping by, I hope I’ve given you some inspiration to make something special for your home this holiday season.

Blog Candy Alert!! Follow our blog via email and comment on this post for a chance to win special blog candy!
|


