Yippee for Yana: Wintery Valentine’s Day Card

Hi friends! Happy Saturday before Christmas! This month and year have been flying! I’m excited to share this gorgeous wintery love card by the super talented Yana Smakula! Be sure to watch the video below and enjoy!
Hi everyone, this is Yana Smakula, welcome back for another Yippee For Yana video! In this episode, I have a Winter Valentine’s Day card for a guy using some older products from Simon. This is an easy project to make and hopefully one that will inspire you to rush to your craft desk and create away!
With the Winter Season upon us, I’ve come to enjoy adding snowy blizzards to my cards. In my previous video, I shared 2 Christmas cards, one of which featured a ton of white snow added with the help of white paint pens.
Since Valentine’s Day is also a Winter Holiday and it typically snows on Valentine’s day in my neck of the woods I do associate this holiday with snow. Hence, I figured it was fitting to add snowy blizzard to a Valentine’s Day card.

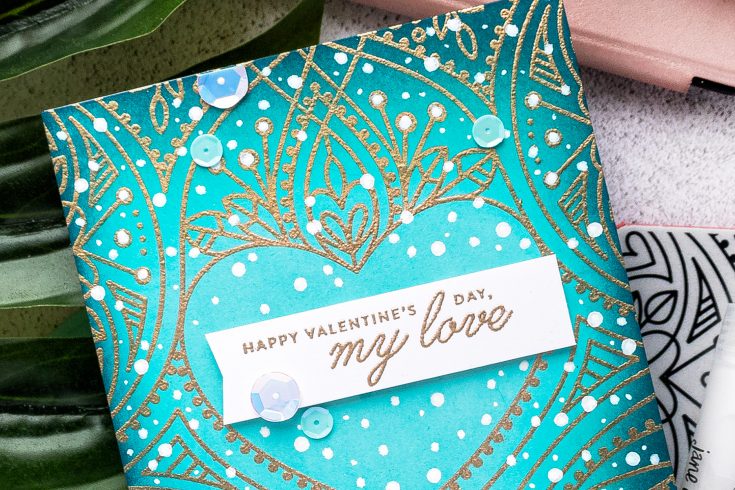
I started to work on my card by heat embossing a background. I used Simon’s Audrey Blue cardstock and embossed Center Cut Heart background stamp in Antique gold embossing powder – it is my absolute favorite color of embossing powder and it is probably the only powder I use all year round – for both Christmas and non-Christmas projects.
Next, I used my heat tool and melted the powder in place. I love the look of Antique Gold embossing powder on this Audrey Blue cardstock, it looks simply stunning! To add some definition to the background I decided to add some simple ink blending. I rarely ink blend full backgrounds, but I do love to ink blend the edges of the panels and keep the center free from any ink as this helps the panels glow and instantly draws the eye of the viewer to that center spot.
I first used Simon’s High Dive ink and ink blended the edges of the panel coming to the center but making sure to keep that center heart free from any ink. I was using a rather heavy hand and applying a lot of ink, but I also was mindful of the transition of the ink so that there weren’t any harsh ink blended lines.

Next, I used Deep Sea ink and added just a touch of this beautiful dark blue around the very edges of the panel. I love the way this panel turned out – very elegant, and wintry looking, I think.
I started to work on a sentiment next. I first wanted to stamp and heat emboss it directly on the background, but I messed it by adding a wrong color embossing powder. I added clear instead of white and thus had to brush it off. By doing so I messed up the stamping and wasn’t able to add the correct color powder over the stamping.
Instead, I stamped the sentiment in clear embossing ink on white cardstock, covered with the same Antique Gold embossing powder and heat set with my heat tool. I cut it out creating a thin strip to place over the embossed and ink blended background.
I used foam adhesive tape and adhere the panel to the A2 white card base. Beforehand I also trimmed the panel down slightly so that a bit of the white of the card base would show through. I also used foam adhesive to mount the sentiment panel on the card.
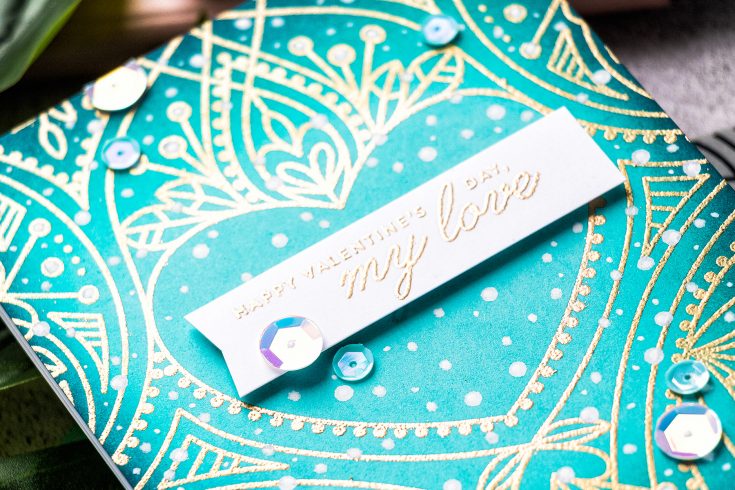
With all the elements adhered I used Story Time Paint pens from Jane Davenport and add a number of white snow-like dots mimicking a blizzard on my card. I shared this technique in my previous video and I simply fell in love with the look so I wanted to try it again on this card as well. I’m glad I did as it added a ton of interest to this card.
Lastly, I embellished my project with several sequins from the Star Spangled mix – I picked a few smaller blue and larger blue sequins and adhered them scattering around the background with the help of Simon’s Craft Tacky glue. I also stamped a simple sentiment on the inside of the card that reads – I’m much more me when I’m with you.
Have fun stamping!
SUPPLIES:
|


Thanks so much for stopping by and thanks to Yana for being our guest!
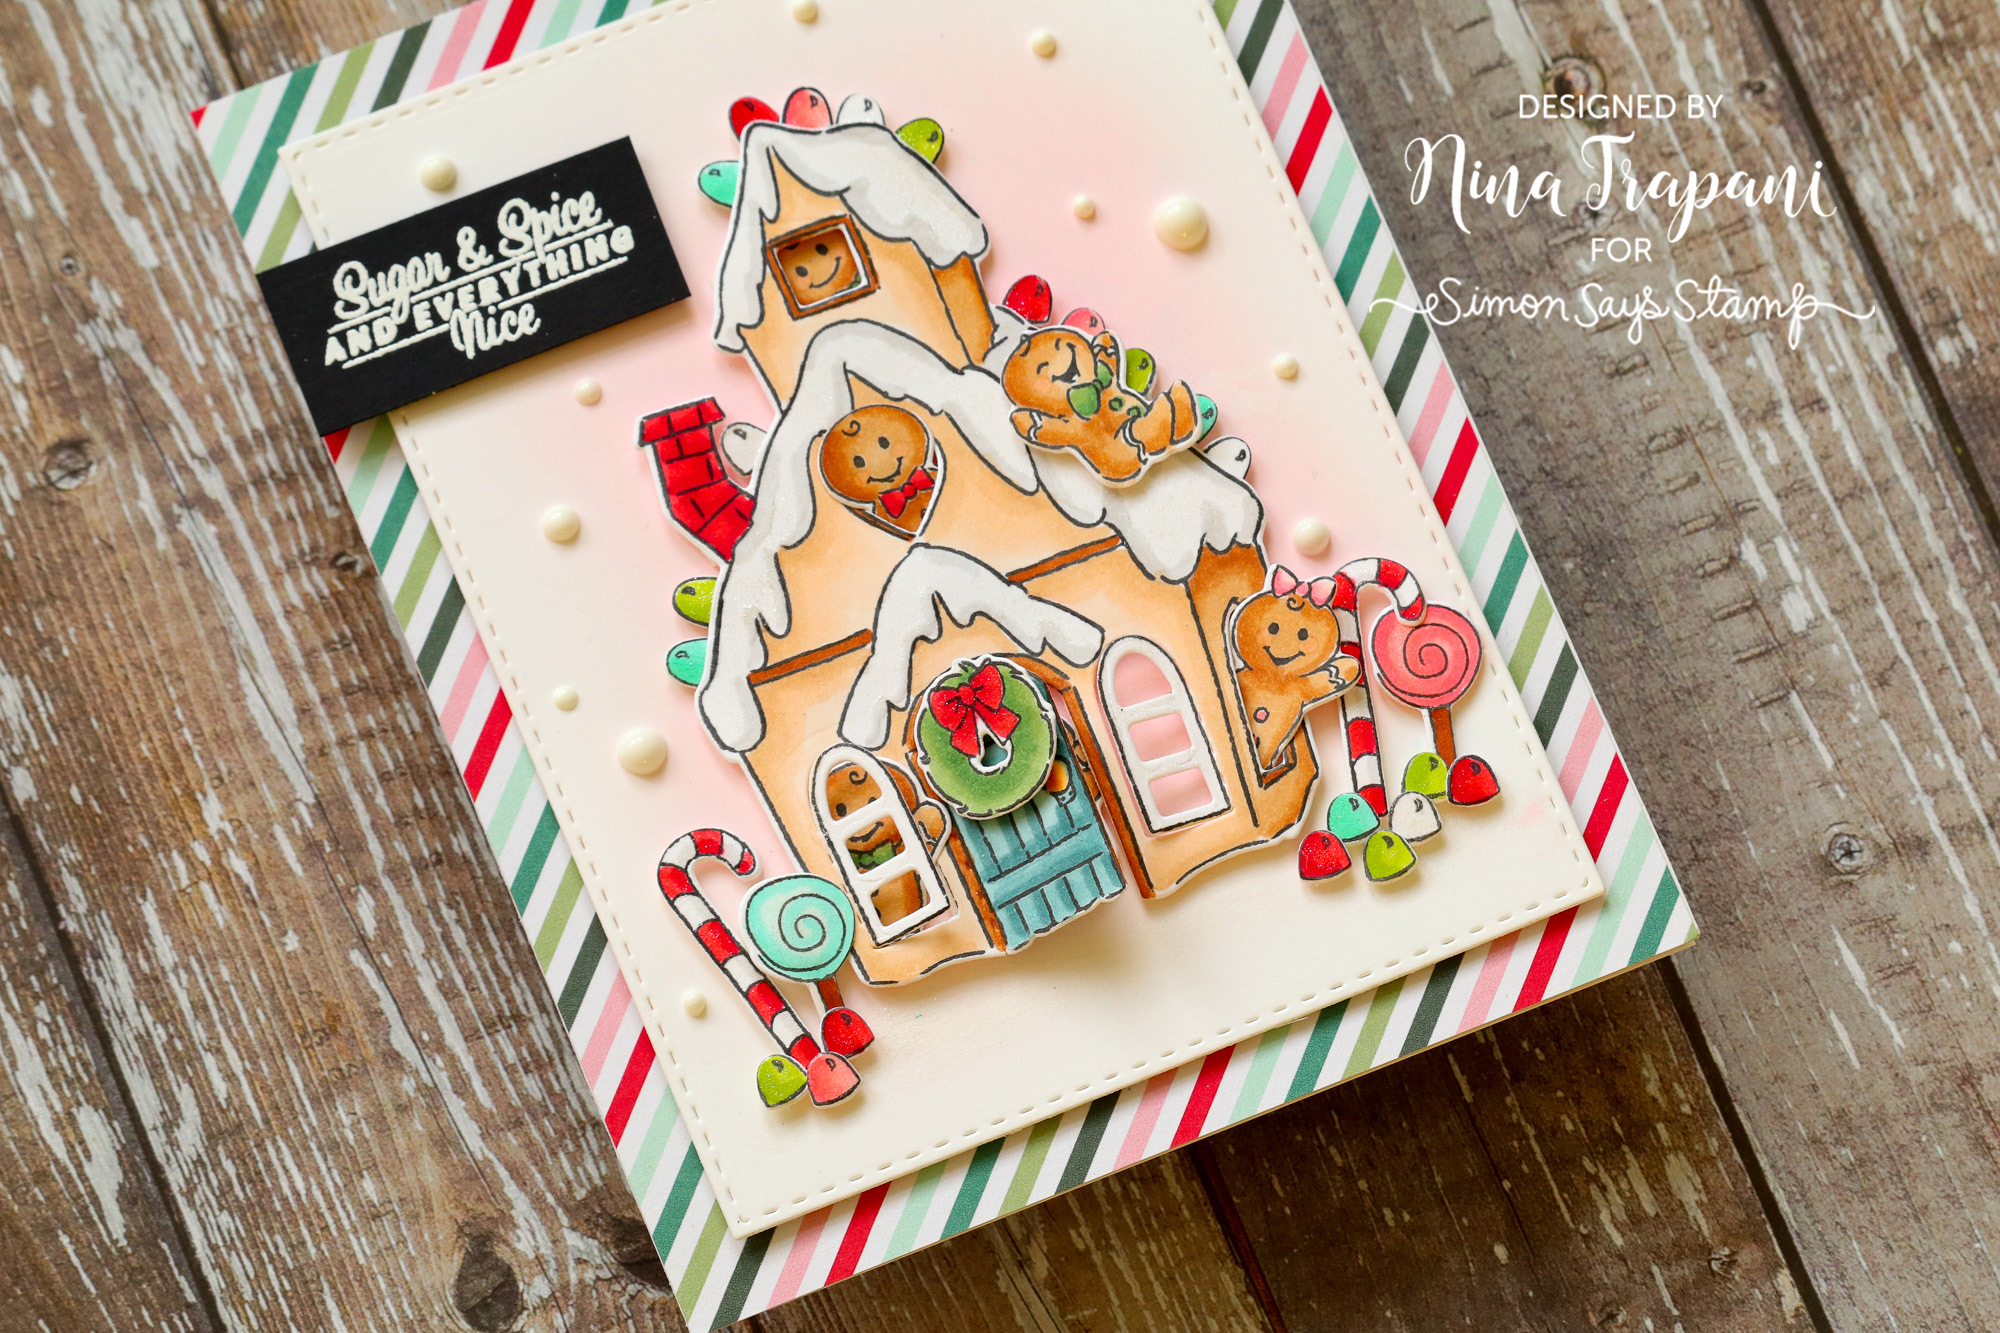
Funny Friday: Gingerbread Cubbies!
Hello friends, it’s Nina-Marie Trapani here with you for another Funny Friday Art Impressions!
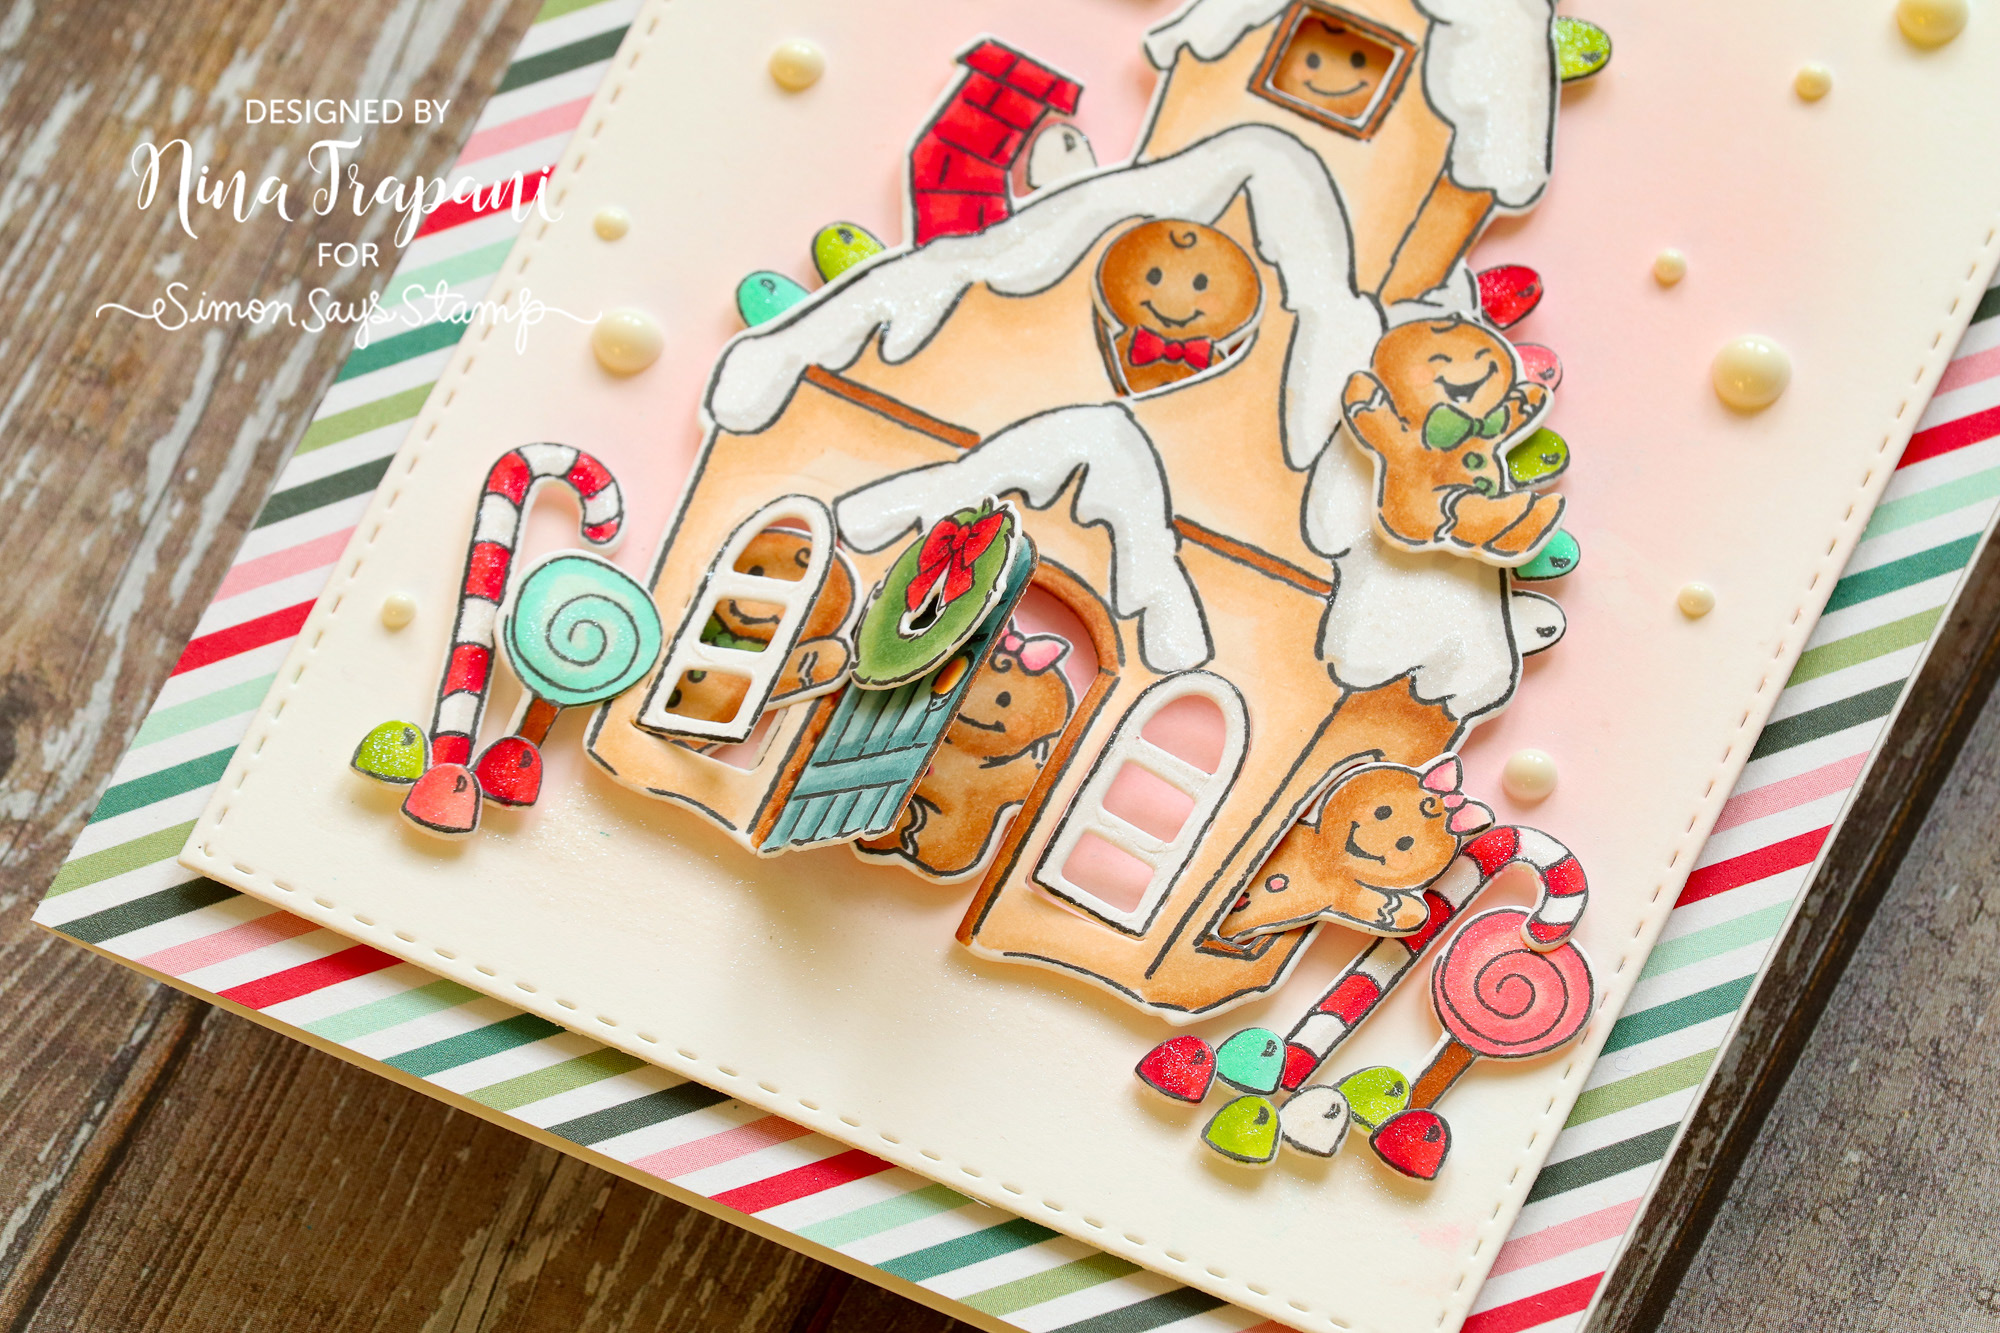
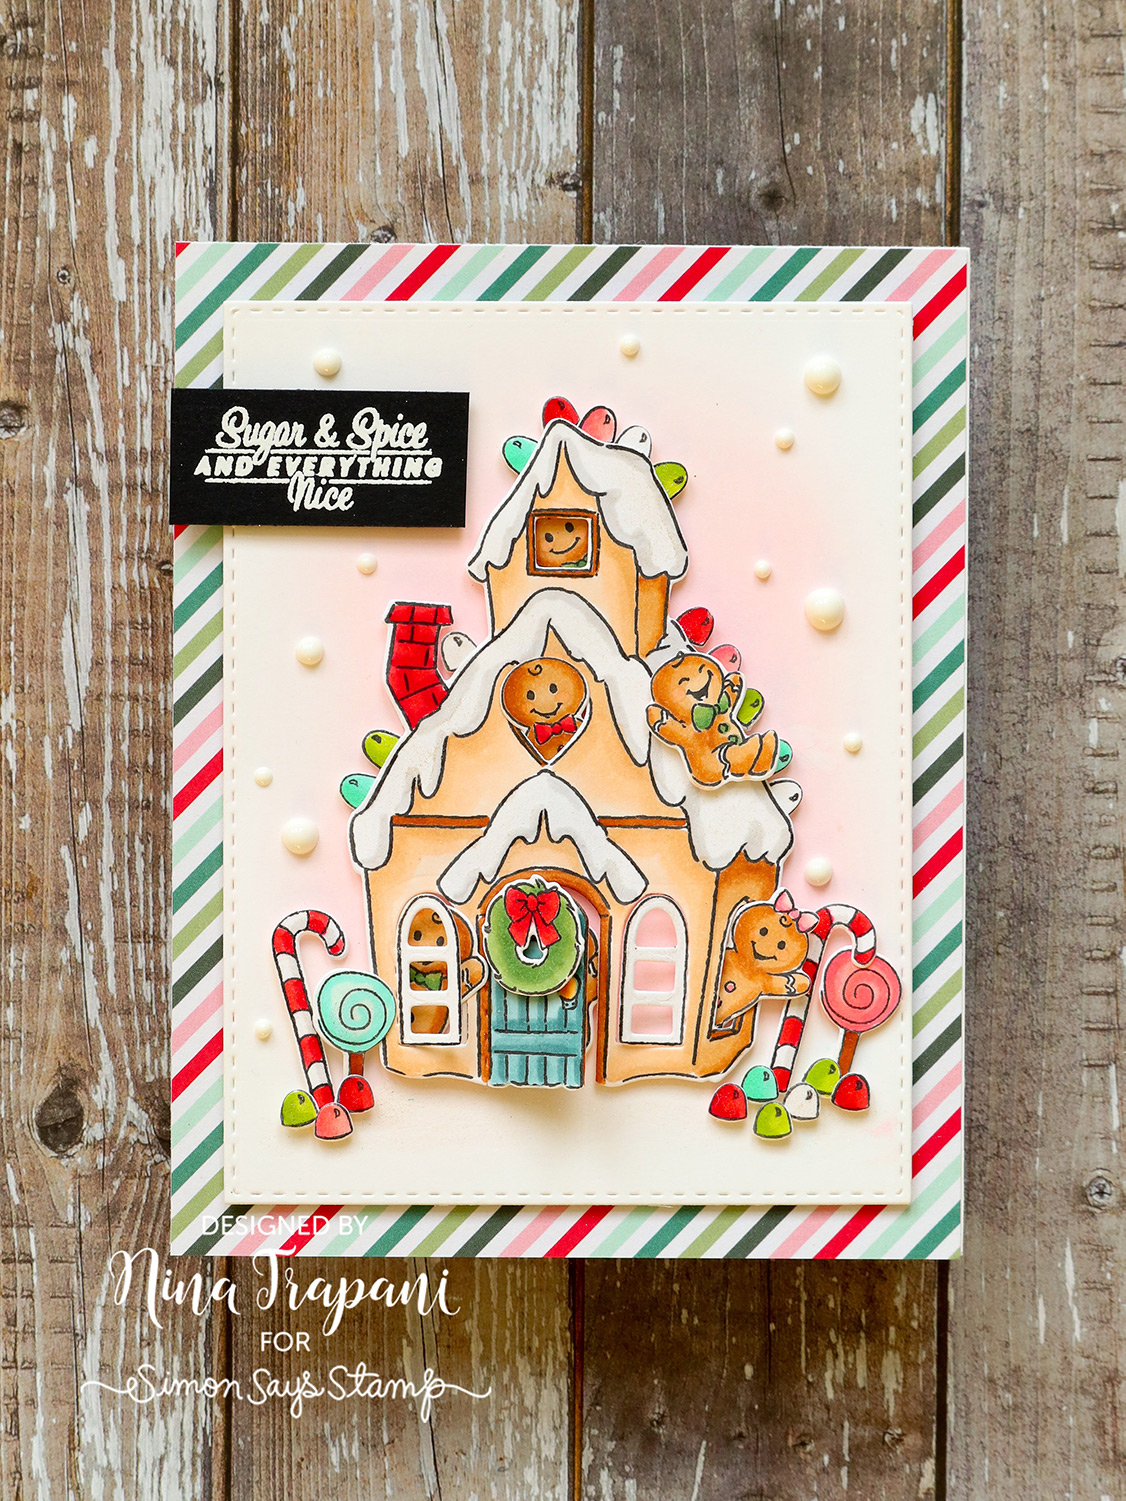
I adore the sweet Gingerbread Cubbies stamp and die set, which creates the most darling interactive card! With a bit of Copic coloring, it takes no time at all to bring this set to life – and while I used Copics to color my gingerbread house, feel free to use whatever coloring medium you prefer.
The stamp set includes all the elements you’ll need to decorate your gingerbread house, including those sweet gumdrops! I added some sparkly Lawn Fawn Liquid Stardust to all my embellishments, a sentiment from the Gingerbread Cubbies stamp set, plus some Pebbles Merry Little Christmas pattern paper for the card base… and this card is finished!
Want to see exactly how I made it? Watch the video below to see!
WATCH THE VIDEO
SUPPLIES
|


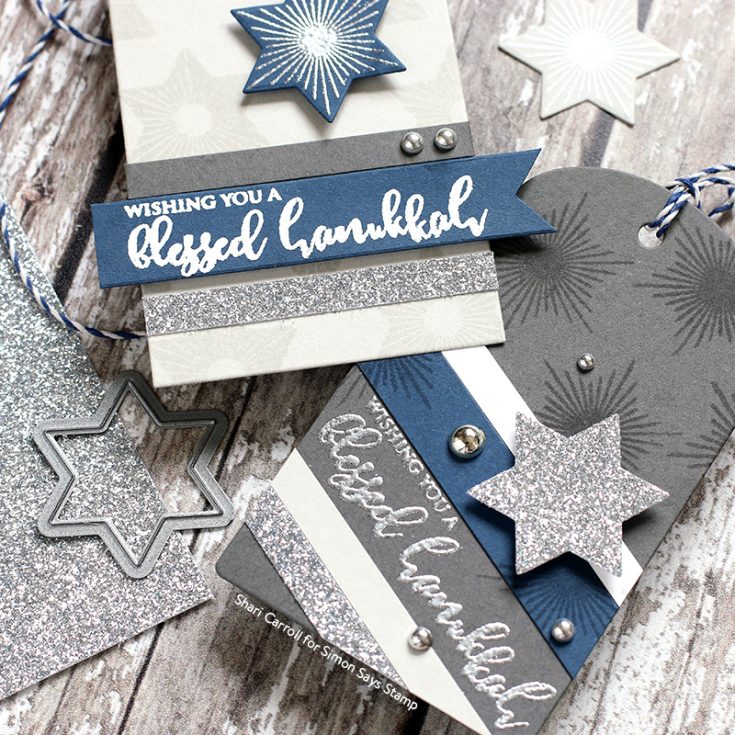
Color Coordinates: Hanukkah

Welcome to another edition of my Color Coordinates series!! Today I’m focusing on Hannukkah with a set of traditional colors to create tags to celebrate the Festival of Lights.

I’ve chosen my colors by using Simon Says Stamp cardstocks Soft Navy, Slate, Fog, Silver Glitter, and Neenah White.
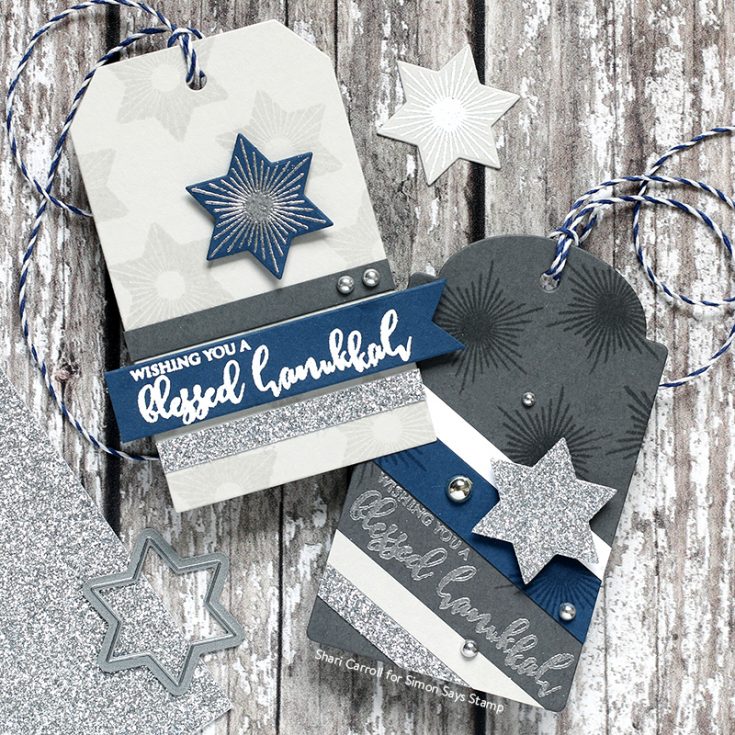
To start out these tags, I die cut them using the Simon Says Stamp Large Tag dies from Fog and Slate cardstocks. I trimmed up various cardstocks in 1/4″ and 1/2″ strips and then stamped and embossed the Altenew Stars using Clear ink and Silver embossing powder. Creating the tags were easy once I had all the pieces and parts ready to assemble in different ways.
If you are interested in printing out the Color Coordinates and creating a swatch book, I have the downloadable templates available below.
- Book template and past Color Coordinates
- May 2018
- July 2018
- August 2018
- October 2018
- January 2019
- March 2019
- April 2019
- May 2019
- June 2019
- July 2019
- August 2019
- October 2019
- December 2019
Thanks for stopping by, I hope you have a creative and enjoyable week!
|


