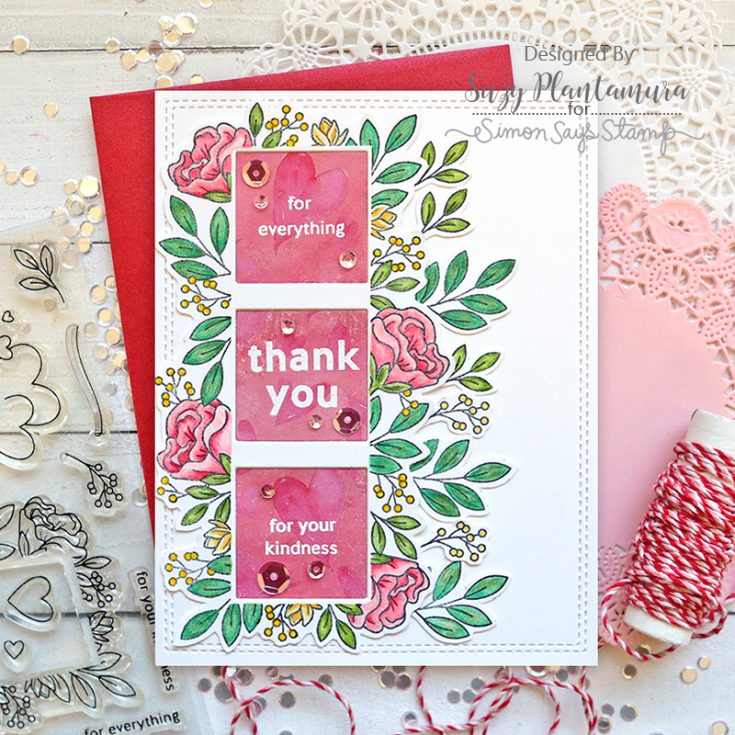
Card Kit Reveal and Inspiration: Window Fames
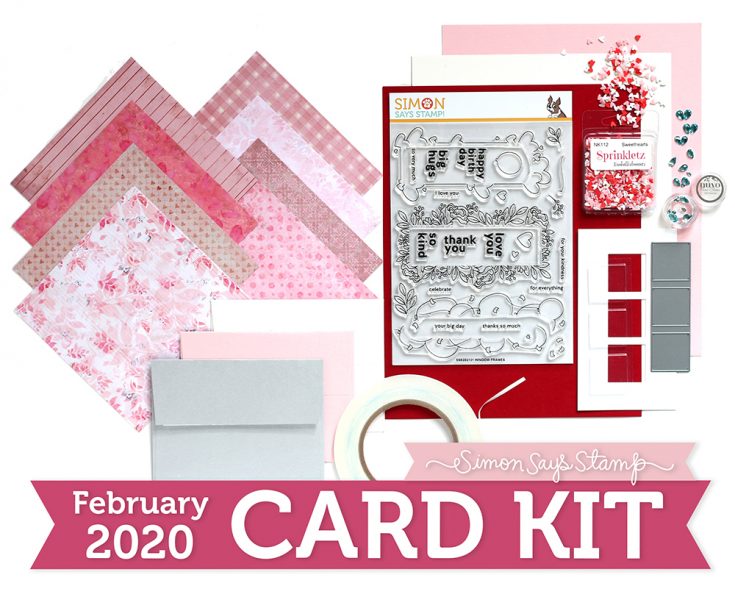
Our February 2020 Card Kit, Window Frames will give you heart eyes with all of the creative options it affords!
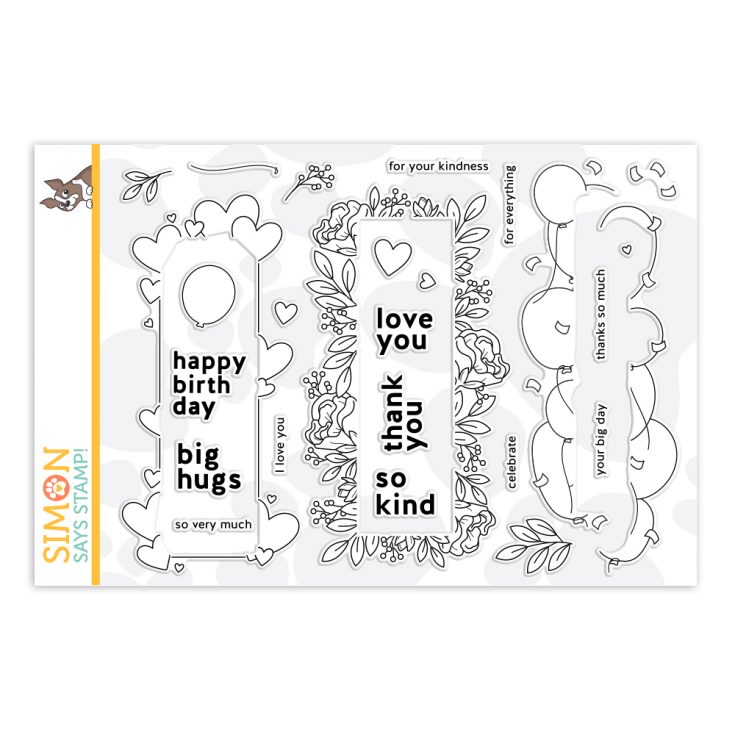
This pretty kit features two fantastic Simon exclusive products—the 6×8 Window Frames stamp set and the clever Trio Window wafer thin die! These products coordinate to create windows for a peek inside the card or fun shaker elements!
To help make fun shaker cards, we’ve included a My Favorite Things Square Shaker Trio Pouch from (which fits perfectly with the die in the kit!), a container of Buttons Galore & More Sweethearts embellishments, 1 jar of Nuvo gemstones, and 1/8” Scor-Tape! In addition, the kit includes PolkaDoodles patterned papers, and coordinating Simon brand cardstock and envelopes.
Our Window Frames Card Kit is the perfect way to share your love and creativity with family and friends!

The NEW Window Frames 6×8 stamp set and the Trio Window die are available for individual purchases in our store!

Don’t forget! We have LOTS of gorgeous card kit inspiration to access and add to in our Card Kit Galleries!
You can purchase the kit at $34.99, or you can subscribe to our kit of the month program for just $29.99 (plus S&H) per month to have our kits delivered right to your door each month!
If you are a subscriber who used Paypal to purchase your subscription, please be sure to pay the invoice that we send you within 3 business days. We have a limited number of this card kit in stock and don’t want you to miss out. For easier and quicker monthly processing, please contact us via email or telephone and we will put your credit card on file as a courtesy for you. Card kits bill and ship anytime between the 16 – 30 of every month.
|


Studio Monday with Nina-Marie: Easy Mini Lawn Fawn Valentines

Hello crafters, it’s Nina-Marie Trapani here with you today and I am very excited to be bringing you some Valentine inspiration using NEW Lawn Fawn products!
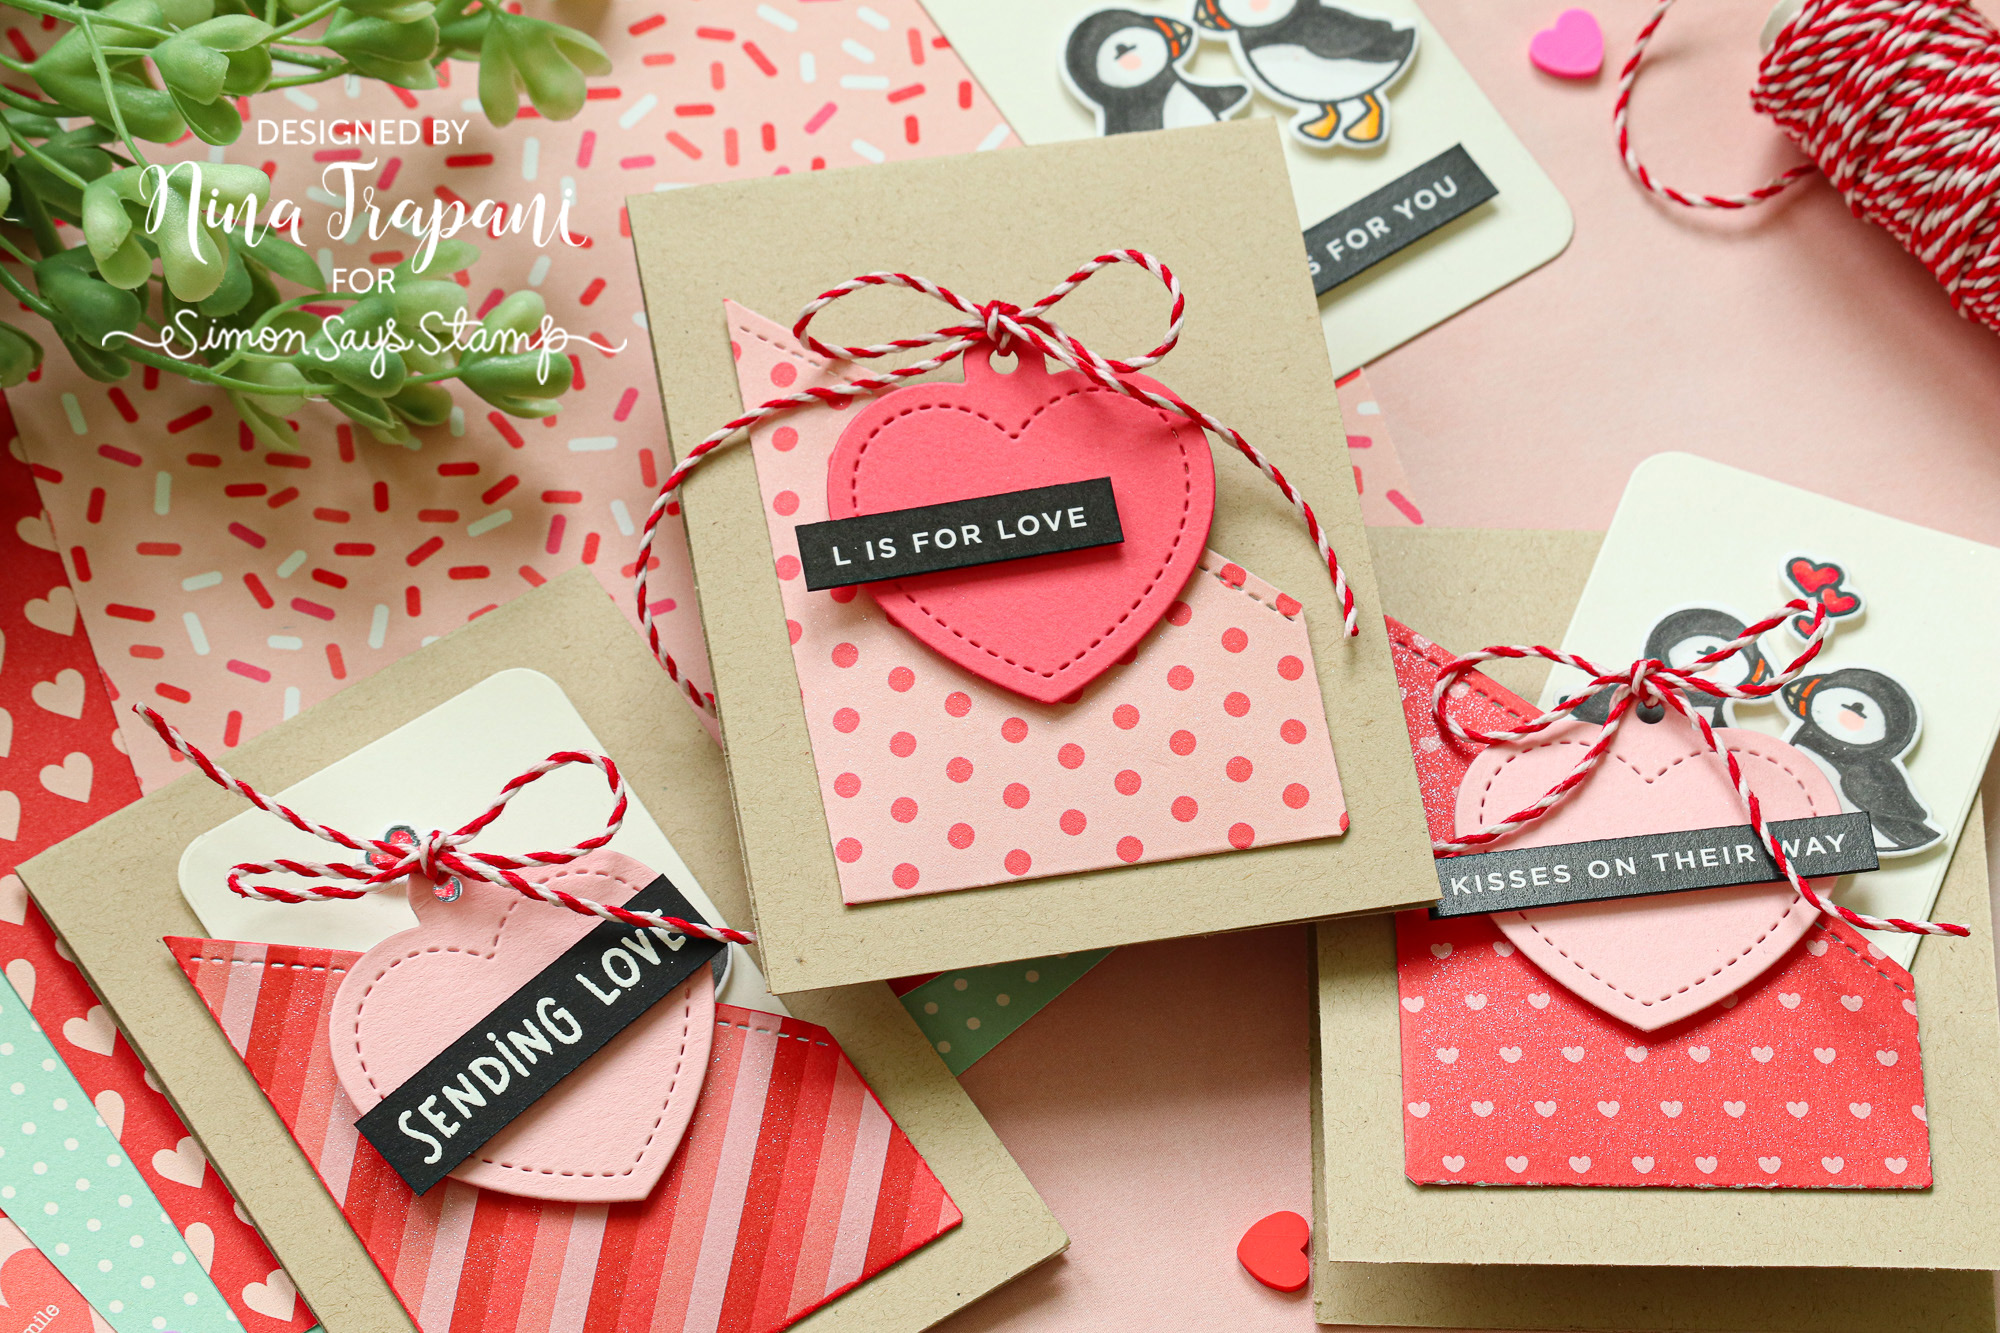
These mini Valentines are perfect for making multiples, so that you can be sure to have one for every special person in your life (because Valentines should be given to EVERYONE we love, right??)!
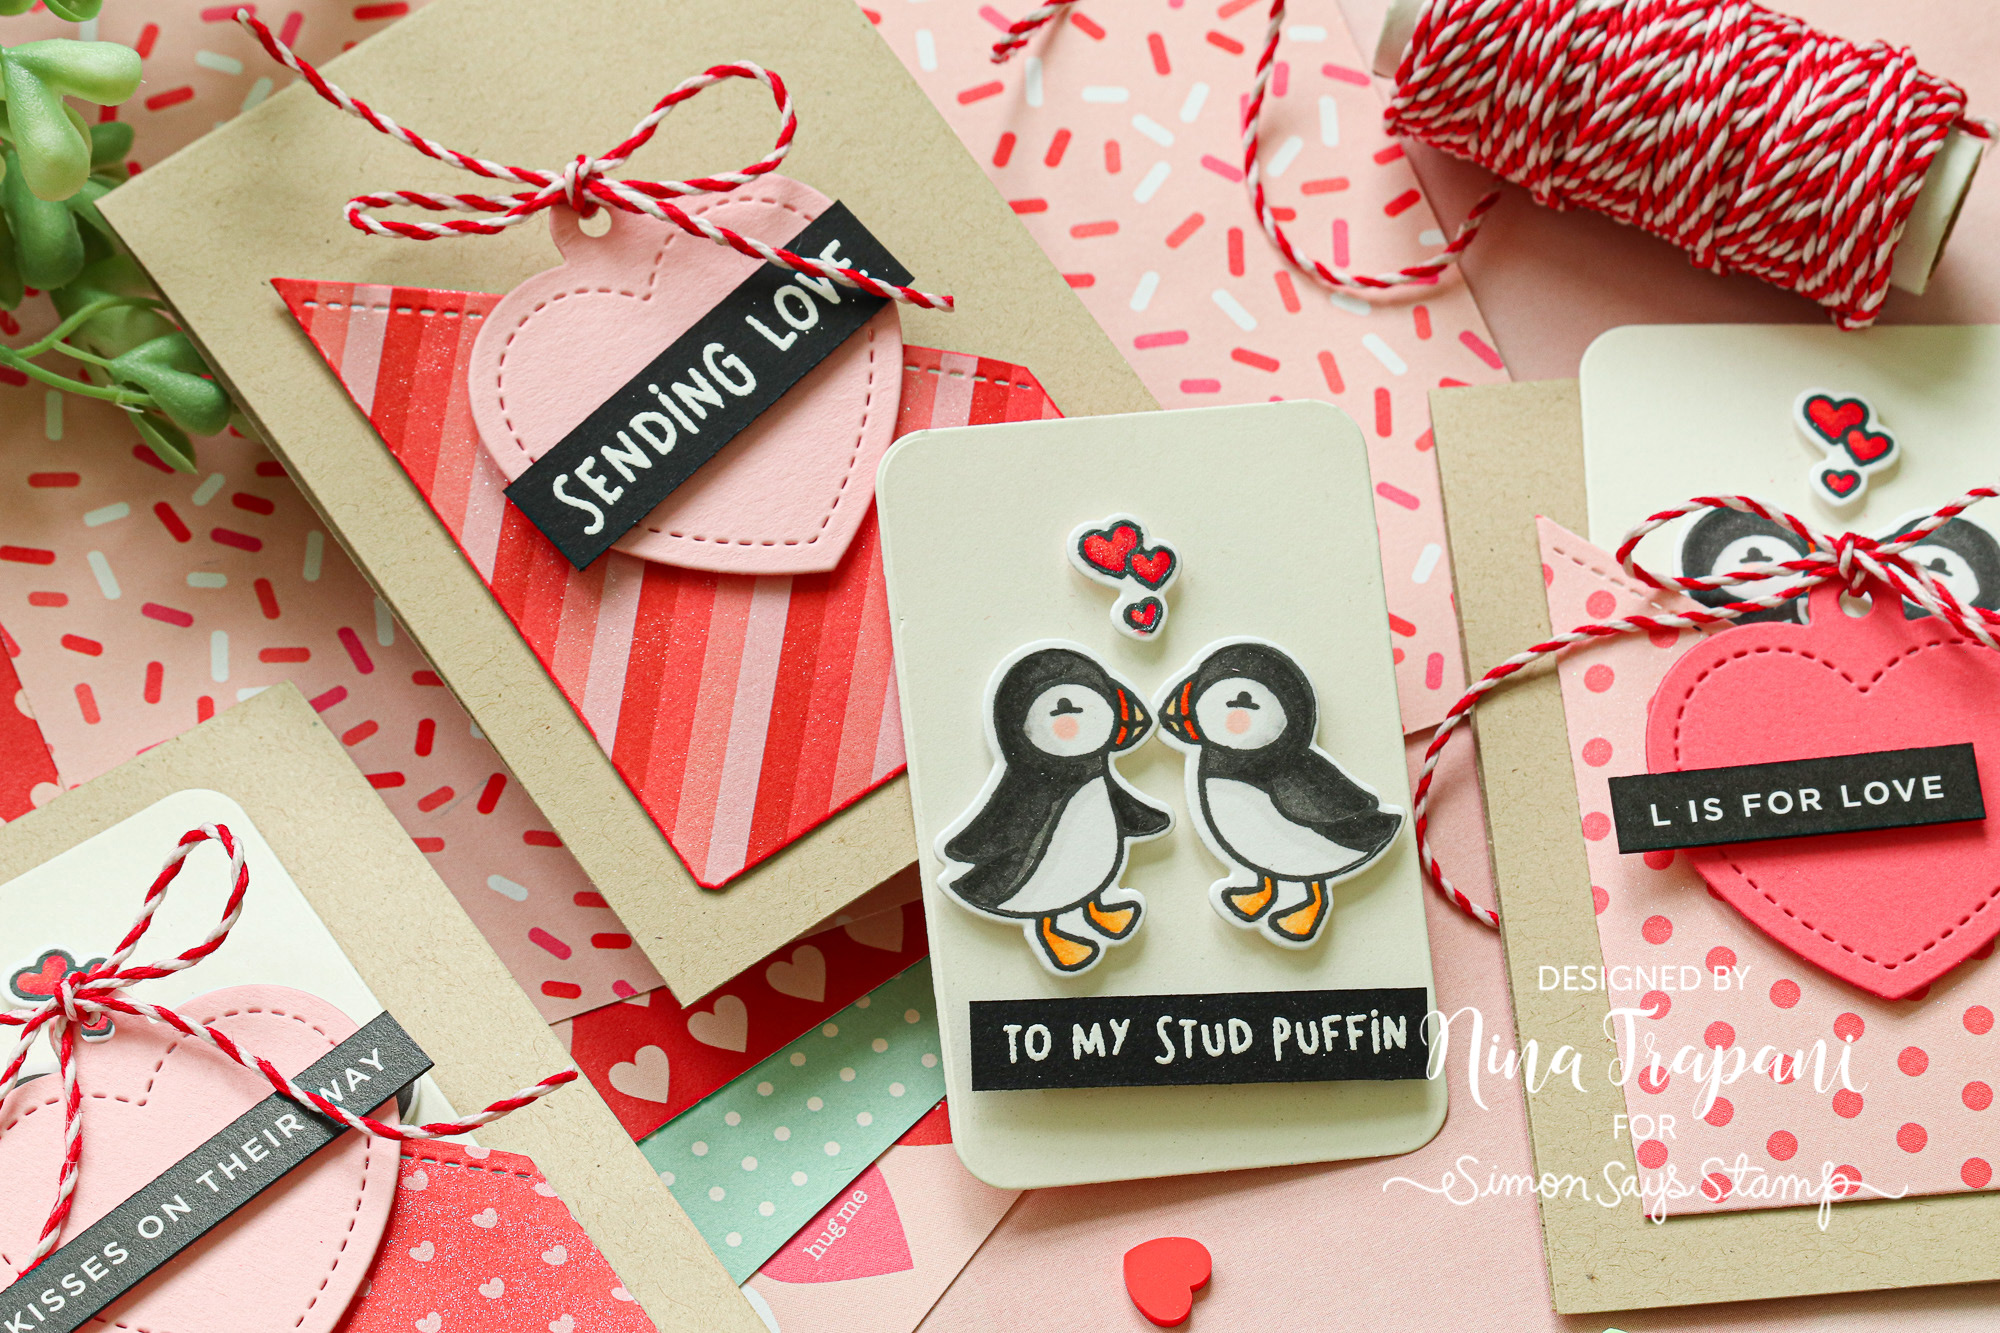
These mini cards are 3×4 and feature the Diagonal Gift Card Pocket from Lawn Fawn. I thought it would be fun to create a small note card that could slip into the pocket for a fun surprise to the recipient. You could also put money or a gift card in the pocket too.
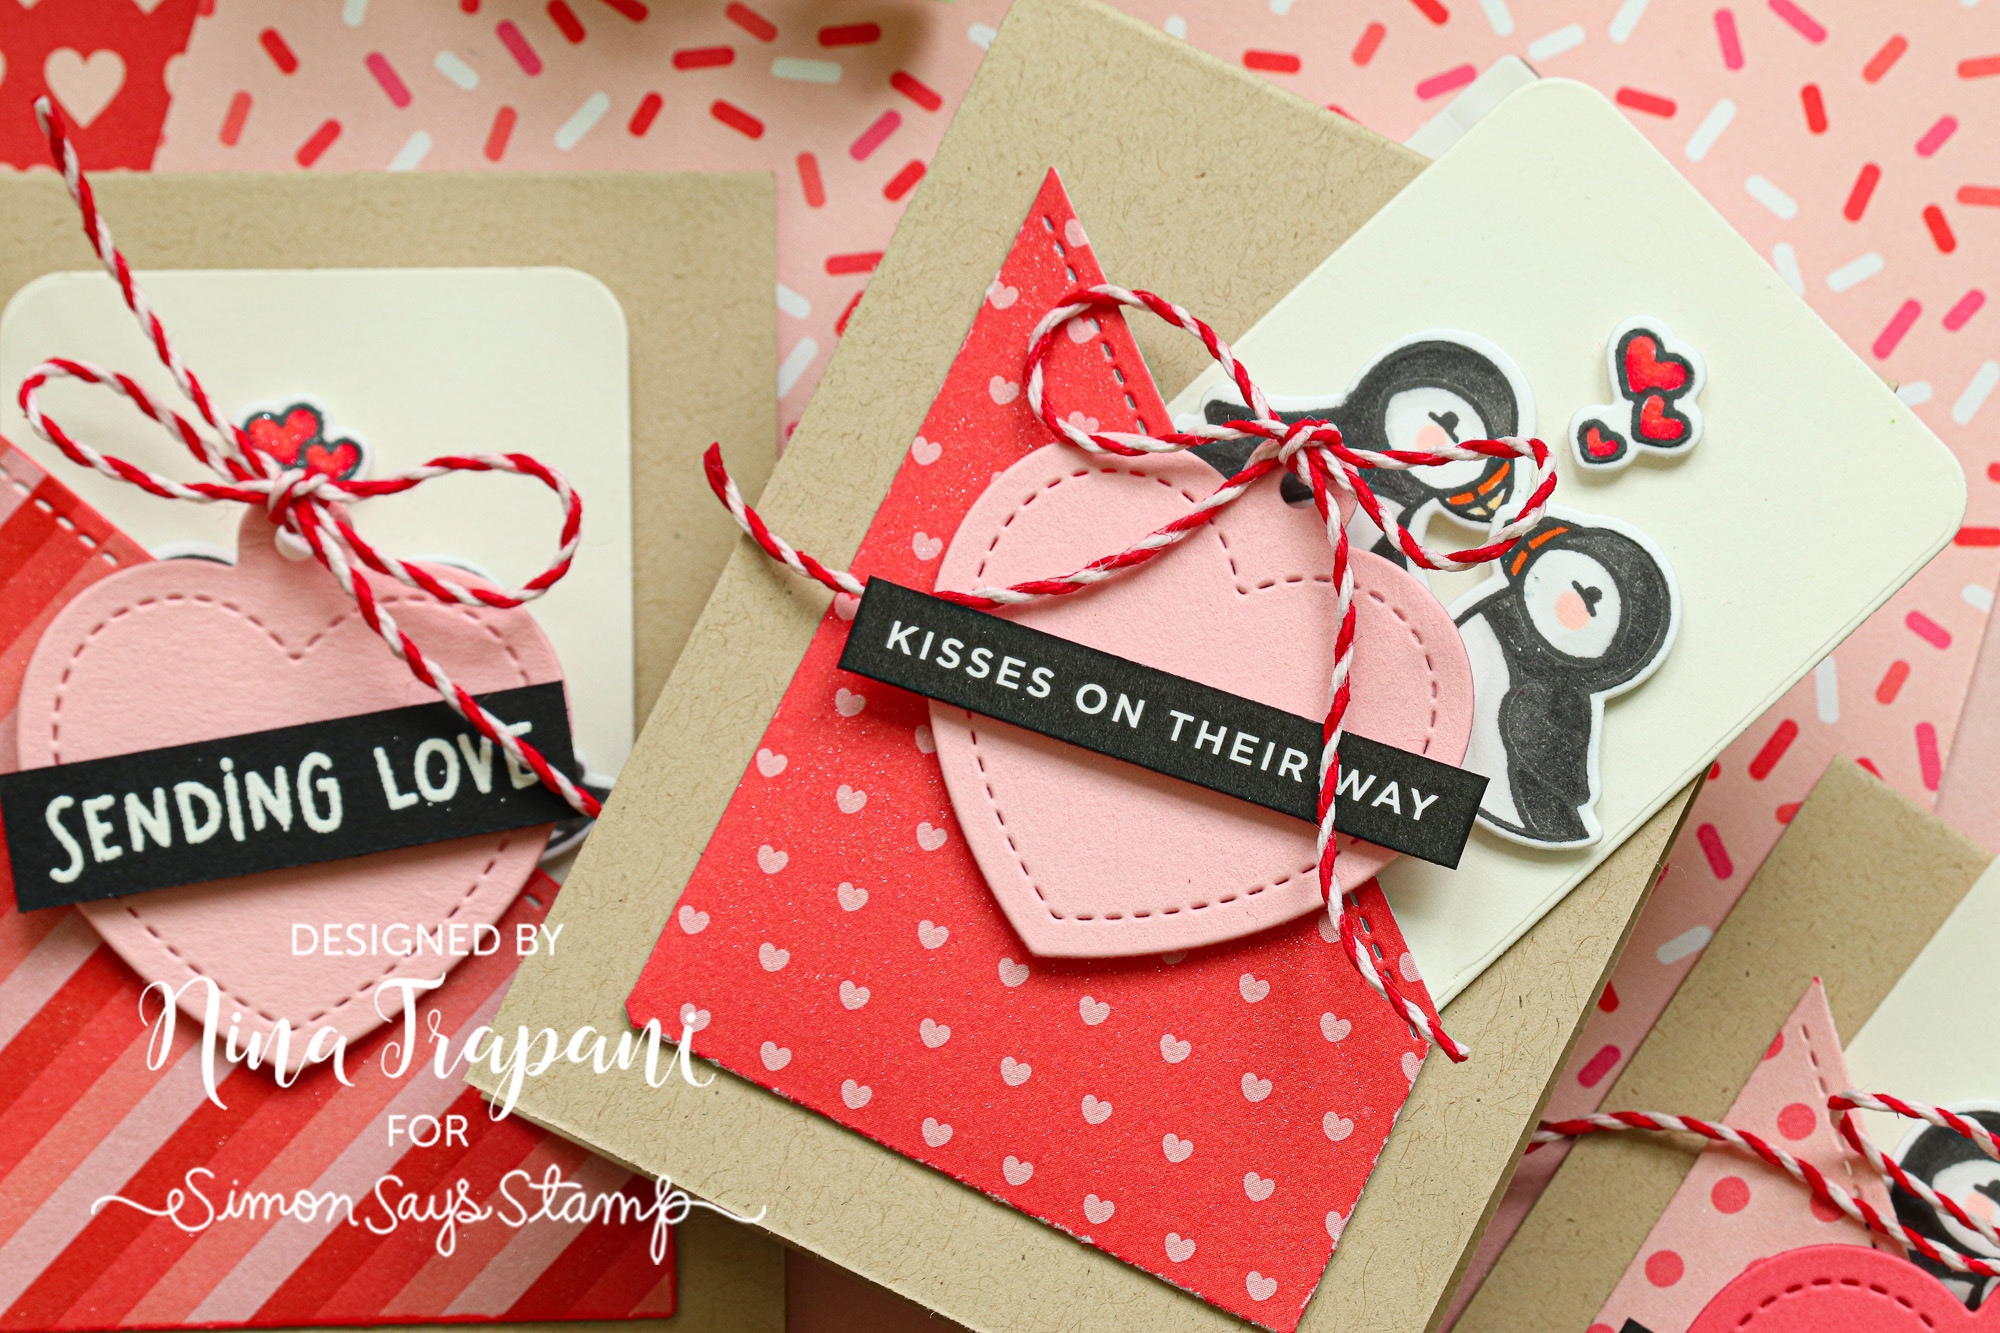
I embellished each mini card with the Stud Puffin stamp and die set from Lawn Fawn. There are only a couple of greetings in the stamp set, so I extended the range of sentiments on my cards by incorporating sayings from Simon’s adorable, Reverse Love Sentiment Strips, too.
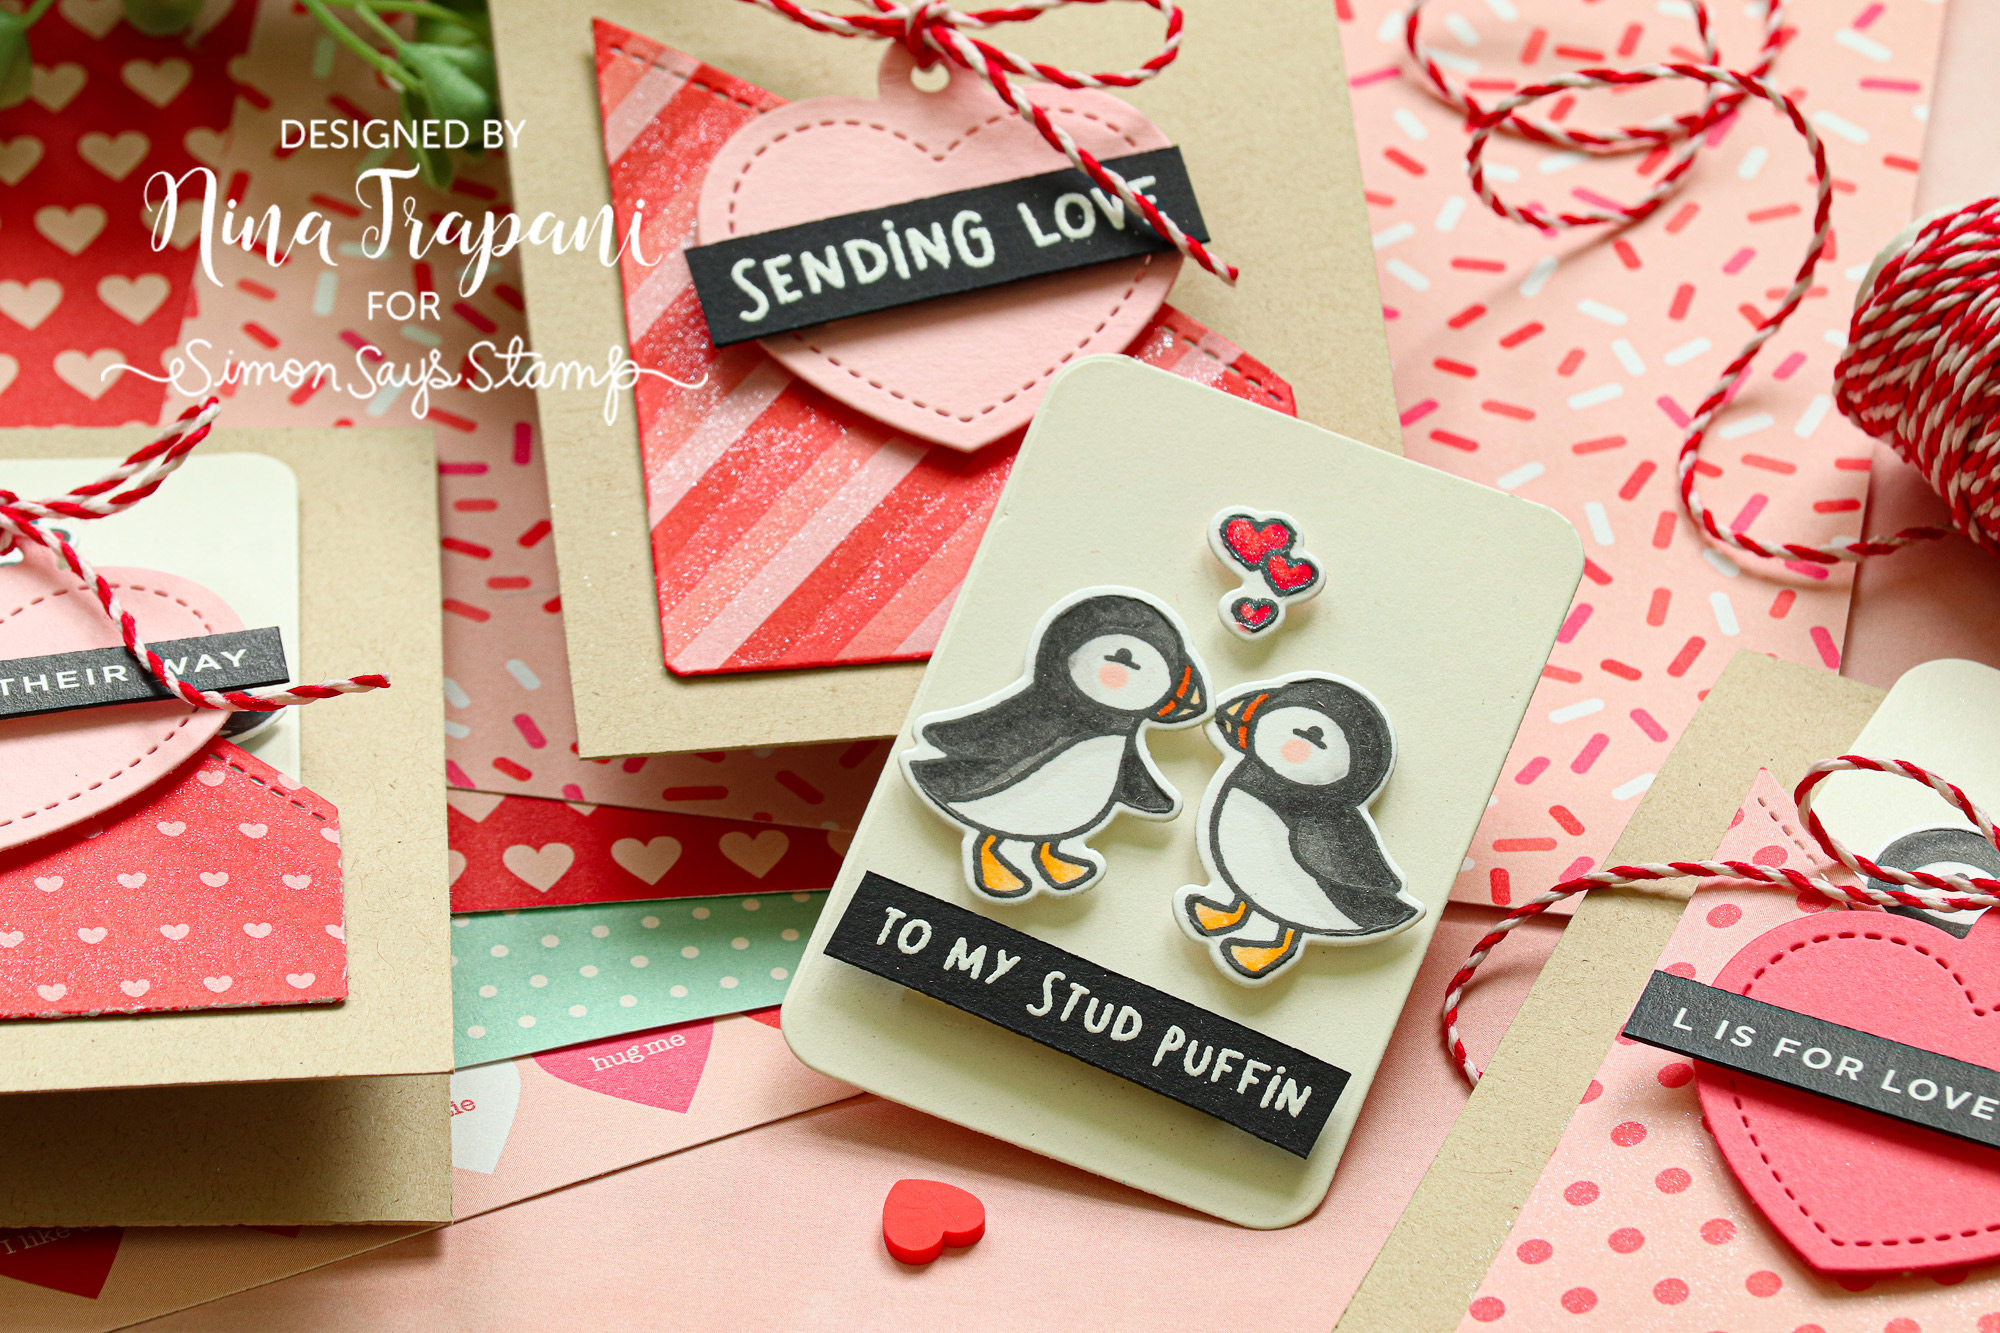
The cute tag die Heart Shaker Gift Tag die (also from Lawn Fawn) was the perfect finishing touch to the front of the pocket and kind of hides the puffins a bit more, making them an even bigger surprise to the person who gets this card! I added a bit of twine to the top and some glitter to the pocket for some sweet accents.
I hope you have fun not only watching today’s video, but also creating these mini Valentines, too! Be sure to watch the video below to see how I made them!
WATCH THE VIDEO
SUPPLIES
|


Doodling with Debby: Easy Watercolor Background
Hi friends! Happy Sunday! It’s always a pleasure to share our monthly installment of Debby Hughes’ monthly card making blog feature, Doodling with Debby! Read on and be sure to watch the video! Enjoy!

Hi, it’s Debby here and for my Doodling With Debby video series for Simon Says Stamp this month, I made this card using a simple gradient wash of watercolours which pairs beautifully with the Tumbling Hearts stencil from Simon Says Stamp and Nuvo Glimmer paste. The result is a lovely backdrop for the You Are Loved Dies.

So, let’s jump into making this card and I started with the gradient wash of watercolours for the background. I used a lot of water to create the background, and so I taped the piece of Arches Cold Pressed watercolour card I used to a board to stop it warping. To create a smooth gradient of colour, I added a wash of clean, clear water over the whole panel. You could do this with a broad watercolour brush as I did or spritz the paper with a mini mister or use a household paintbrush. It doesn’t matter how you wet the paper but what you are looking for is an even sheen of water. When you tip the board to the light, you can see a soft sheen of water. You don’t want so much water that you have a lake because if you then add watercolour to that amount of water you will get the colour just puddling. Having a sheen of water prevents the puddling while encouraging the paint to move through the water. With that sheen of water, the paint gently spreads through the background. I started with a light wash of purples, whatever was on my palette mixed with Daniel Smith Rose Of Ultramarine and I blended this out by rinsing my brush often until it was the palest of colours. I took this purple halfway up the card. Then from the top down, I bought a wash of pale rich yellow. Again, what was on my palette and then mixed with Quinacridone Gold. I brought this down to meet the purple layer but again washing my brush out as I went so that the junction between the two colours is very pale. This background was inspired by a winter sky I saw with deep purple hues near the horizon and the warmth of the sky above.
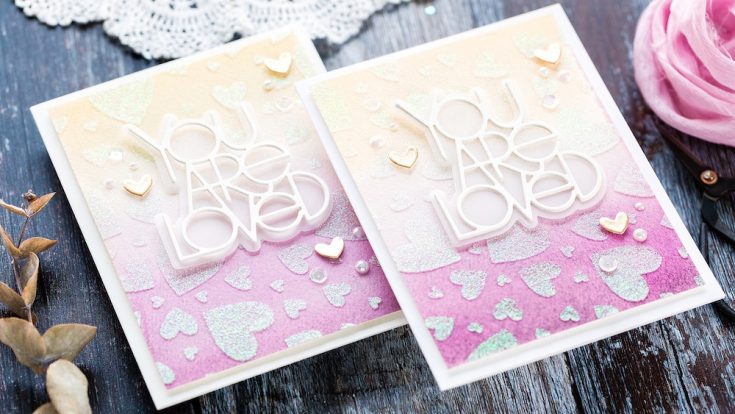
With the first layer down and with the paper still wet I added more depth of colour. I mixed Lunar Black in with my original purple mix, and as this dried the pigment settled into the valleys of the textured watercolour card giving a granulated effect. Again, I washed this layer out to the palest of colours by rinsing my brush in water bit by bit. Then I added a further yellow layer to the top with more richness of golden hues to the mix. I used a heat tool to dry the background and then while the panel was still taped to the board, I taped the Tumbling Hearts stencil over the top. I kept the card on the board as the Nuvo glimmer paste I swiped through the stencil is also a relatively wet medium and the board will hold the card from warping. I spread glimmer paste as if I’m spreading butter on bread by using a Ranger palette knife and a shallow angle to draw the glimmer paste over the stencil letting the paste settle into the heart-shaped openings. I worked the paste backwards and forwards over the stencil until I had the whole area covered and a smooth finish. I then lifted the blue tape holding the stencil in place and then everyone’s favourite part is lifting the stencil to reveal the glittery design. I used a heat tool to speed up the drying process.
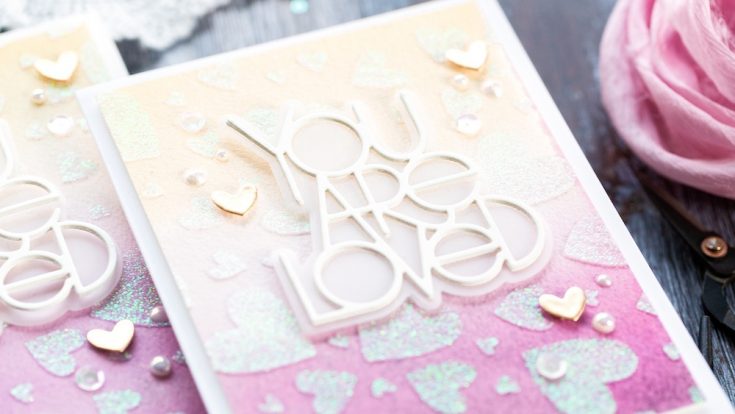
I kept the rest of this card clean and simple so that I didn’t cover up too much of the background. I chose the You Are Loved dies and cut the lettering three times from Ivory card and the shadow background piece from vellum. I then used Gina K Connect glue to layer the Ivory die-cut lettering pieces together. The nozzle of the tube makes it easy to dot small amounts of glue over the back of the lettering pieces and then stack one on top of the other. If you add too much glue, then dab off the excess on scrap paper before stacking the dies together, and then you won’t get any glue squidged out. On my original card, I glued the stacked dies to the vellum piece and I’m not quite sure why I changed my mind to do this next part as it is fiddly, and I’d already created dimension by stacking the dies. However, I did so here you go, I cut small pieces of foam tape and added them to the back of the stacked dies and then adhered them to the vellum. I then added more foam adhesive on the back of the vellum and added the piece to the front of the card. I added foam adhesive to the back of the panel and added it to a card base cut and scored from Ivory card.
When cutting out the You Are Loved dies, there are some optional hearts to add to the centre of the letter ‘O’s. I wanted to use these but scattered more randomly on the card front. I also wanted these to be in a warm gold embossed colour, so I took each heart die and pressed it into an ink pad of clear embossing ink. I then dunked the die in Antique Gold embossing powder from Simon Says Stamp and used a piece of blue tape to pick up the small die and then heat the powder until it melted. One coat wasn’t enough to cover the die, so I repeated the process a second time. I’m sure there is a more straightforward method to doing this, but I like keeping the die free so that the heated powder smooths over the edges and forms a beautiful shape when heat embossed. I repeated this process with three heart die cuts and then added small pieces of foam adhesive to the back of them and dotted them around the lettering in a triangle formation. I added Fairy Wings Nuvo Dream Drops and Glossy Pearls from Little Things From Lucy’s Cards and finally a few sequins.
That completes this easy watercolour background inspired by a winter sky and then jazzed up with a stencil and glimmer paste plus a simple die cut sentiment and a few sparkly embellishments. Thanks for joining me today and I hope you join me next time for Doodling With Debby.
Watch below or in HD on YouTube.
SUPPLIES:
|


Thanks so much for stopping by, and thanks to Debby for being our guest!


