Waffle Flower Crafts Easy Cloud Background & Beach Scene

Hi friends! Happy Friday! Did you know we are showcasing Waffle Flower Crafts all April 2020 long as our Simon Says Stamp Brand of the Month?!

Please join me in welcoming back special guest Rebecca Keppel who is sharing a special summery project reprising some sweet summer Waffle Flower products! Be sure to watch the video for more info and enjoy!
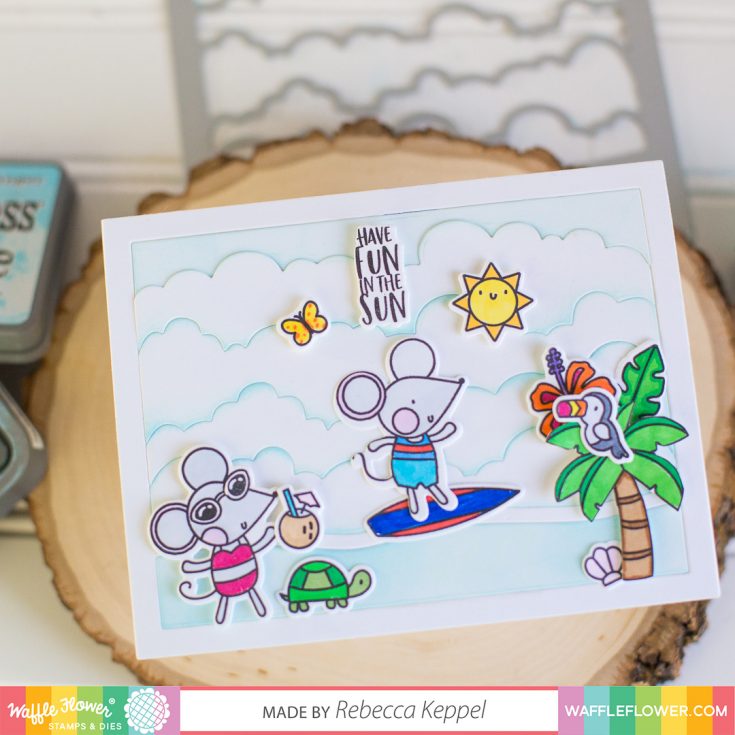
Hi everybody! I’m Rebecca with Waffle Flower Crafts and I’m super excited to be here on the Simon Says Stamp blog today sharing a card video featuring some new stamps and dies from Waffle Flower’s July Release. In this video, I am sharing a quick and easy way to create a fabulous puffy cloud background, perfect for a fun beach scene.
The Cloudscape Panel Die cuts a 5.5 x 4.25 frame and cuts out cloud layers on the inside. You could cut this out of white and blue cardstock and alternate the colors to create a cloudy sky. I decided to cut out Strathmore Bristol Smooth White Cardstock and ink blend with Distress Oxide ink on the edges of the cloud pieces.
When you put all the pieces back together like a puzzle you end up with a really pretty sky background that was SO fast to create. I like covering the bottom piece of the die cut with blue ink to mimic water.
Next, I stamped, colored and die cut all the images from the Fun in the Sun Combo (also from the July release). These little mice and beach accessories are so fun to move around and it’s easy to combine a bunch of them to create a cute scene.
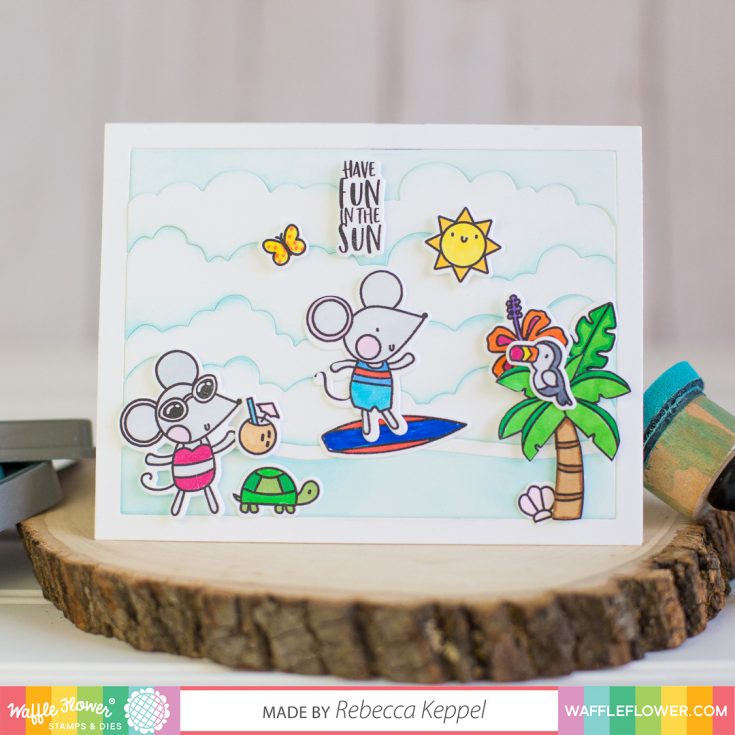
Alternate dimensional adhesive and tape runner so that some of the characters appear closer or further away. Add your sentiment and you’re done! Using the Cloudscape Panel Die is the easiest way I’ve found to create that awesome puffy cloud background and I will be using it for MANY of my card scenes in the future!
Thank you so much for stopping by! -Rebecca
SUPPLIES:
|


Thanks so much for stopping by and thanks to Rebecca for being our guest!
Oxide Ink Easter Egg Cards
Hi friends! Happy Thursday! Thanks for stopping by the blog today! With the Easter holiday right around the corner, we’re re-sharing these clever cards by special guest designer Heather Ruwe a few years ago. She did some very cool and clever outside-of-the-box thinking using oxide inks! Be sure to read on to learn how to create this cool concept for yourself and enjoy!
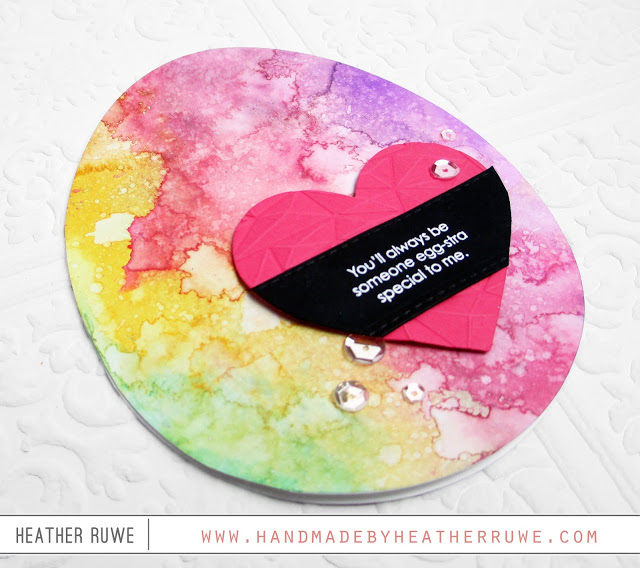
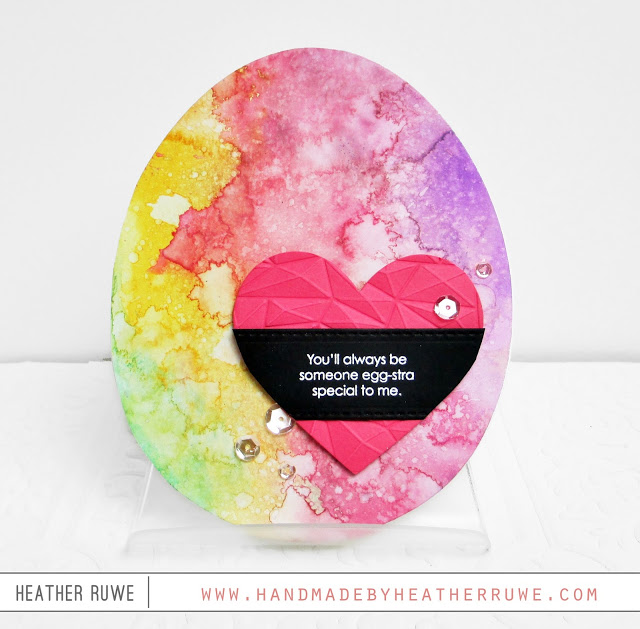
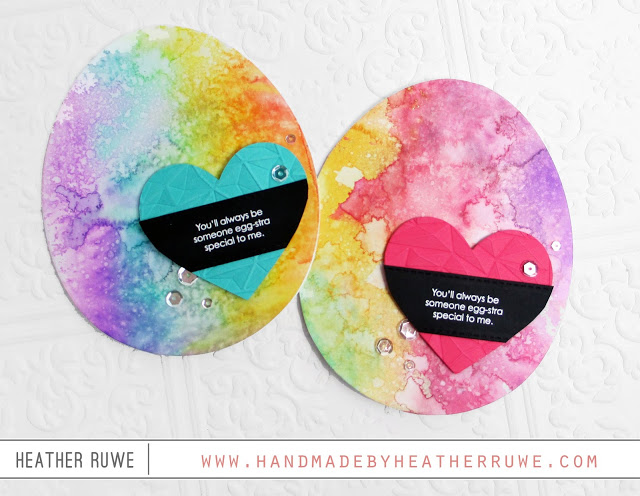
Hello and welcome. I’ve been having so much fun playing with Distress Oxide Inks. I’ve been experimenting and creating many backgrounds. The finished look reminded me of Easter eggs after they have been color dyed, which inspired these cards…
I applied the ink to a craft sheet and then sprayed with water. I swiped a piece of watercolor cardstock through the ink and dried it with my heat gun, spraying with water as it dries.
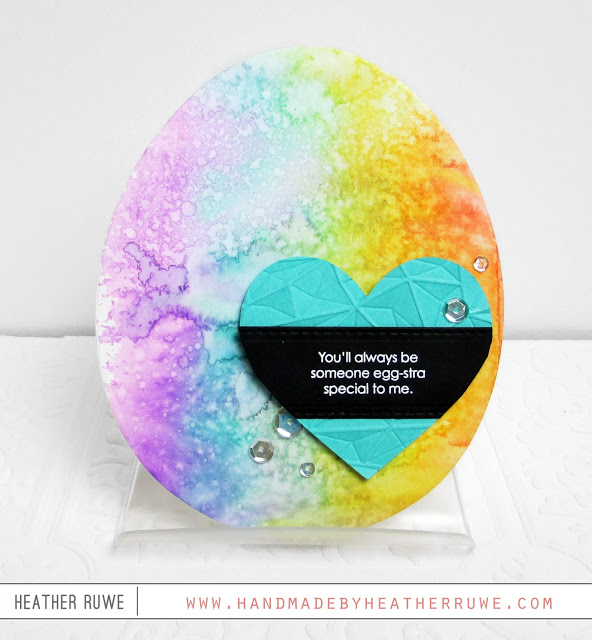
I wanted to make an egg shaped card but didn’t have a large egg die, so I used the largest balloon of the Simon Says Stamp’s balloon die set. After die-cutting the backgrounds, I trimmed off the end piece off the bottom of the balloon and turned it upside down, creating an egg shape!
I white heat embossed a sentiment from the Easter Greetings stamp set on to a strip of black cardstock cut with the stitched banner die. I also die-cut some hearts and dry embossed them with an embossing folder. I finished the cards with a sprinkling of clear sequins.
Supplies:
 |
 |
 |
 |
 |
 |
 |
 |
 |
 |
 |
 |
 |
 |
 |
 |
 |
 |
 |
 |
Thanks for reading today, and thanks to Heather for being our guest!
Spring Is In The Air Framed Panel
Hi friends! Happy Wednesday! Please join me in welcoming back the always wonderful and inspiring Emma Williams as a special guest on our blog today! She made such an inspiring art piece to share with you! Be sure to check out the step by step process for more details and enjoy!
Hello everyone, I hope you’re all keeping safe and staying well!
I’m really happy to be back on the Simon Says Stamp blog sharing my latest project with you all and today, I’ve chosen to create a home decor piece that I hope will bring some sunshine into your lives!
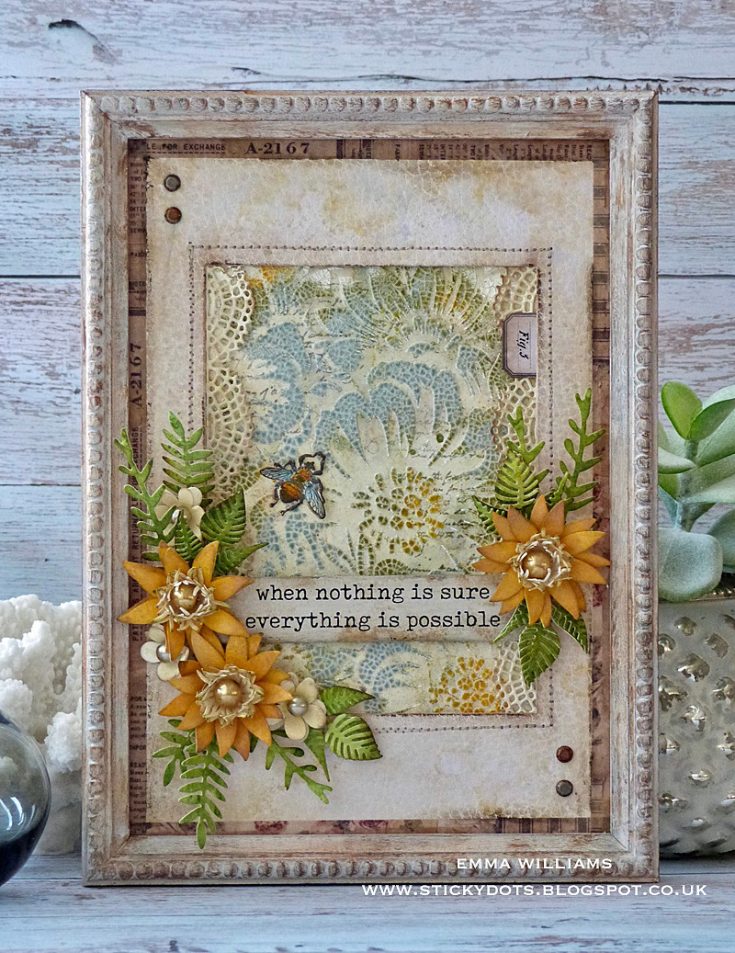
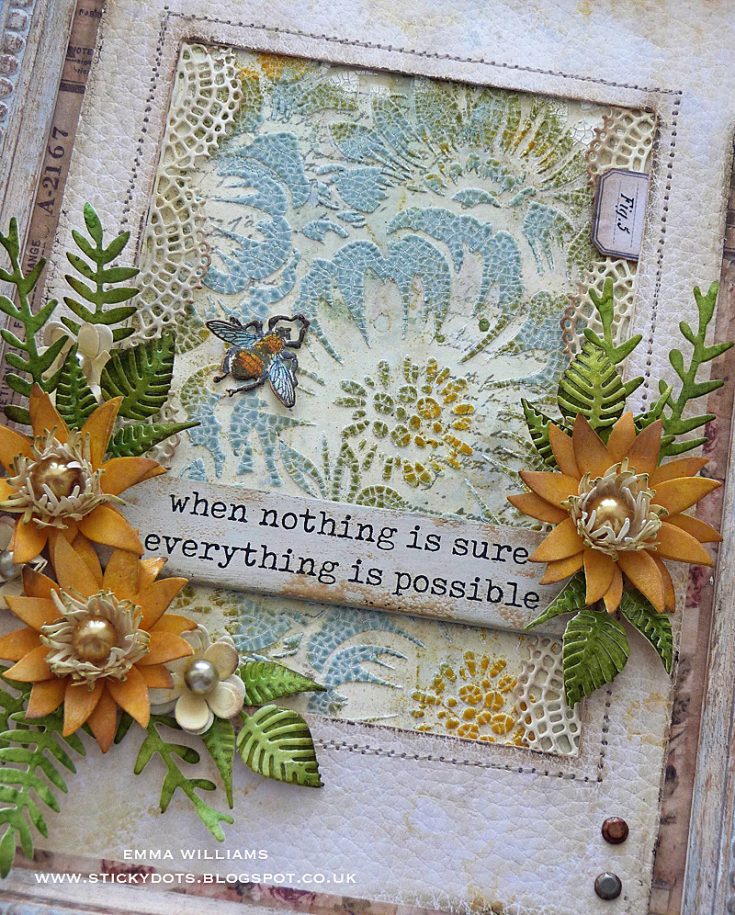
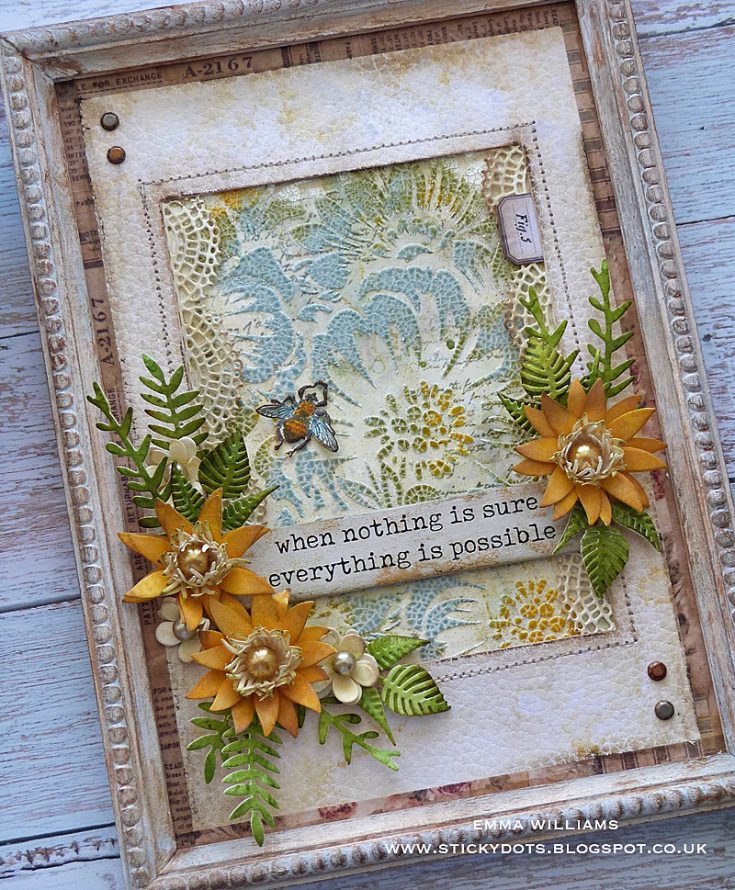
For this particular project, I used a Tim Holtz Framed Panel as my base and packed it full of texture, layers and plenty of detail using dies from Sizzix and plenty of Tim Holtz products, all of which will bring the whole piece to life to make a piece perfect to display for this time of year.

Using the 6.5” x 9” Framed Panel, which comes in two separate pieces, the frame and the baseboard ~ I began by applying a coat of gesso over the surface of the frame and around the edges of the baseboard. (You can prime the entire board if you choose but on this particular project, the background will be covered, so I usually just paint the edges and then cover the back with some paper to create a nice finish to the project).
To create a shabby chic look to my frame, I then applied Weathered Wood Distress Paint. I applied a small amount of paint from the bottle onto my glass mat, dipped my brush into the paint and then wiped the brush onto a cloth to remove the excess paint. I then dry brushed the surface of the frame and the edges of the baseboard by allowing the brush to just kiss the surface of the frame. If you do add too much, no problem ~ just apply some more of the gesso over the areas you’re not happy with to knock back the color.
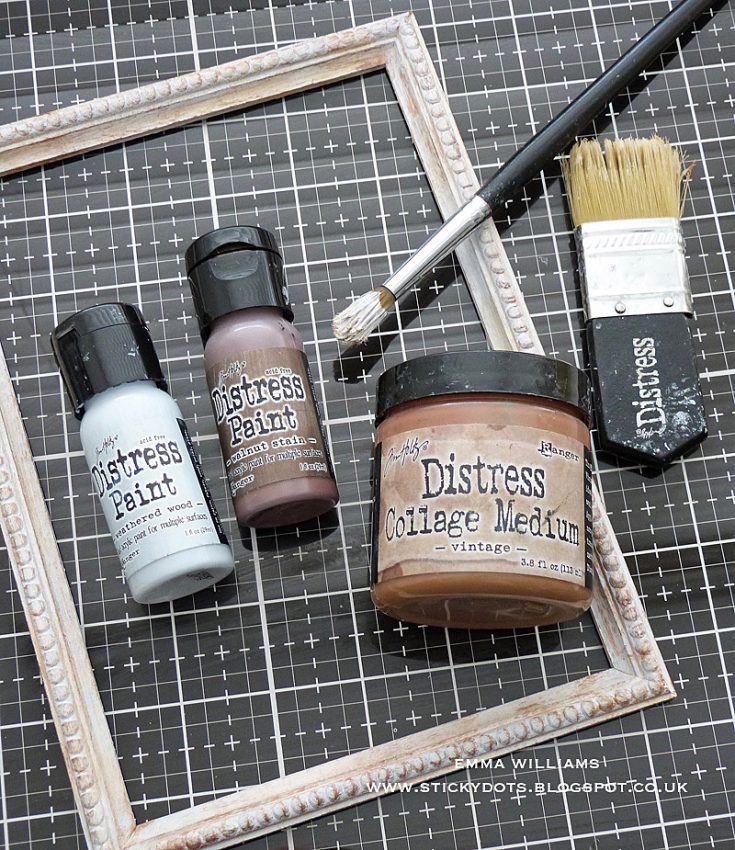
Gently heat dry the painted surfaces and then repeat the dry brushing technique but this time using Walnut Stain Distress Paint. Heat dry and then using the Collage Brush, apply a thin layer of Vintage Collage Medium over random areas of the frame.
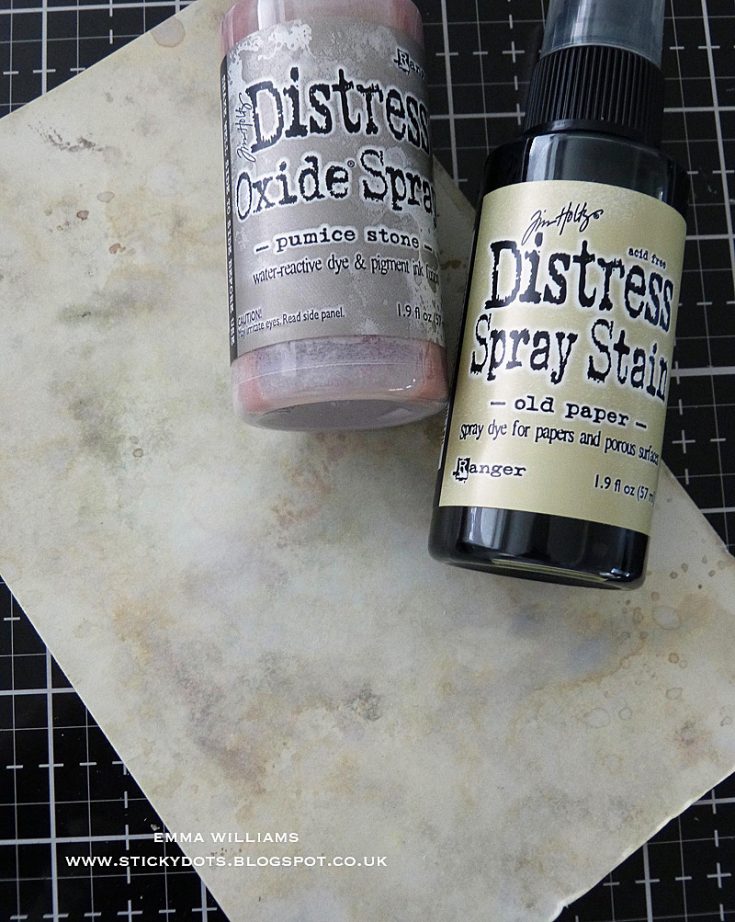
Setting the framed panel to one side to dry, I moved onto the central area and cut a piece of Mixed Media Heavystock card. Lightly spritz the card with a mist of water and then spritz with Old Paper Distress Spray and Pumice Stone Oxide Spray. Heat dry the surface and I haven’t shown it here but I then inked up the script stamp from the Entomology stamp set with Hickory Smoke Distress Ink and stamped the script over random areas of the panel.
Place the Bouquet Layering Stencil over the top of the inked and stamped panel, securing the stencil with some low tack tape so that it doesn’t move.
Using a palette knife, apply a layer of Crackle Paste by dragging it over the top of the stencil. Carefully remove the tape and the stencil.
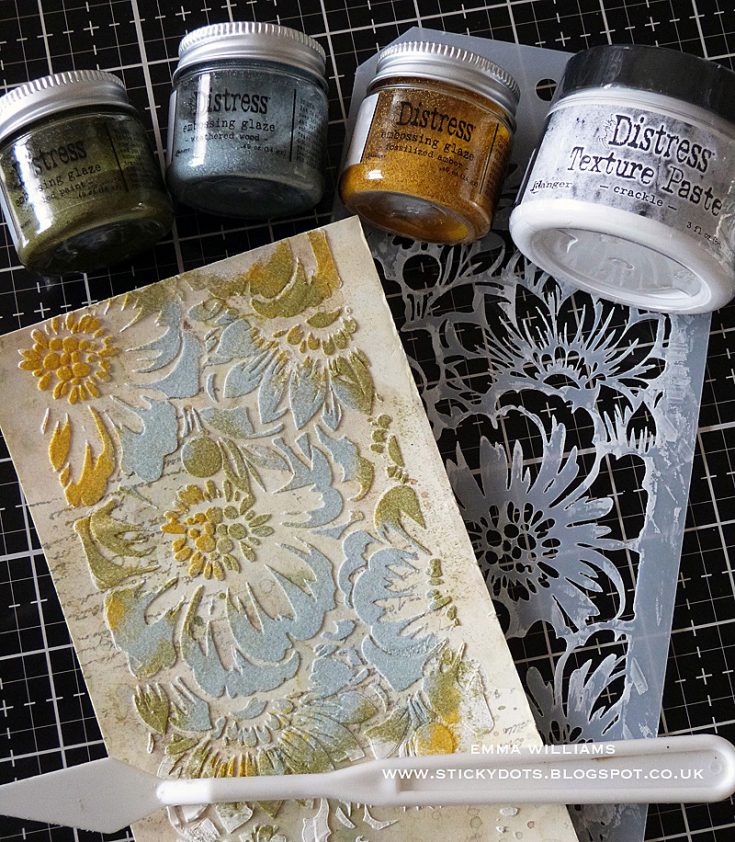
Whilst the paste is still wet, sprinkle Peeled Paint, Weathered Wood and Fossilized Amber Embossing Glaze over the wet paste, sprinkling the different colors one at a time onto different areas to accentuate the design of the stencil. Tap away the excess and set the panel to one side. Once you see the small cracks starting to appear, you can then take a heat gun and apply heat to the areas where you have sprinkled the glaze.
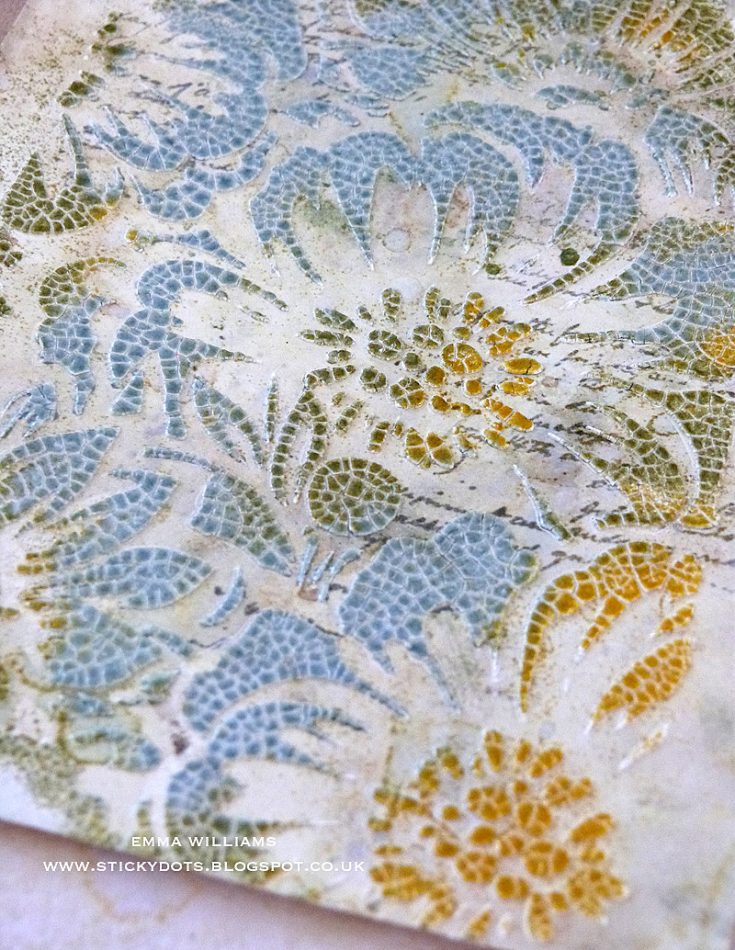
Don’t overheat the paste, just apply a steady stream of heat and you will notice when the glaze starts to melt, it’s then time to move onto the next area and you will end up with a beautiful crackled panel as in the photo below.
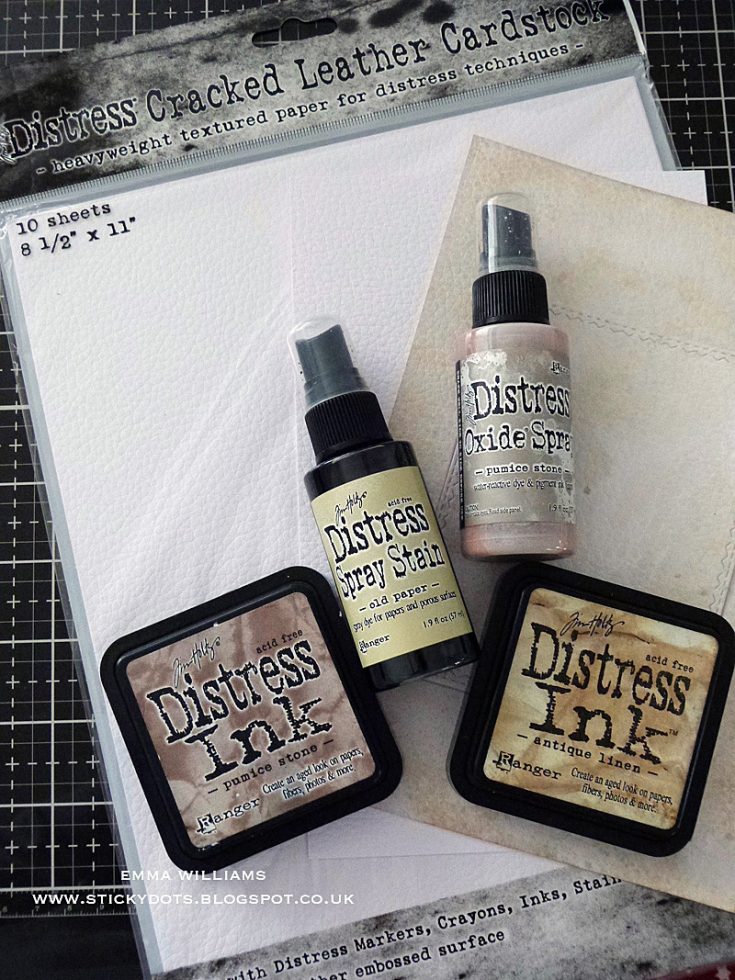
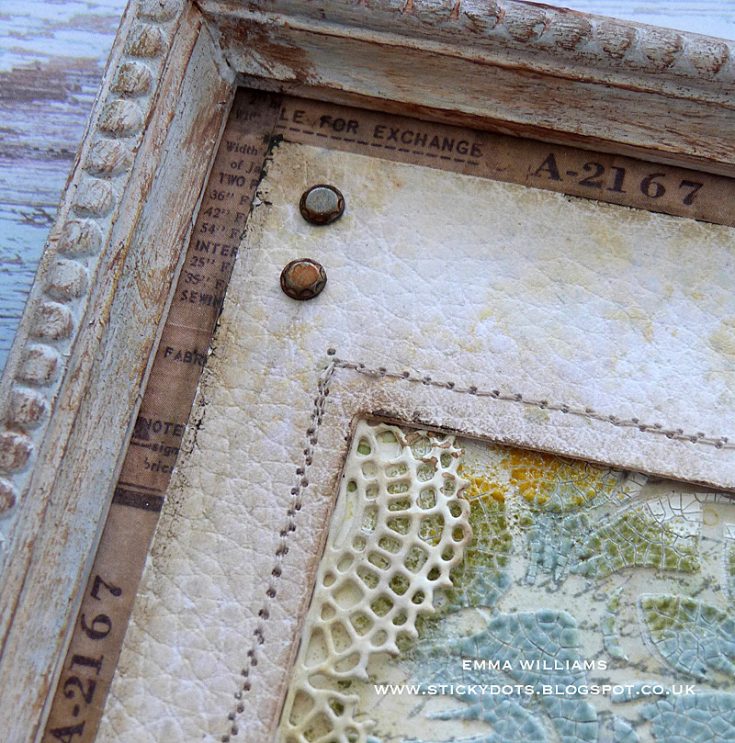
To create the aperture frame that sits over the top of the crackled panel, I cut a piece of the Cracked Leather Cardstock, cutting it slightly smaller than the baseboard of the framed panel. I wanted to create the look of ‘foxing’ on the card, giving it the appearance that it’s weathered and worn but I still wanted to keep the color quite light and neutral, so to create this effect I lightly spritzed the card with water and then misted Old Paper Distress Spray and Pumice Stone Oxide Spray over the top. After drying the card stock I inked the surface with Antique Linen and Pumice Stone Distress Inks. Once more, I lightly spritzed water over the surface, to create little pools of ink, dabbing away any excess water before giving a final burst of heat to dry the card.
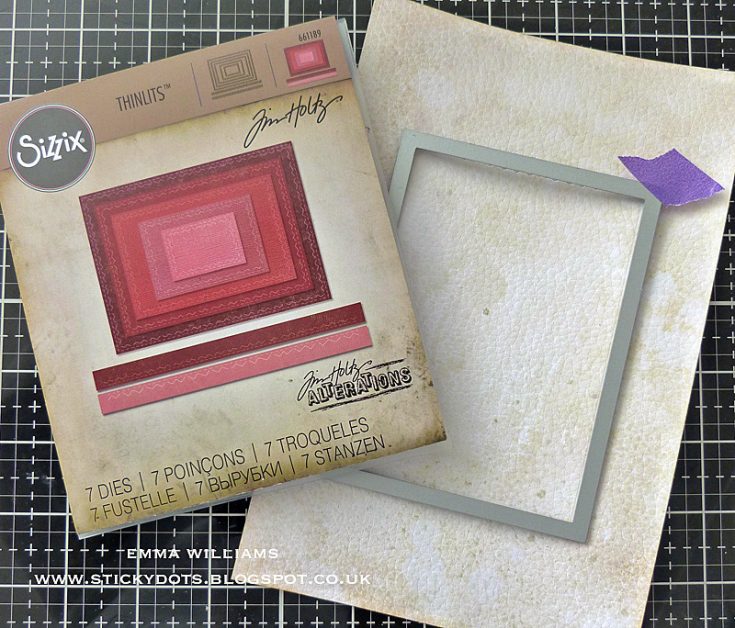
Using the largest sized die from the Tim Holtz Stitched Rectangles die set, (I have this set in my stash but you can use any die you choose to create the aperture), I placed it in the centre of the card panel and ran it through my machine to die cut the aperture before machine stitching a border around the outside of the aperture.
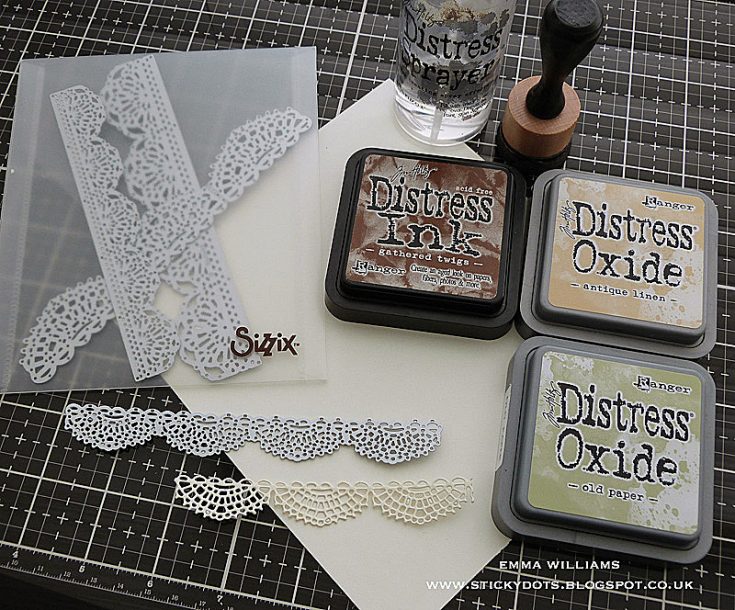
Taking one of the four dies from the Crochet Thinlit Die Set, die cut two strips of card. Ink the die cuts with a combination of Antique Linen and Old Paper Distress Oxides Inks and then spritz with a light mist of water to blend the color. Heat dry and then ink the edges of the crochet pieces with Gathered Twigs Distress Ink.
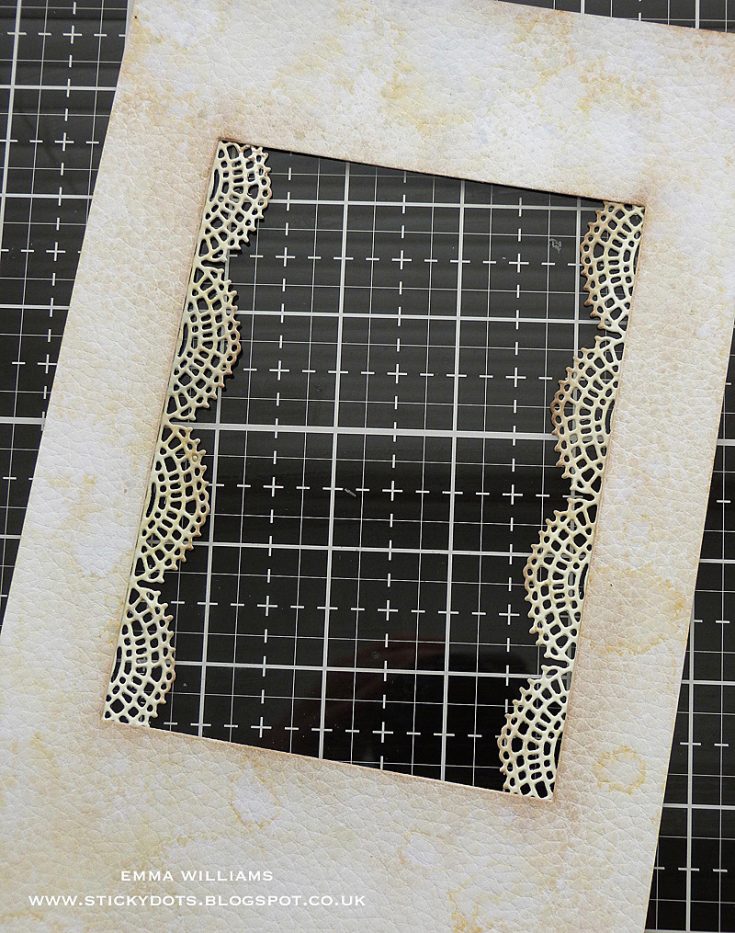
Attach the two crochet strips to the back of the aperture frame on the cracked leather card, placing the die cuts on the left and right hand sides and securing them into place with a line of tape.
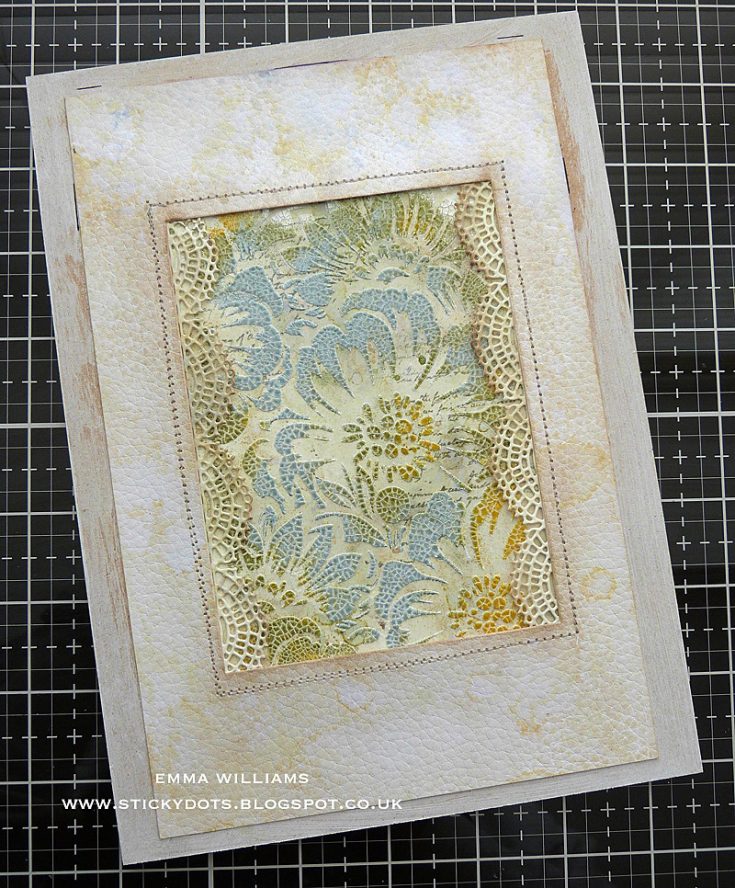
Place the stenciled panel behind the aperture window and again secure into place with a strong adhesive tape. Adhere the panel onto the baseboard using Matte Collage Medium and allow to dry.
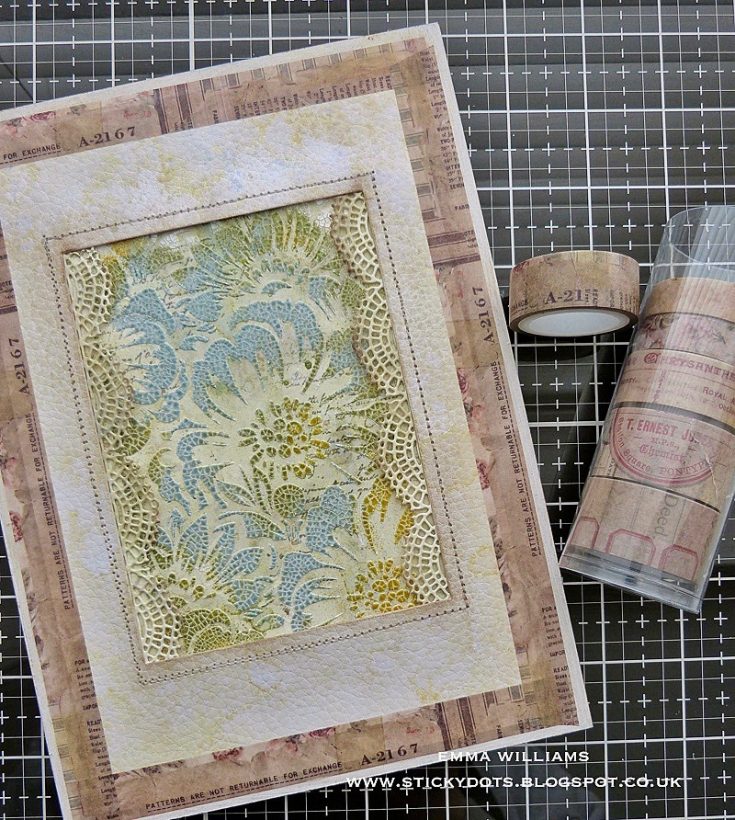
Cut strips of the Remnants Design Tape and adhere each piece around the four edges of the Cracked Leather cardstock frame to create an inner border to the wooden frame.
Adhere the wooden frame with Matte Collage Medium and allow to dry.

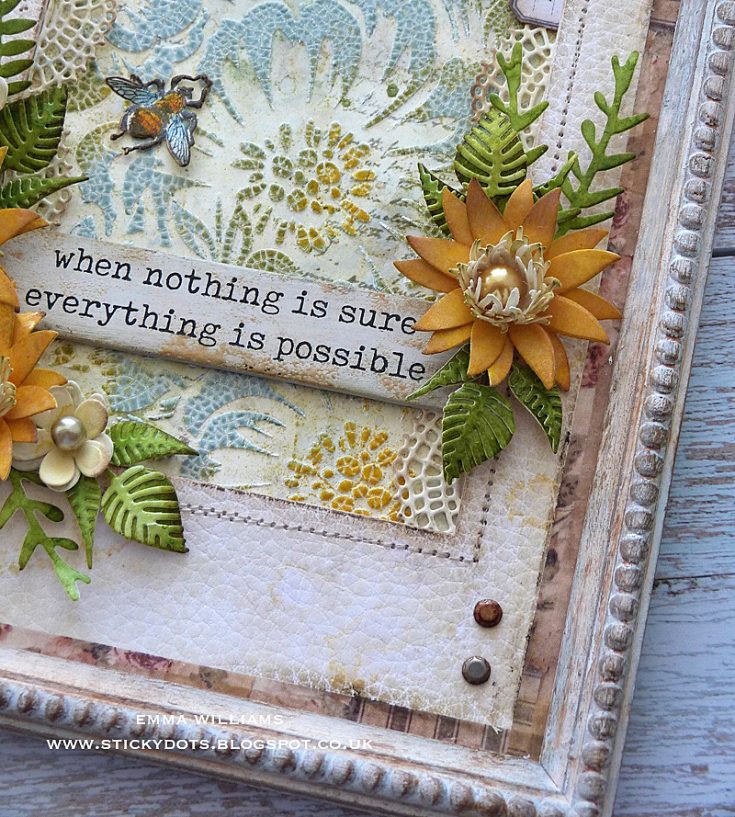
For the quote across the centre, which I thought was perfect for this moment in time, I used one of the Theories Quote Chips. Scribble Walnut Stain Distress Crayon over the top and then using my finger I blended the crayon over the chip. I then dabbed the edges with the Embossing Dabber before sprinkling Antique Linen Embossing Glaze over the top. Tap away the excess powder and heat until the glaze has melted.

Use Matte Collage Medium to attach chip across the stenciled panel.
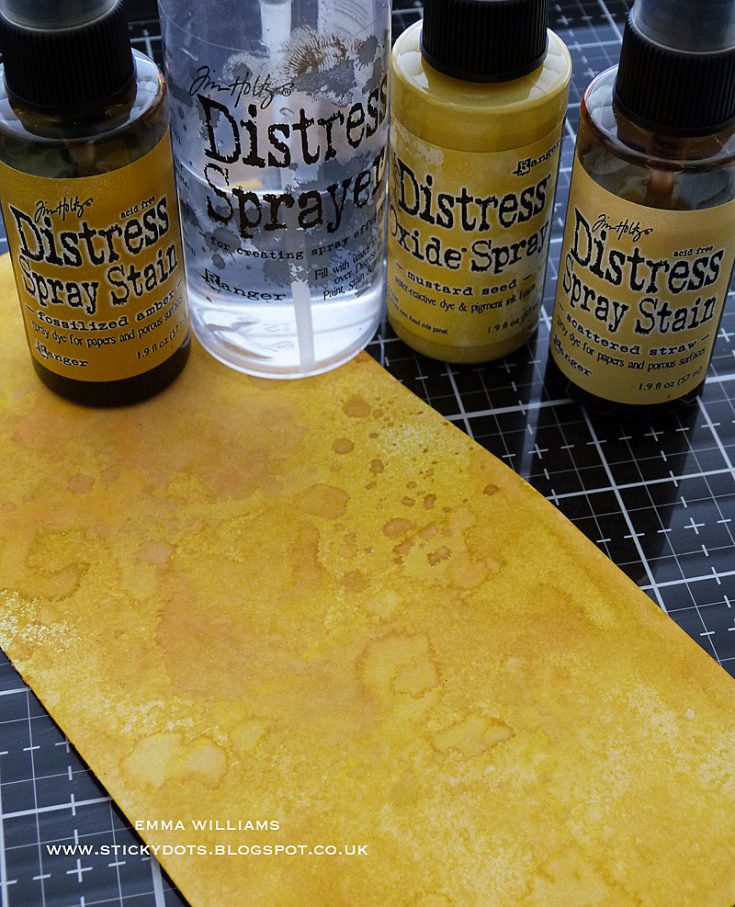
Moving onto the flowers, I began by inking panels of Mixed Media Heavystock card by spritzing the card with water, and then misting with Scattered Straw Distress Spray Stain, followed by Mustard Seed Oxide Spray and finally, Fossilized Amber Distress Spray Stain. Heat dry the card surface.
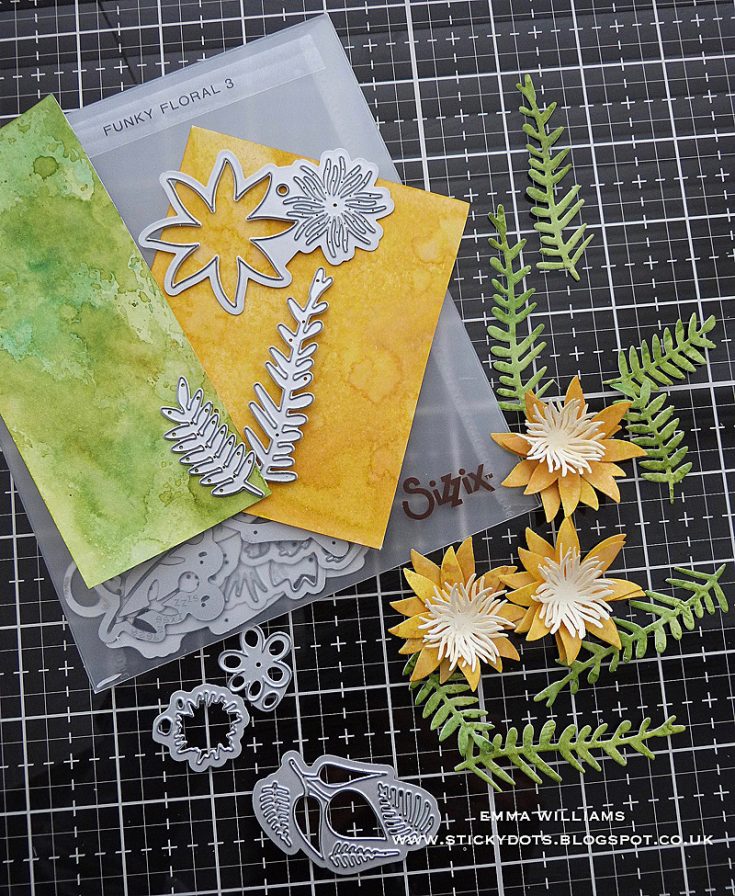
Die cut a selection of petals from the yellow card, to create three flowers. You will need two layers of petals for each complete flower. You will also need to cut six of the stamen pieces from the Mixed Media card and a selection of foliage cut from green card which is inked with a combination of Peeled Paint, Forest Moss and Mowed Lawn Distress Spray Stains.
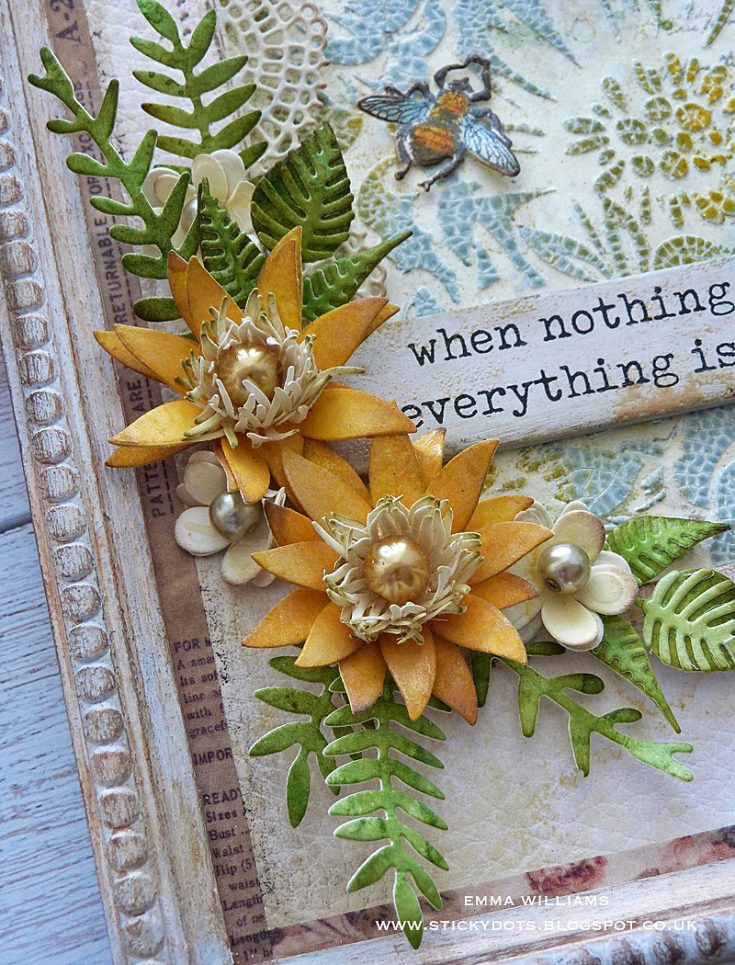
To make the 3 flowers, shape each of the petals to create a more realistic look to the flowers, and then layer them over the top of one another, slightly offsetting each layer. Layer two of the stamen pieces and attach to the centers.
Attach the flowers, together with the foliage using a hot glue to secure them into place, arranging them to cascade around the quote chip. Using the Funky Florals 3 Die Set, I also added some smaller layered flowers cut from card lightly inked with Antique Linen Distress Ink.
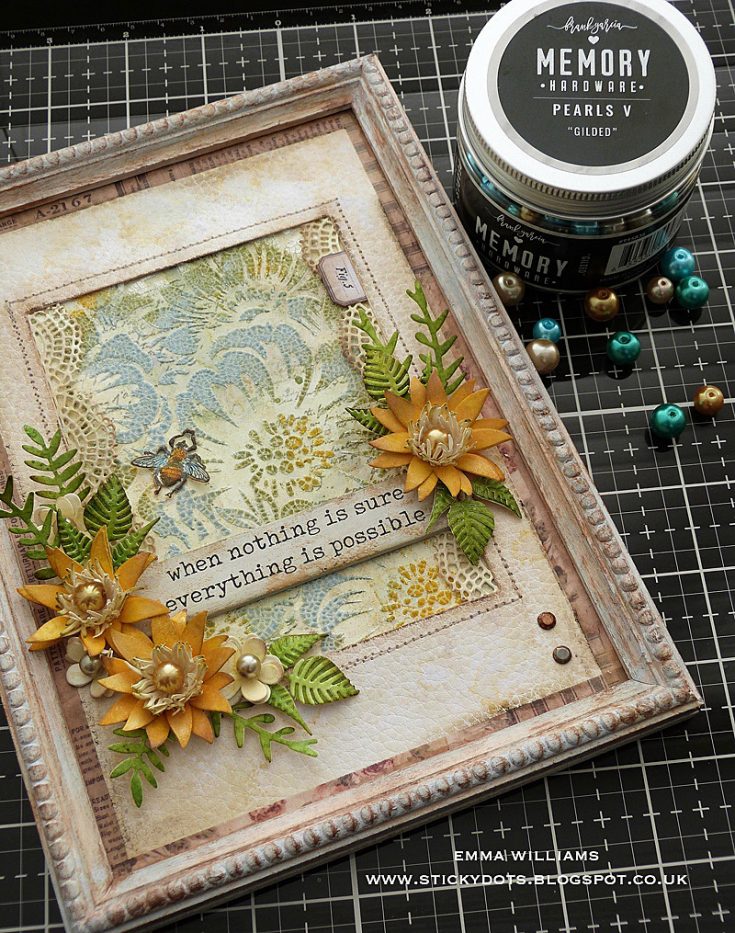
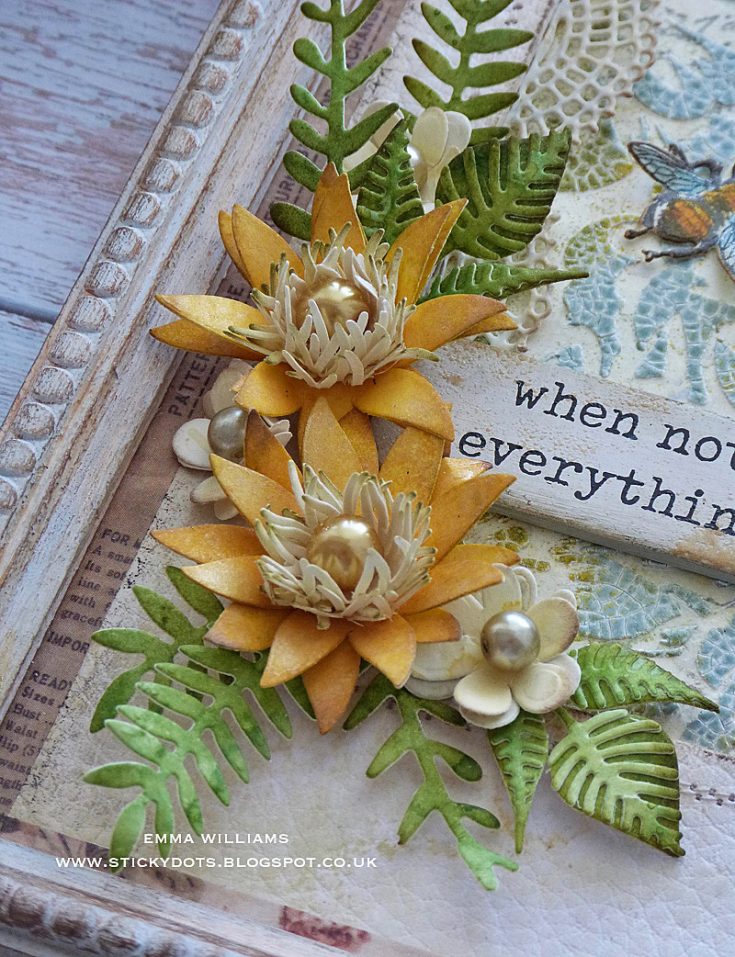
Place glass pearls in the centers of all of the flowers.
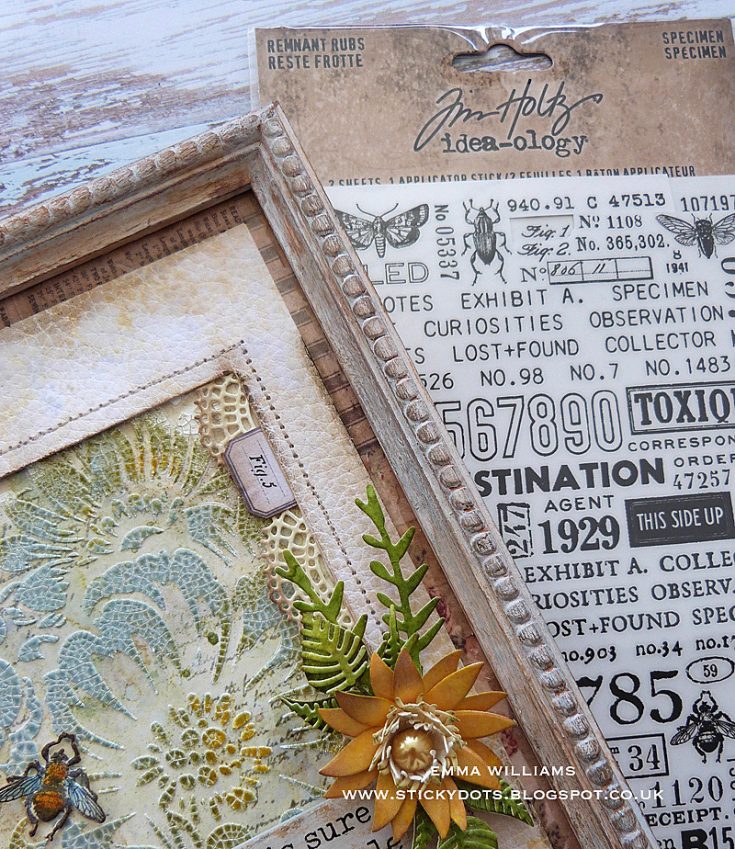
Attach a small label taken from the Field Notes Ephemera Set to the top right hand corner and apply a ‘Fig 5’ Remnant Rub to the label.
Place two Hardware Heads in both the top left and bottom right hand corners.
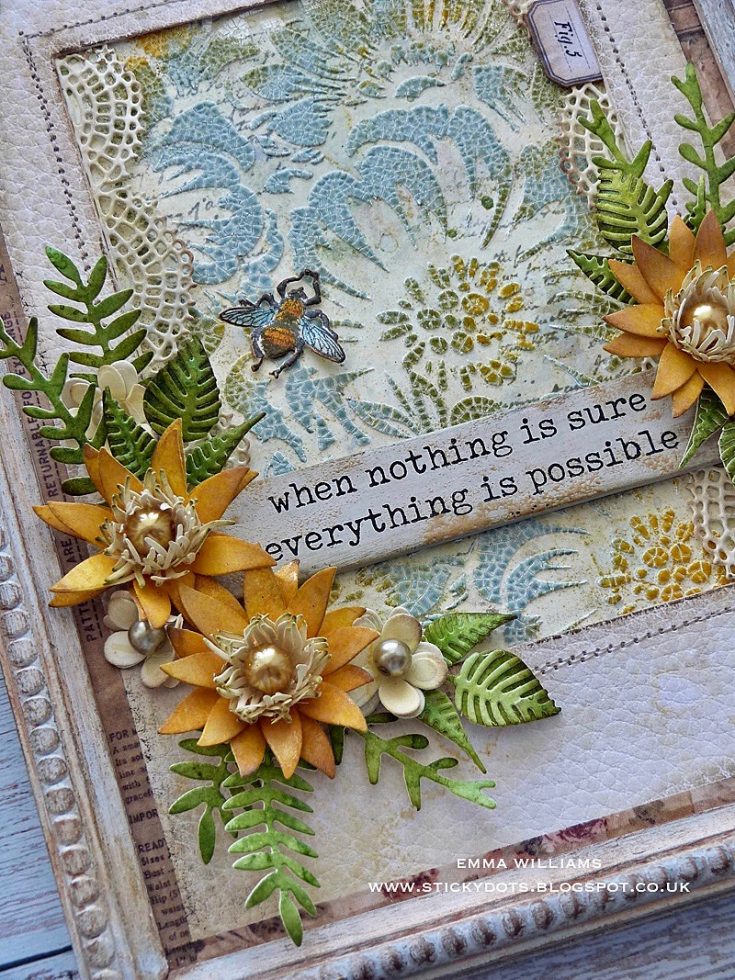
Finally I stamped a bee from the Entomology set onto watercolor card, and colored it with Distress Marker Pens before die cutting it with the corresponding Entomology Die Set. If you haven’t got this die set, then just fussy cut around the outline. Attach the bee onto the stenciled panel.
Thank you so much for stopping by today ~ it’s been fun taking you through the creative process of this project and I hope I’ve given you some tricks and techniques that will inspire you with some ideas of your own!
Stay safe everyone…Emma x
SUPPLIES:
|


Thanks so much for stopping by, and thanks to Emma for being our guest!


