Yippee for Yana Reprise: Sea Party Birthday

Hi friends! Happy Thursday! We wanted to re-share this Summery Birthday card edition of Yippee For Yana with the fantastic Yana Smakula! Be sure to watch the video for more information, and enjoy!
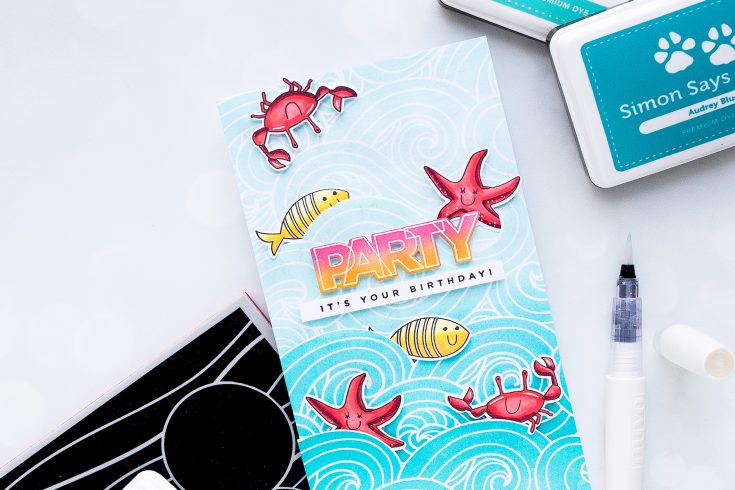
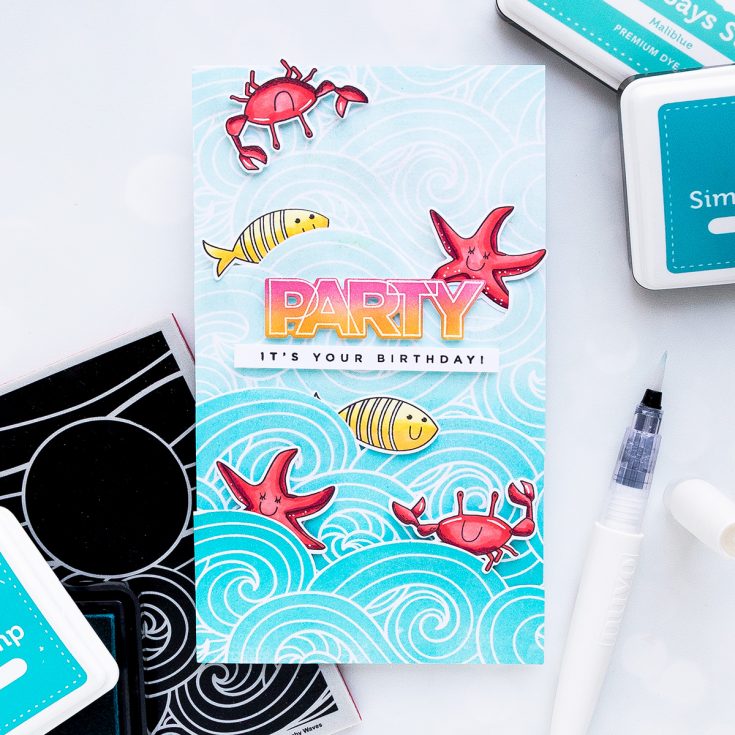
Hello friends, this is Yana and welcome back to another Yippee For Yana video! I love the Beachy Waves background stamp from Simon’s Recent release and I’ve been wanting to use it for some cards. I’m going to show you how you can use just a portion of the background and extend it cover the front of an A2 or even bigger card.
I’m using Simon’s Dye inks in delicious Summer colors – High Dive, Audrey Blue and Maliblue colors; these are just the most perfect shades of blue and are oh so so awesome for Summer stamping or ink blending. I have a serious crush on the Maliblue color – I’ve been using it a ton this Summer.
The trick here is to stamp the portion of the Beach Waves background (the waves portion) onto separate pieces of paper multiple times and piece each portion together with the others to create a continuous background for a card.
I want my background to have a gradient to it, the bottom portion of my waves is going to be darkest, and the top – lightest so I’m using multiple shades of blue when inking the stamp for each portion. Starting with High Dive and Audrey Blue for the bottom, Audrey Blue and Maliblue for the middle and Maliblue for the top.
To simplify this you can totally ink up one section with High Dive, one using Audrey Blue and one using Maliblue.
To help me piece these layers together I used scissors and cut along the wave lines. At first, I wanted to make an A2 card, but later seeing how I had a ton of background space I decide to make a taller card. I am always inspired by Kristina Werner and how she makes these super fun tall cards and I decided to give one a try. My card ended up being 4 1/4 wide by 7 3/4” tall.
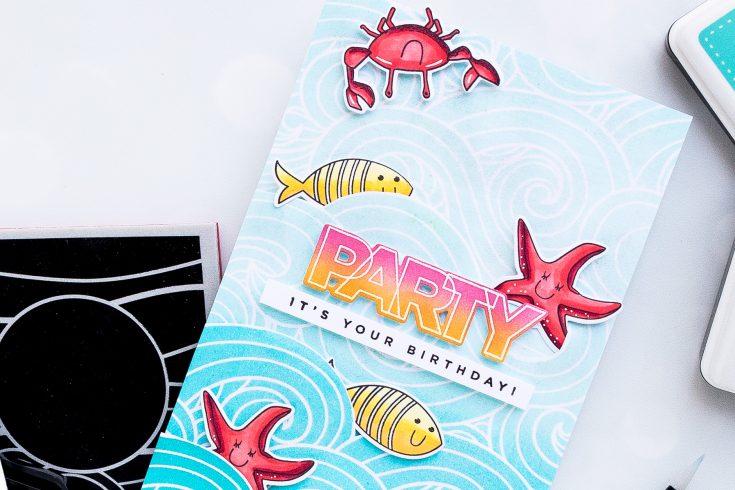
Next, I stamped critters from Under The Sea Animals stamp set. I used Simon’s Intense Black ink and stamped 2 of each – crab, fish, and starfish. I used Copic markers in R39, R24, R22, Y35, Y15, and Y11 to do the simple coloring. Later, I added white pen details to crab and starfish.
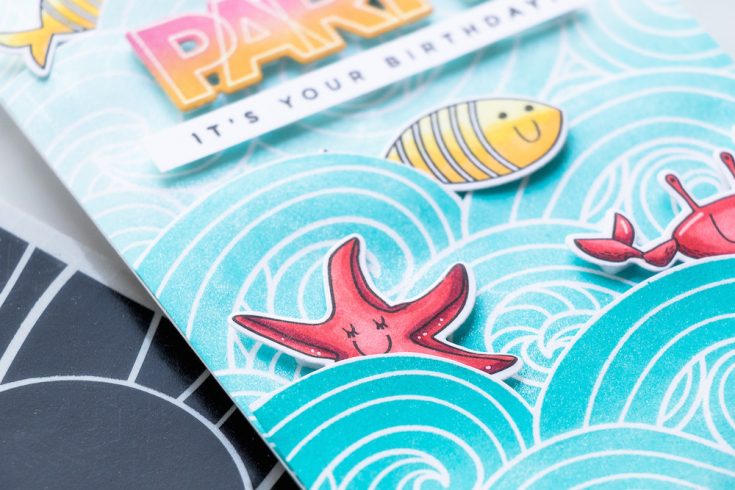
I also need a sentiment and for this, I white heat embossed “Party” from Cathy’s Birthday Palooza stamp set. I used Sunshine and Hollyhock inks from Simon for some emboss resist ink bleeding. Using coordinating dies I cut these out and arranged on my card with the help of foam adhesive. I also stamped “It’s Your Birthday” and foam mounted it under the “Party”. Lastly, I used my Tonic Studio shimmer pen and coated my entire background with this shimmer.
Have fun stamping!
WATCH THE VIDEO:
SUPPLIES:
|


Thanks so much for stopping by and thanks to Yana for being our guest!
Making the Cut: Christmas in July Santa Pup

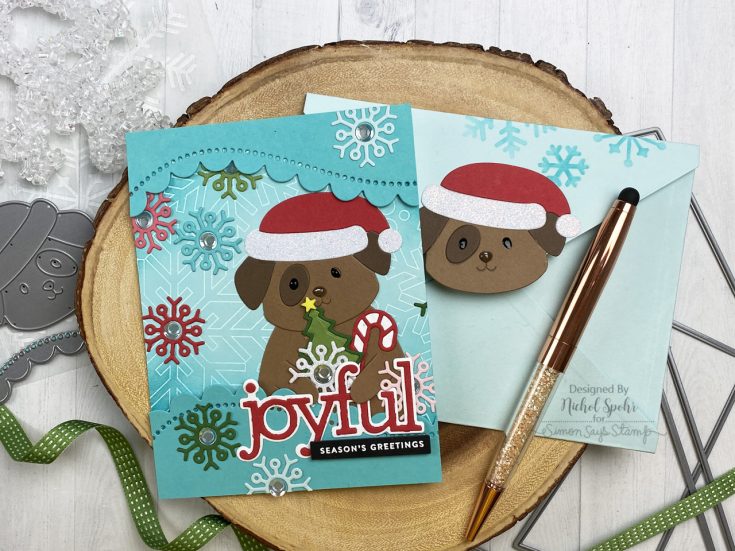
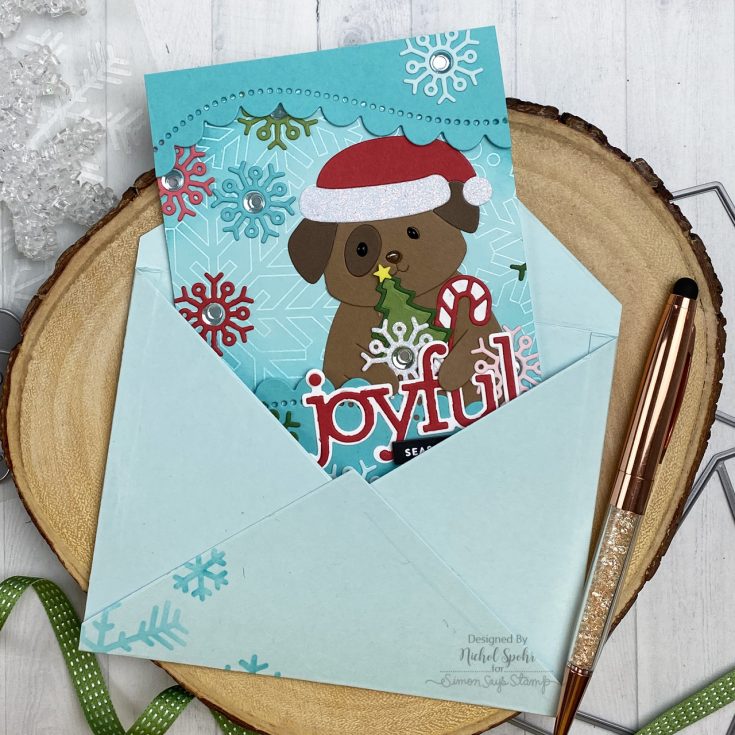
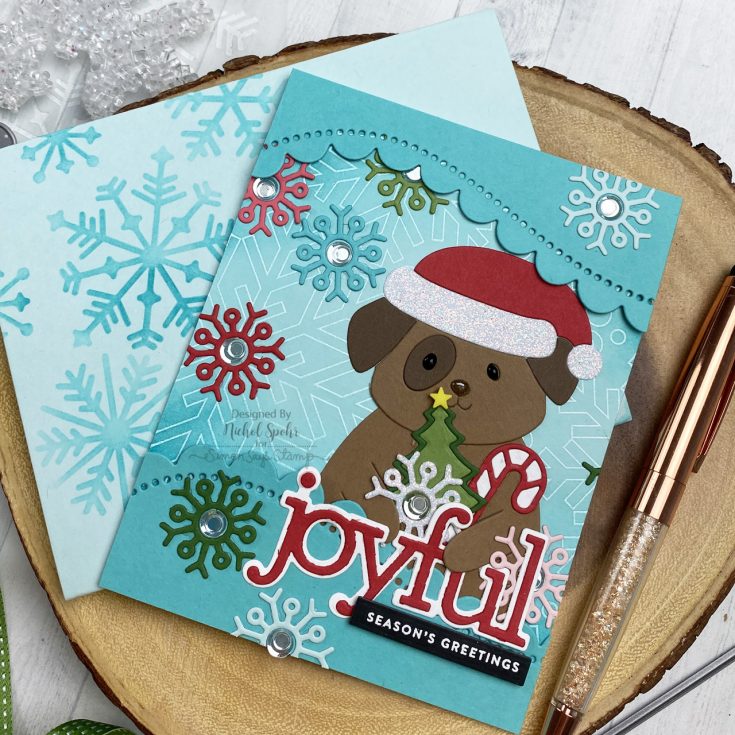
Hi friends! Happy Wednesday! Please join me in welcoming back special guest Nichol Spohr for our monthly installment of Making the Cut, a blog series showcasing the love of wafer thin die cutting! This adorable card and matching envelope features the Big Picture Book Santa Pup, Christmas Icons, and our Joyful sentiment die!
Be sure to watch the video for more information, and enjoy!
WATCH THE VIDEO:
SUPPLIES:
|


Thanks so much for stopping by, and thanks to Nichol for being our guest!
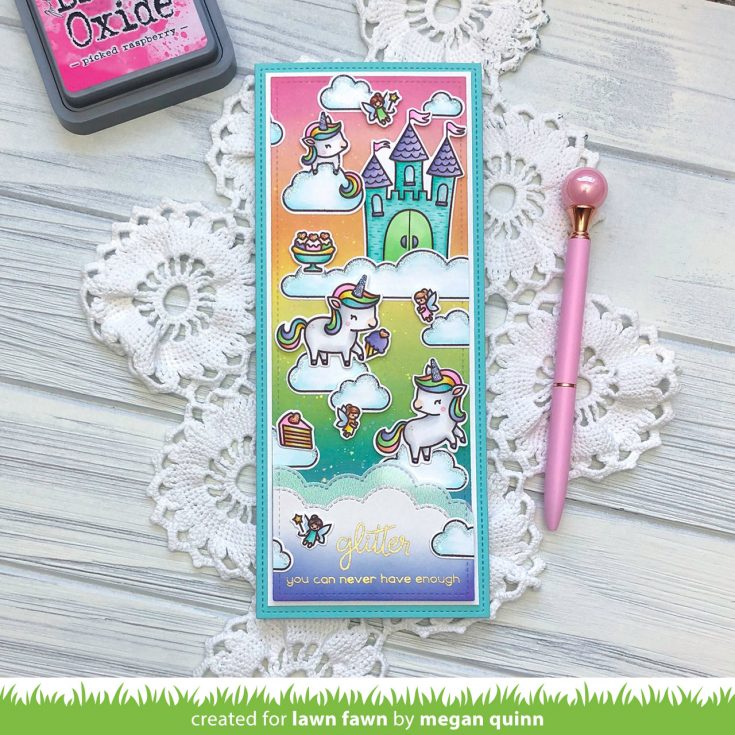
GLITTER: You can never have enough
Hi friends! I’m delighted to welcome back special guest Megan Quinn to our blog today showcasing some brand new Lawn Fawn products from the Summer 2020 release!

Hello friends! This is Megan from the Lawn Fawn Design Team and I am delighted to be on the Simon Says Stamp Blog today. I am sharing a card using some amazing new products from the Lawn Fawn Summer Release! The whole release has such a whimsical and fairy tale feel to it and I love it all so much!
Lately, I have really enjoyed making slim line cards. This style allows even more room to add images to your card designs and Lawn Fawn recently released three awesome Slimline Die Sets. These sets add a beautiful stitching detail to the edges of the panels and make creating this style even easier.
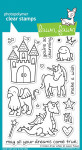
For my card today, I used the new Unicorn Picnic and All The Clouds Stamp Sets. (A picnic with unicorns?! Yes, please!) These sets are packed full of images to create fun scenes. The only limit is your imagination! I also added in the previously released Critters Ever After Stamp Set to round off my scene.
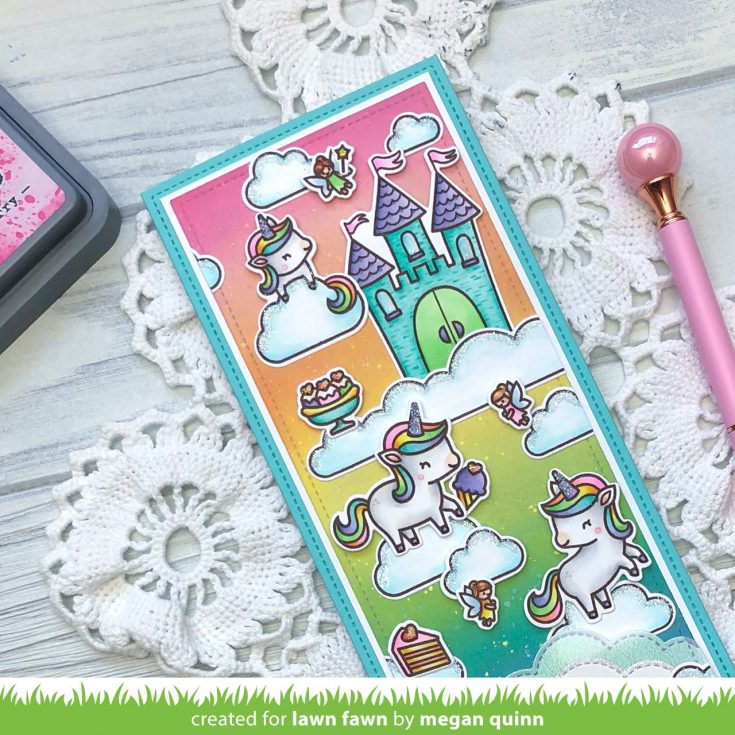
To create my unicorn card, I started by stamping my images out and coloring them with Copic Markers. I then die cut them out using the coordinating dies.
Next, I die cut a piece of Bristol Smooth Cardstock using the stitched rectangle die from the Small Slimline with Lift the Flaps Die Set to make the focal panel. I then ink blended the panel using Distress Oxide Inks with a blending brush in the following order from top to bottom: Picked Raspberry, Spun Sugar, Spiced Marmalade, Squeezed Lemonade, Twisted Citron, Peacock Feathers, Tumbled Glass. To add some fun gold speckles, I water down a little metallic gold watercolor from the Kuretake Gansai Tambi Starry Colors set and flicked it over the panel.
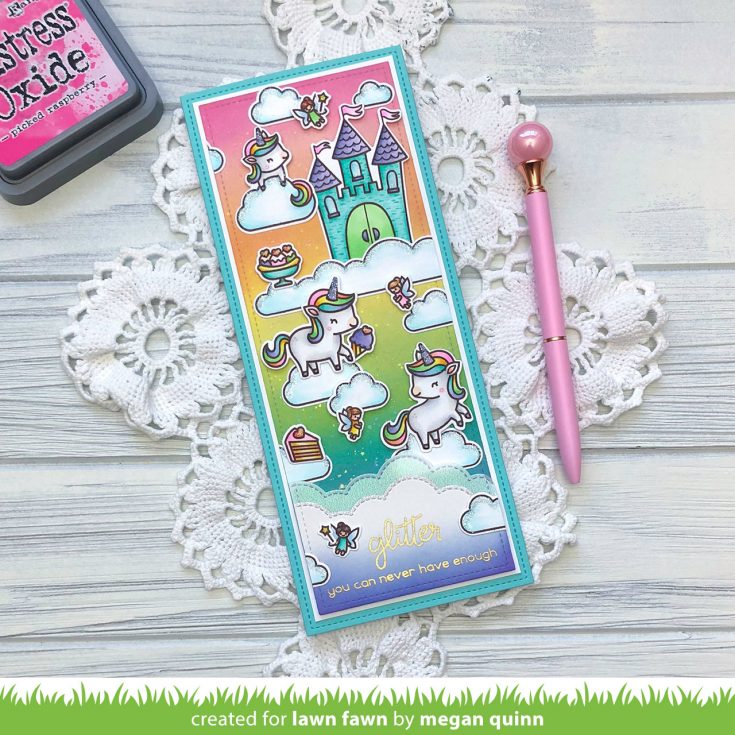
I then die cut a second rectangle from Bristol Smooth Cardstock and a piece of Lawn Fawn Pearlescent Vellum using the same die. I used the largest die from the Cloudy Hillside Pop-Up Add-On to die cut both of those to create the clouds at the bottom of the design. I ink blended Blueprint Sketch and Wilted Violet at the bottom of the Bristol cloud panel to finish the rainbow ombre inking. Then, I stamped the sentiment using Lawn Fawn Clear Ink and heat set Lawn Fawn Gold Embossing Powder over the top. Next, I adhered the two cloud layers together and used foam tape to pop them up on the bottom of the card front.
I used a mixture of Lawn Fawn Glue Tube, glue dots, and foam tape to adhere my images to the front. I then popped the front panel onto a piece of Lawn Fawn White Cardstock that I trimmed to slightly less than 8 1/4″ x 3 1/4″ and adhered that to a die cut panel of Lawn Fawn Mermaid Cardstock.
Thank you so much for joining me today! Please be sure to check out all of these amazing products from Lawn Fawn. I hope that you have a wonderful day!
SUPPLIES:
|


Thanks so much for stopping by, and thanks to Megan for being our guest!


