Yippee for Yana: Floral Card & Matching Envelope
Hi friends! Happy Tuesday! Please join me in welcoming back special guest Yana Smakula to our blog today! Be sure to watch the video and enjoy!

Hi everyone, this is Yana Smakula, welcome back for another Yippee For Yana video! Today I a card and matching envelope to share. Both were created using a few of my favorite techniques – pattern stamping, Copic coloring, and hot foiling.
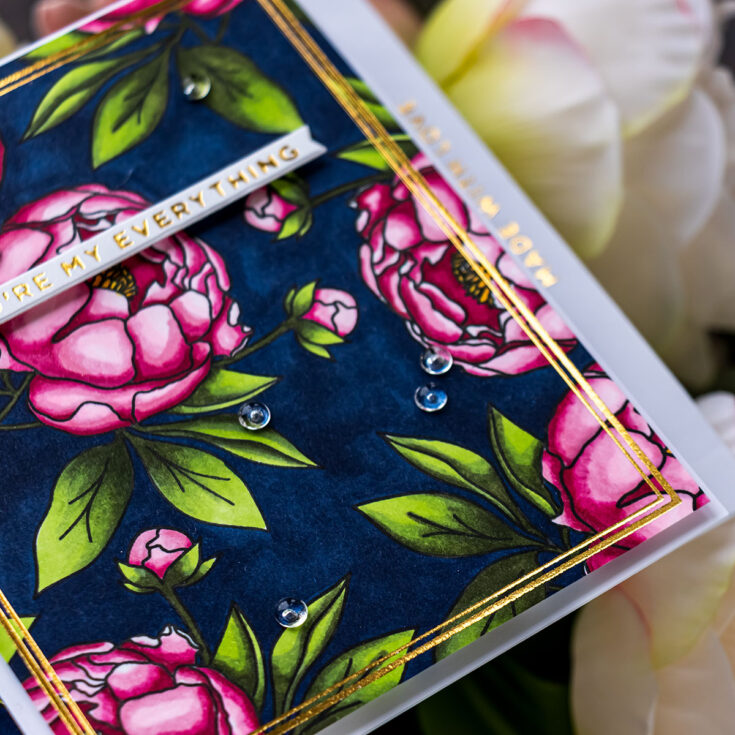
I first made a card with a floral pattern and it occurred to me it would be great to make a coordinating envelope to put the card in and really wow the recipient.
I started by stamping a floral pattern onto 4 1/4 x 5 1/2” Neenah Solar White 80lb cardstock using a stunning peony from the Best Friend Ever stamp set. I used Memento Tuxedo Black ink for stamping and my MISTI stamping tool to make it easier.
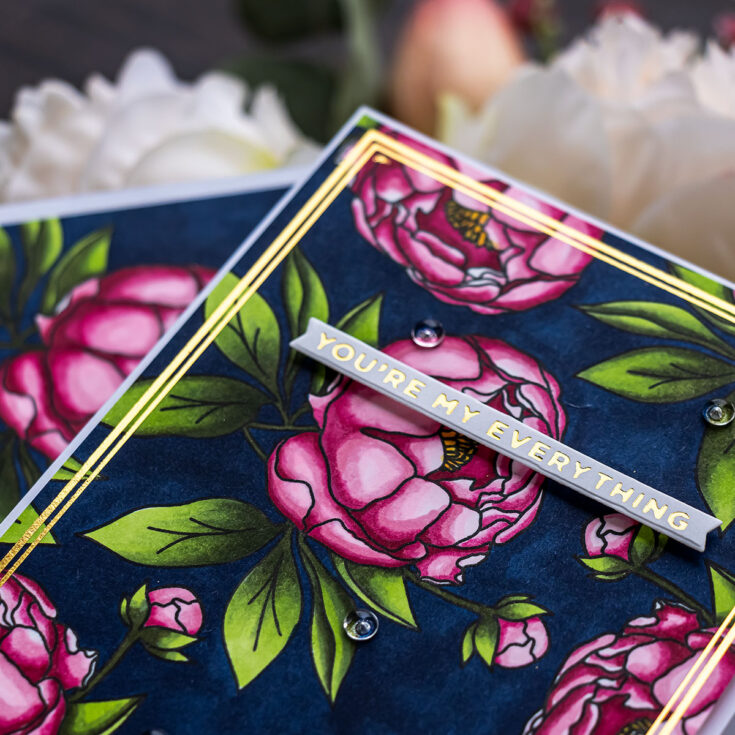
I used my Copic markers to color the image and I colored the peonies in the same way for both my card and the envelope liner. To create the liner I used a piece of white cardstock cut to 4 1/4 x 5 1/2”, I placed it inside the envelope and used a pencil to roughly mark where I need to cut it. No science here, no measuring, I just eyeballed everything. Next, I used my paper trimmer and simply cut the panel to an approximate size. It worked beautifully in the end.
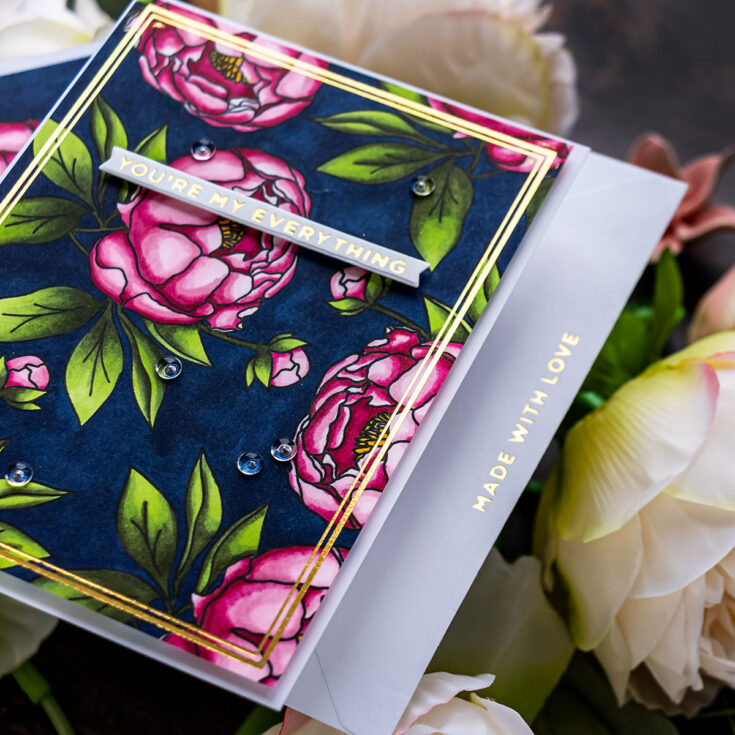
I love to add foiling to my cards, so I used one of the new Spellbinders essential Glimmer plates – Duo Line Rectangle and foiled a rectangular frame in gold foil. I also foiled a sentiment that reads You Are My Everything. Even the envelope was adorned with some foiling – I added Made With Love foiled in gold. Have fun stamping!
WATCH THE VIDEO:
SUPPLIES:
|


Thanks so much for stopping by, and thanks to Yana for being our guest!
Making the Cut: Lucky Leprechaun Scene

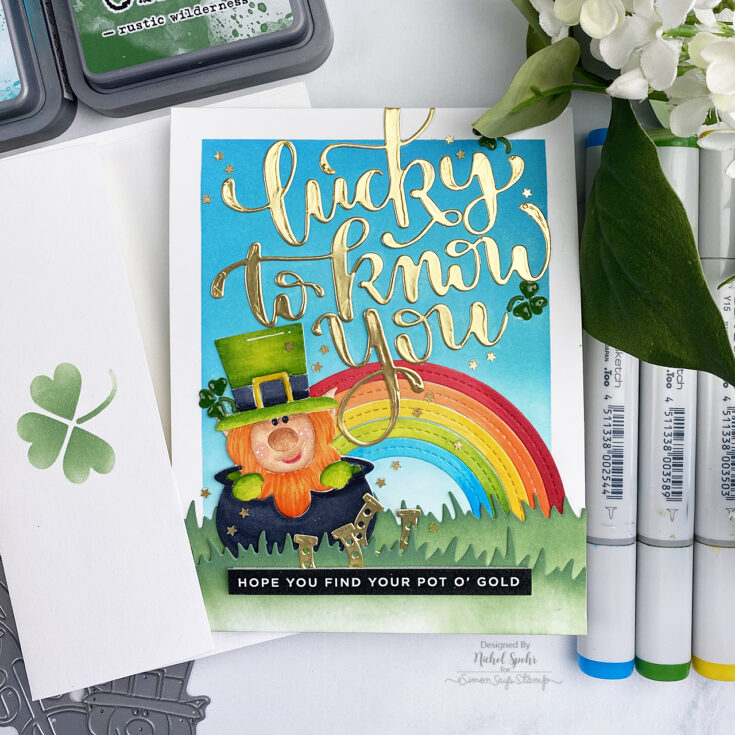
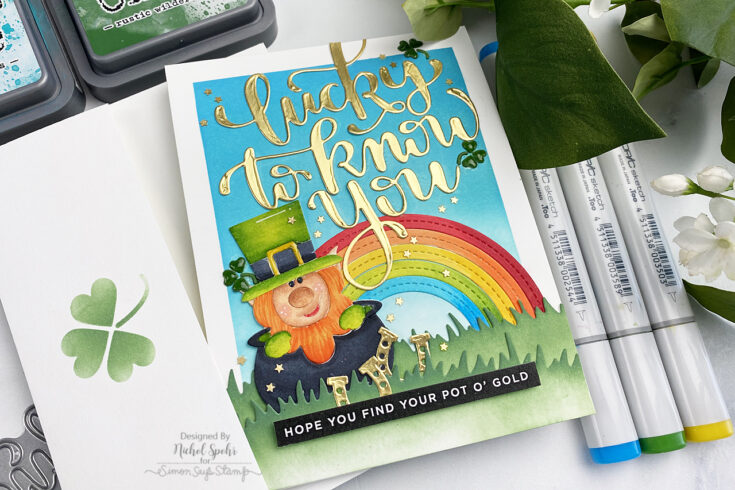
Hi friends! Happy Monday! Welcome to our monthly installment of Making the Cut with Nichol Spohr, where we celebrate the love of die cutting! Nichol made this adorable card showcasing our new Leprechaun die as well as the Lucky to Know You sentiment, the Stitched Rainbow dies from Lawn Fawn, as well as a sentiment from our All Things Happy sentiment strip pack! Be sure to watch the video for more info and enjoy!
WATCH THE VIDEO:
SUPPLIES:
|


Thanks so much for stopping by, and thanks to Nichol for being our guest!
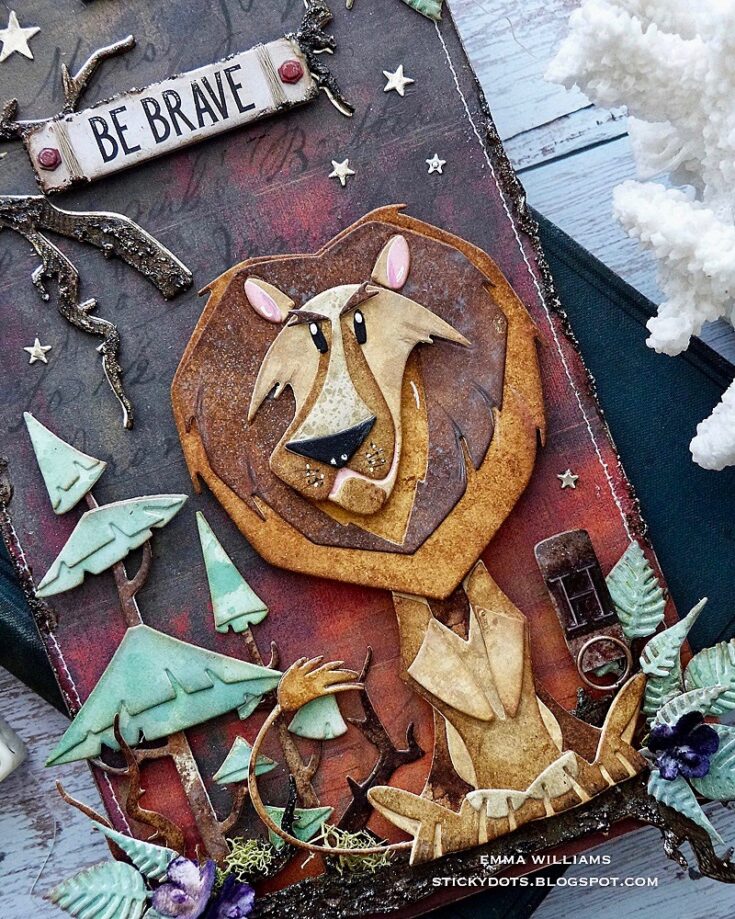
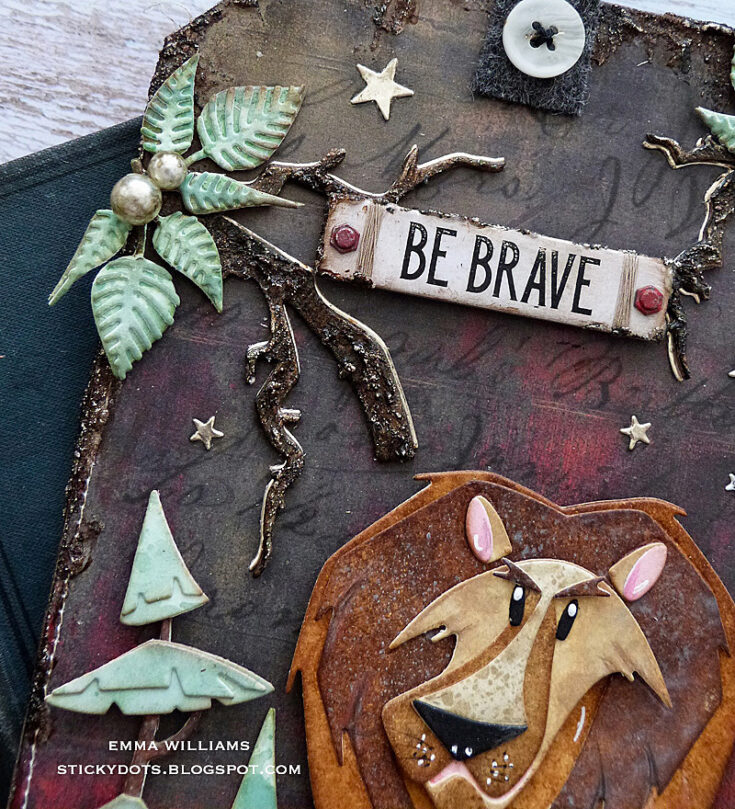
Harrison, Be Brave ~ Etcetera Tag
Hi friends! Happy Sunday! Please join me in welcoming back special guest Emma Williams to our blog! It’s always such a delight to share her extensive talents! Read on and enjoy!

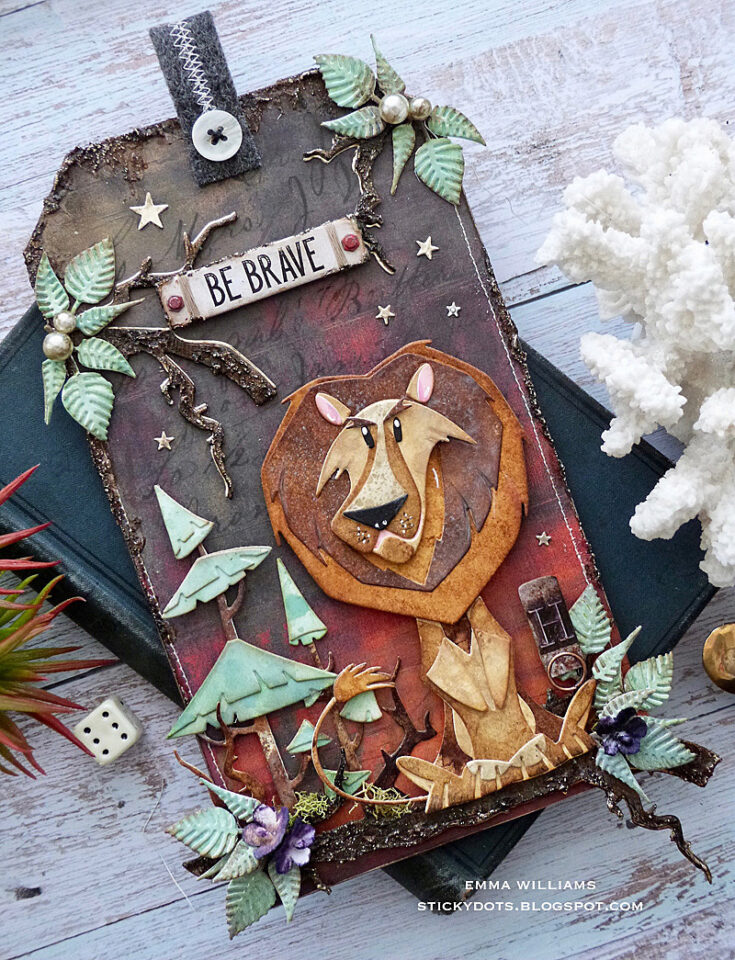
Hello everyone! I’m thrilled to be back on the Simon Says Stamp blog, and excited to be sharing my first post of 2021 with you all and as always, the start of a new year means that we have some gorgeous new releases to start playing with and today, I’d love to introduce you to Harrison, the king of the jungle and hope you love the tag I’ve created using products from Tim Holtz, Ranger Ink, Stampers Anonymous and Sizzix.
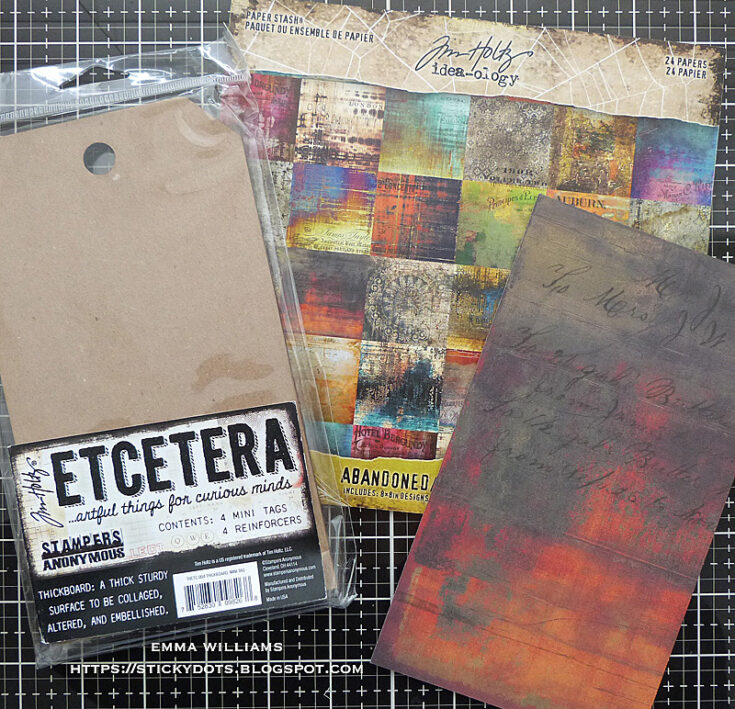
I began by covering a Mini Etcetera Tag with paper from the Abandoned 8” x 8” Paper Stash. Cut the paper to fit the size of the tag before adding a line of machine stitching down each side.
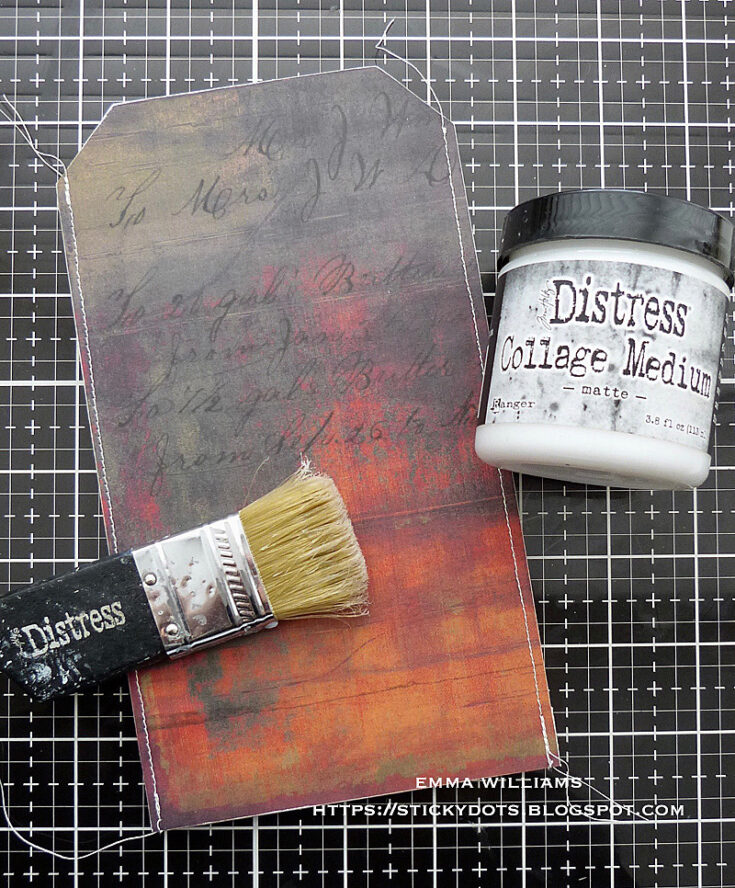
Adhere the paper panel to the tag using Matte Collage Medium, applying a coat of the medium over the top to seal the paper.
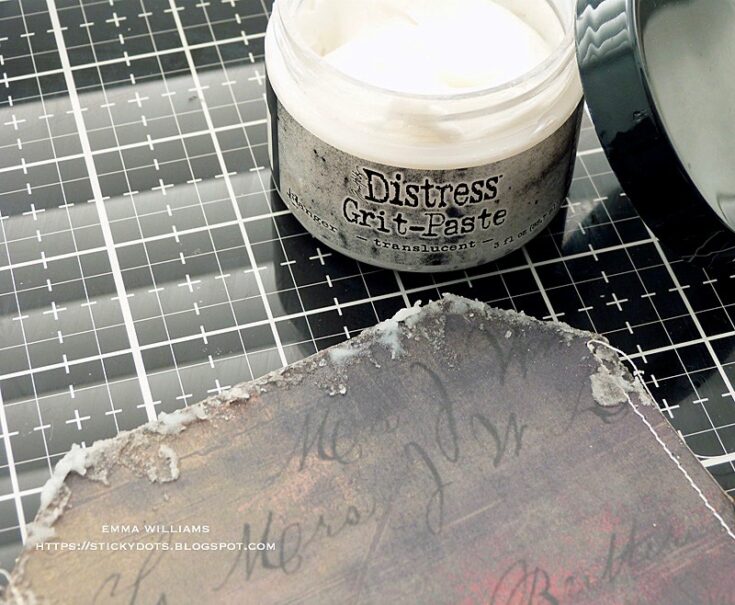
For added texture around the outside edge of the tag, I applied small amounts of Distress Translucent Grit Paste. I actually use my fingertip, but you can also use a palette knife to do this.
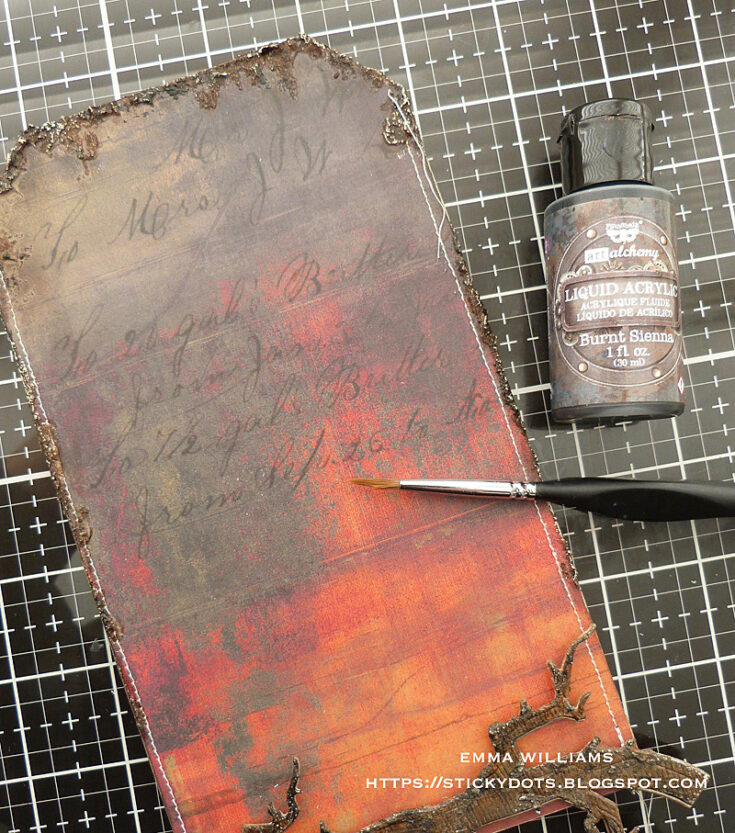
Allow for the paste to dry and set before adding color by painting it with Prima Marketing Burnt Sienna Art Alchemy Liquid Acrylic Paint.
To add more depth of the color, I then applied Black Soot and Antiqued Bronze Distress Crayons over the top of the paste to accentuate the texture.
Setting the tag to one side, I moved onto creating Harrison. This die is part of the Sizzix Colorize series by Tim Holtz, and Harrison is created by cutting each individual piece and adhering the layers over the top of one another to build dimension to the character. I would recommend that you apply adhesive sheets to the back of your cardstock before die cutting as this will be your friend when piecing Harrison together.
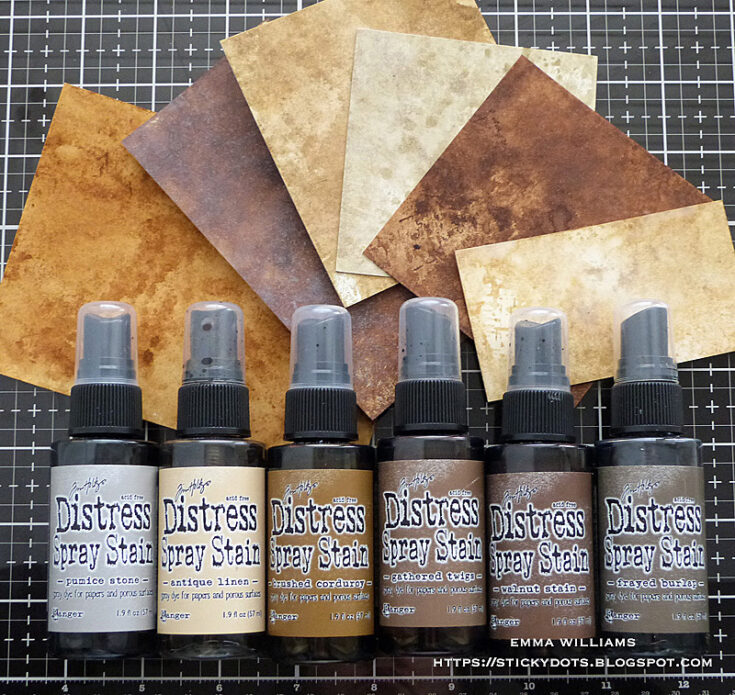
To begin bringing him to life, I inked Distress Watercolor card using various shades of brown Distress Spray Stains. As a guide, these are the colors that I used; Pumice Stone, Antique Linen, Brushed Corduroy, Gathered Twigs, Walnut Stain and Frayed Burlap but you can choose to create Harrison in any color that suits your mood.
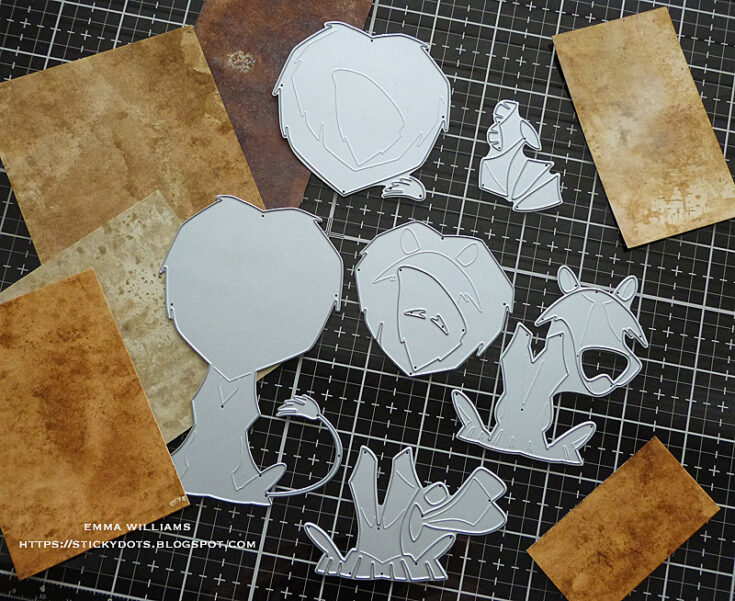
Spritz the white card with a light misting of water and then with the spray stains, building up the different shades that you need to create Harrison. Once I was happy with each color and they were dry, I began die cutting the various layers. In addition to the brown inked card, I used pink card for the ears and black and white card for his eyes.
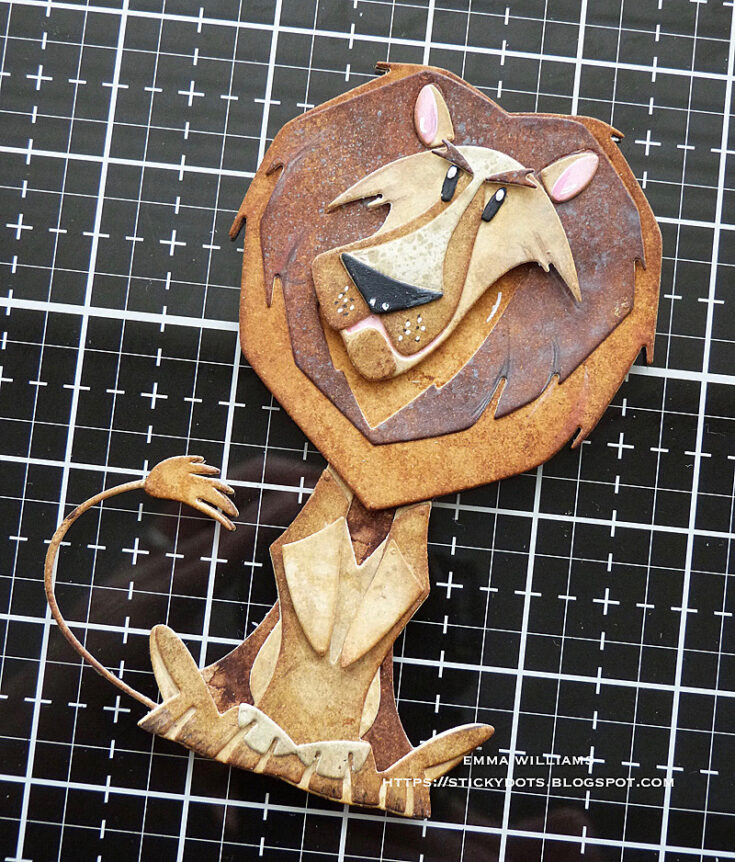
Taking each layer, assemble these pieces to create Harrison, adding a few tiny accent dots around his nose using a black and white pen.
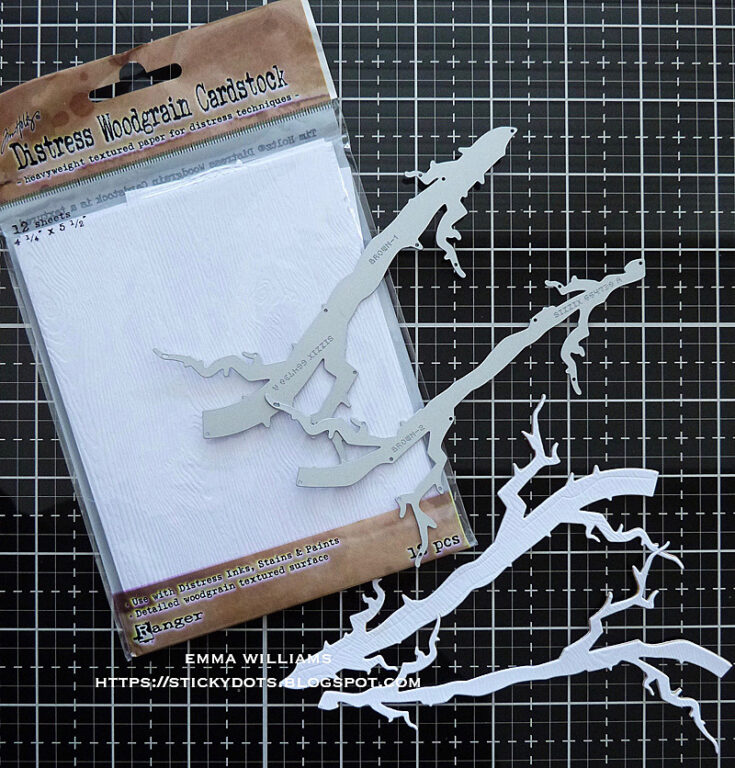
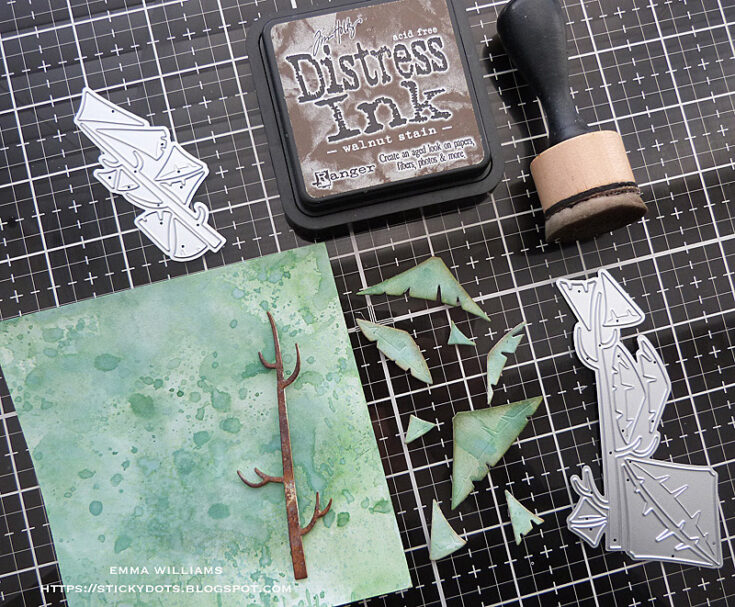
To create the log that Harrison sits on, I used the branch from the Sizzix Arthur Colorize Die Set by Tim Holtz and cut the pieces from Tim Holtz Woodgrain Watercolor Card. There are two pieces to this die and I cut each individual piece three times before layering and adhering them over the top of one another, to create two branches resembling the thickness of chipboard.
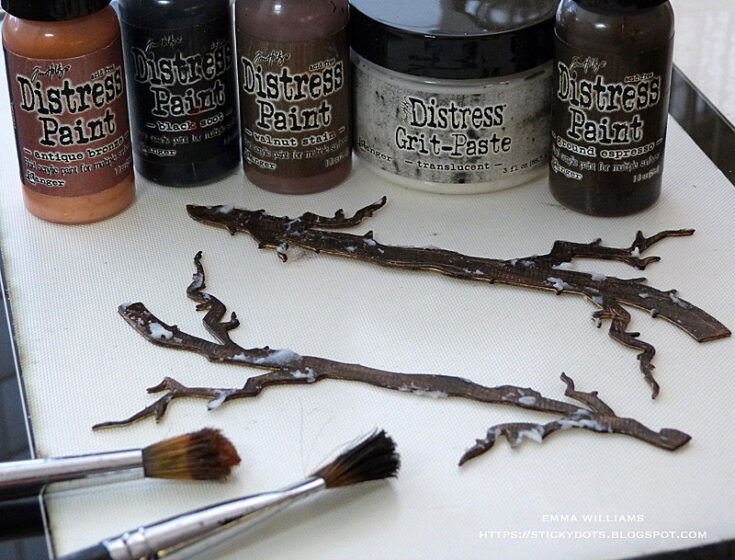
Apply small amounts of Translucent Grit Paste to the branches and allow to dry before painting over the surface of each branch using a combination of Walnut Stain, Black Soot, Antiqued Bronze and Ground Espresso, in this order of color. I started with a base coat of Walnut Stain and once this is dry, I used the dry brushing technique to apply my subsequent paint layers over the top. Dip a dry brush into each paint, remove the majority of the paint onto a paper towel and then gently brush over the surface of the branch, heat dry the paint layer and then add the next color of paint.
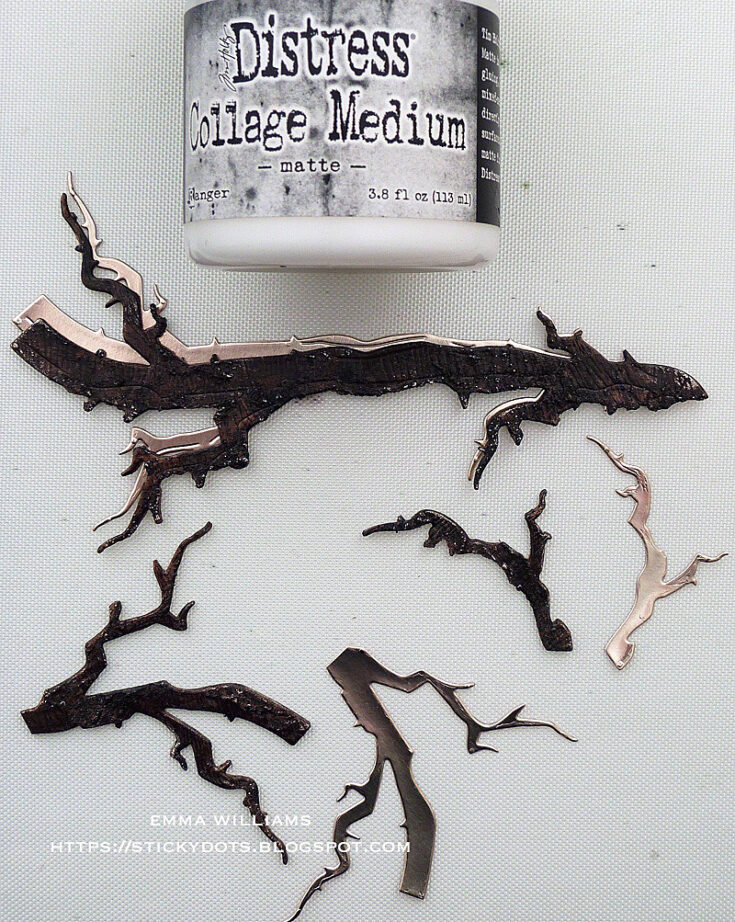
Die cut gold metallic kraft stash using the branch die to create the gold shadow that sits underneath the painted branch. Adhering the gold layer to the back of the branch with Matte Collage Medium.
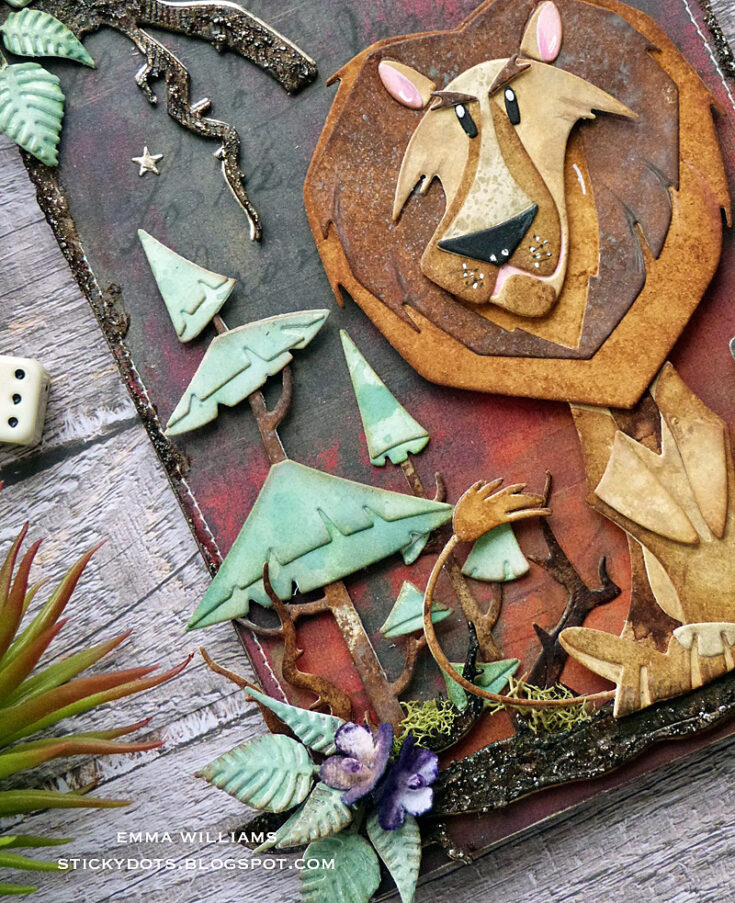
To create the trees on the right, I used two of the trees from the Funky Trees Thinlits Die Set.
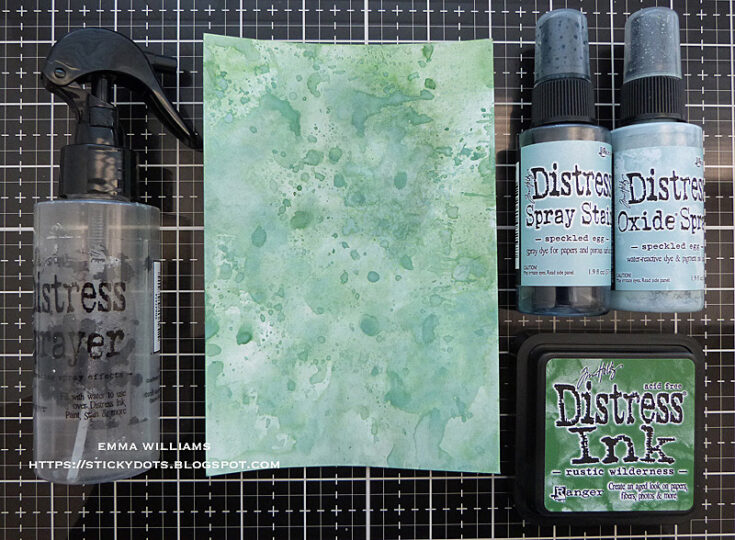
Cut the tree trunks from some of the leftover dark brown card that was inked for Harrison and for the tree tops, I colored Distress Watercolor card using the same technique as in step 6 but this time with Speckled Egg Spray Stain and Speckled Egg Oxide Spray before smooshing some Rustic Wilderness onto my glass mat, spritzing with a little water and dipping the speckled egg card into the green pools of ink to add some more depth.
Assemble the trees to create a small, and large tree.
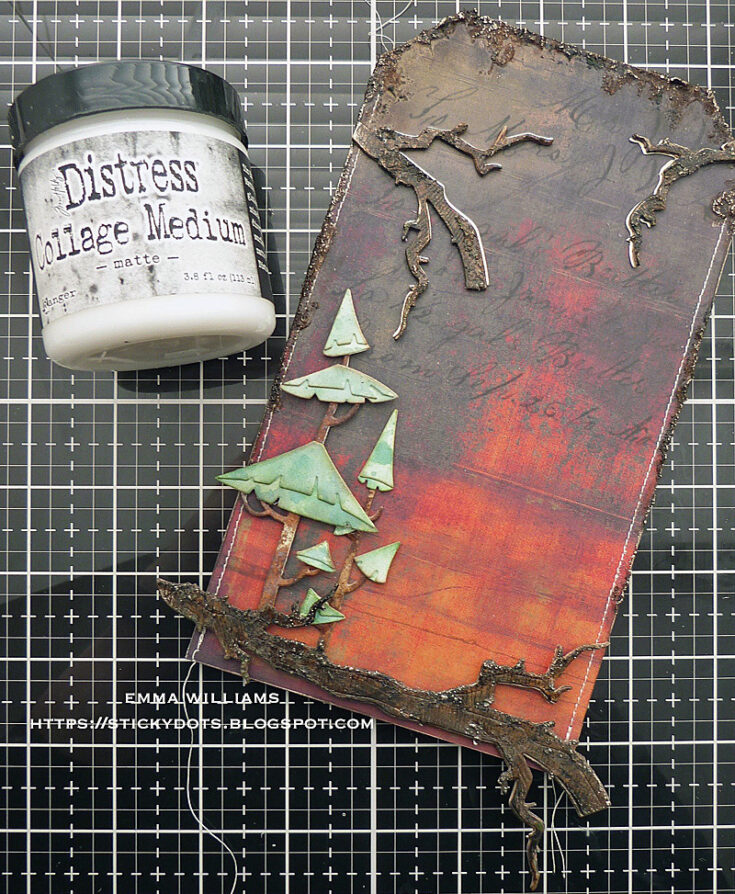
Adhere the large branch across the bottom of the tag, leaving some to slightly overhang the bottom edge. Cut the smaller branch into two pieces before attaching these to the top left and right hand sides. Attach the Funky Trees on the right hand side.
Sit Harrison on right hand side of the log, using foam on the back of him to add dimension.
Using the leftover inked card from the tree tops, I cut each set of leaves from Distress Watercolor card using one of the dies in the Funky Florals 3 Thinlits die set. If you don’t have this die set, any die cut leaves will work.

Once all my pieces were cut, I assembled the foliage before inking the edges with Walnut Stain Distress Ink and a blending tool. Attach and arrange all of the foliage onto the branches, top and bottom.
In the centers the branches attached at the top, I used some Tim Holtz Bauble Adornments leftover from my Christmas stash.
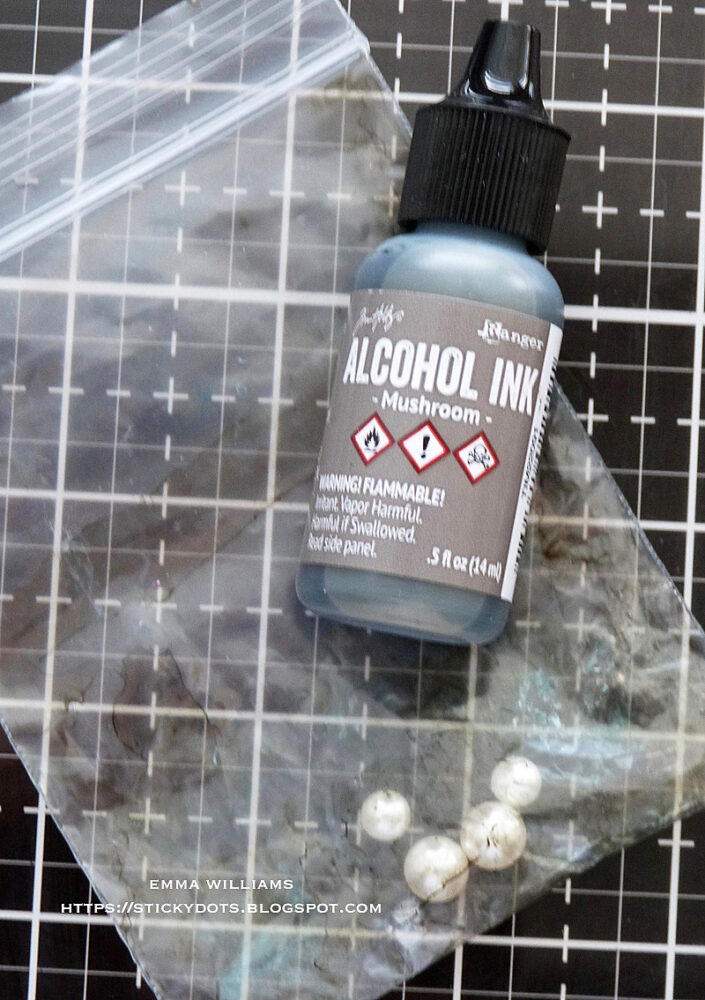
.I inked four various sized baubles with Mushroom Alcohol Ink by placing them in a small sealed bag, adding a drop of the ink and shaking them around to coat them in the ink before adhering them to the centers of my leaves using Matte Collage Medium.
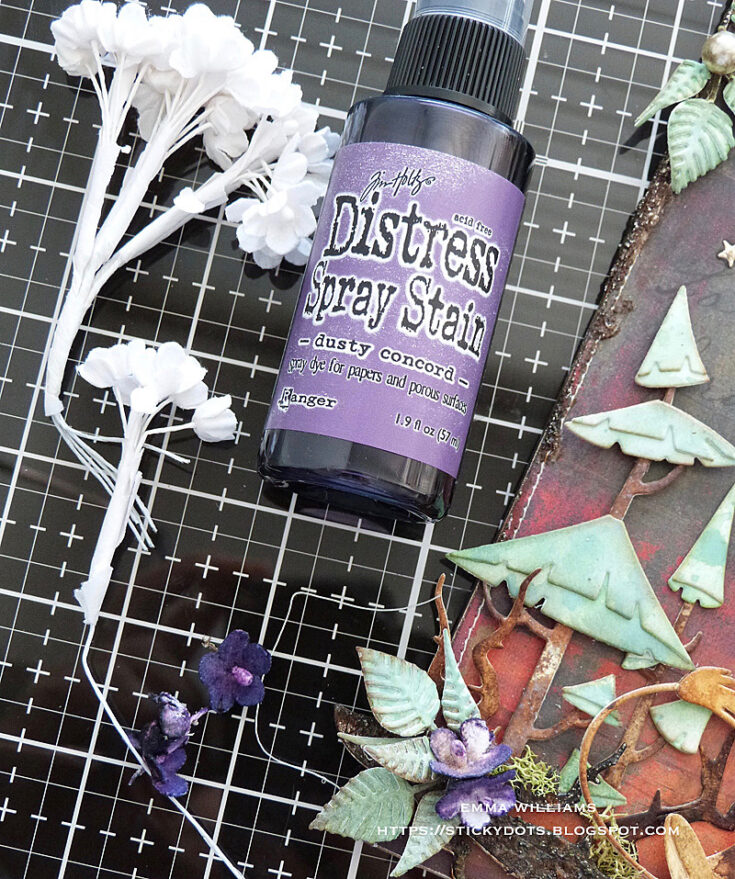
On the bottom branch I attached some flowers cut from the stems of Bouquet Findings. Each flower is colored with a spritz of Dusty Concord Distress Spray Stain and once the flowers were dry, I arranged them and attached them to my branch.
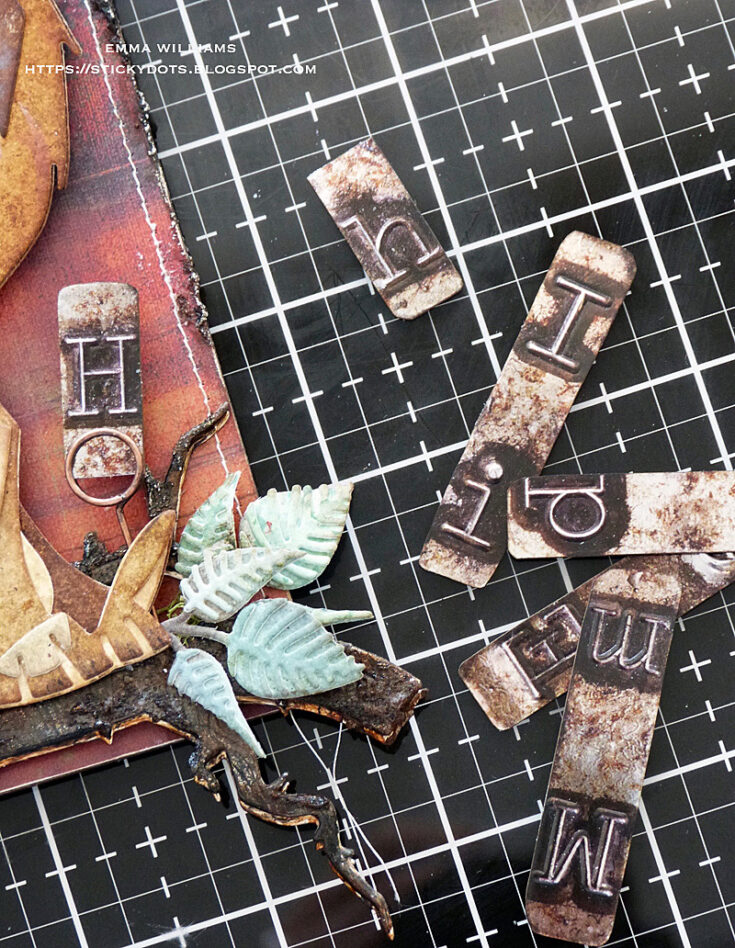
For the letter ‘H’, for Harrison, I sliced a Type Chip in half, and secured the capital letter ‘H’ onto a Memo Pin. Attach the memo pin to the right hand side of Harrison.
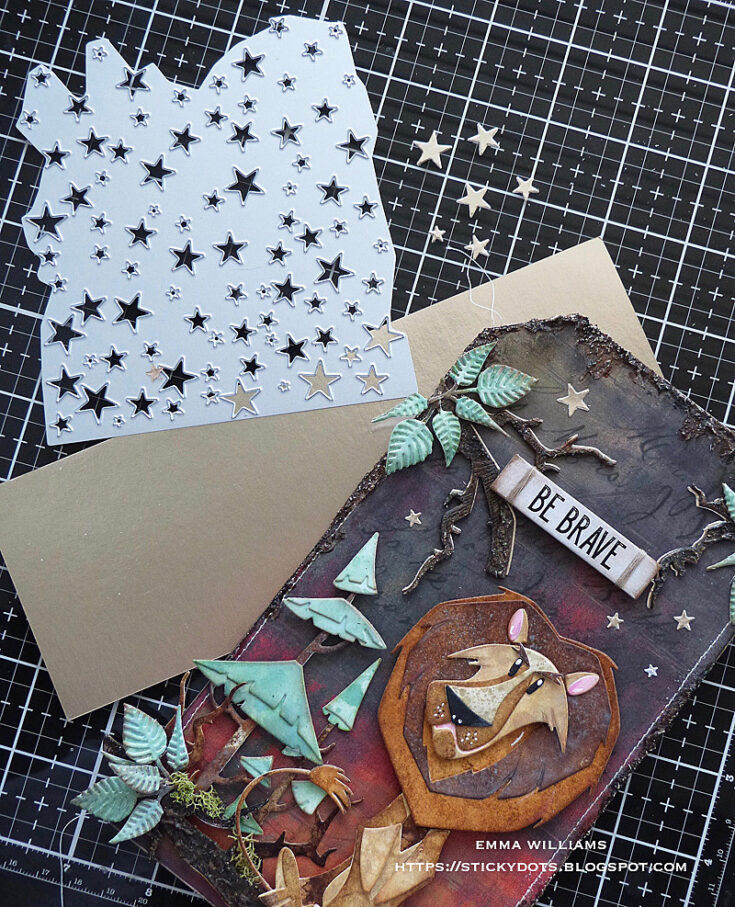
I attached some die cut stars to the background, cut from more of the gold metallic kraft card, using the Falling Stars Thinlits die and placed these around Harrison.
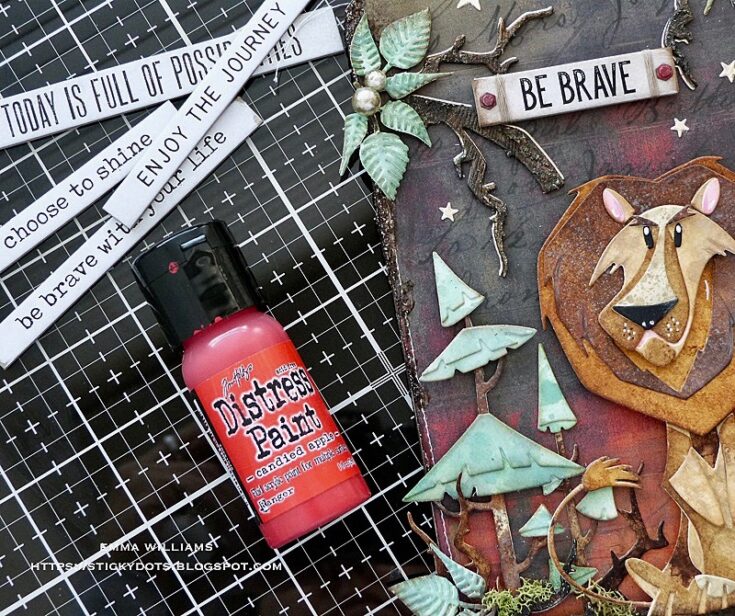
After applying some Translucent Grit Paste around the edge of a Theories Quote Chip, ‘Be Brave’, I colored the paste with my Walnut Stain Distress Crayon, and lightly blended the crayon over the surface of the chip.
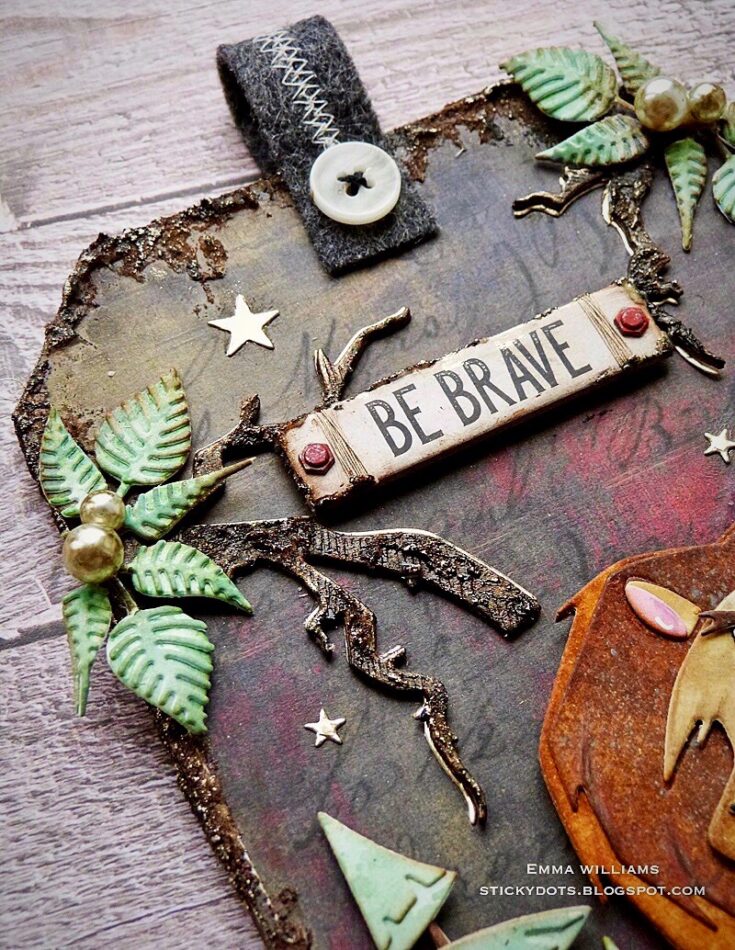
I then wrapped cotton thread around each side of the chip and attached the chip to my tag using foam pads. On either side of the chip, I placed a Hardware Head painted red with Candied Apple Distress Paint.

Finally, I added a loop at the top of my tag, so that this piece can be hung and for this I used a Stitched Scrap which I doubled over to form a loop and attached each end to my tag with strong adhesive. To complete it, I placed a button onto the loop.
Thank you so much for stopping by today ~ Harrison was so much fun to work on and I think this would be a perfect piece to hang in a child’s bedroom or you could use some of the tricks and techniques to create cards, etc but whatever you choose to make, I hope that I’ve inspired you with my project. See you again soon…Emma x
SUPPLIES:
|


Thanks so much for stopping by, and thanks to Emma for being our guest!


