Not a Card with Nina-Marie: Simple Birthday Decor Projects!
Hello, crafters! It’s Nina-Marie Trapani here, and I have a new installment of our Not a Card series to share with you!
Are you ready to sweeten up your next birthday party? I’m sharing 5 different party ideas that you can make in very little time!
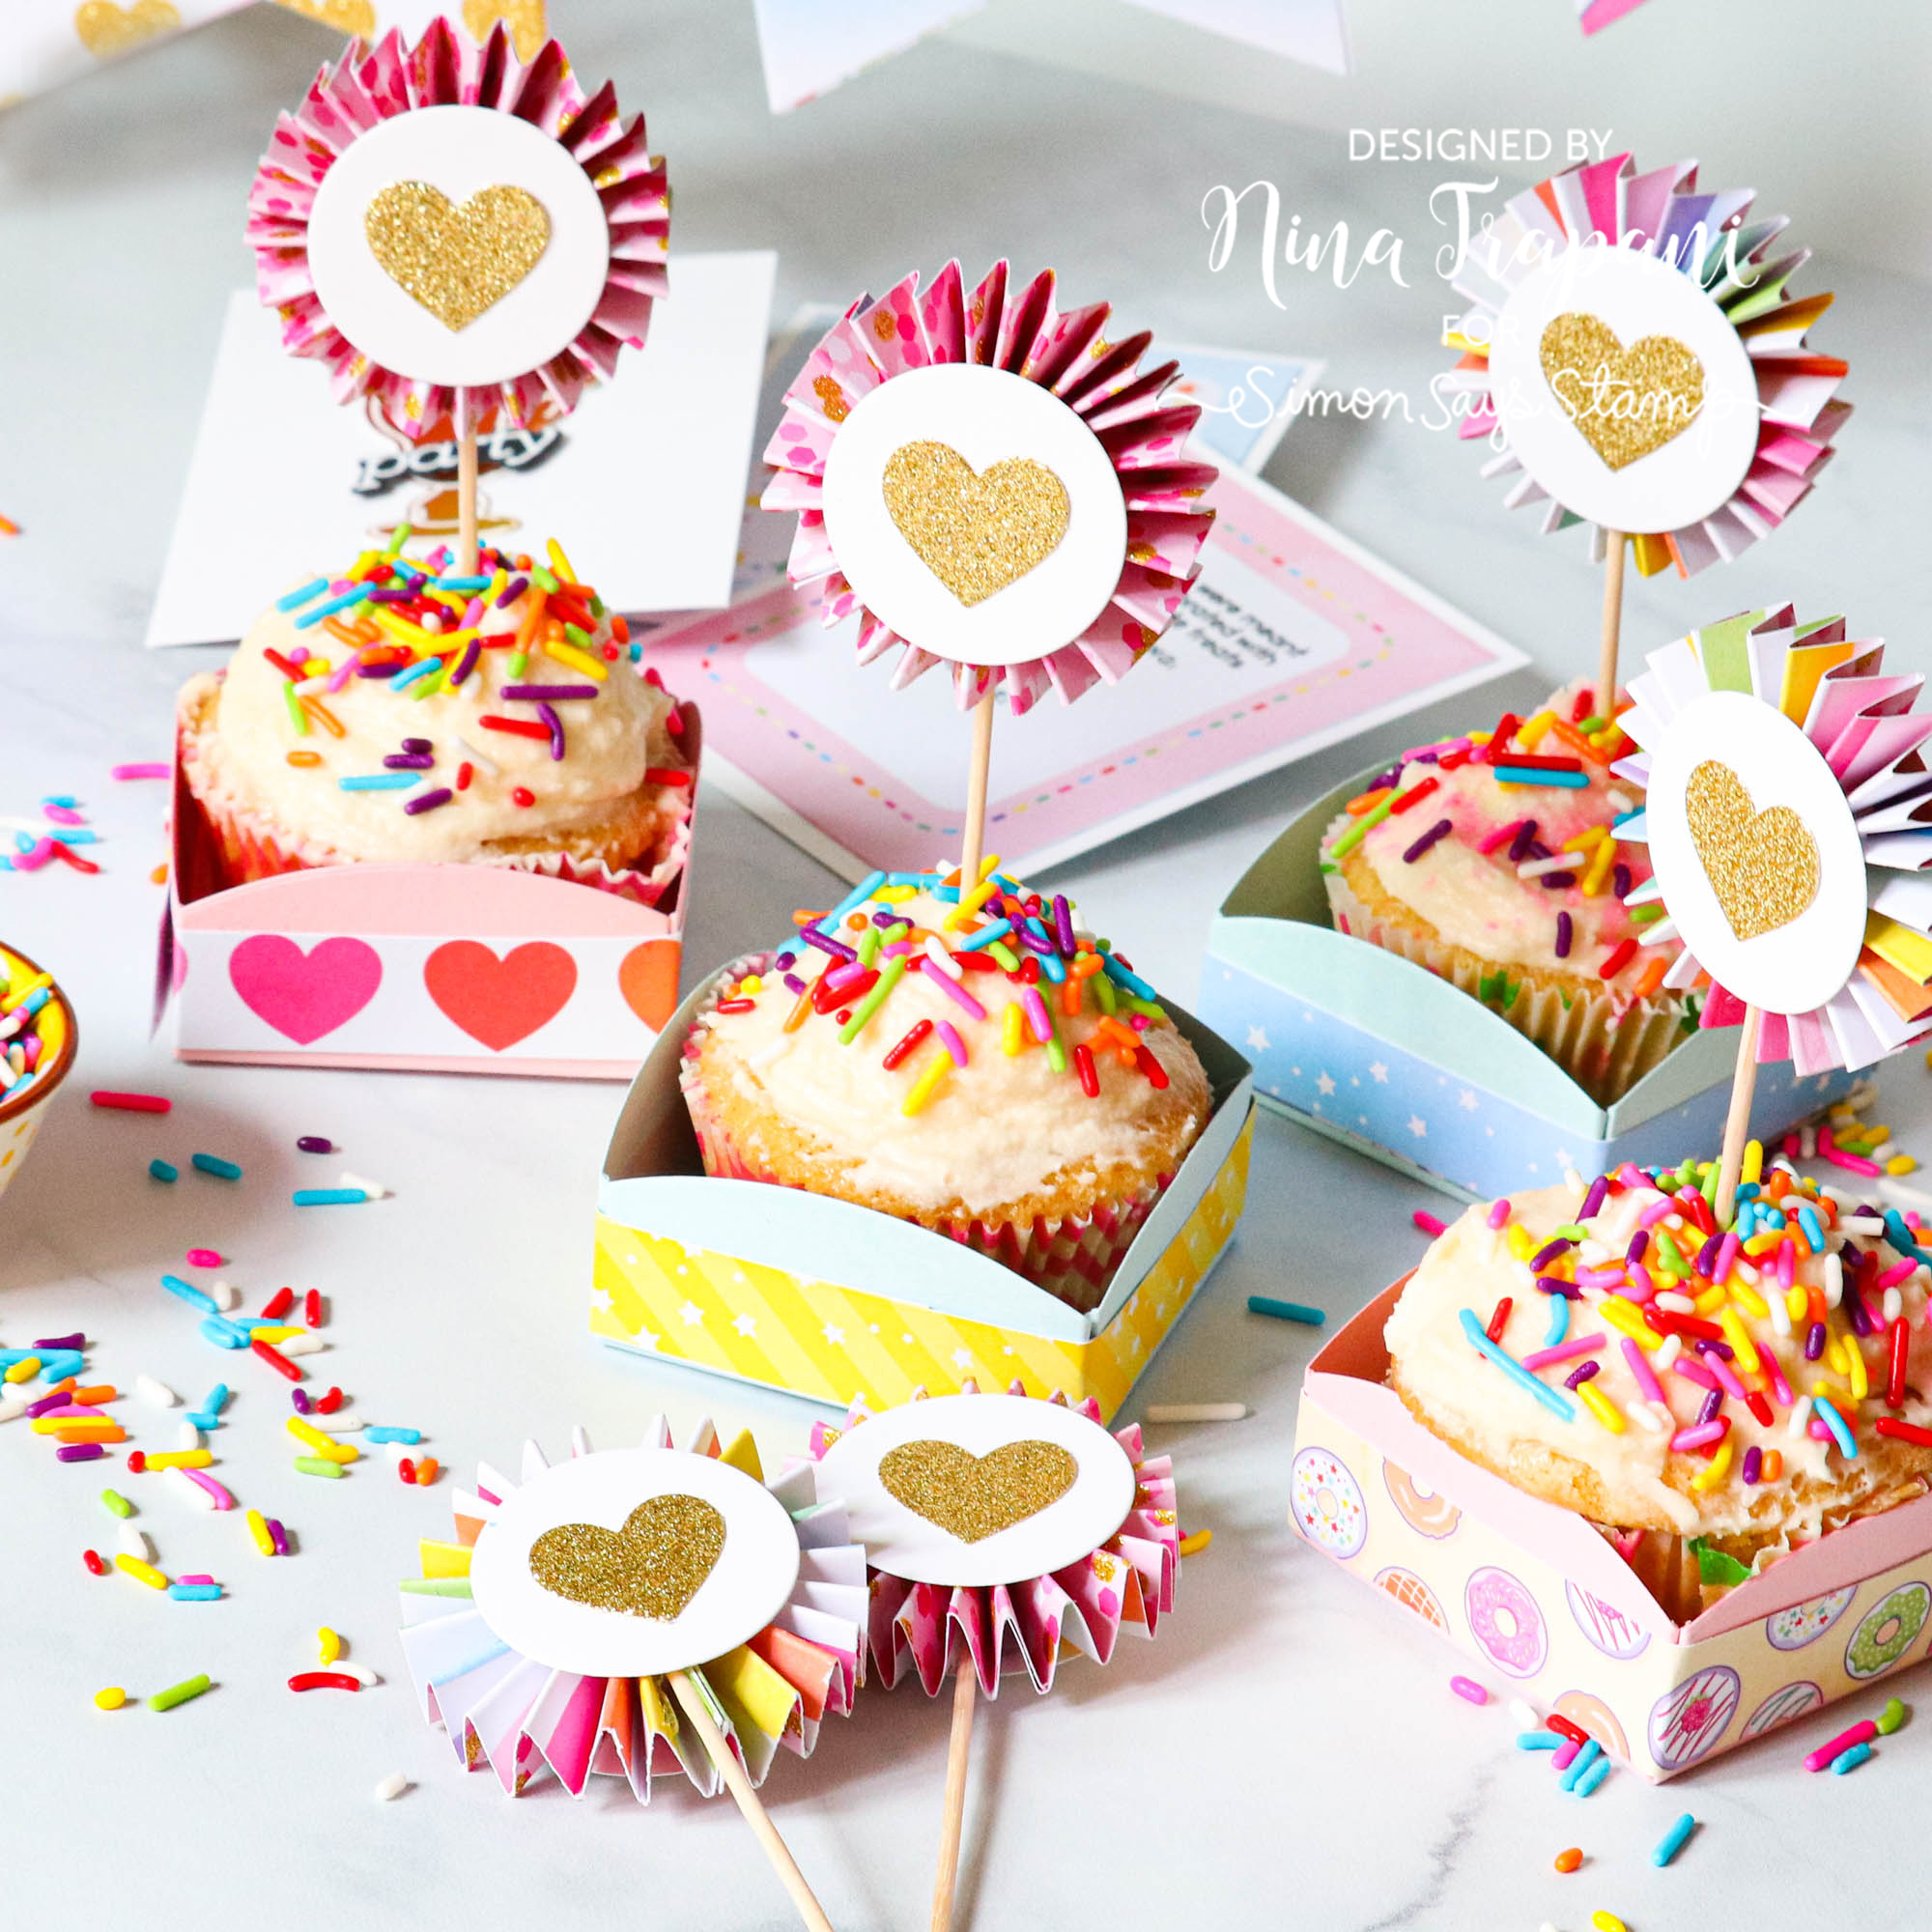
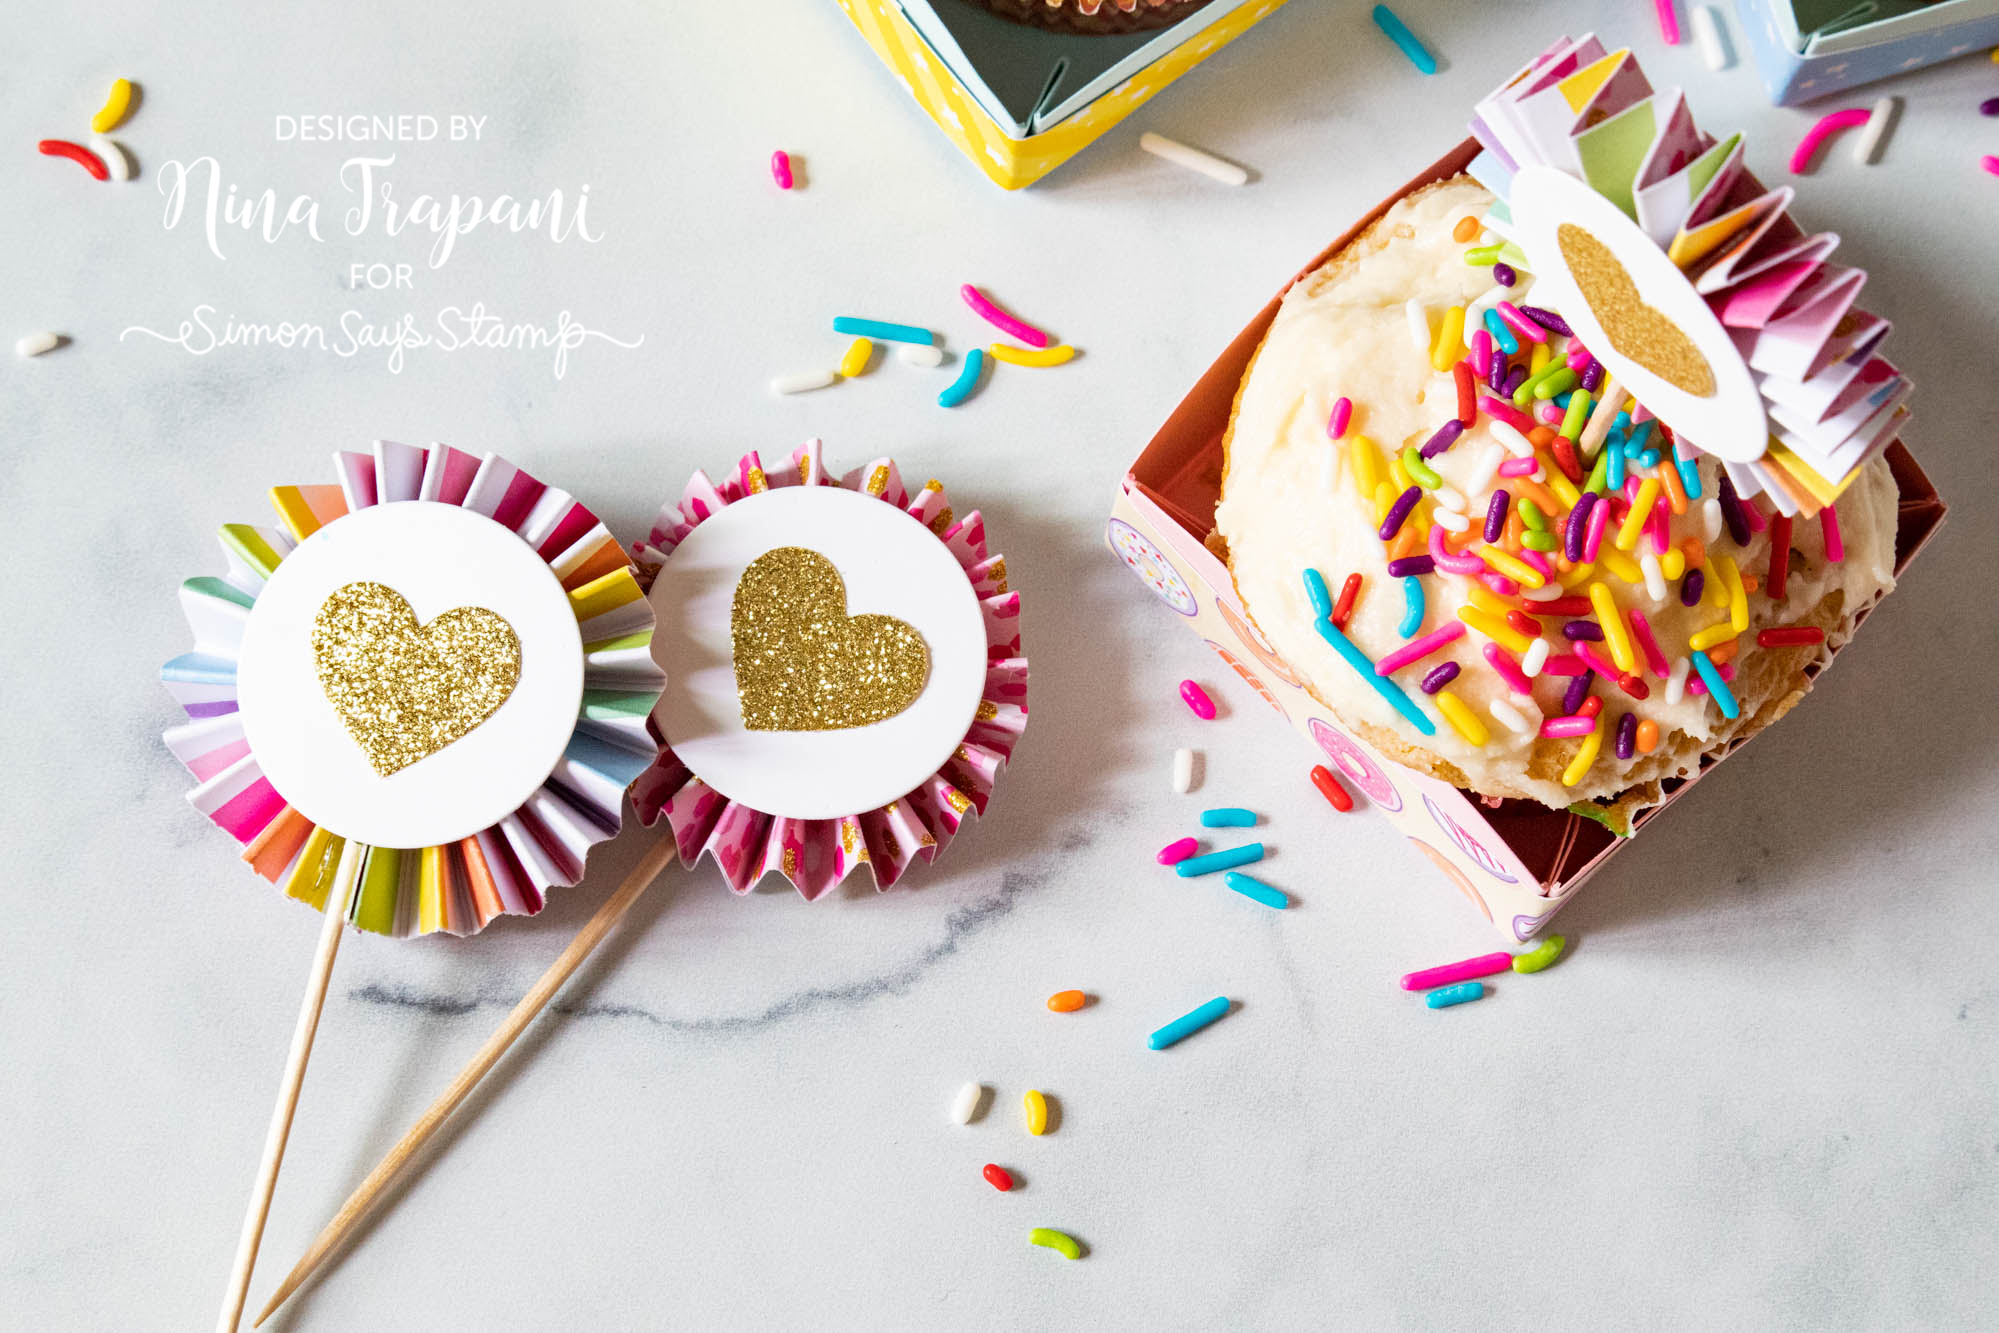
In the video for today’s project, I will show you how to make simple cupcake boxes and toppers. These colorful embellishments make your cupcakes look even sweeter!
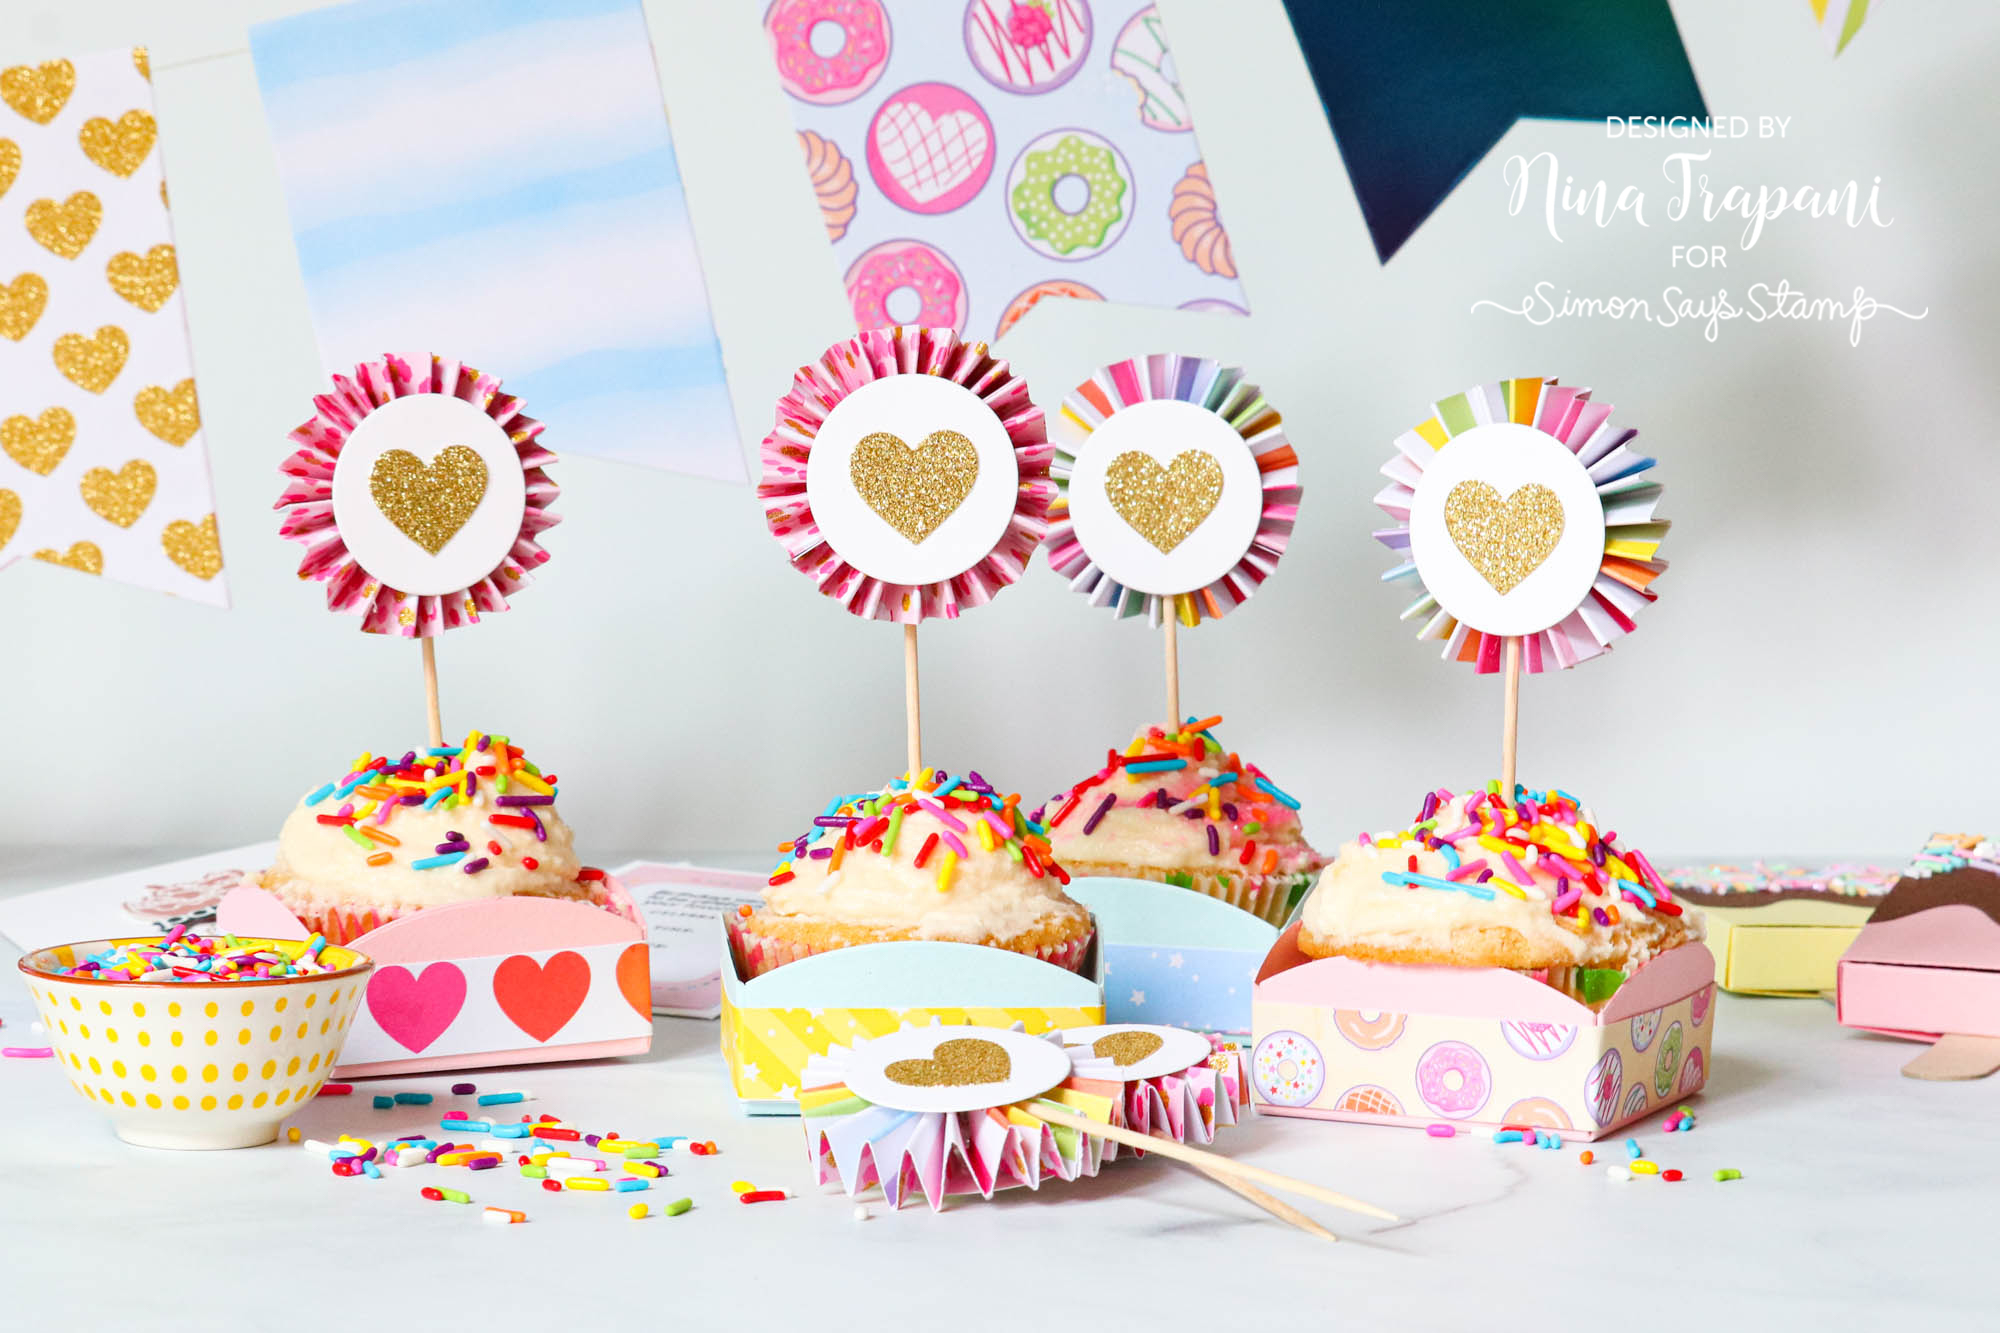
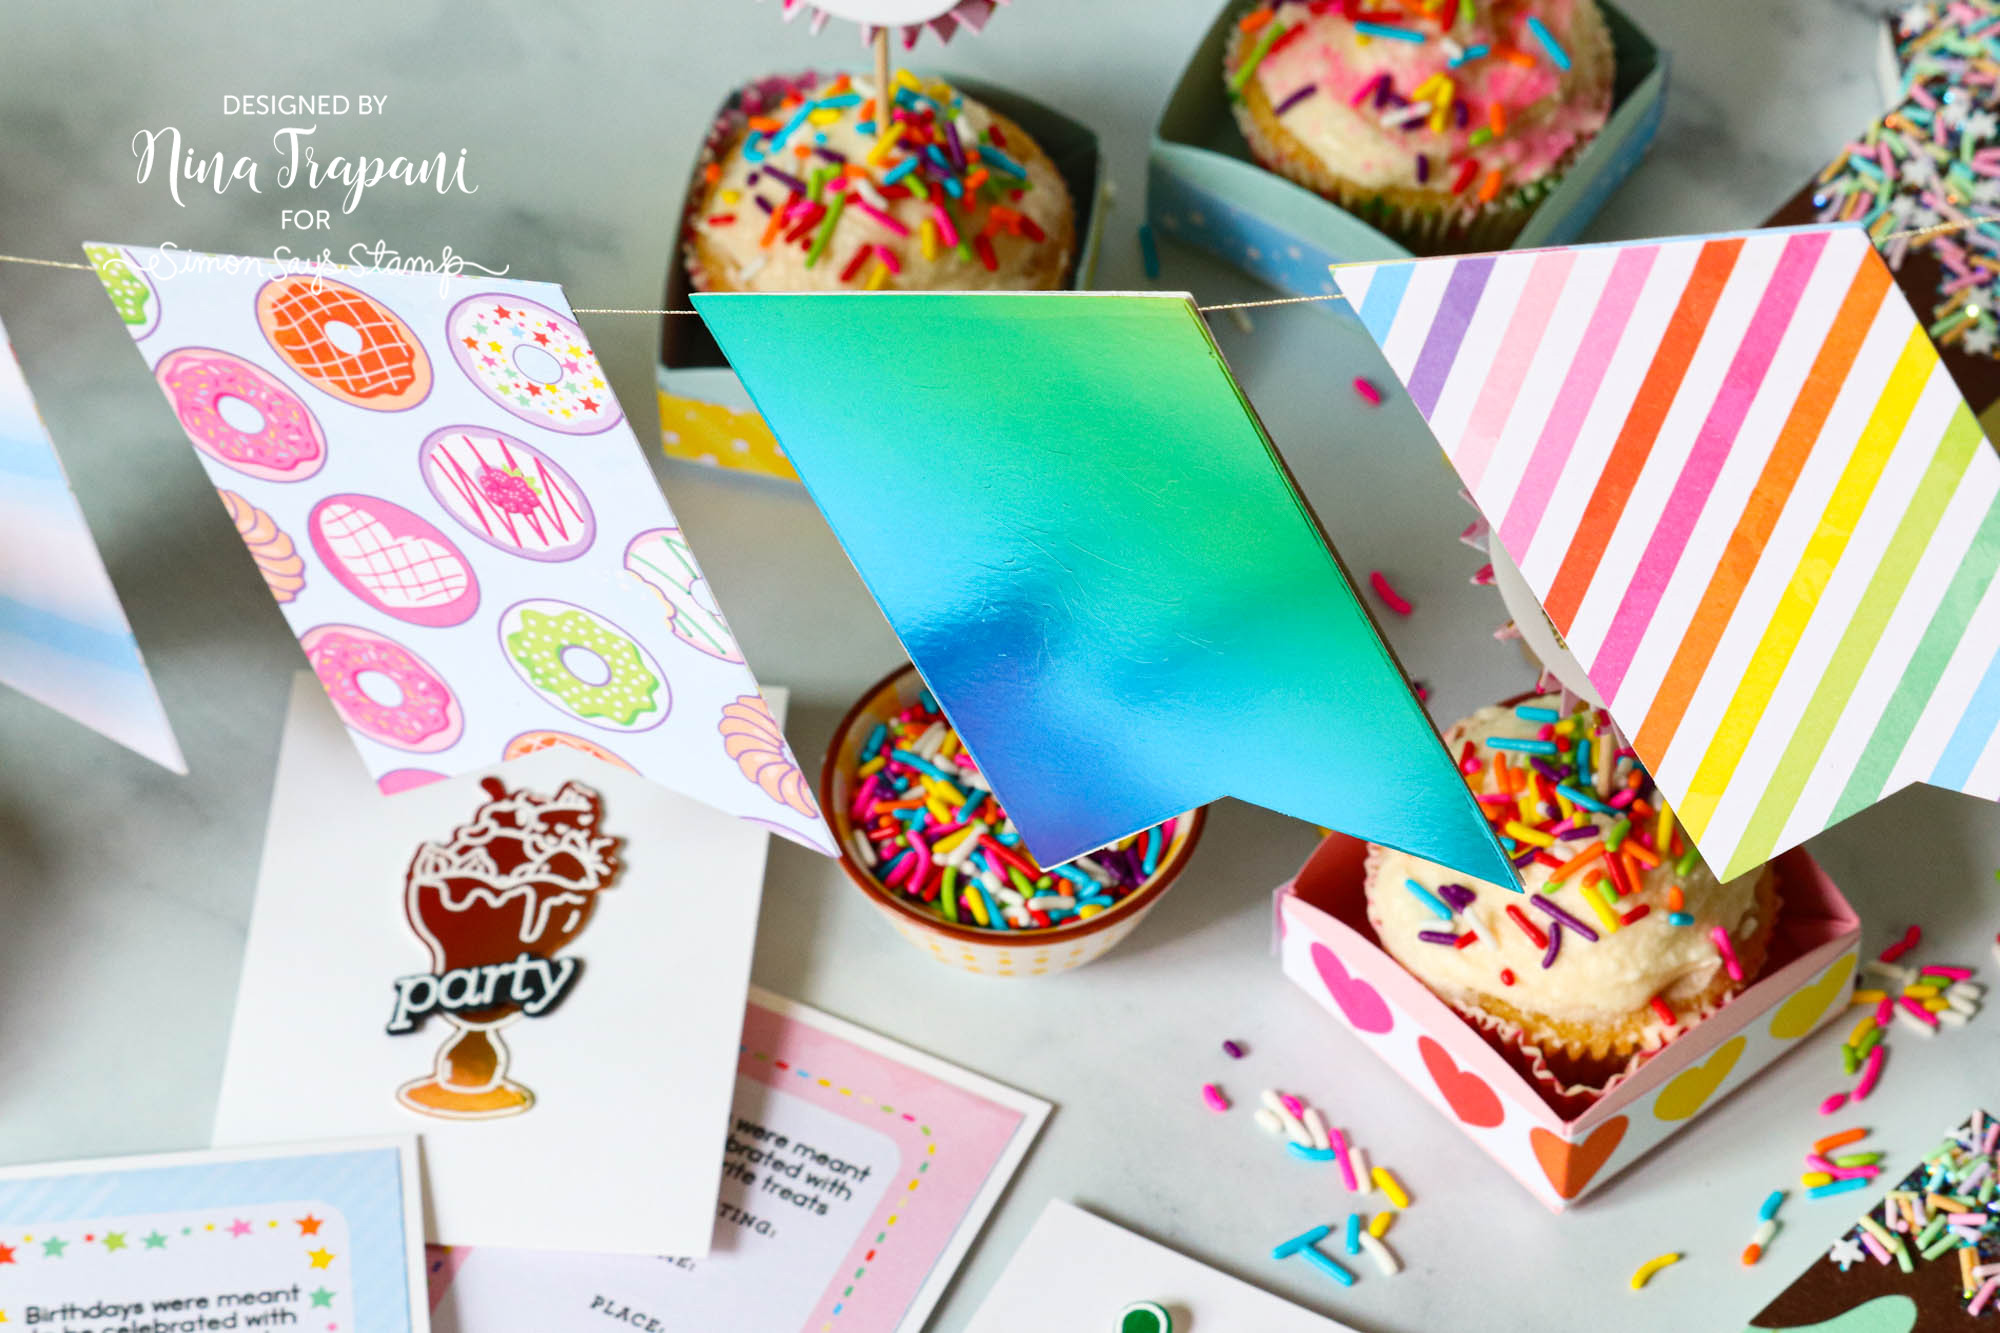
I used colored cardstock, patterned paper from the DCWV Unicorns and Rainbows pack with a simple circle die to make the cupcake boxes. The toppers feature that same patterned paper formed into little rosettes are embellished with a Simon heart die and gold glitter cardstock.
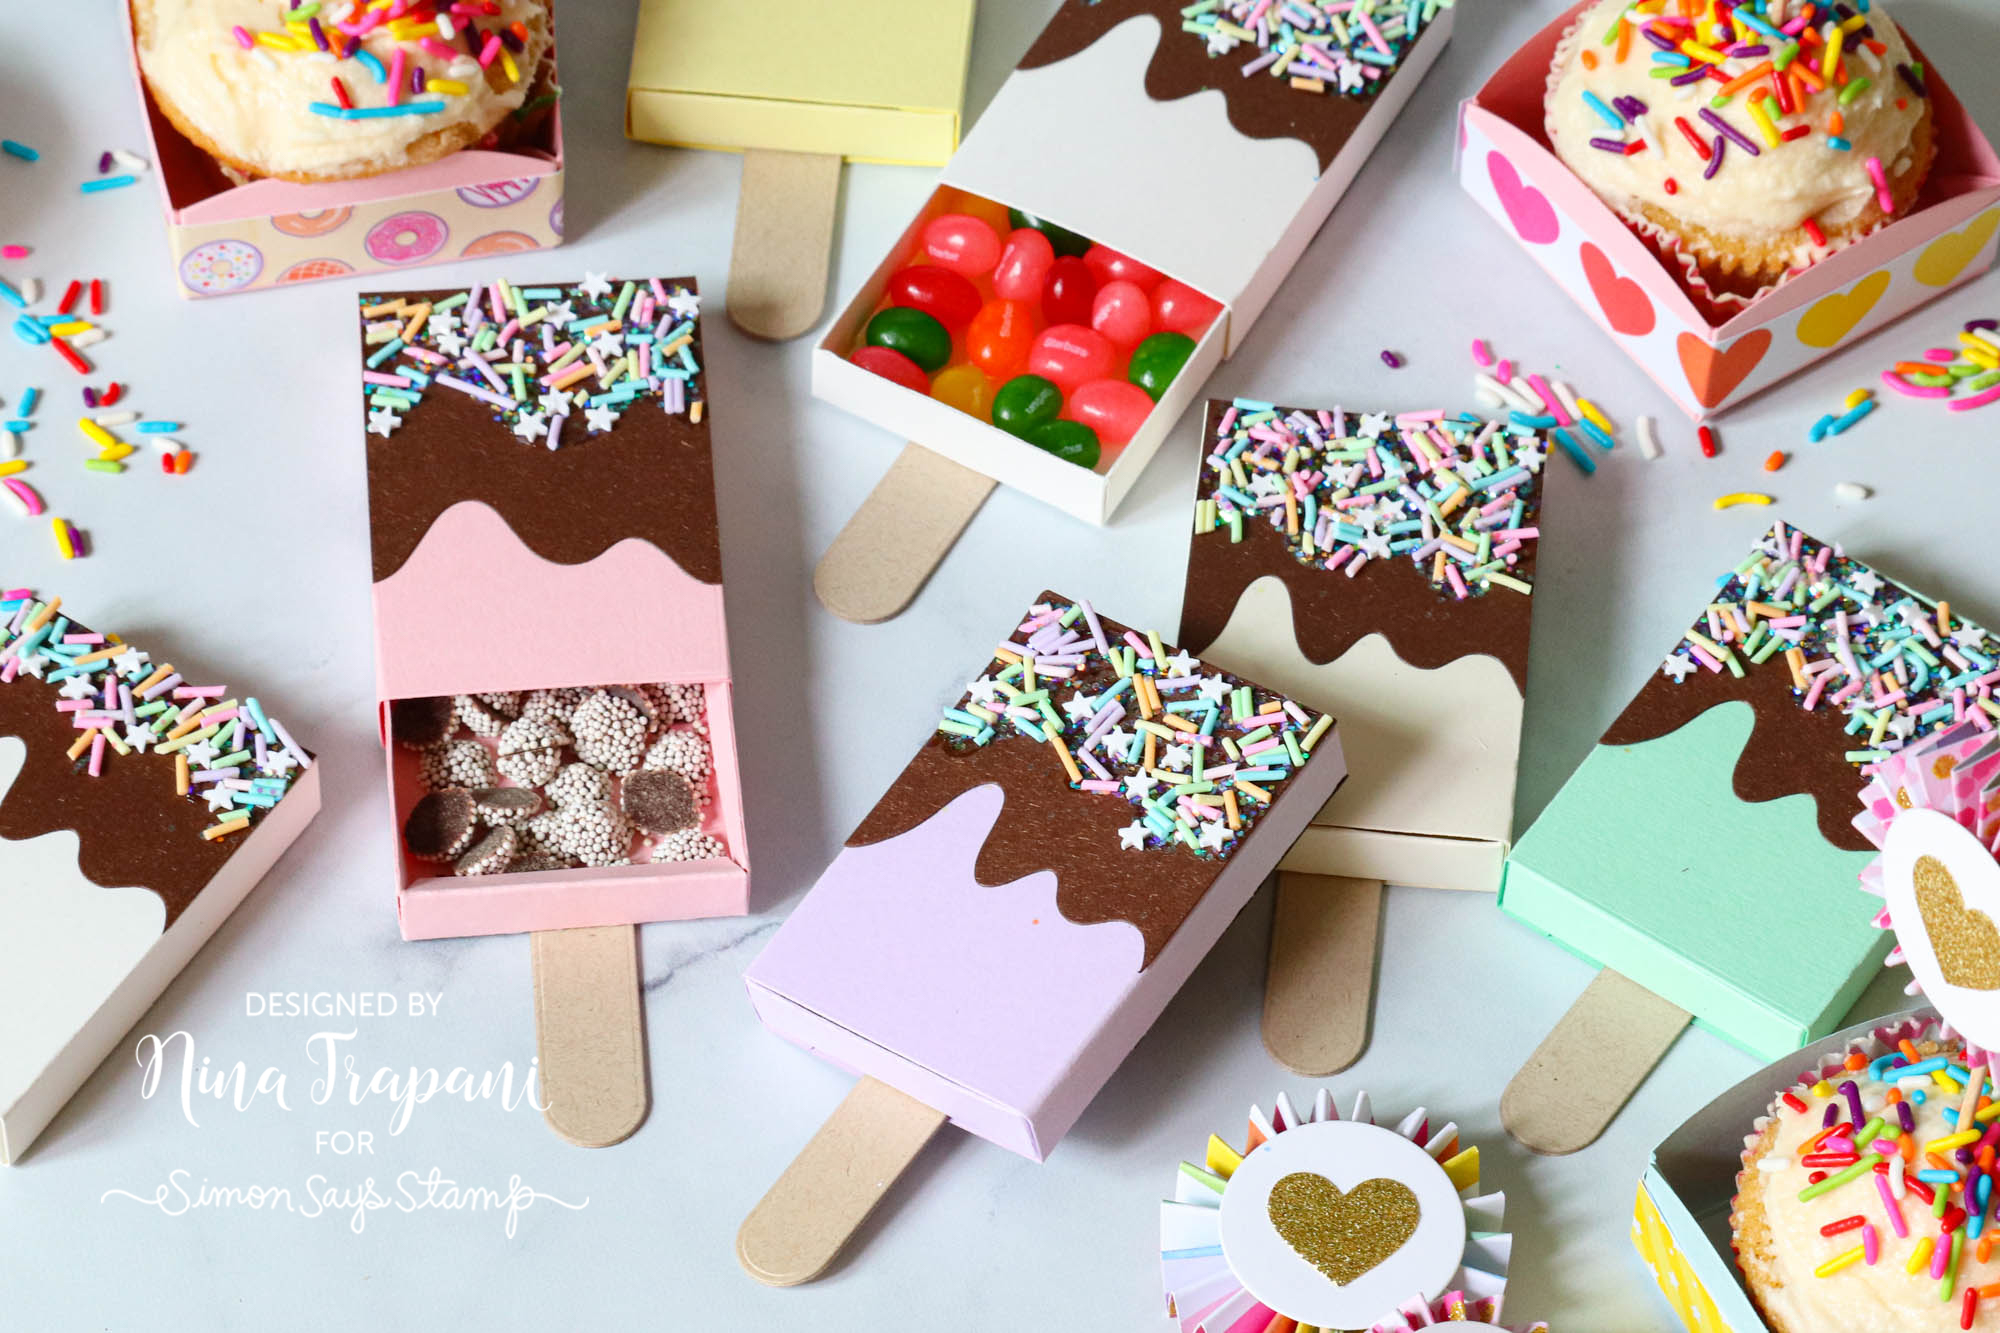
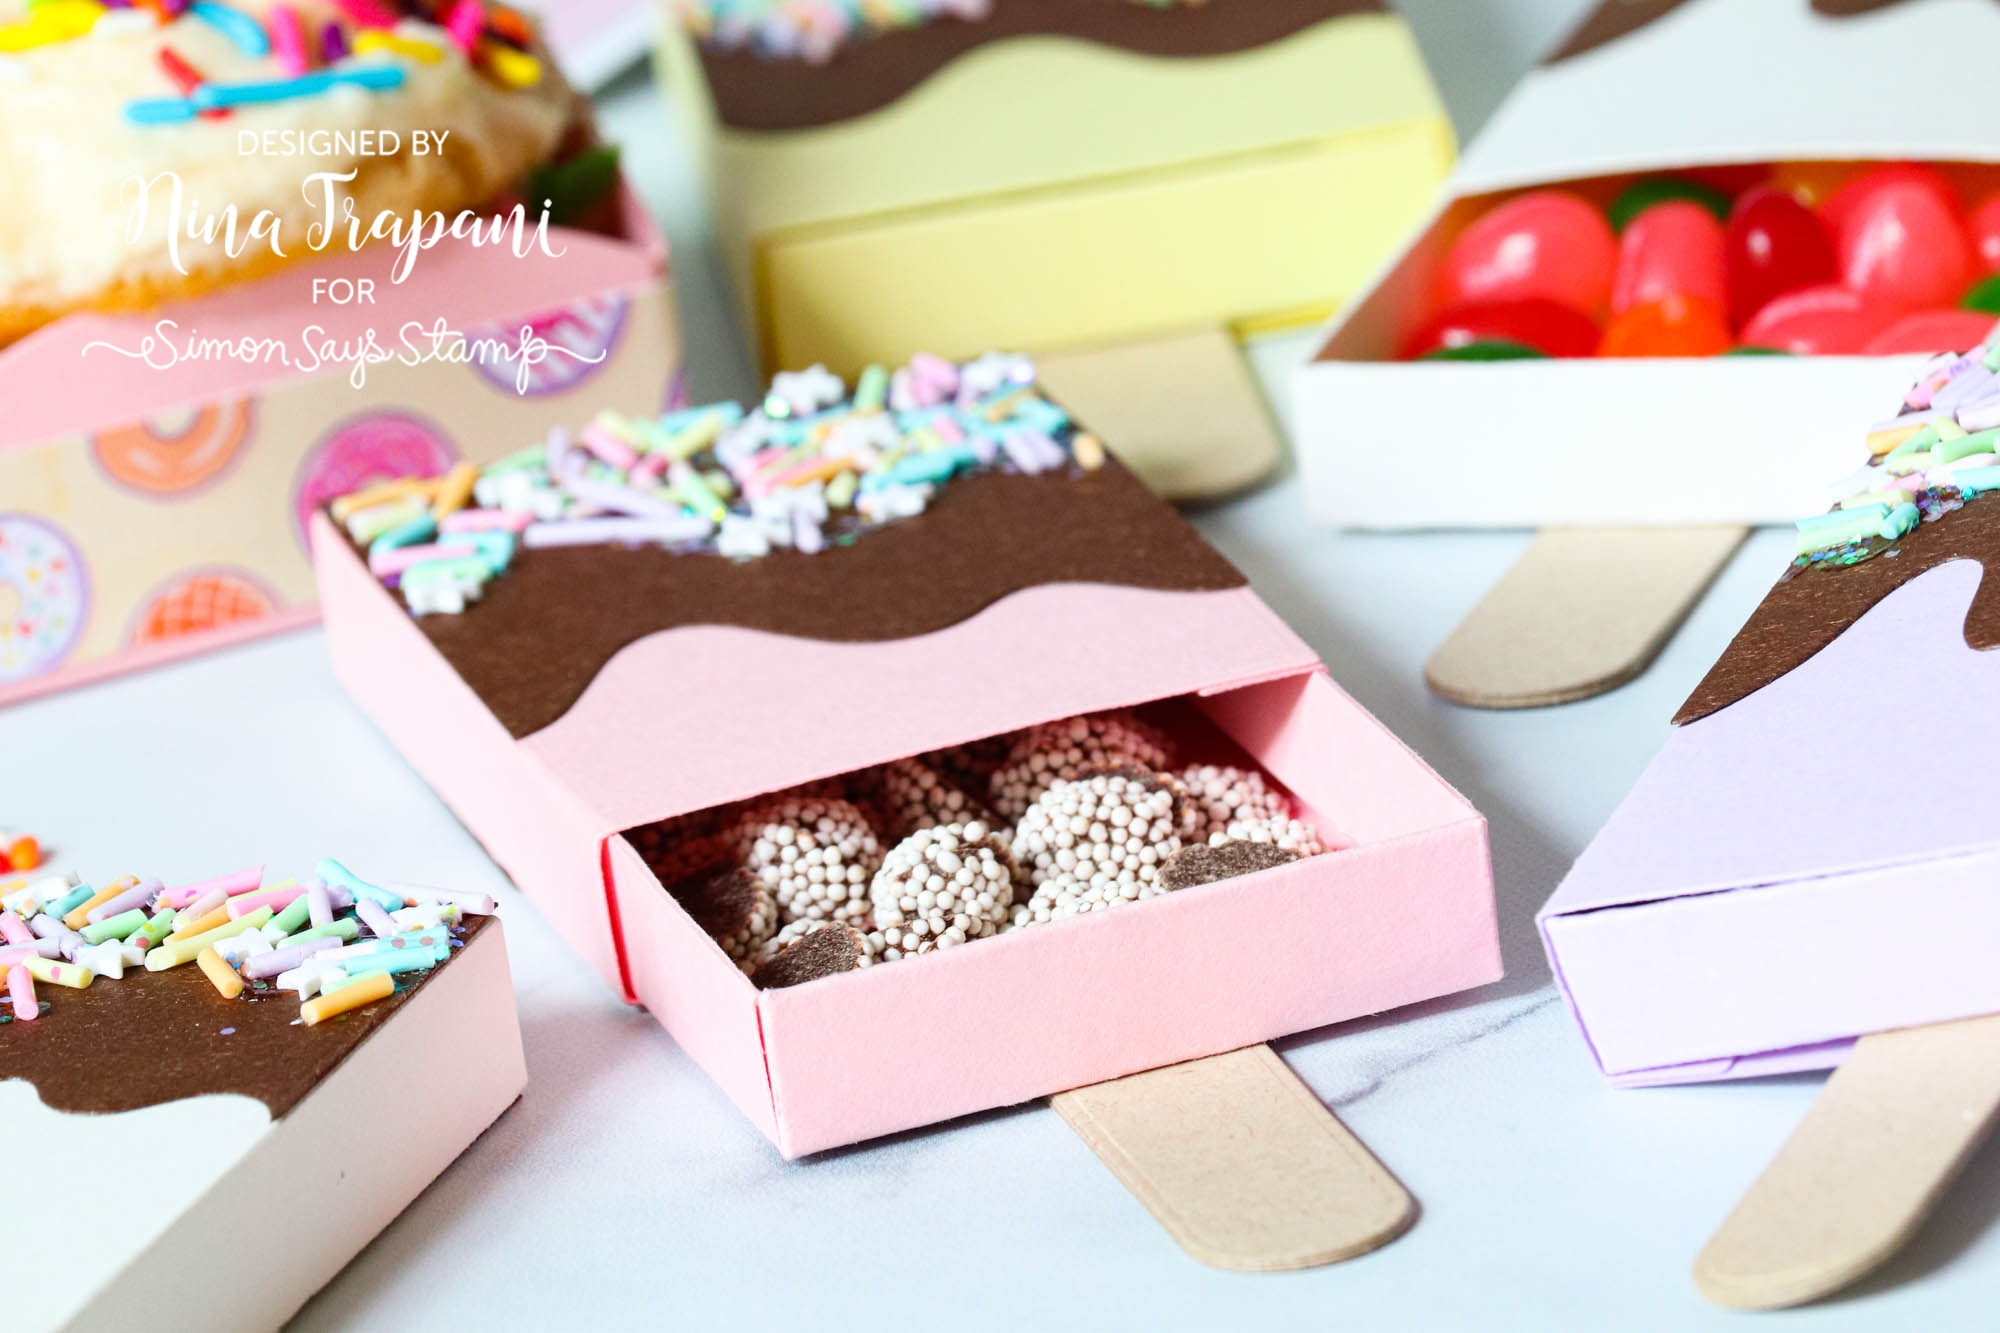
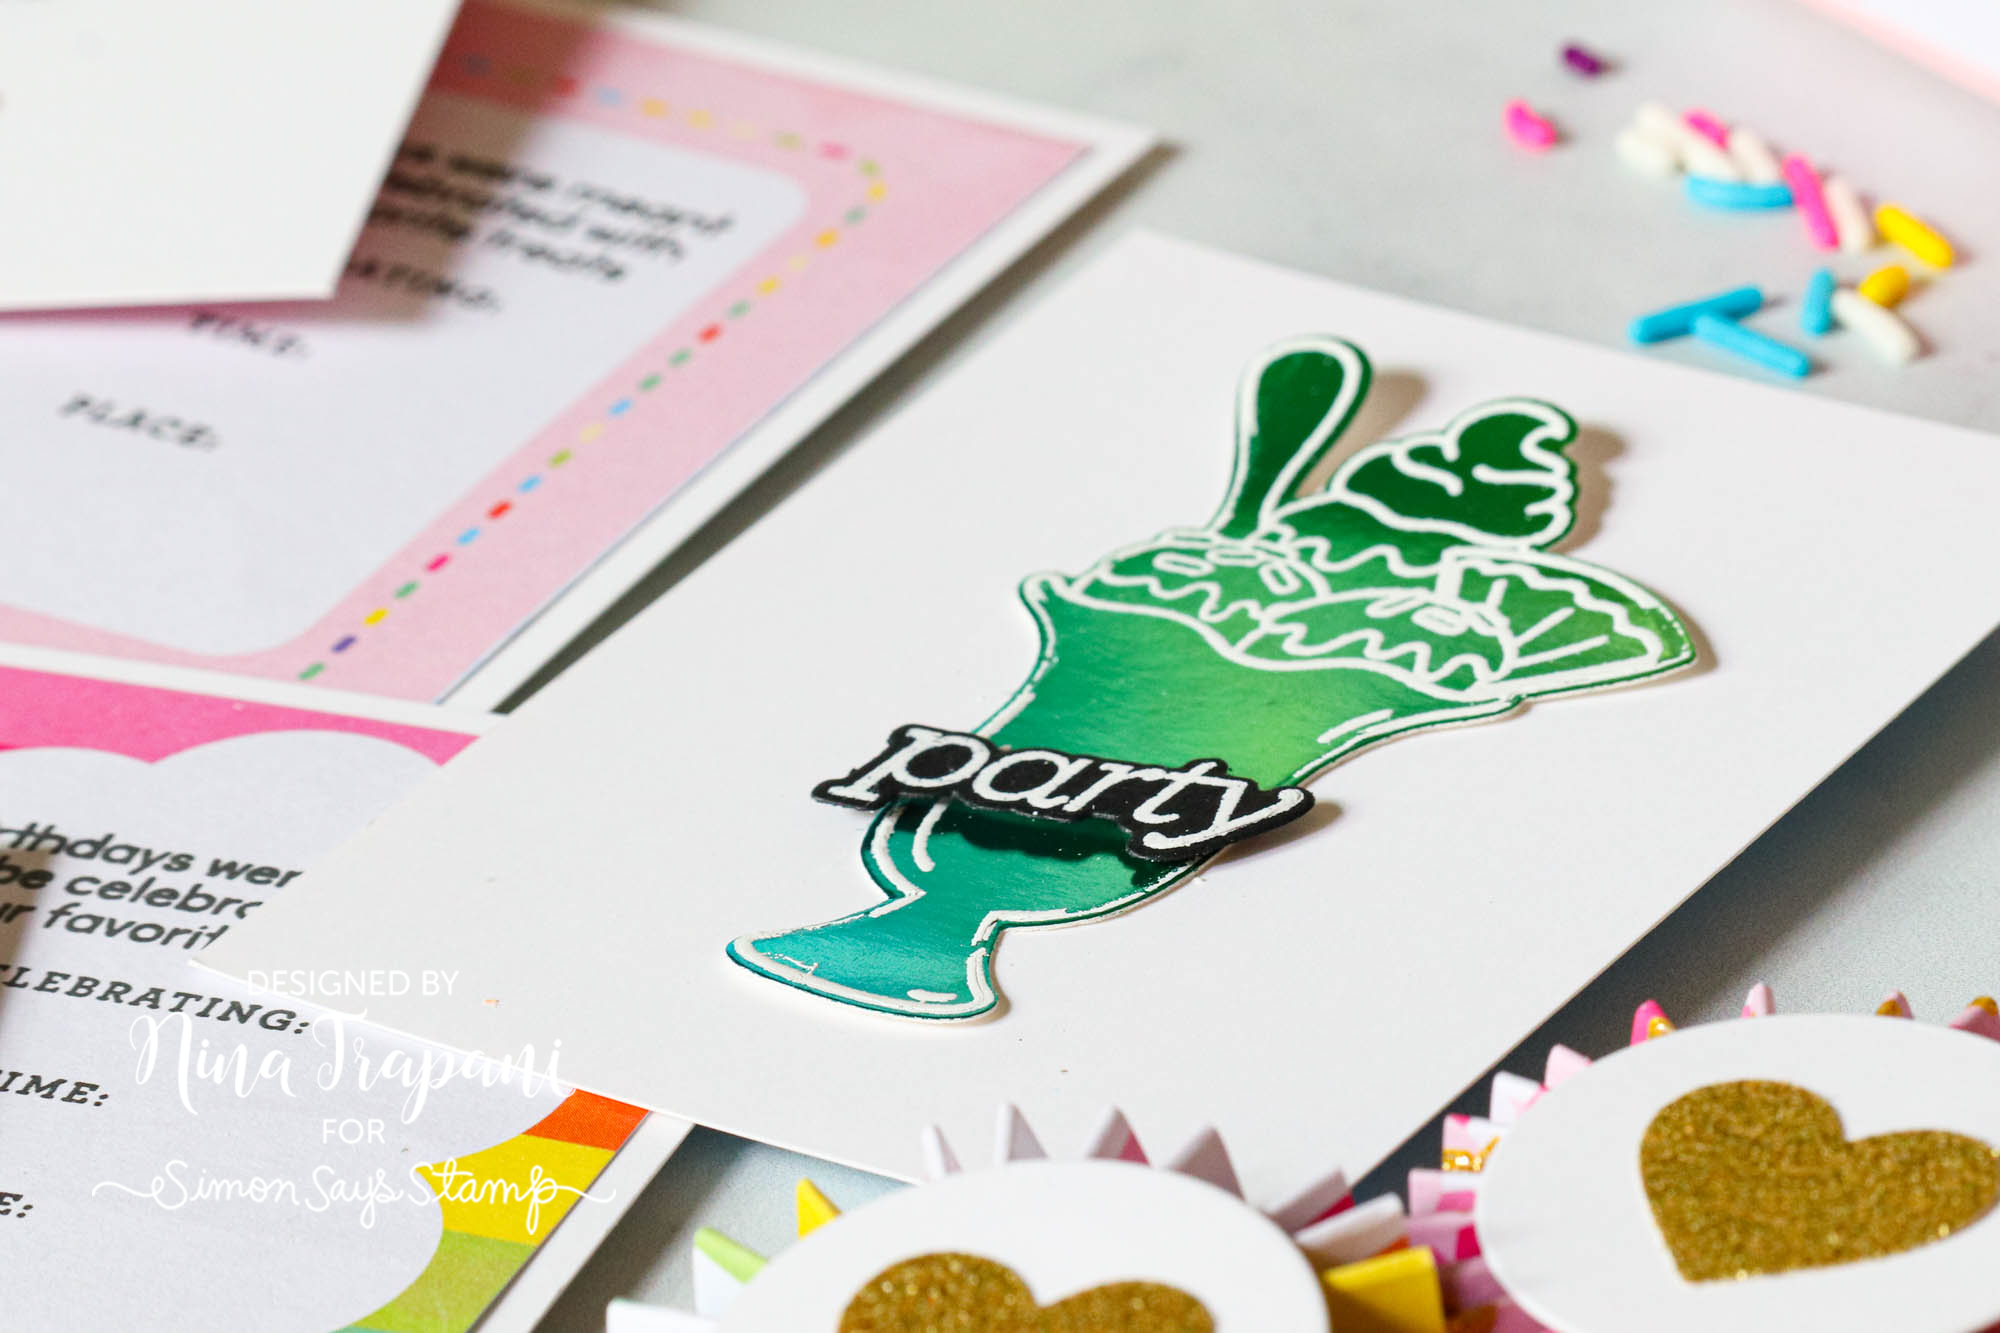
Speaking of sweet, you’re going to LOVE these ice cream-themed party favors! I made them with the Mama Elephant Matchbox Builder die and added that fudge sauce effect by cutting brown cardstock from the Paper Rose Ice Cream Blob die. I made the “popsicle stick” from a simple rounded rectangle die. A few confetti pieces and glitter made the perfect sprinkle effect for these delicious favor boxes!
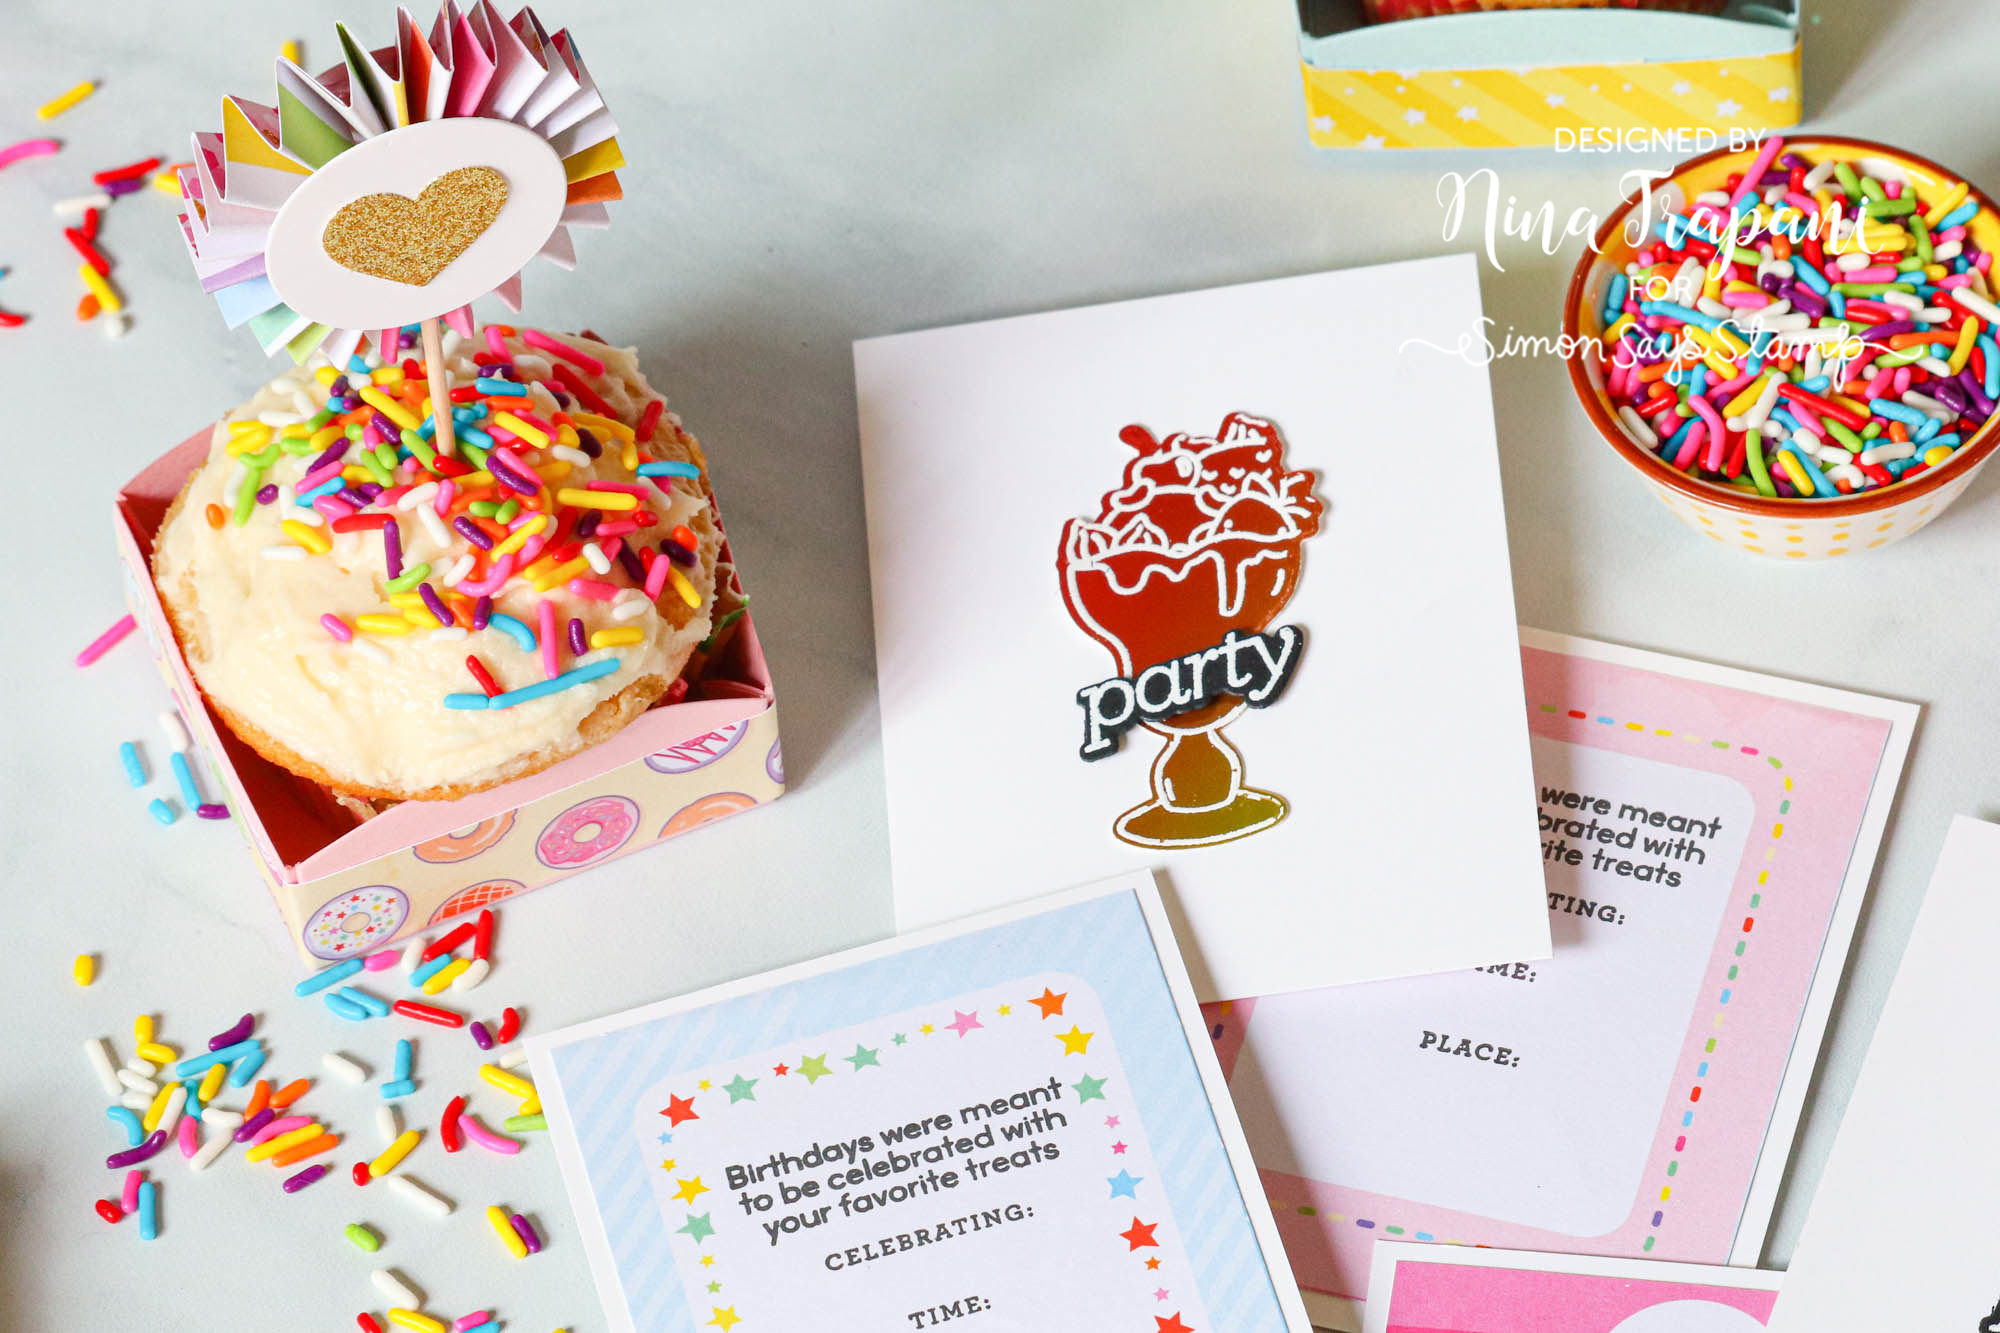
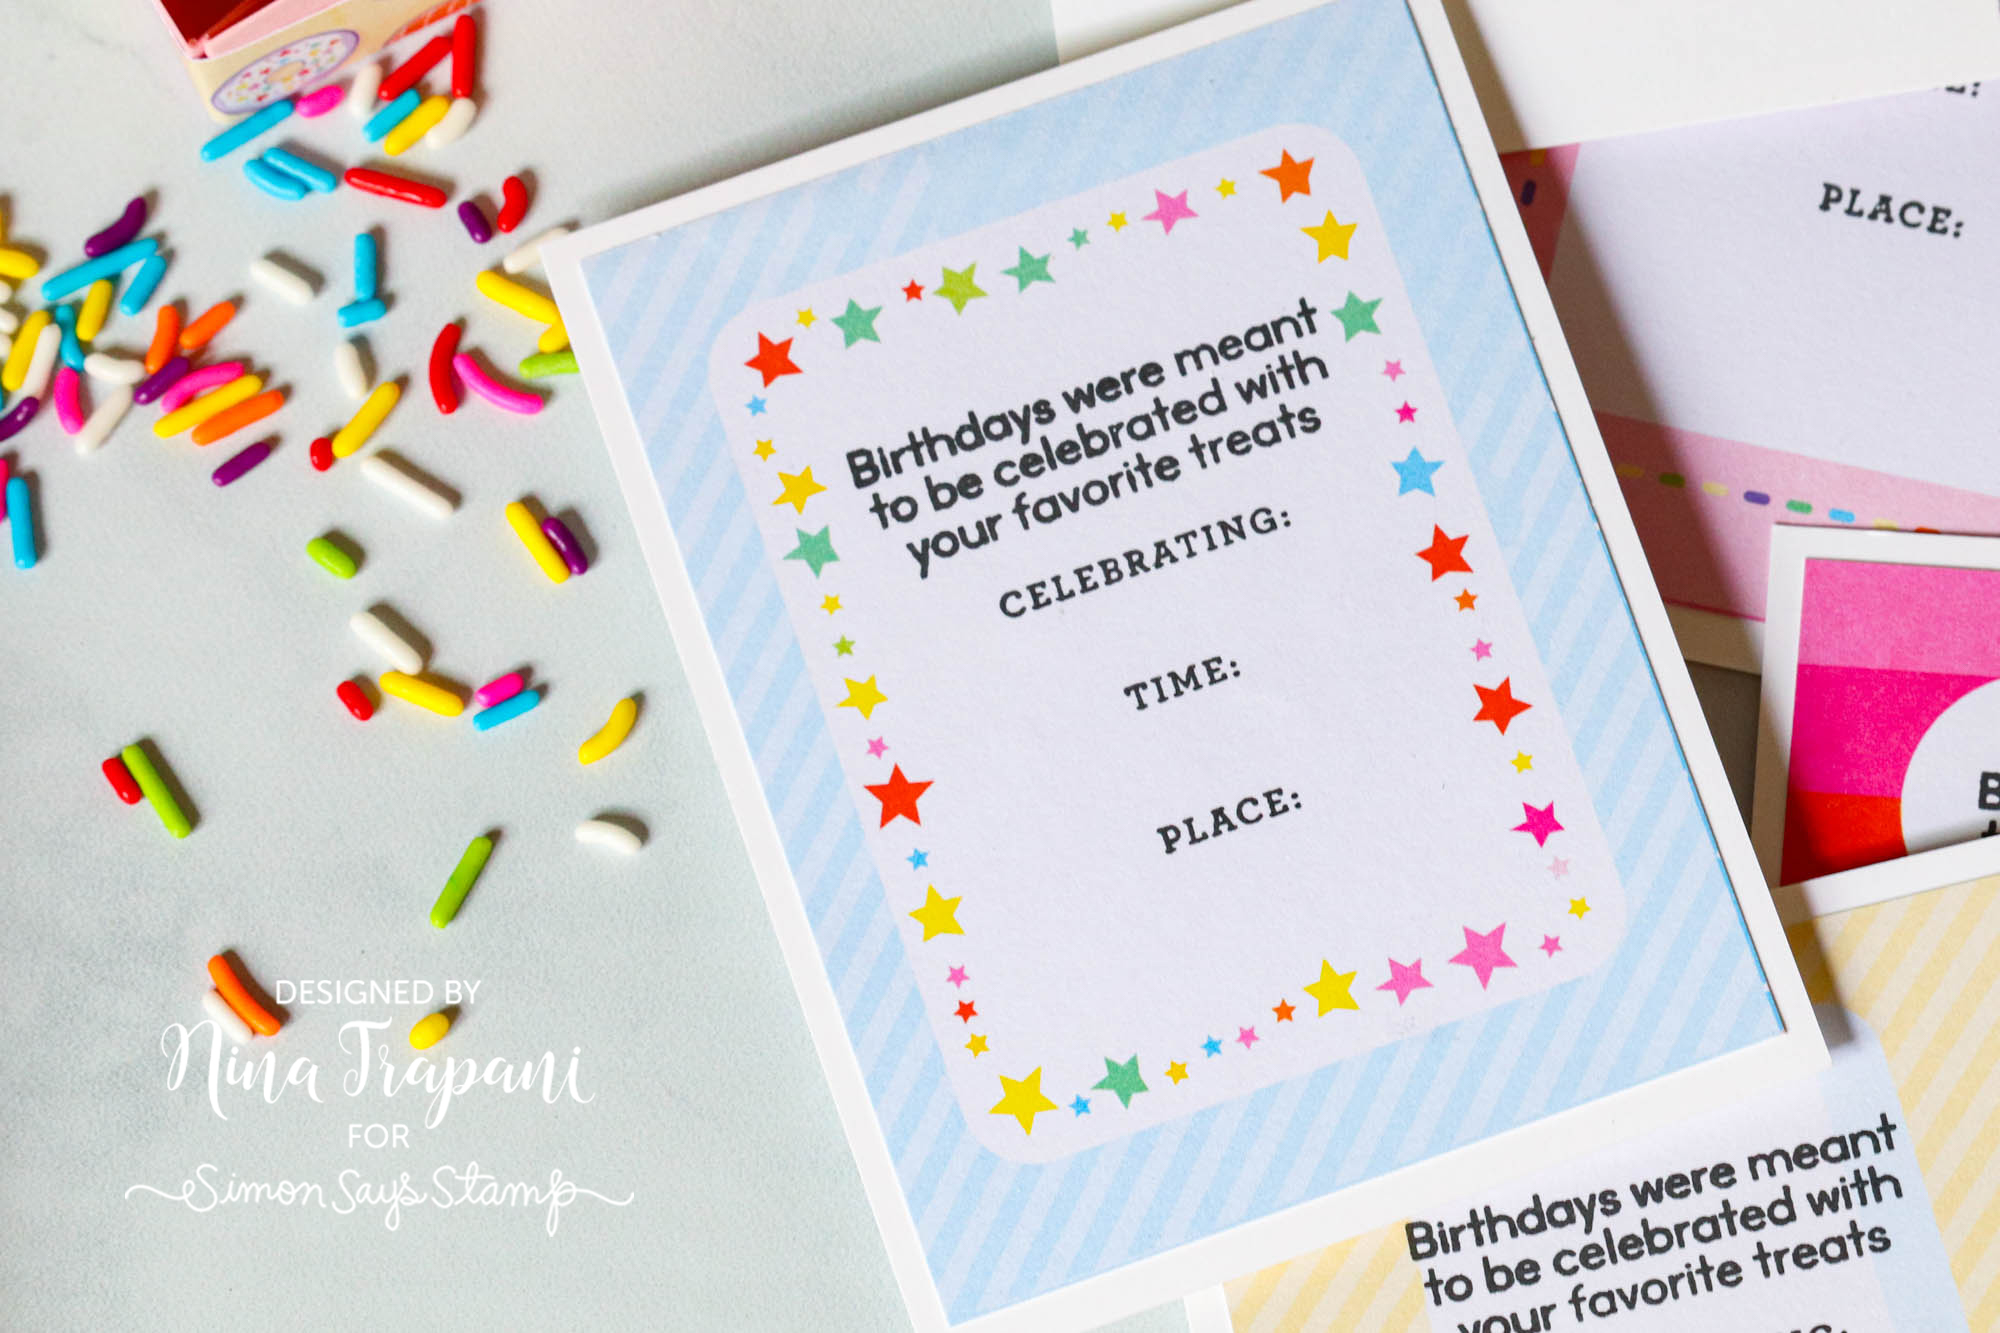
No birthday party can happen without some invitations! These flat panels are double-sided and decorated with some simple festive pieces. I white embossed images from Simon’s Sundae Afternoons stamp set onto Holographic Rainbows cardstock, which I adhered to the front of the panel. The backside is covered with one of the journaling cards in the Unicorns and Rainbows patterned paper pack and stamped with items from the Sundae Afternoons and CZ Design’s Grad Party set – this made the perfect place for filling out the details of your party! The invitations measure 4 1/4″ x 3 1/4″.
And raise your hand if you love a festive banner! :) The Unicorns and Rainbows patterned paper, as well as the Holographic Rainbows and gold glitter cardstocks, all paired together beautifully to make a stunning, rainbow banner. I used the Honey Bee Stacking Banners die to cut each design twice; these pairs are going to be glued together for a double-sided design. In between each banner pair, I adhered some gold twine; this looks beautiful with the gold colors throughout my party decor.
Whether you use all of these ideas or just a few, I hope you are inspired to make some creative, sweet treats for your next party! I made sure to keep each element as simple as possible so that you can make many of these without taking TONS of time to do so.
Be sure to watch the video to see how all of these pieces were made!
WATCH THE VIDEO
SUPPLIES
|


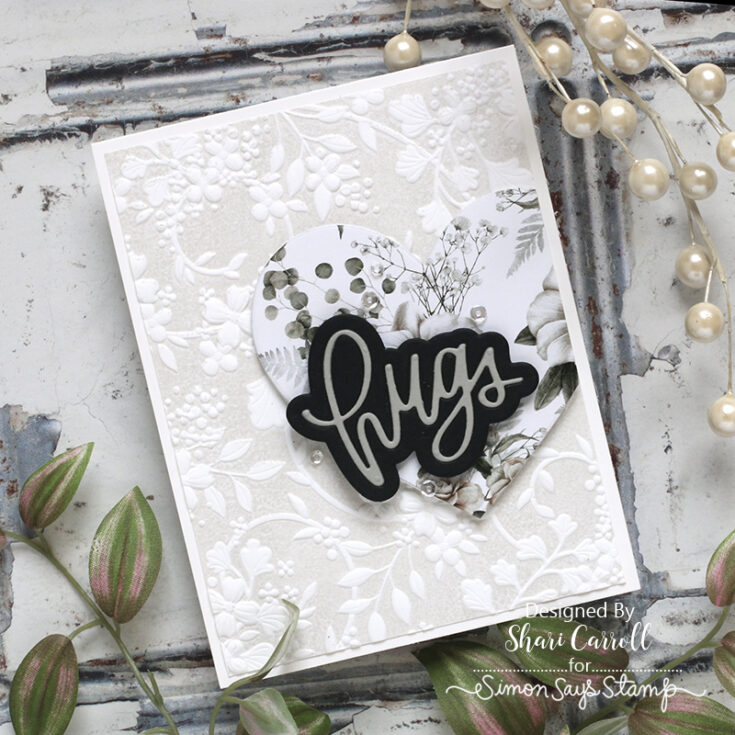
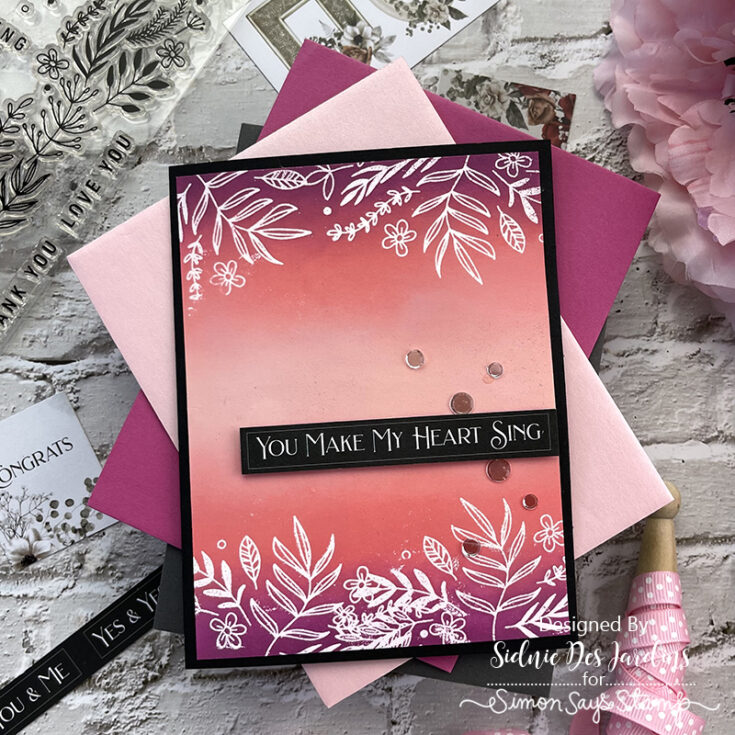
Card Kit Reveal and Inspiration: Garden Greetings
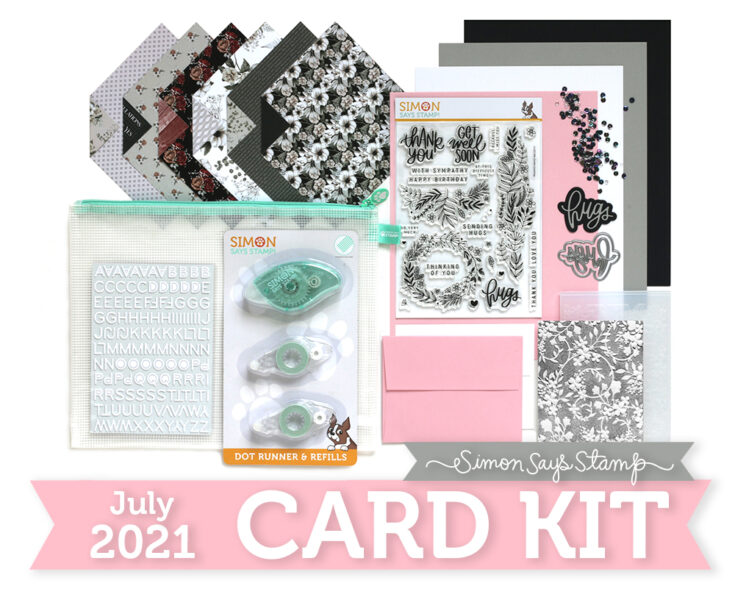
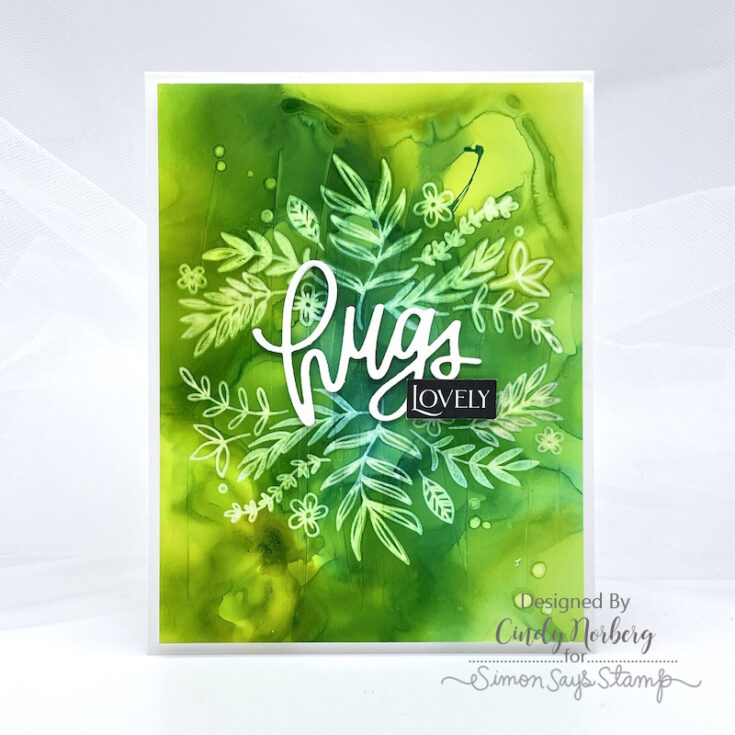
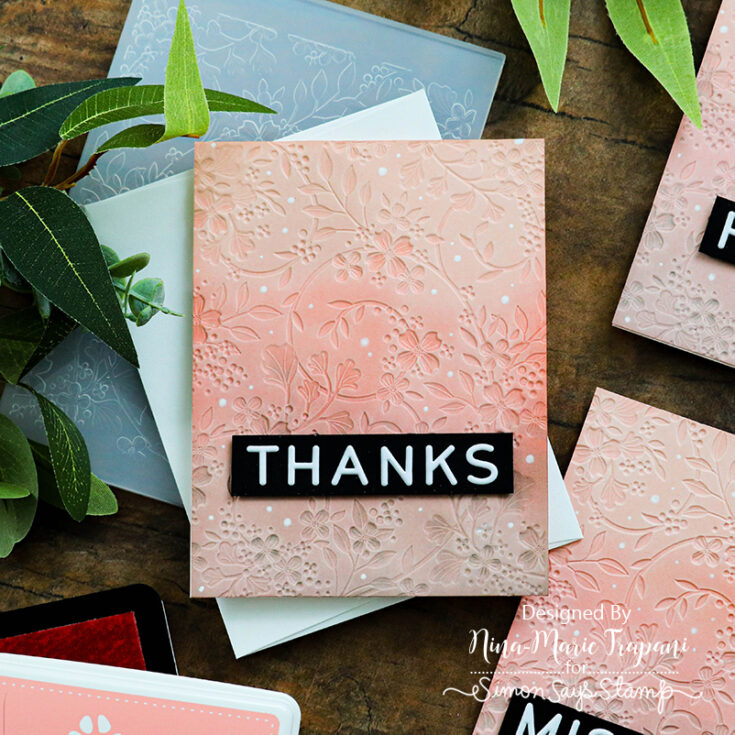
Your mind will be flowering with ideas as you create with our July 2021 Card Kit Garden Greetings!
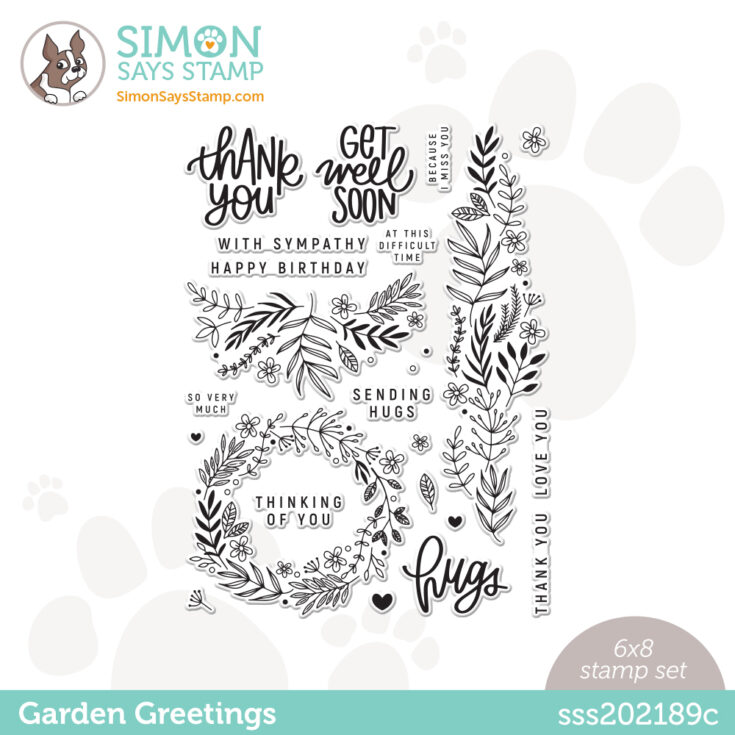
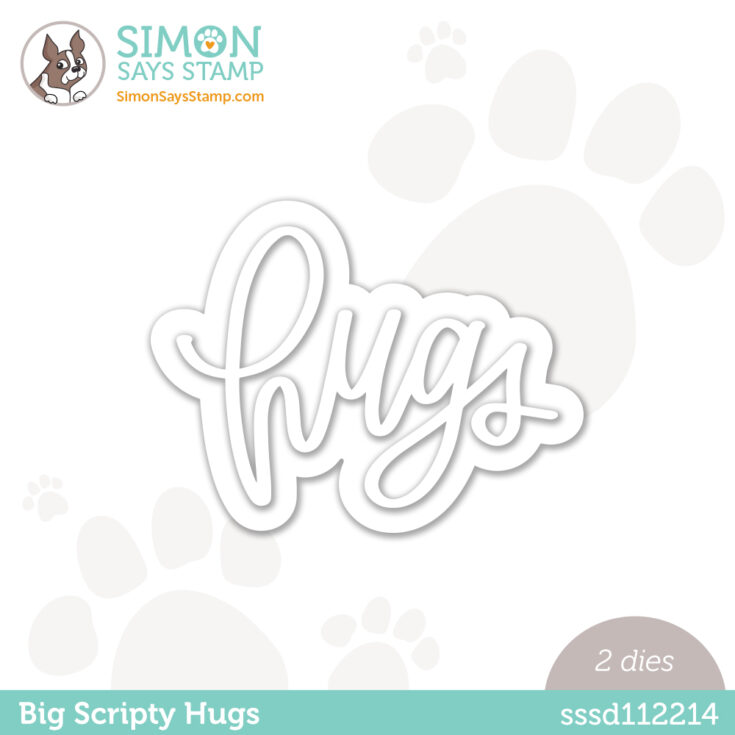
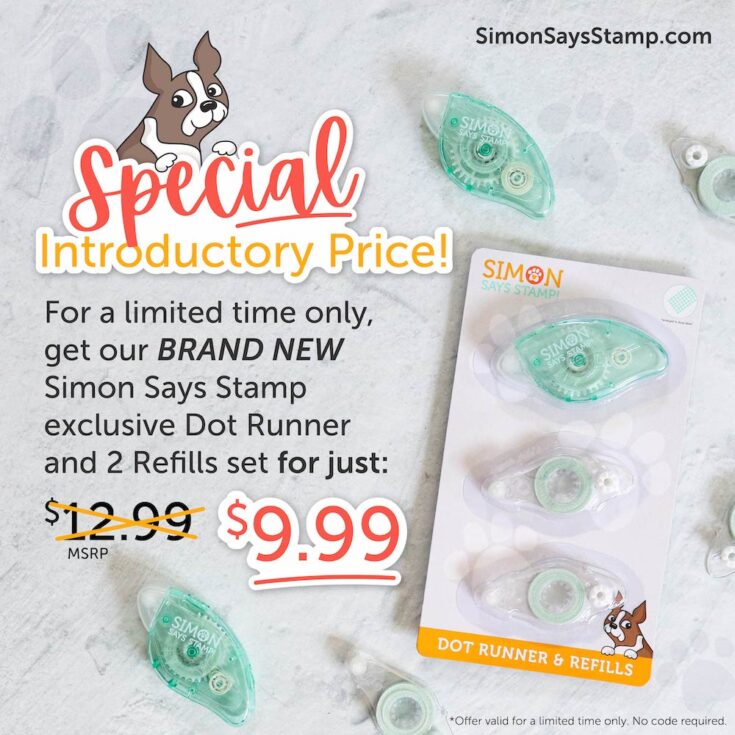
This kit includes 5 brand-new Simon exclusive products—the lovely Garden Greetings 6×8 stamp set, the Blossom Field embossing folder, the Big Scripty Hugs die, a Simon brand dot runner, and 2 refills (how cool!), AND a package of Orca sequins. WOW! You’ll also get one of our just-released Mesh Zipper Bags, too!
We’ve also included a variety of floral-themed Paper Rose patterned papers and a package of puffy alphabet stickers from Pinkfresh Studio. Rounding out the kit are two Simon brand envelopes and three colors of Simon cardstocks, plus a sheet of Neenah Solar White!
Garden Greetings will transport you to a lush floral wonderland and give you hours of creative fun!
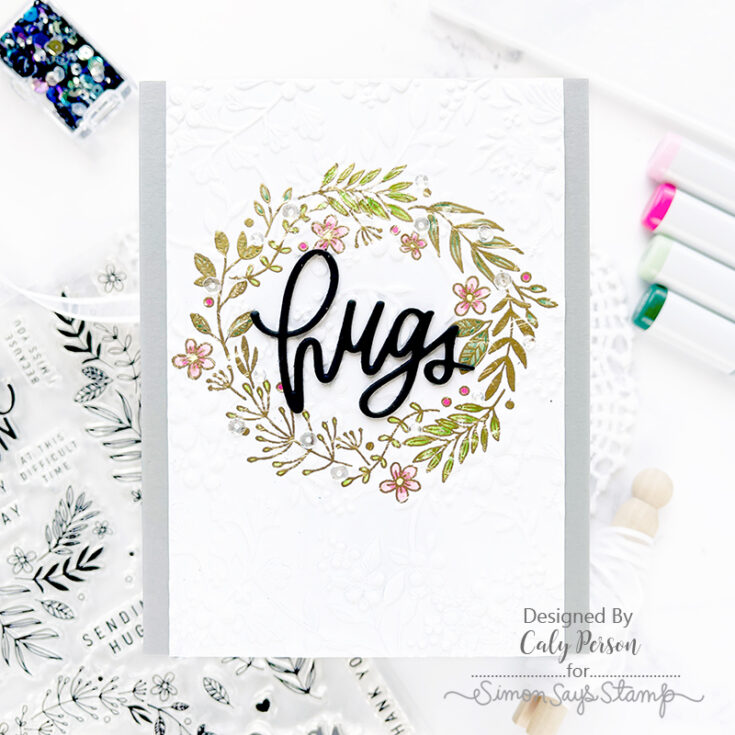


The NEW Garden Greetings 6×8 stamp set and Big Scripty Hugs die are available for individual purchases in our store!
Don’t forget! We have LOTS of gorgeous card kit inspiration to access and add to in our Card Kit Galleries!
You can purchase the kit at $39.99, or you can subscribe to our kit of the month program for just $34.99 (plus S&H) per month to have our kits delivered right to your door each month!
If you are a subscriber who used Paypal to purchase your subscription, please be sure to pay the invoice that we send you within 3 business days. We have a limited number of this card kit in stock and don’t want you to miss out. For easier and quicker monthly processing, please contact us via email or telephone and we will put your credit card on file as a courtesy for you. Card kits bill and ship anytime between the 16 – 30 of every month.
Botanical Notes Altered Notebook Encore by Emma Williams
Hi friends! Happy Sunday! It’s always such a treat to have special guest Emma Williams on our blog! Please read on to learn details of this gorgeous project in case you missed it!
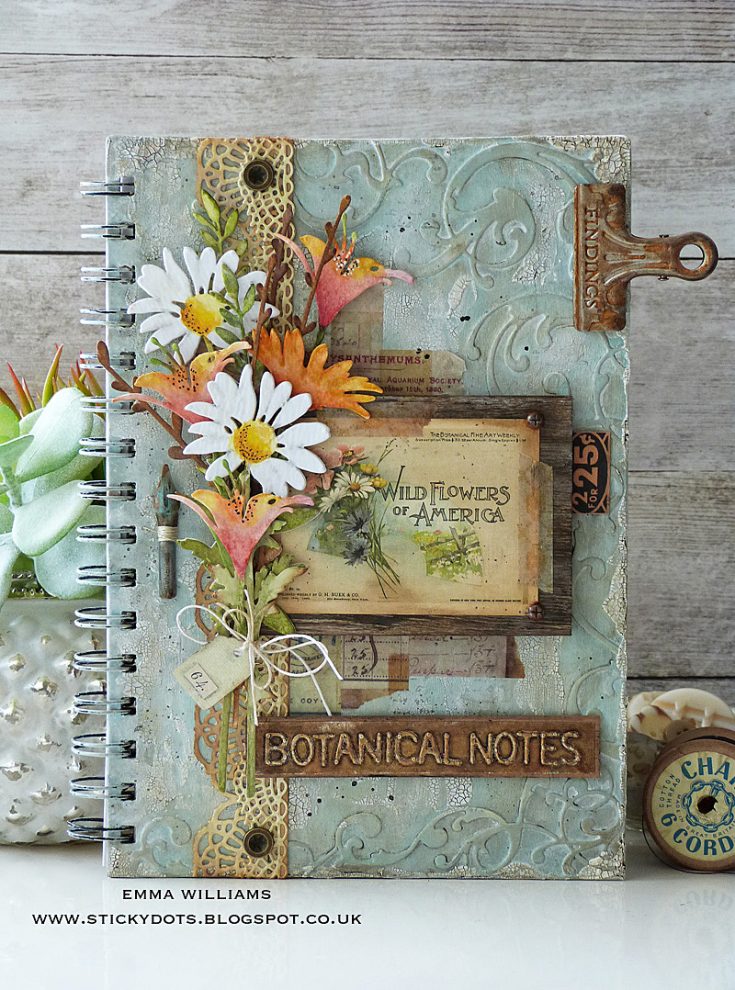
Happy Sunday everyone, it’s Emma here and I’m really happy to be back on the Simon Says Stamp blog to share my latest project with you all ~ an altered, vintage style notebook, created using some wonderful products from Tim Holtz, Sizzix and Ranger.
I must admit I’m a bit of a stationery addict ~ ever since I was a child, I’ve loved notebooks, pens, and all things paper and over the years I’ve collected so many pieces but the one thing I love most is taking a plain notebook and decorating it myself, creating something really special and unique. So, with this in mind and combining it with another love of mine, the garden ~ I bought a plain kraft notebook from my local £1 shop and transformed it into a vintage-style botanical notebook, perfect for my garden notes and sketches.
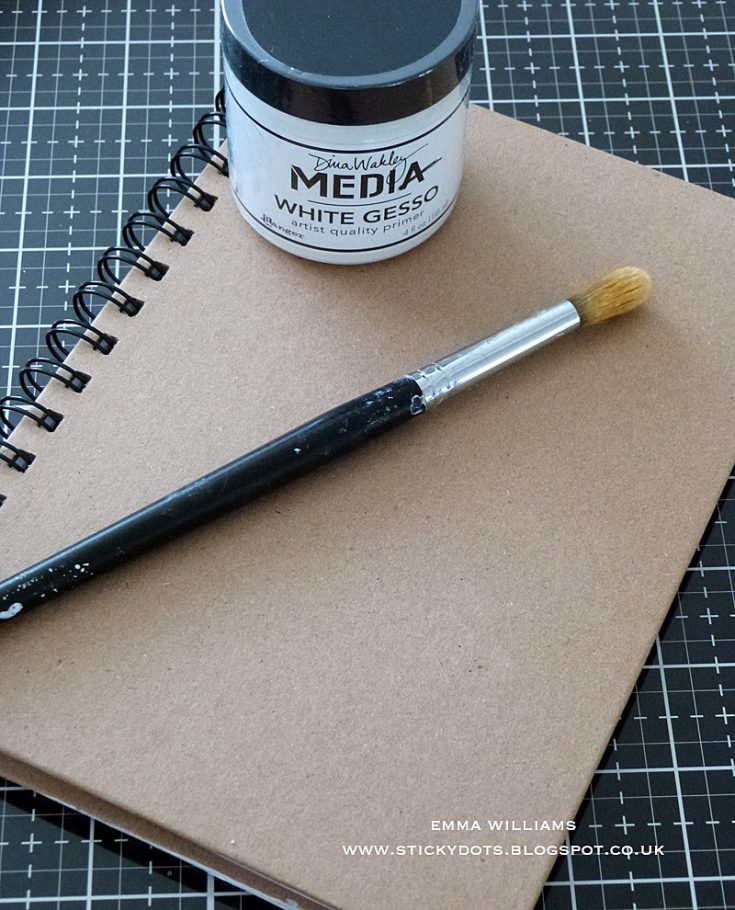
So, let’s get started and to begin with I primed the cover of my notebook with a coat of gesso and allowed it to dry.
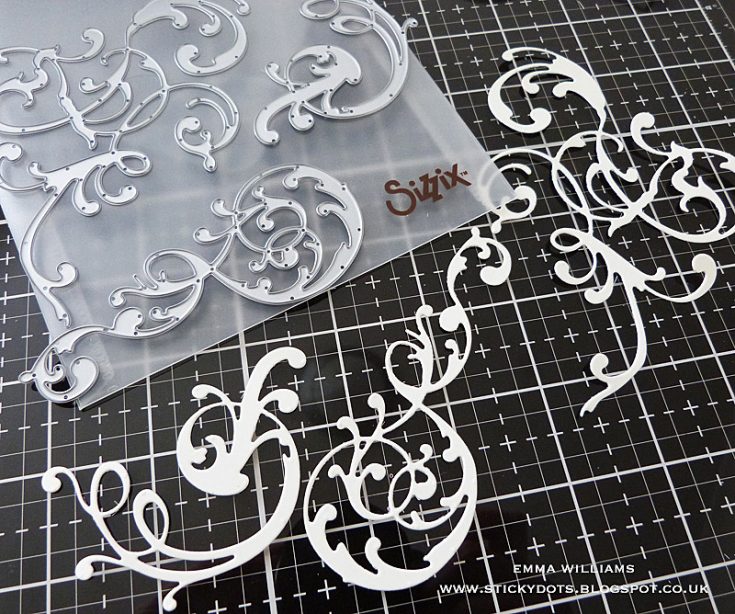
I wanted to add some texture to the cover and for this, I used die cuts that will create the look of embossing and I used the Adorned die to die cut some Tim Holtz Mixed Media Heavystock Card, cutting a selection of the swirls.
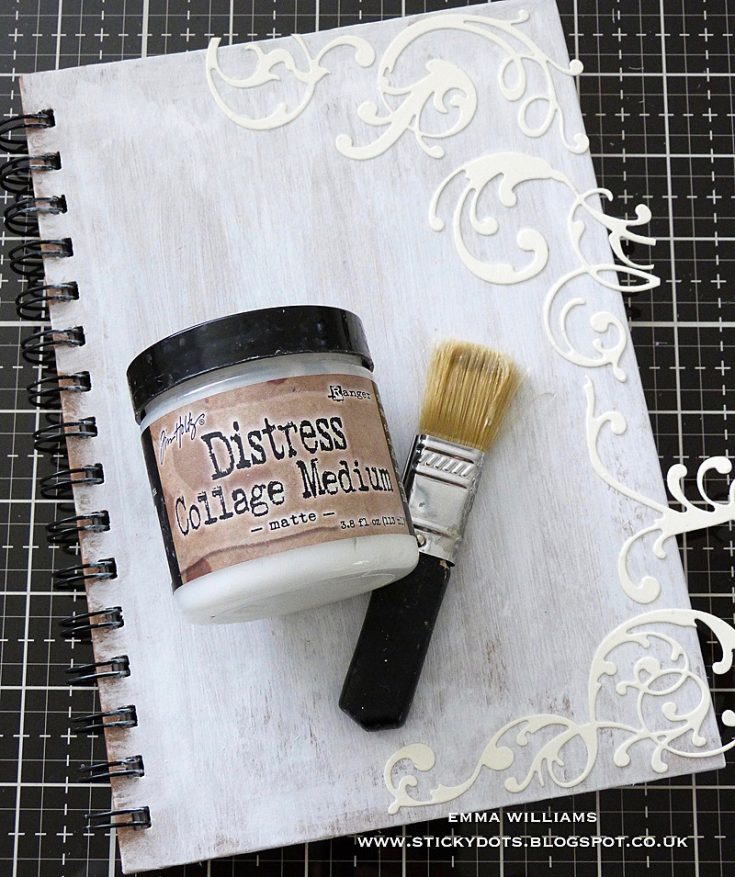
I arranged and adhered the Adorned die-cut pieces onto the front of the gessoed cover using Matte Collage Medium and a Collage Brush and once again allowed the medium to dry. Snip away any excess pieces that hang over the edges.
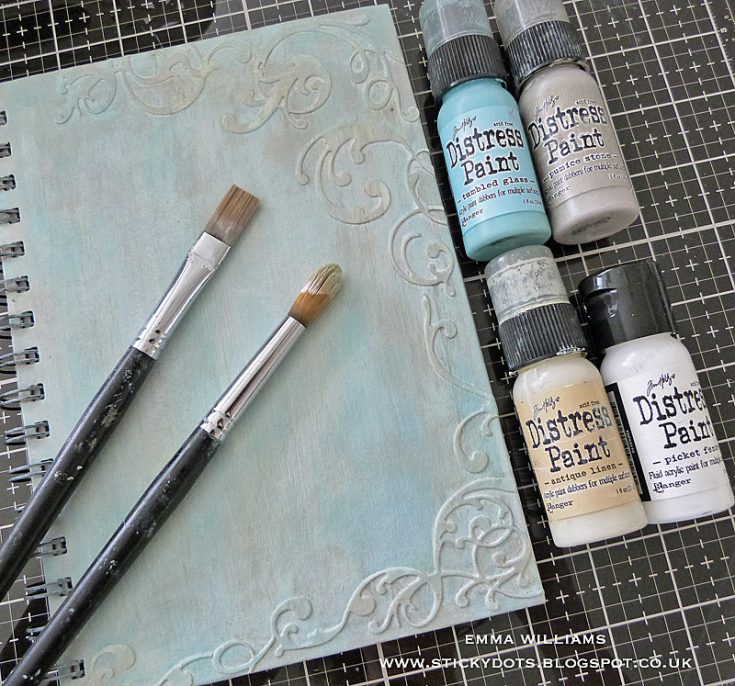
To add color to the cover, I used a combination of Distress Paints, layering each color over the top of the previous layer. To begin with, I covered the entire notebook cover with a coat of Tumbled Glass and heat dried this layer. I then took a dry paintbrush and dipped the brush into a small amount of Antique Linen Distress Paint before removing the majority of the paint on a cloth, leaving a tiny amount on the brush. I then dry brushed the paint over the surface of the blue cover, just allowing the brush to kiss the surface. Heat dry and then repeat with the remaining two colors, Pumice Stone, followed by a final layer of Picket Fence. If you feel you want to add more of any color, just repeat the process of dry brushing but remember to always dry each layer in between applications as you don’t want to end up with a muddy mess.
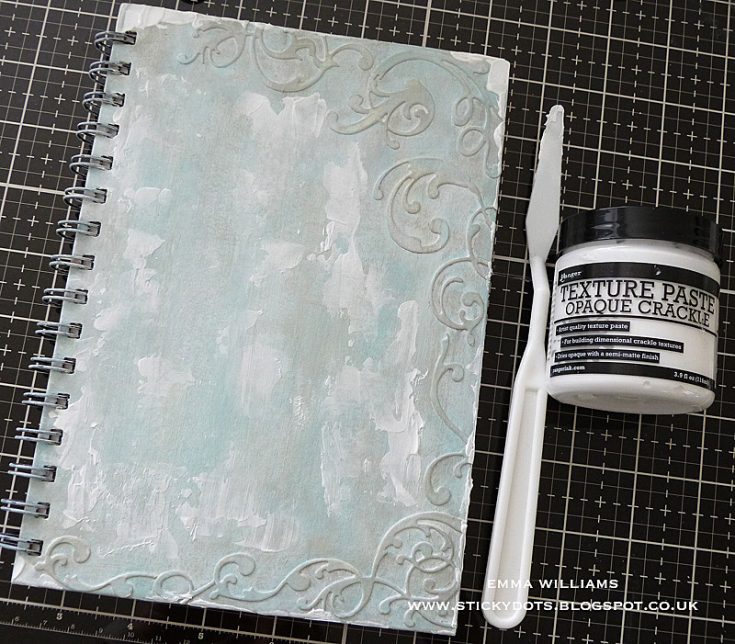
Once I was happy with my cover, I then added some more texture using a palette knife to apply Ranger Ink Texture Crackle Paste. You can apply as much, or as little paste as you want, you are completely in control of how much crackle you would like on your cover.
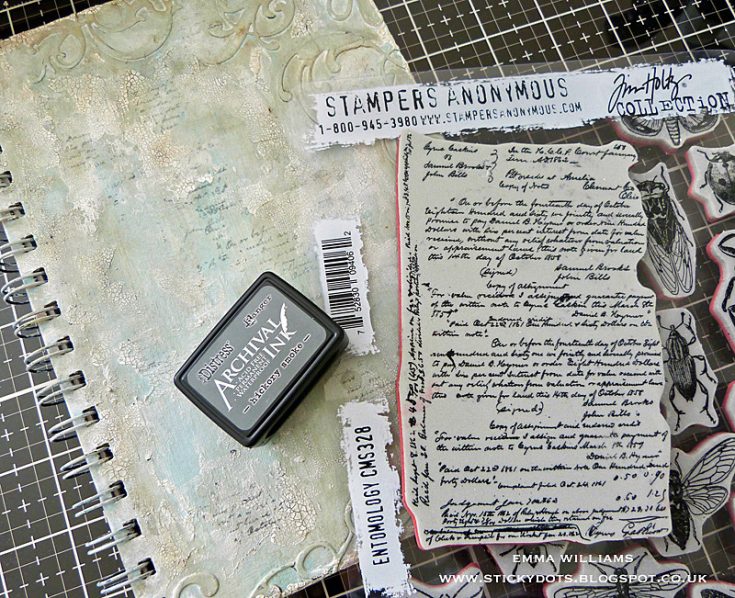
Allow the paste to dry and the crackles to appear before adding a final layer of stamping in Hickory Smoke Archival Ink, stamping the text over random areas of the cover. I usually use a text stamp for this process and I personally love the stamp in the Tim Holtz Entomology set but you can use any text stamp you have to hand.
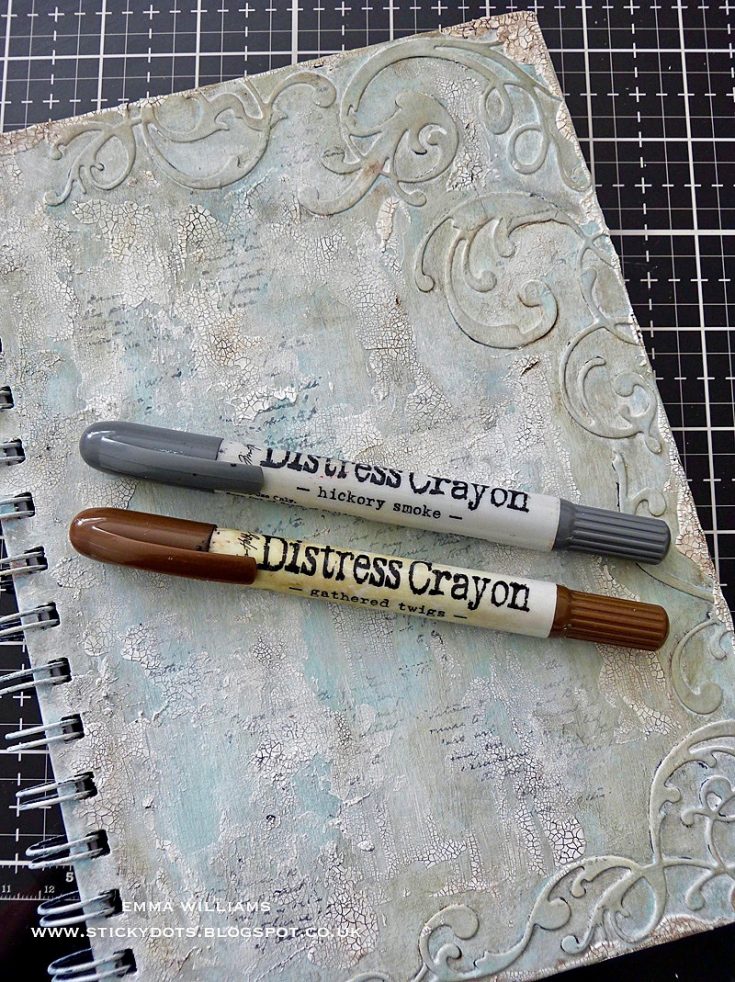
Using Hickory Smoke and Gathered TwigsDistress Crayons, I scribbled the individual colors onto my glass mat before picking up each color with a water brush and applying them directly onto the crackles, Hickory Smoke, to begin with, followed by the Gathered Twigs and just allowing the color to sink in and accentuate the crackles. Remove any excess water or color with a cloth.
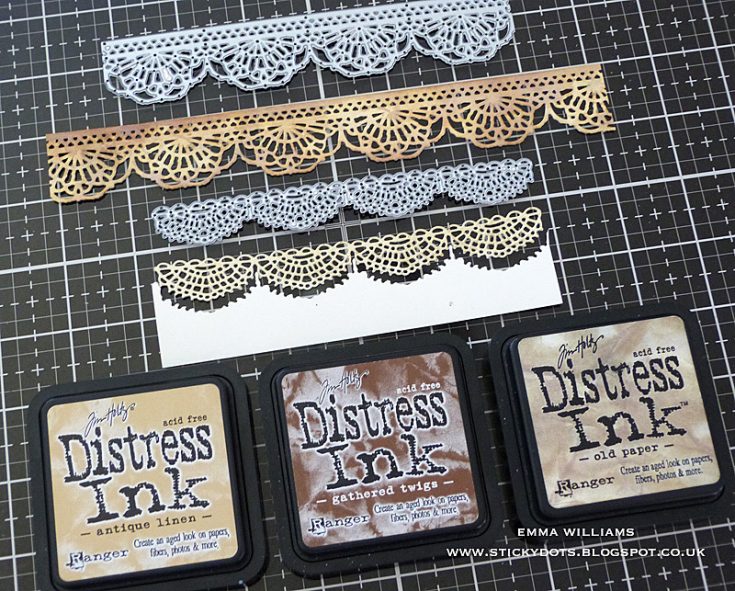
I now have my basic cover ready to decorate and bring to life and the first part of the decorating process is the crochet border that runs down the side of the book cover. For this I used the Crochet Thinlits die to die cut Mixed Media Heavystock card. This die is perfect to create borders as you can extend the length by die cutting your first section and then removing the die, lining it up with the previous cut and then passing it through the die-cutting machine to create one longer length of crochet lace. Ink the die-cut crochet lace with Antique Linen and Old Paper Distress Inks before adding a light inking of Gathered Twigs to the edges.
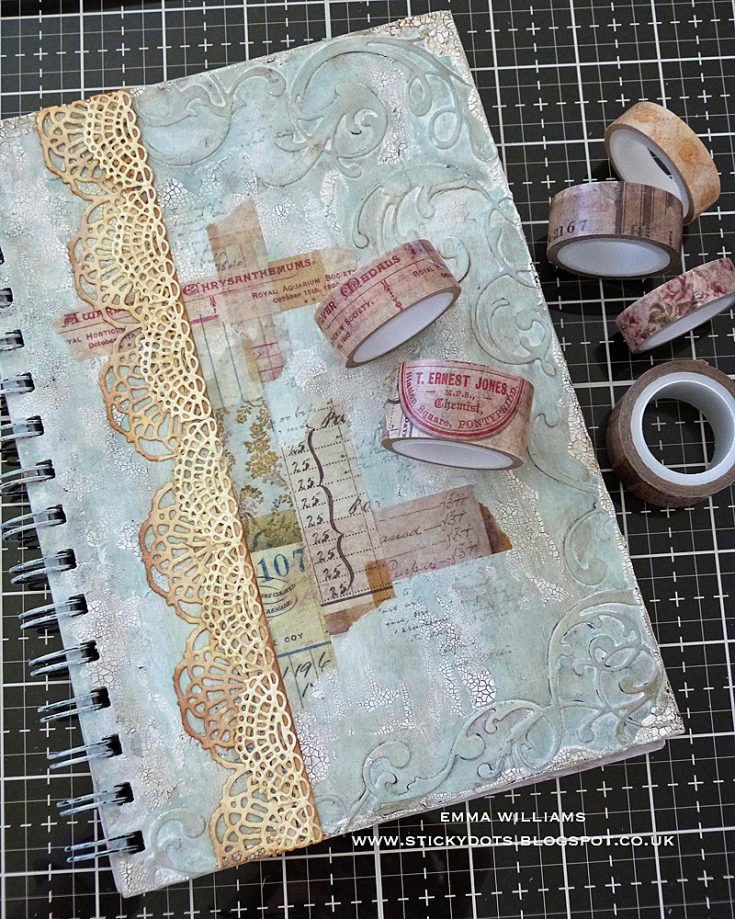
Attach the lace down the side of the cover, together with randomly torn strips of Remnants DesignTape. It might not look pretty at the moment, but don’t panic!
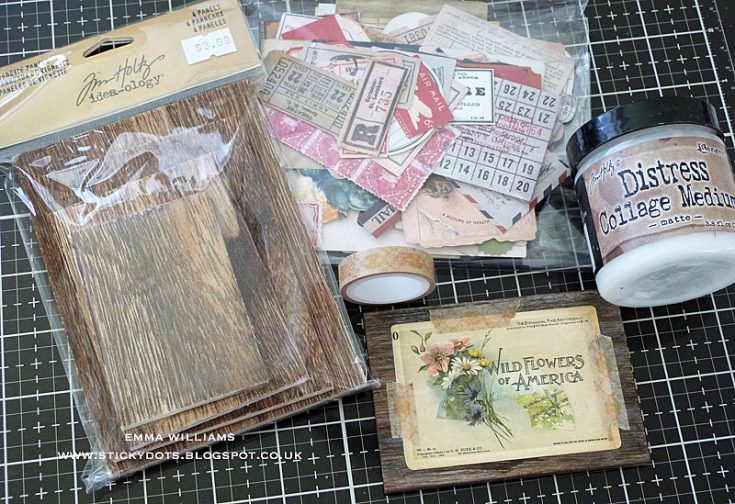
To create the panel that sits on the front, I used the smallest Vignette Panel from the set and using Matte Collage Medium, I adhered the Wild Flowers of America ephemera piece from the Keepsakes Ephemera pack directly onto the wooden panel. I then took torn pieces of Remnants Design Tape and applied these around the edges of the ephemera piece.
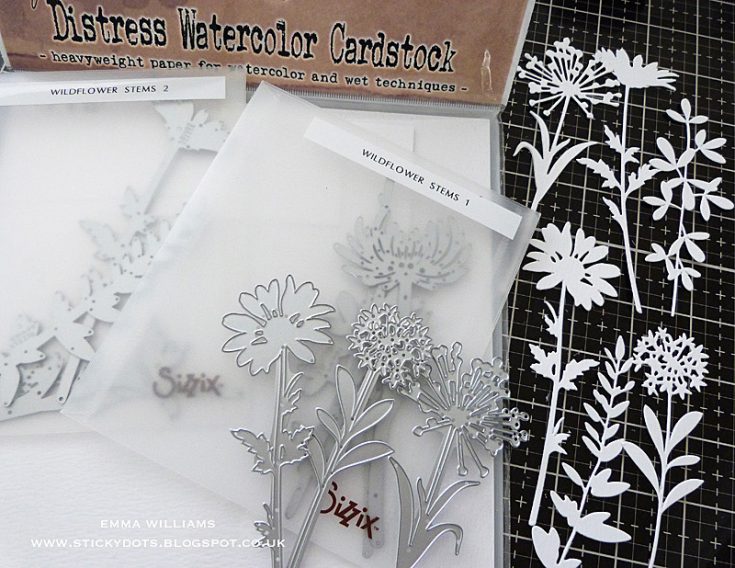
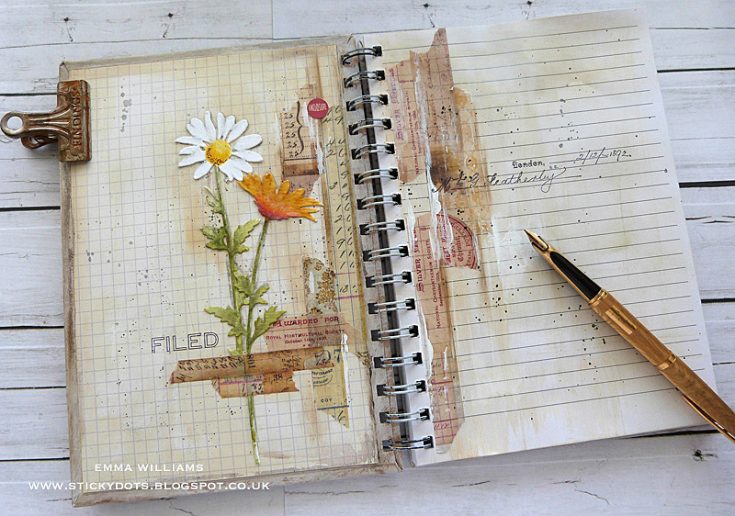
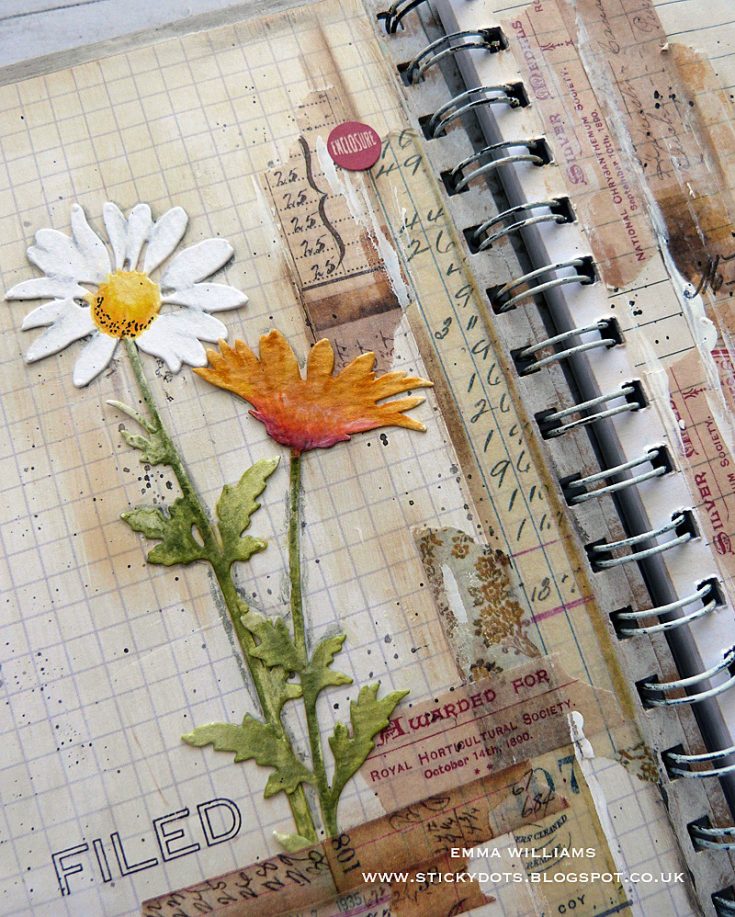
Setting the wooden panel to one side, I moved onto creating that beautiful bunch of WildflowersStems. I used stems from both of the Tim Holtz Wildflower Stems 1 and 2 die sets to die cut a selection of flowers from Distress Watercolour Card, but it’s entirely up to you which ones you choose, this is your book ~ choose the flowers you love the most.
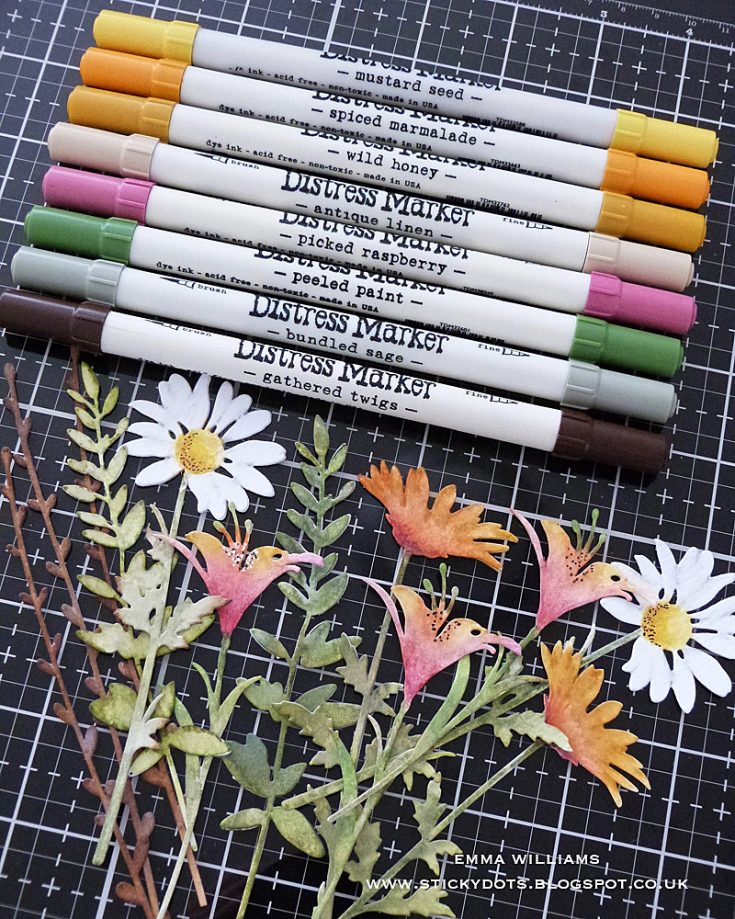
To color the flowers I used Distress Marker Pens, (colors are shown in the photo above) and a water brush, applying the colors to each individual stem. Once again, the colors are your choice, you don’t have to use the same colors as I used if you don’t want to.
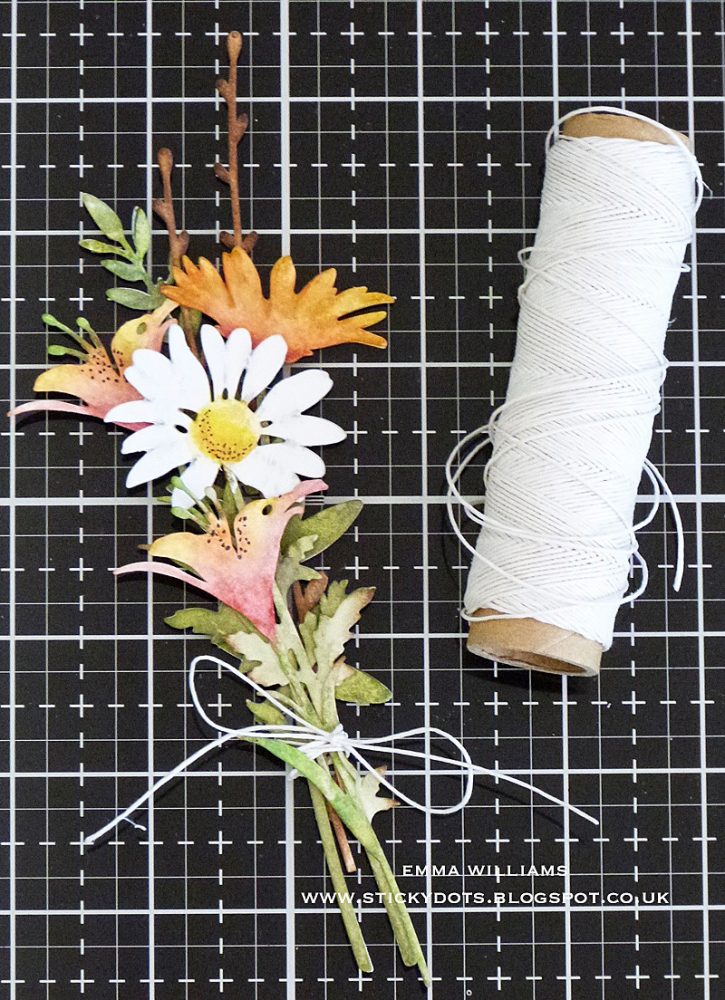
Arrange the flowers into a bouquet ~ I used a small dot of Matte Collage Medium behind each flower to attach them securely into place before tying them together with some twine.
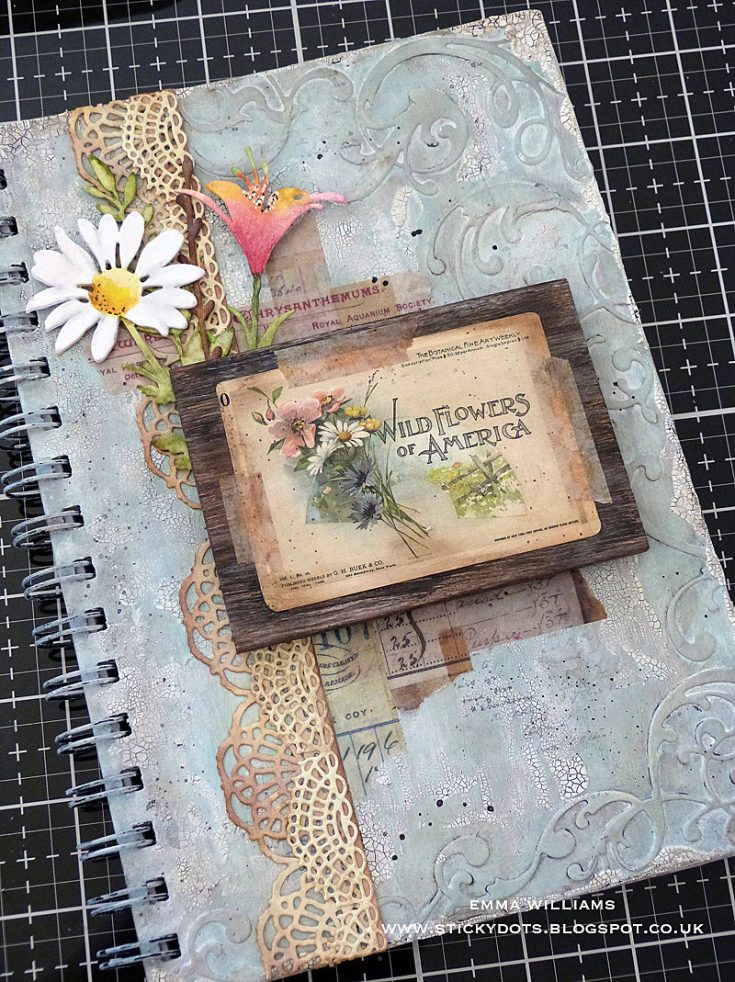
Using Matte Collage Medium, attach your wooden panel to the front of the notebook, placing some leftover wildflower stems that weren’t used in the bouquet, behind the panel.

Attach the wildflowers bouquet down the left-hand side of the notebook. I also added a small tag to the bouquet.
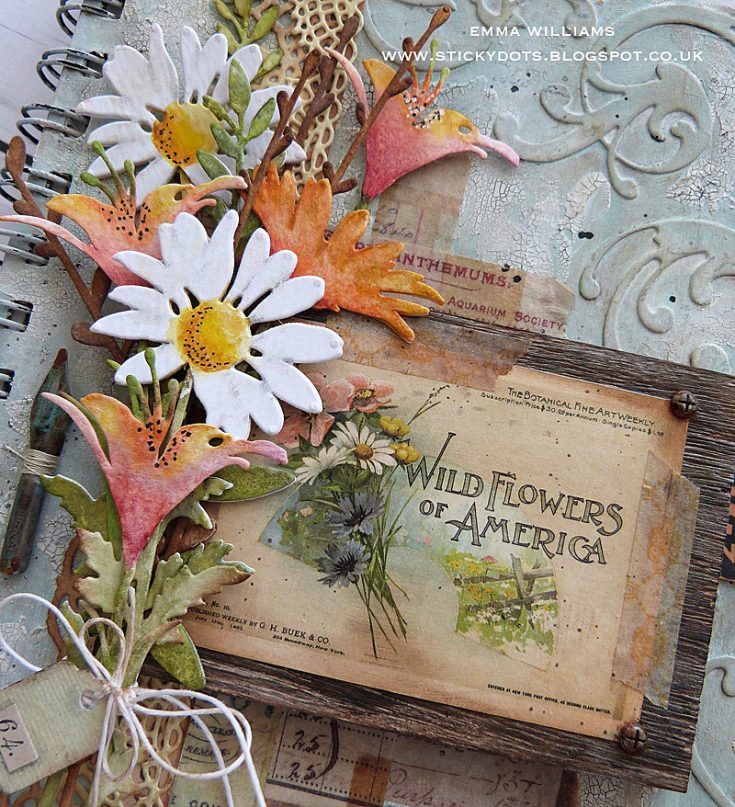
At this stage, I also added a Pen Nib to my arrangement, altering it with a little Evergreen Bough and Antiqued Bronze Distress Paint to create that vintage patina effect and then attached it to the cover with Matte Collage Medium.
I attached a couple of Hardware Heads to the top and bottom right-hand corners of the Ephemera piece, again altered with Evergreen Bough and Antiqued Bronze paint to create a rusty effect.
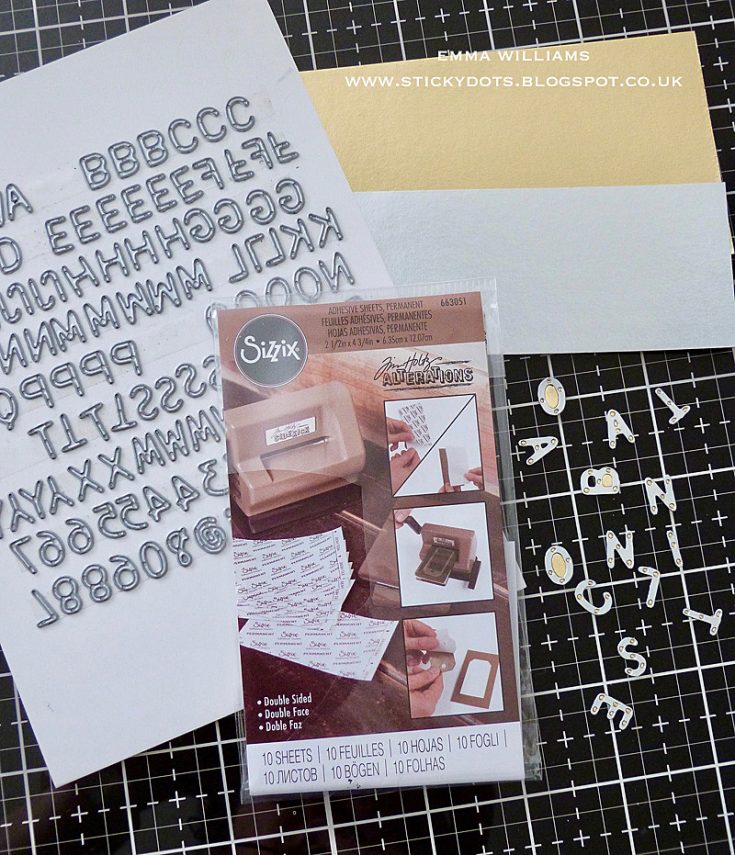
We’re nearly there and all that’s left is the Botanical Notes metal effect plaque. For this, I cut a panel of gold metallic kraft stash, 10 x 2cm. I then cut my lettering from silver metallic kraft stash using the Alphanumeric die to spell out the wording, Botanical Notes which I attached to my panel. When using these letters, I would recommend adding Adhesive Sheets to the back of your card as this will be your best friend when attaching the letters to your panel.
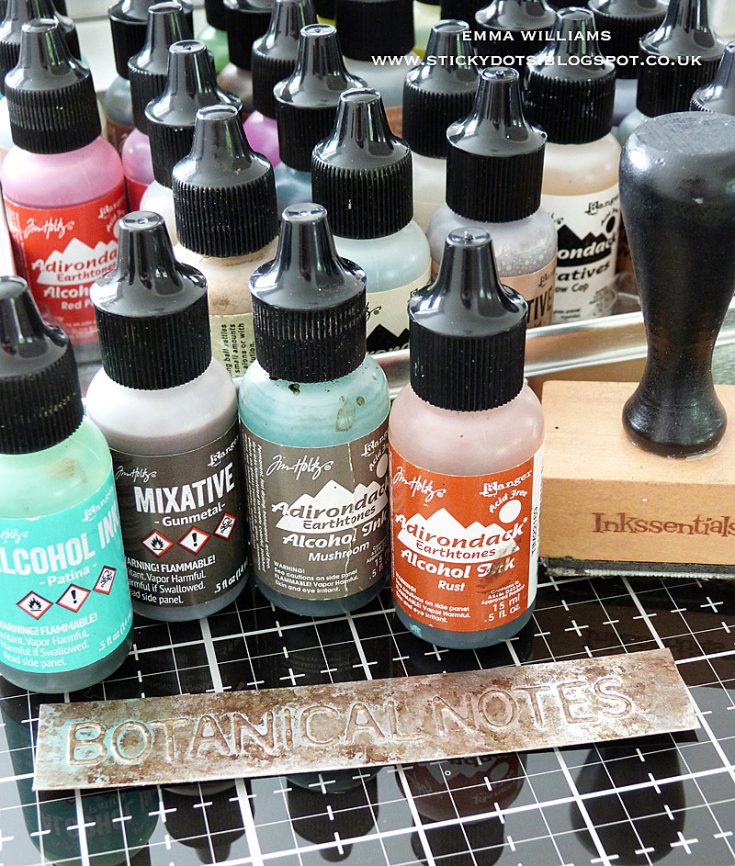
Using the Alcohol Ink applicator tool, ink the panel with a combination of Patina, Gunmetal, Rust and Mushroom Alcohol Inks to create an aged look to the metal.
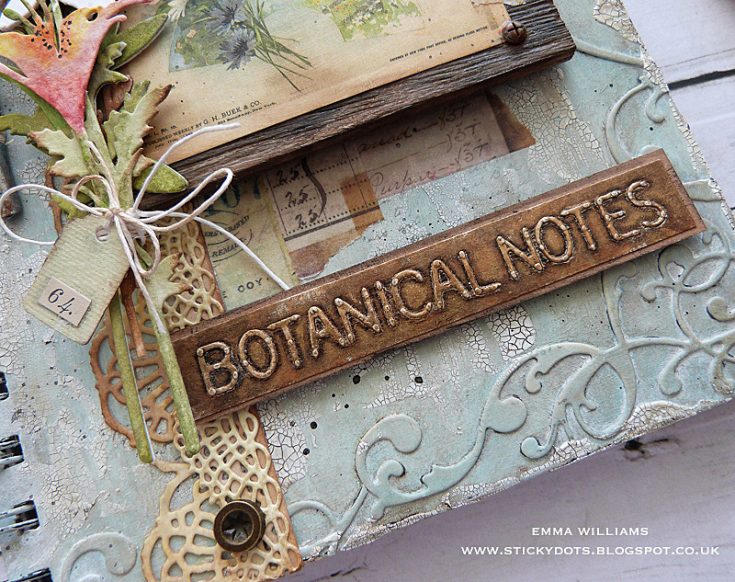
Attach the finished plaque to your notebook cover. I also added some Hardware Accents to the top and bottom of the crochet border strip
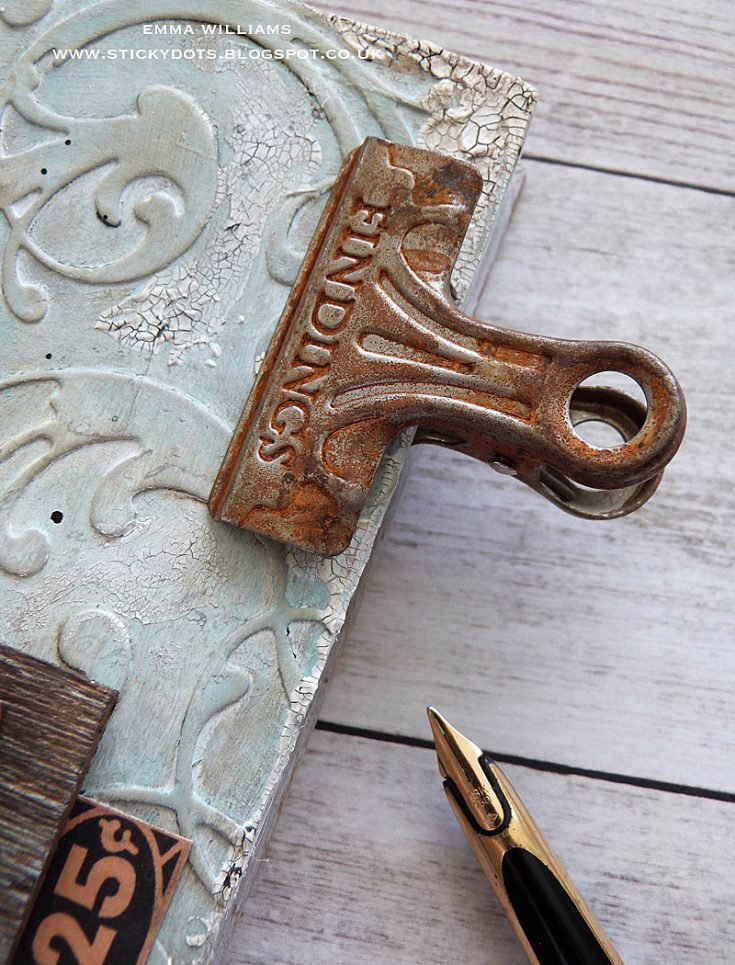
Finally, I added a Rusty Clip, clipped onto the corner….
…and that is how I created this vintage style notebook, which is ready to use!
Thank you so much for stopping by today ~ it’s been fun taking you through the creative process of this piece and I hope I’ve given you some tricks and techniques that will inspire you with some ideas of your own.
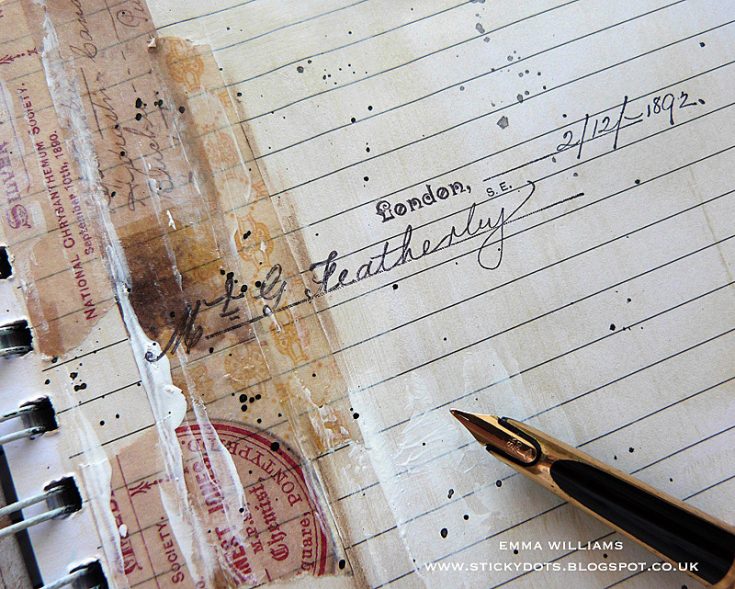
And before I say goodbye, I also wanted to show you how you can add decoration inside the book too…using some of the leftover Wildflower Stems, torn Design Tape strips, a little bit of paint and a few stamps from my collection.
See you again soon…
Emma x
SUPPLIES:
|


Thanks so much for stopping by and thanks to Emma for being our guest!


