Yippee for Yana: Stretching Christmas Stamps

Hi friends! TGIF! Please join me in welcoming back the super talented and inspiring Yana Smakula as she shares a super fun Birthday card she made by stretching some of her Christmas stamps in the latest edition of our bi-monthly Yippee for Yana series! Be sure to watch the video to learn more and enjoy!
Hello, crafters, this is Yana Smakula for Simon Says Stamp! Welcome back for another Yippee For Yana video! In this video, I invite you to stretch your Holiday stamps beyond Christmas cardmaking.
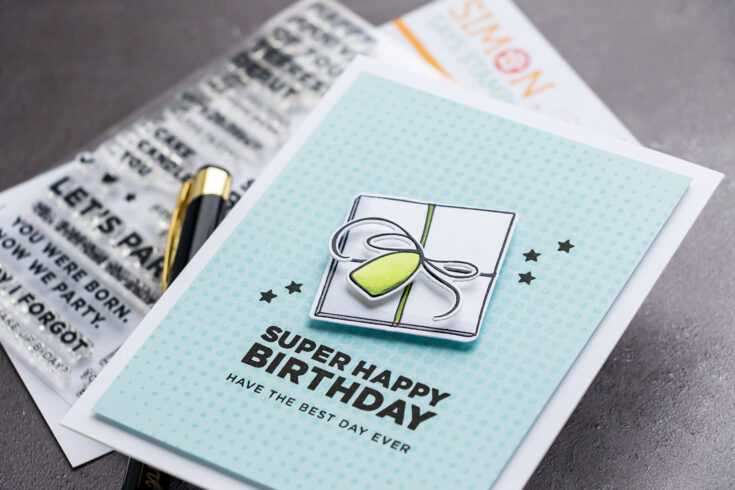
One of my favorite Christmas stamp sets from 2021 is one called Gift Wrap. This set features several images of gifts along with some holiday sentiments and imagery such as poinsettias, candy canes, pine branches, and more. It is a great Holiday set, hoverer, the main images, the gifts, are evergreen and can be used all year round for Birthday cards.
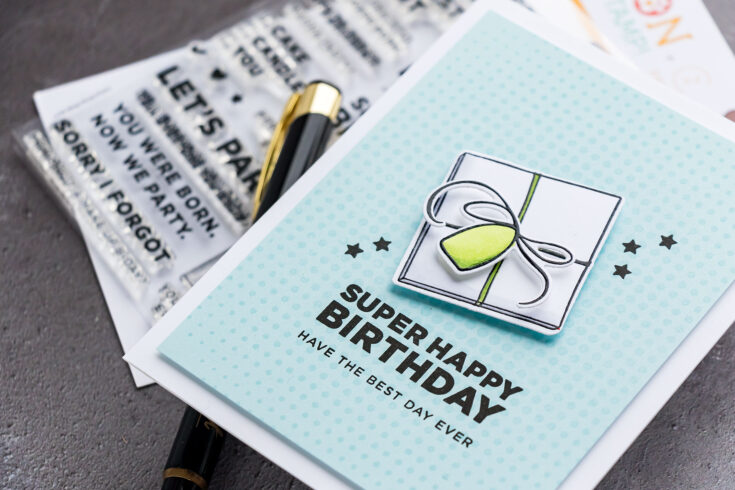
I stamped the gifts and the tags in Versafine Onyx Black ink on Neenah Solar White 80lb cardstock and heat set the ink with the help of clear embossing powder and my heat tool.
You can also stamp these gifts onto colored cardstock, or onto patterned paper, or even use some other pattern stamp from your stash and stamp a pattern onto the gifts to create your own unique wrapping paper. You can also stamp these onto scrap wrapping paper you might have after the holidays!

I used my Copic markers and did very simple coloring. The Gift Wrap stamp set has a set of coordinating dies. I used mine to cut these out – they even cut out the paper inside the loops on the gift tags. I highly recommend you get the dies as well, as these images aren’t that easy to fussy cut.
If you color your gifts with alcohol markers or maybe you use watercolors or some other coloring medium, you can add a simple pattern or a simple design on top by using a white or a black pen. I used a wide white pen and drew wonky diagonal lines on one of the gifts. For the other gift, I did large irregular dots.

With the gifts done I worked on a background for my cards. My plan was to make simple cards with a colored cardstock background. I used various cardstock colors from my stash. To add interest to the background, I didn’t want to have a blank background, I used Simon’s Halftone Circle Background stamp and stamped it in watermark ink for a tone-on-tone look.
Next, I stamped various birthday sentiments on each of the panels using stamps from Cathy Zielske’s Stop, Drop, Party stamp set. I love the bold look of these, and the sentiments themselves, of course, are very unique.
Next, I foam mounted a gift onto each of the backgrounds, I placed the gifts at an angle. I didn’t want to add any embellishments to these cards, but I did stamp several stars around the gifts – the stars tie in nicely with the black stamped sentiments.
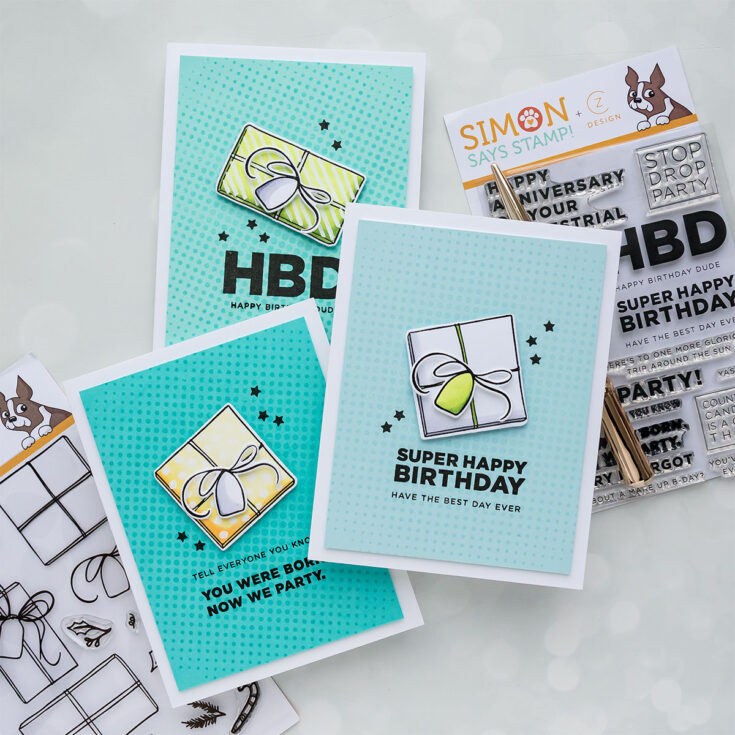
I also trimmed these background panels to 3 3/4 x 5” and foam mounted them onto A2 white side folding card bases.
So don’t put your Christmas stamps away just yet. Look through your stash and see which images can be used all year round. I’m sure you’ll find something fun!
WATCH THE VIDEO:
SUPPLIES:
|


Thanks so much for stopping by, and thanks to Yana for being our guest!
Mixed Media Card with Kristina Werner – Alcohol Inks & Distress Paint
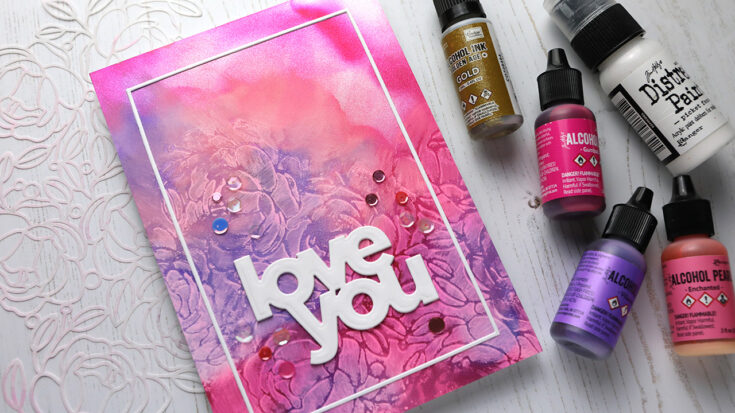
Hi, all! Kristina Werner here. Today I have a fun mixed media card for you. It combines alcohol inks with Distress Paint, plus some die cutting.
I started out by creating an alcohol ink background using Silver Sparkle Alcohol Cardstock, which made it beautiful all on its own. I used three colors of alcohol ink. I used Gumball, and Enchanted and Villainous which are pearlescent alcohol inks.
To add some detail, I experimented with Picket Fence Distress Paint and the Peonies and Leaves stencil. At first, I tried to create a monoprint, but I didn’t have enough paint on the stencil. Then I decided to apply the paint over the stencil like usual.
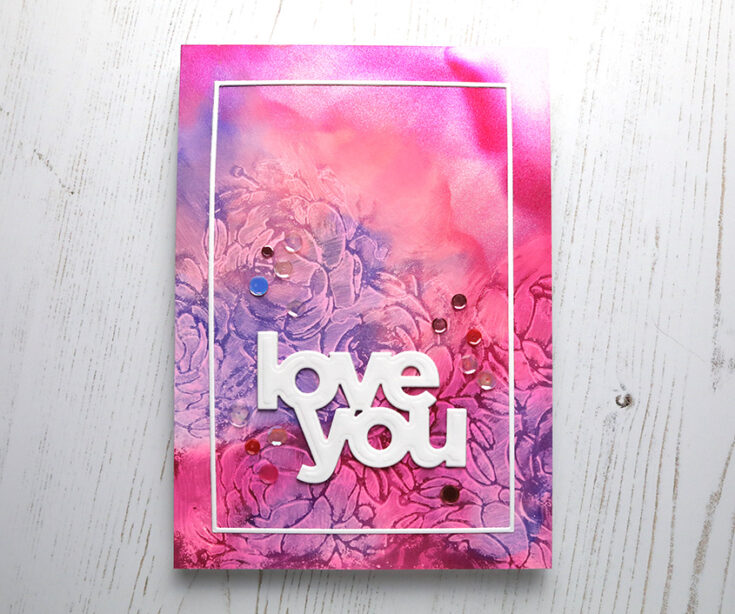
To my surprise, the effect was beautiful! The white paint dries back quite a bit (as you can see in the photos), and the colorful background shines through. I was pleasantly surprised with the results.
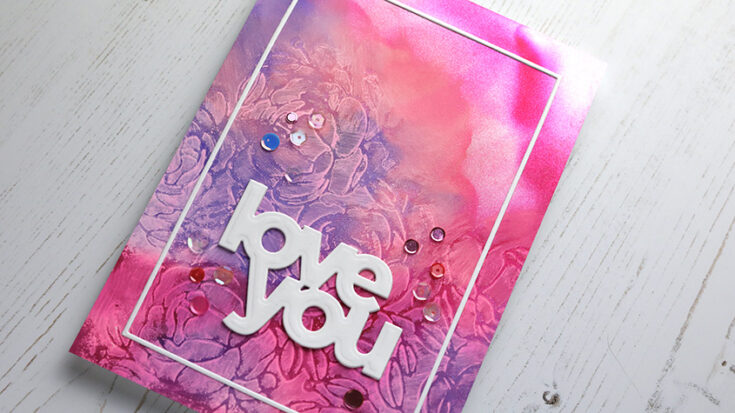
To finished off the card, I stacked four die cuts made using CZ Design’s Love You die set for the greeting. I also diecut a thin frame using Simon’s A7 Thin Frames die set.
I hope you enjoy the video and it inspires you to mix some different mediums on your cards! I’ve never mixed alochol inks and paint before so this was fun! Enjoy!
Supplies
|


Lovely Layered Chickadee
Hi friends! Happy Wednesday! Please join me in welcoming special guest Mindy Eggen to our blog! Be sure to read on for all the details and enjoy!
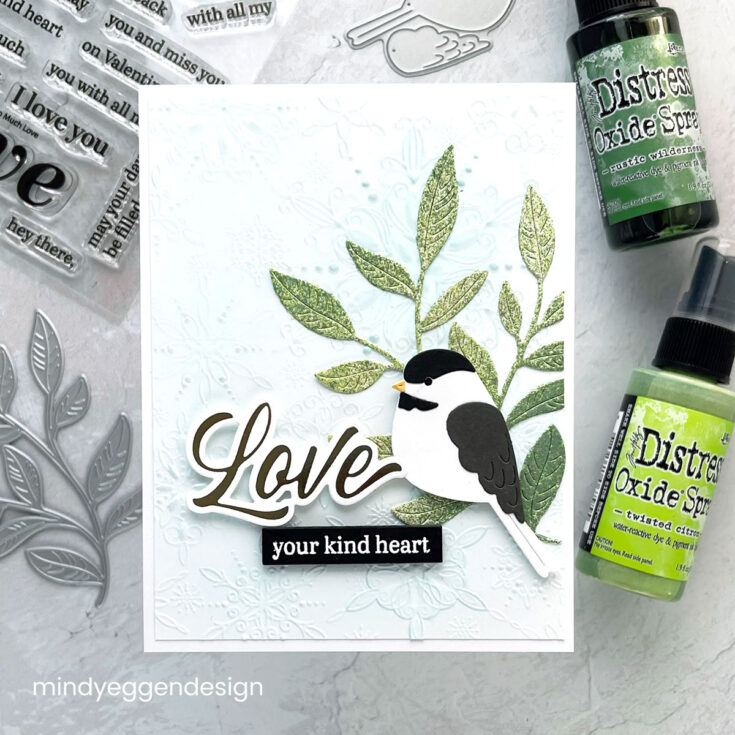
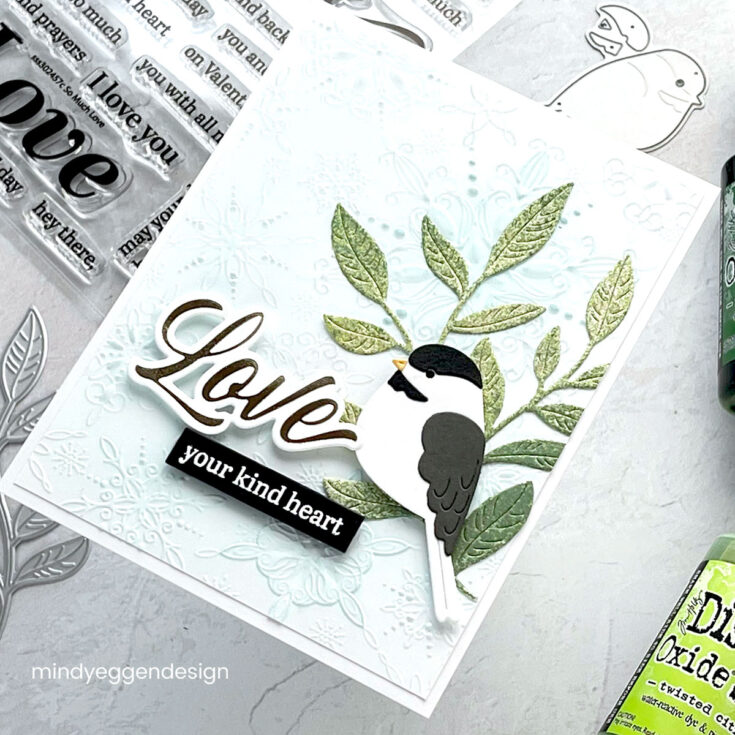
Welcome friends and Happy New Year! I’m so excited to be joining you on the Simon Says Stamp blog today. My card features this adorable Layered Chickadee die which is great for any occasion. I honestly was never a bird person up until the last few years. Now, I have a couple bird feeders right outside my window where I craft.
One thing that I really like about these small layered critters is I can use my scraps of cardstock. Some of the colors I used are Black, White and Storm Cloud cardstock to layer my chickadee. I see these birds all the time at my feeders.
I also thought my chickadee would pair nicely with one of my favorites dies which is the Privet Branch. Using my splat box, I lightly sprayed my die cut piece using Twisted Citron and Rustic Wilderness Distress Oxide Spray. I also added shimmer with the Tarnished Brass Distress Mica Spray.
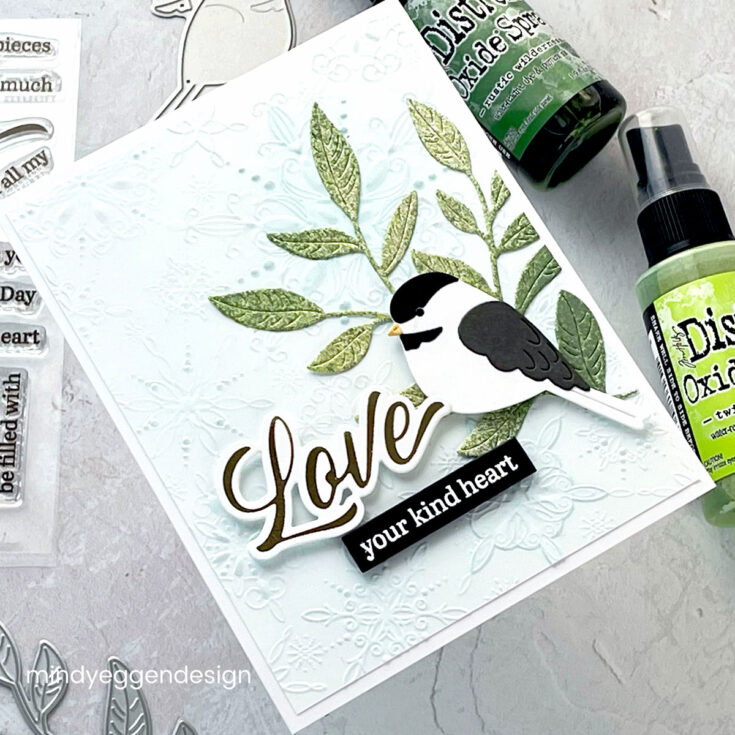
For my background, I used the Filigree Snowflake Embossing Folder to add a bit of interest. I didn’t want the background to over power the image so I just lightly added some blue ink over the embossed design using an Altenew Blending Tool. I didn’t even ink up the brush, I just used whatever ink was left from a previous use.
I have a few hot foiled sentiments stashed in my drawer all ready to go from the Pinkfresh Studio Brushed Sentiments Hot Foil Plate. I paired the brushed sentiment with a smaller sentiment from the So Much Love stamp set. I stamped it in White Pigment Ink, heat embossed with White embossing powder and die cut with the Sentiment Labels die. I love how the black of the sentiment ties in with the Black on the chickadee.
I hope you enjoyed today’s inspiration. I truly enjoyed creating this card and might need to create a chickadee in some rainbow colors just for fun.
Thanks so much for spending time with me today and thank you to Simon Says Stamp for inviting me to their blog. Best wishes in the New Year!
SUPPLIES:
|


Thanks so much for stopping by, and thanks to Mindy for being our guest!


