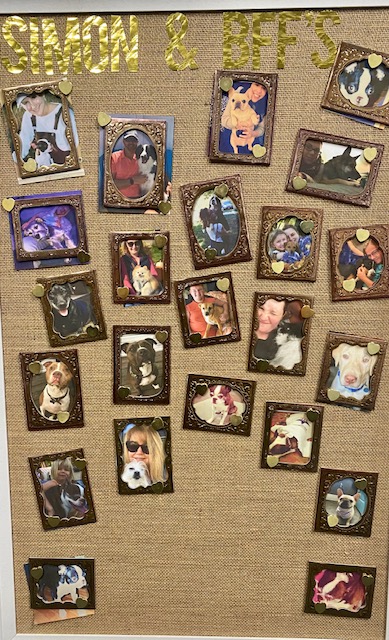
Hey! It’s National Dog Day!

Happy Thursday, friends! We’d be remiss if we didn’t mention that today is NATIONAL DOG DAY! In case you didn’t know our brand name is lovingly named after our found Heidi Crowl’s dog Simon. A lovable and ornery Boston Terrier that is brought to life in so many of our store creatives like the one above!
That being said, you probably won’t be surprised to know that many employees of Simon Says Stamp have pups that are near and dear to their hearts! In celebration of National Dog Day, we’d love to share with you a collage made of some of our favorite furry friends! (with room to grow ;))
Zoomin’ By to Say…
Hi friends! Happy Wednesday! I hope you’re having a great week so far!! Please join me in welcoming special guest Megan Quinn to our blog with this absolutely DARLING card design that could be great for a boy or girl and for any occasion! Read on to learn how she made it and enjoy!
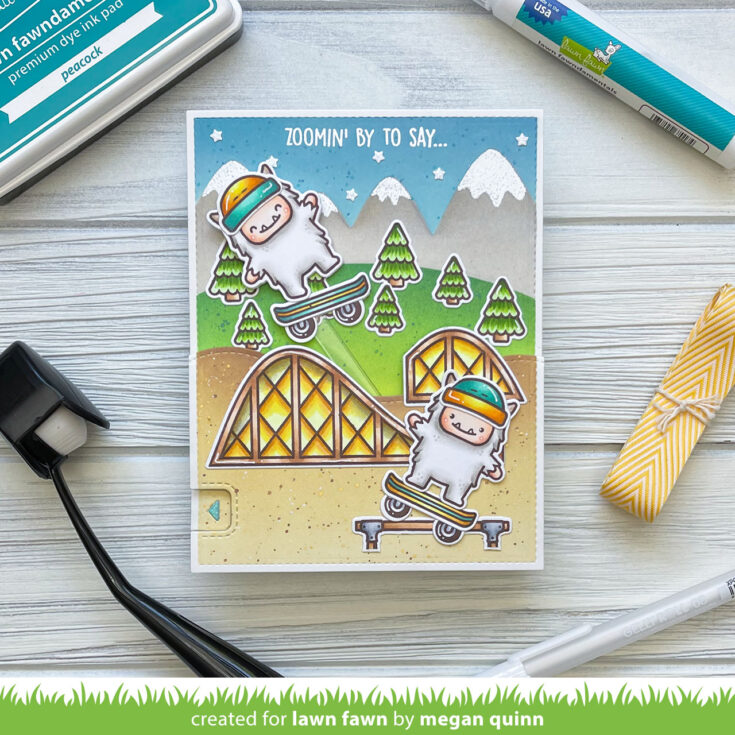
Hello! This is Megan and I am so happy to be back on the Simon Says Stamp Blog today to share a fun interactive card with you! Interactive cards are my favorite to create and the Swish ’n Pop Die Set from Lawn Fawn makes them so fun and easy to create.
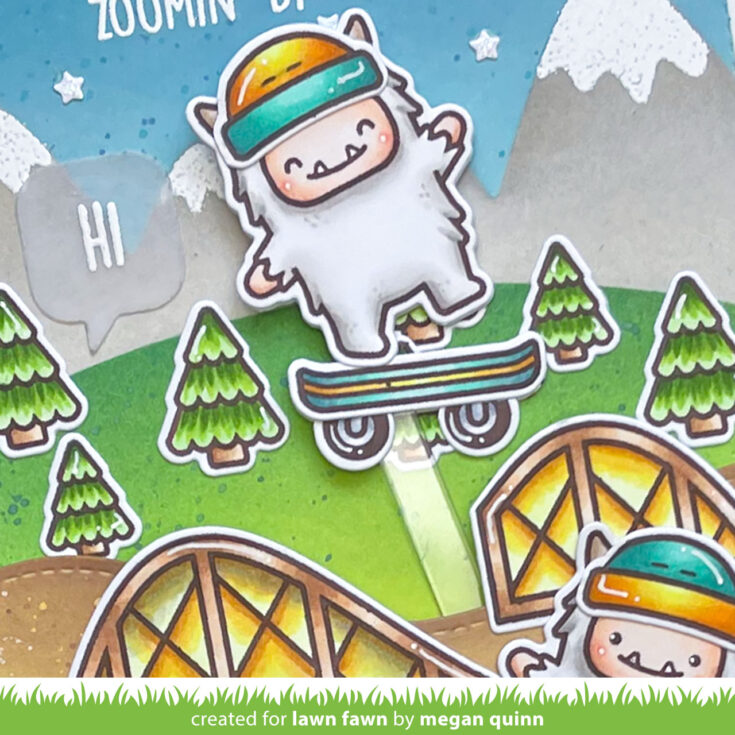
The card that I designed to share with you today features the adorable yetis from Yeti Or Not. I always enjoy using stamp sets in new and creative ways, so I decided to use them out of their natural habitat. As I was looking at the stamp set, I noticed that the snowboard looked a lot like a skateboard with no wheels. An idea was born! The recently released Scootin’ By Stamp Set has scooters with wheels that fit the snowboard perfectly.

To begin, I chose the images that I wanted to use. I picked ones from Yeti Or Not, Scootin’ By, Coaster Critters, and Let’s Play and stamped them onto Lawn Fawn White Cardstock using an alcohol friendly ink. I then colored the images using Copic Markers and cut them out using the coordinating dies.
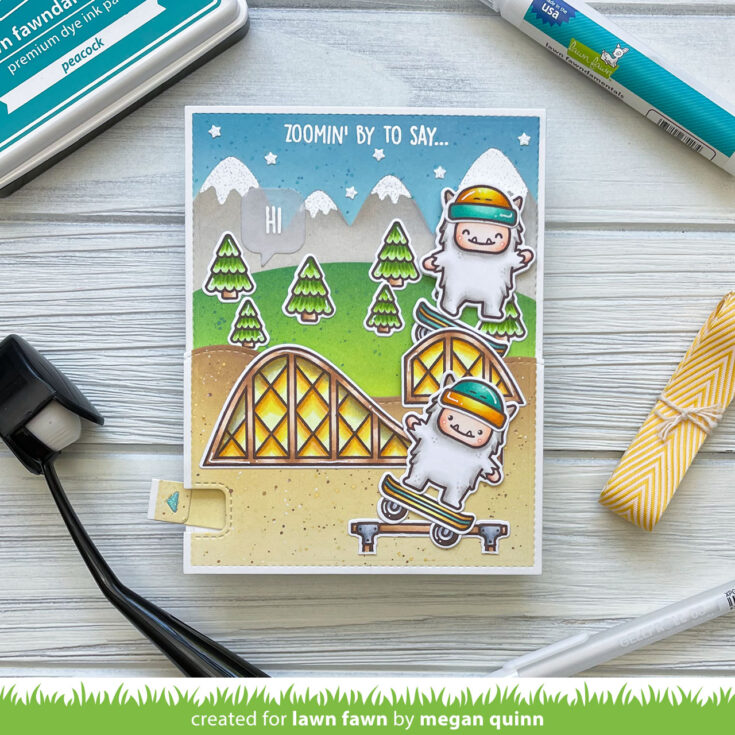
Next, I built the background elements for the scene. Using the largest rectangle from Large Stitched Rectangles Stackables, I die cut two panels from Bristol Smooth Cardstock. I then die cut the second panel using the Stitched Hillsides Die Set to make the foreground of the scene. I wanted to maintain a white border around the scene without adding an additional layer, so I used Post It Tape to mask off the edges on both pieces. I ink blended the foreground piece using Antique Linen, Scattered Straw, Vintage Photo, and Gathered Twigs Distress Oxide Inks. Then, I flicked on some Vintage Photo and a bit of gold from the Gansai Tambi Starry Nights palette.
For the main panel, I used the Hillside and Mountain Stencils to ink blend the remainder of the background scene. The grassy section was ink blended using Twisted Citron, Mowed Lawn, and Rustic Wilderness Distress Oxide Inks. On the mountain range, I used Pumice Stone and Hickory Smoke. I used Speckled Egg, Faded Jeans, and Chipped Sapphire for the sky. Lastly, I used Lawn Fawn Clear Ink to dab the snowy peaks onto the mountains using the Mountain Stencil and heat embossed them using white embossing powder. This really makes them stand out from the sky. Once the panel was dry, I heat embossed a sentiment from Scootin’ By at the top.
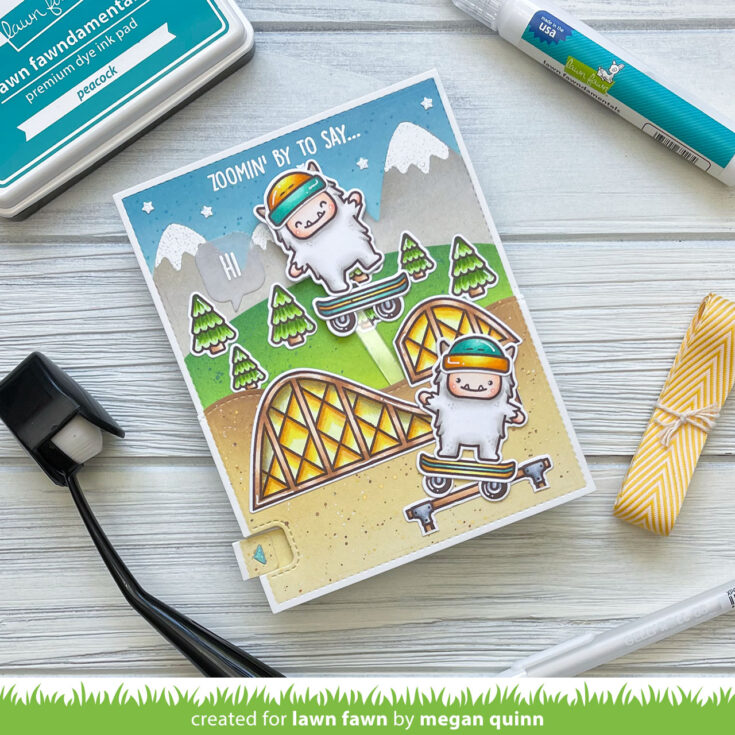
The Swish ’n Pop Die Set really takes the guess work out of where to line the dies up to create the perfect scene. I wanted the yeti to move across the scene from left to right so instead of using the “L” shaped piece to die cut the holes for the mini brad to go thru, I turned the main panel over and lined the die up on the backside of the panel. I then die cut the swishing piece from acetate and flipped it over to swing the opposite direction and positioned the pull tab piece to be pulled from the left side of the card. I then laid the foreground piece over the main panel and used it as a guide to line up the die that cuts the notch out. Easy peasy!
To finish the card, I heat embossed the remaining “Hi” sentiment onto a piece of vellum and die cut it using the Speech Bubbles Die Set. I positioned this behind the yeti in the starting position for a fun surprise when the recipient pulls the pull tab. I then used a mix of liquid glue, glue dots, and foam tape to adhere the images and panel down to form the scene. I was very careful not to place any foam adhesive in the way of the swishing mechanism. I adhered the back panel to a white card base using foam tape as well and this card is done!
I hope that you have enjoyed seeing my card. Thank you so much for stopping by the Simon Says Stamp Blog and I hope that you have a great day!
SUPPLIES:
|


Thanks so much for stopping by, and thanks to Megan for being our guest!
Crafty with Caly: Blooming Thoughts

Hi friends! Happy Tuesday! Please join me in welcoming back special guest Caly Person in our bi-monthly edition of Crafting with Caly blog series! Be sure to read on and watch the video for more details and enjoy!

Hi, Friends! It’s Caly and I’m sharing a floral birthday card using stamp-layering images from Ink to Paper. I’m combining two floral sets using Blooming Thoughts and Prominent Petals along with the Mix and Mat Confetti Dies for a feminine floral layout – but you can re-create this card with any color combination.
I used Simon Says Stamp inks for my card today – I really love the full rainbow range of their inks!
Prominent Petals: Rosie Cheeks, Teeny Bikini, Watermelon, Magnolia, Key Lime, Green Leaf
Blooming Thoughts: Pale Blush Pink, Sunkist, Rose Apple, Fern
WATCH THE VIDEO:
The stamping is easy when you die-cut first. There are so many layers and details, so die-cutting first makes sure you stay inside the cut lines. If you don’t have a stick mat to use, you can also use some temporary adhesive to hold all your die-cuts in place on your stamp platform to keep things in place while stamping your images.
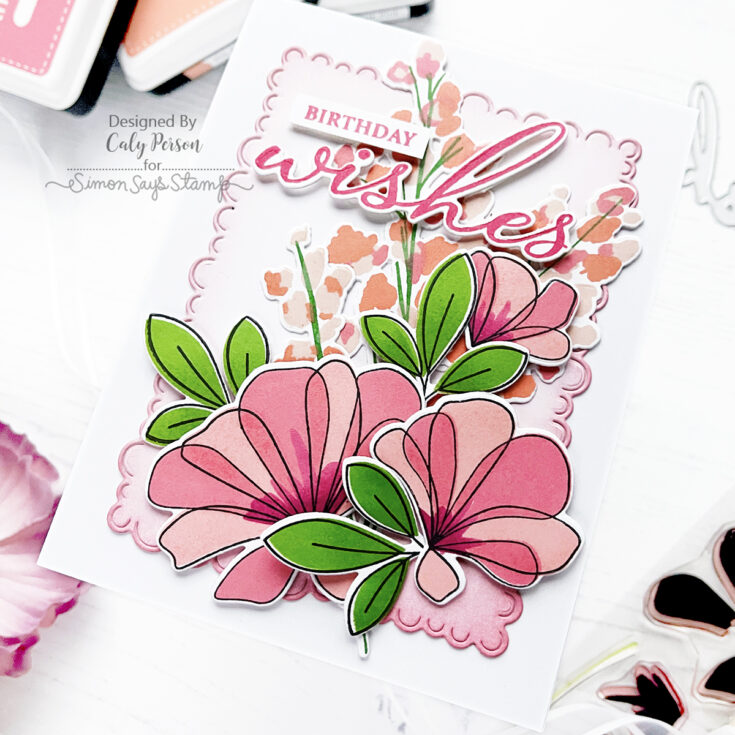
After stamping all of my images, I die-cut the scalloped panel from the Mix and Mat Confetti Dies. To give it some color, I used Teeny Bikini ink to blend around the edges with the Cheeky Simon Says Stamp Large Blending Brush.
I finished by arranging and adhering my stamped images and attaching sentiments stamped in Watermelon ink from the Perfect Pairs Commodities set from Ink to Paper.
I hope you enjoyed this project! Have a wonderful day!~Caly
SUPPLIES:
|


Thanks so much for stopping by and thanks to Caly for being our guest!


