Thank you for 20 GREAT years!
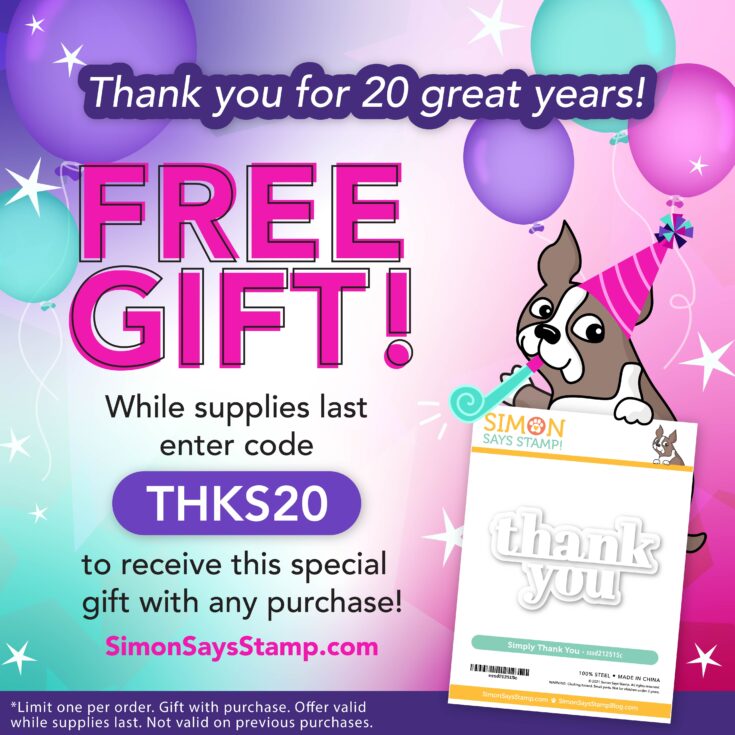
Hi friends! We turn 20 this month, and have some fun surprises in store to celebrate this milestone and thank YOU– our fabulous and loyal customers! Going on NOW (and while supplies last or until the end of the month) receive this pretty Simply Thank you die set FREE with any purchase when you enter code THKS20 at checkout! Please enjoy!
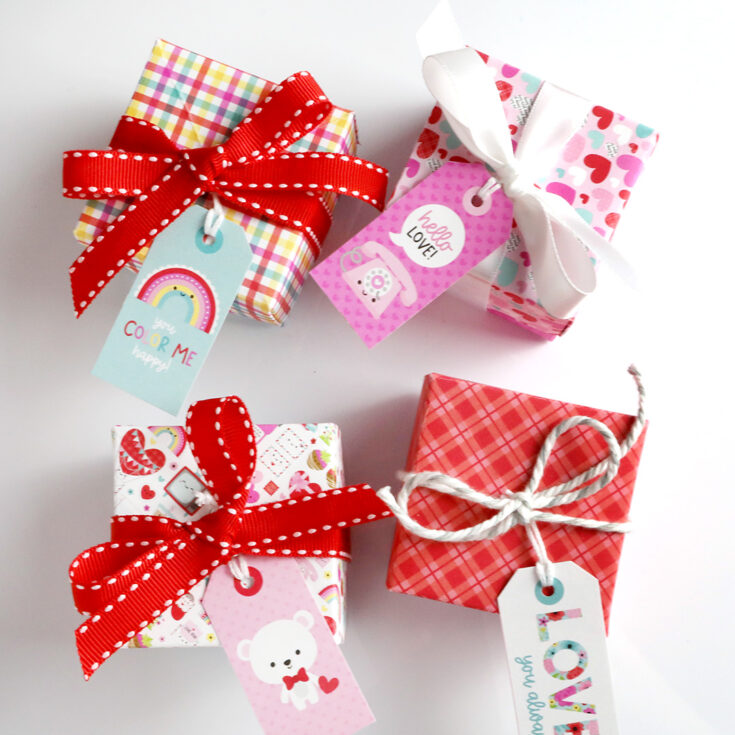
Easy Origami Boxes for Valentine’s Day! Limited Edition Happy Mail Kit
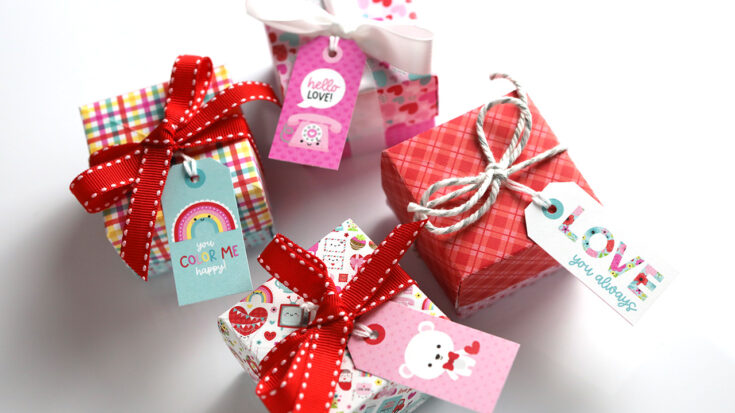
Hi all! Kristina Werner here with some super cute Valentine’s Day boxes! I used the patterned papers in the Limited Edition Happy Mail Card Kit to create small 2×2 boxes. These origami boxes are very easy to create, and fun to decorate!
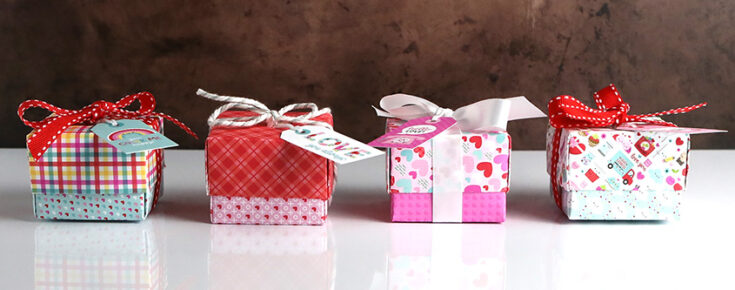
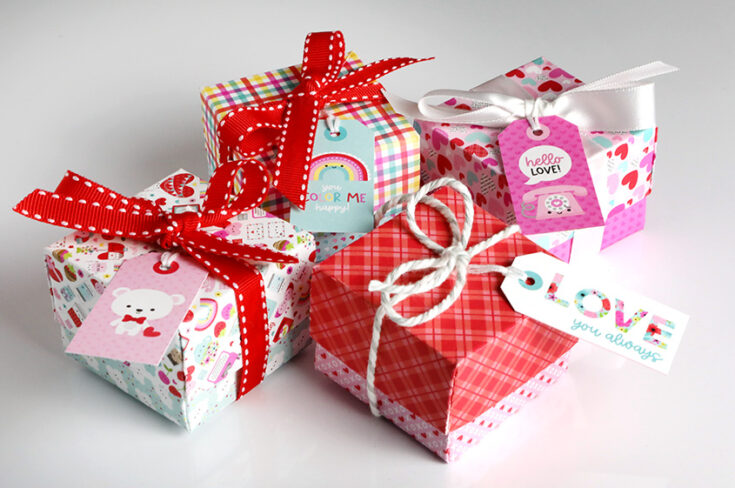
For the top of each box, you will need a 6″ x 6″ sheet of paper. And for the bottom of each box, you will need a 5.75″ x 5.75″ sheet of paper. This ensures that the top of the box will fit over the bottom. I used the Lots of Love patterned papers from Doodlebug that are included in the kit.
To make the tops of the boxes not come completely down and hide the alternating patterned paper used for the bottom of the box, I created an interior liner out of cardstock (see video below for exact details). I used 1.5″ x 8.5″ strips of cardstock and scored them to create the liner.
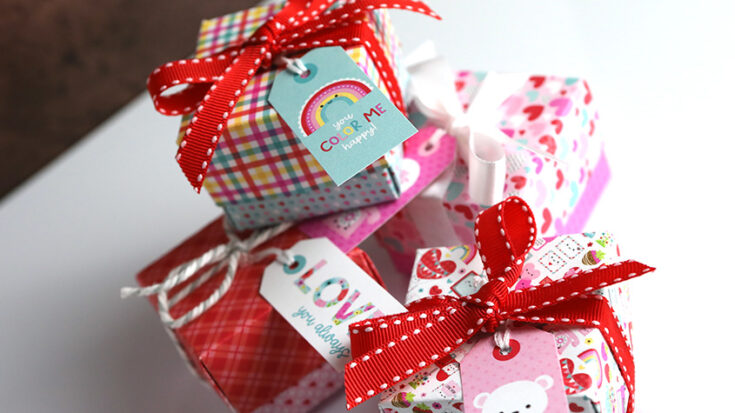
To finish off the boxes, I tied bows around them using leftover scraps of ribbon and twine in my stash. I also attached tags. The tags were trimmed out of one of the pieces of patterned paper in the kit. There are so many small elements to use!
You can get this limited edition card kit HERE! Enjoy the video!
Supplies
|


One Card Five Ways: Love You Bunches

Hi friends! Happy Monday and happy last-day-of-January!! (Wow, that was fast!!) Please join me in welcoming back special monthly guest Suzy Plantamura! Read on for lots of pretty inspiration featuring our Love You Bunches stamp set! Enjoy!!
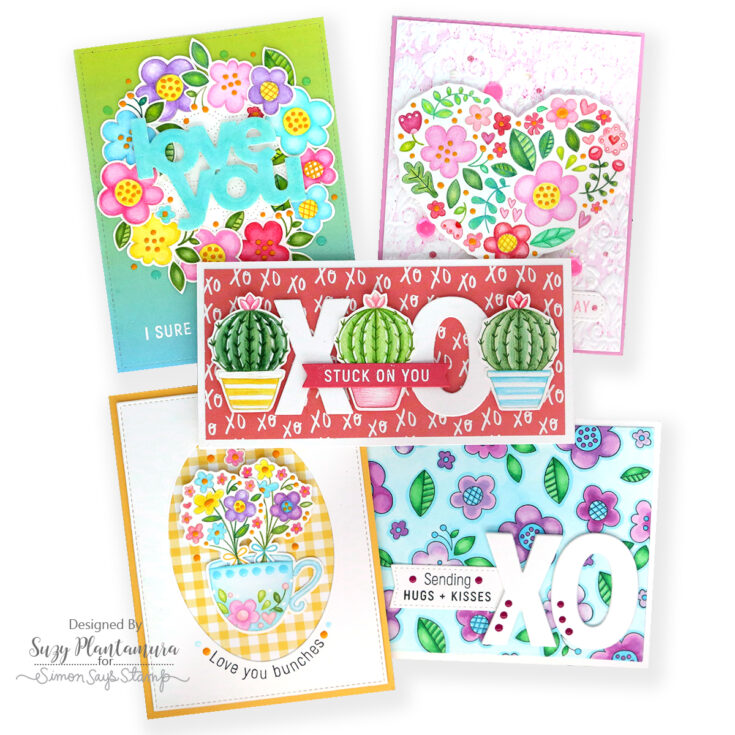
Hello Simon Says Stamp Friends! Who is ready for Spring?!?!?! I know I am as it is my favorite season. I love Spring weather, colors, and flowers. So naturally, I picked this stamp set called Love You Bunches for my “one stamp, five ways” post today. It is full of flowers and can be used for Valentine’s Day or for Spring as you will see!
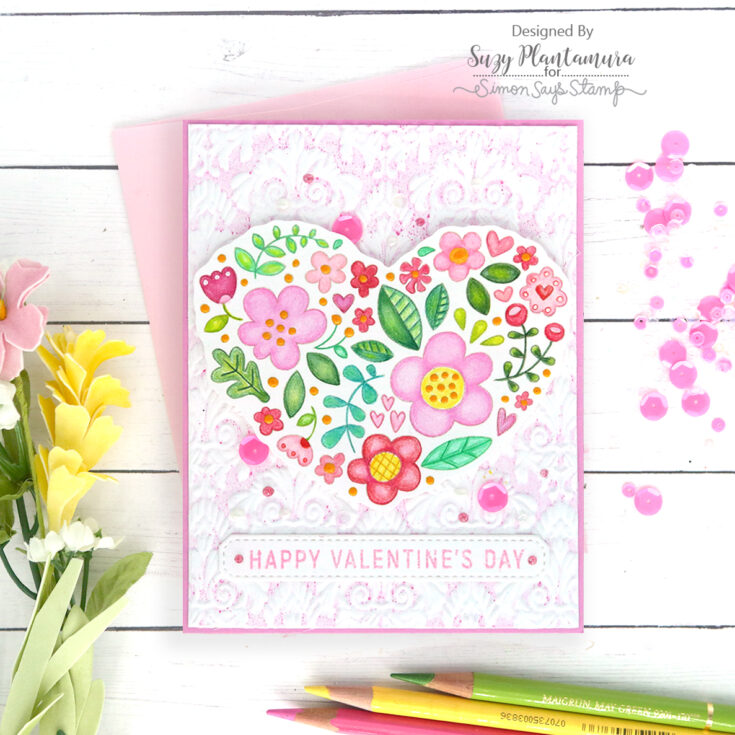
My first card uses the Love You Bunches for a Valentine’s Day card. To make the background, I used the SSS River Damask Embossing Folder. I rubbed Kitsch Flamingo Distress Oxide Ink on the flat side of the embossing folder. I then ran my cardstock through and got a pink image. I then ran it through again for a lighter pink image. I used the second one for the background of this card.
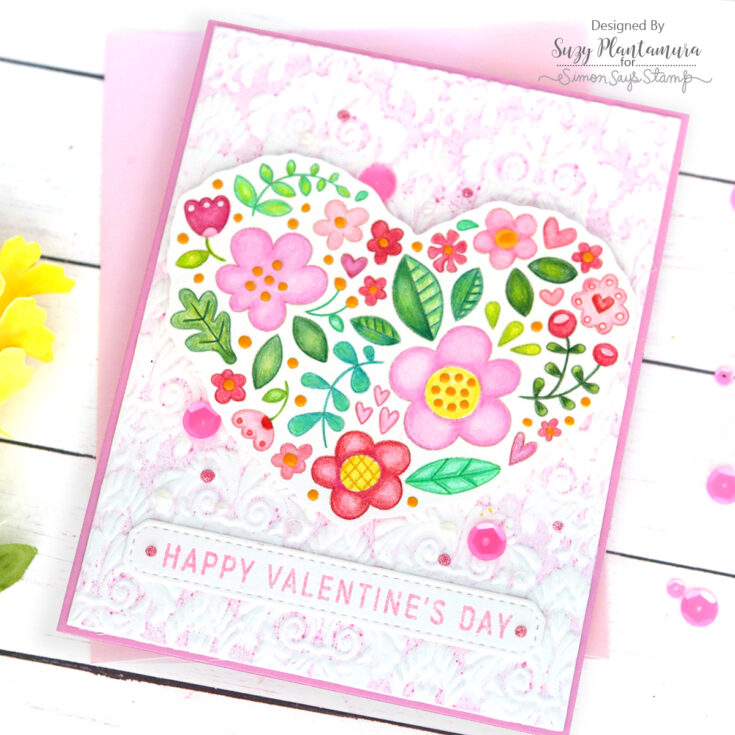
I stamped the large heart image from the Love You Bunches stamp set on white cardstock with a light color of ink. I colored the images in with colored pencils in lots of Spring colors. I didn’t have the matching set of dies, so I cut around the heart. I attached it to the card front with foam tape beneath it. I embossed the sentiment with Kitsch Flamingo Embossing Glaze on a white banner. I added some Dandelion Yellow Nuvo Drops over the small dots in the heart and the center of the flowers. I used Enchanting Pink Glitter Drops and Cloud 9 Dream Drops around the heart. I also added some pink sequins from the SSS Sweetheart Mix.
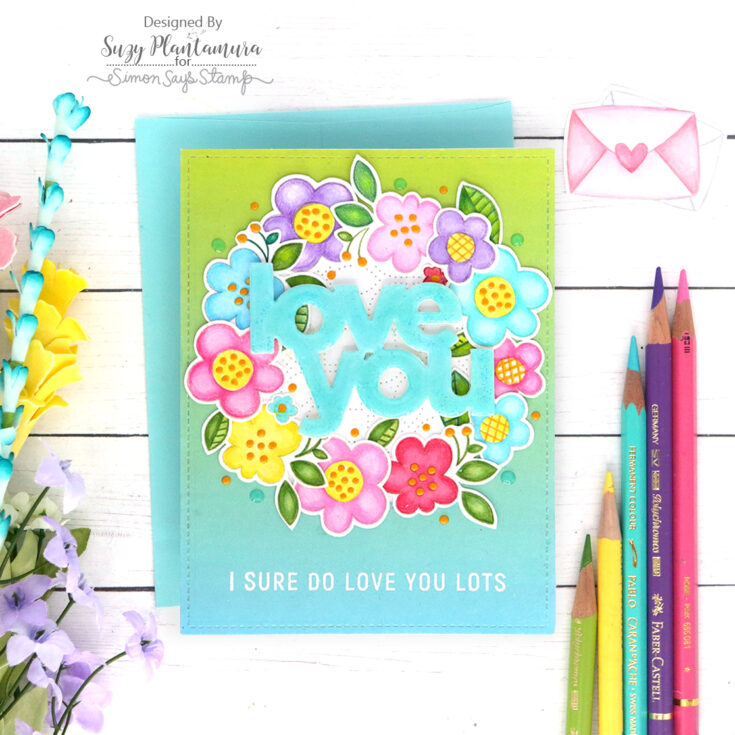
I made the background with a piece of patterned paper in my stash and I’m not sure who it is by. I die-cut a circle from the top of it using the SSS Thin Frame Circle Dies. I used the SSS Detail Petal Slim Plate Wafer Die for the piece on the inside of the circle giving it a little bit of design and texture. I die-cut the CZ Love You Die out of watercolor paper and painted it a light blue color.
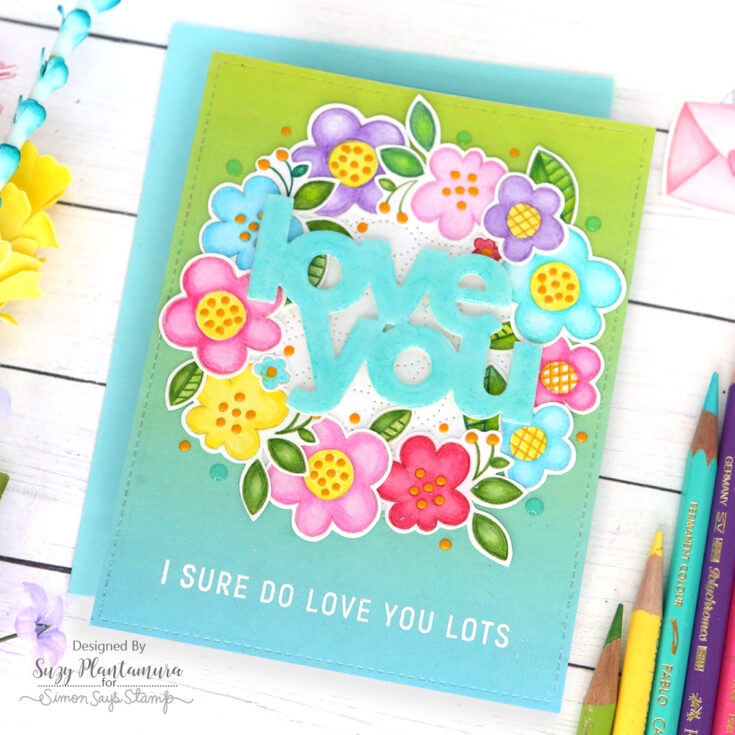
I stamped all of the flowers in the Love You Bunches stamp set multiple times on white cardstock with a light color of ink and I colored them in with pencils. I arranged them around the circle to form a wreath. I used Dandelion Yellow Nuvo drops over the yellow areas of the flowers and around the wreath. I attached the “Love You” over the center of the wreath with foam tape behind it. I used a thick layer of Iceberg Blue Jewel Nuvo Drops over the letters to make them stand out more and applied a few drops around the wreath. I embossed “I sure do love you lots” on the bottom of the card with white embossing powder.
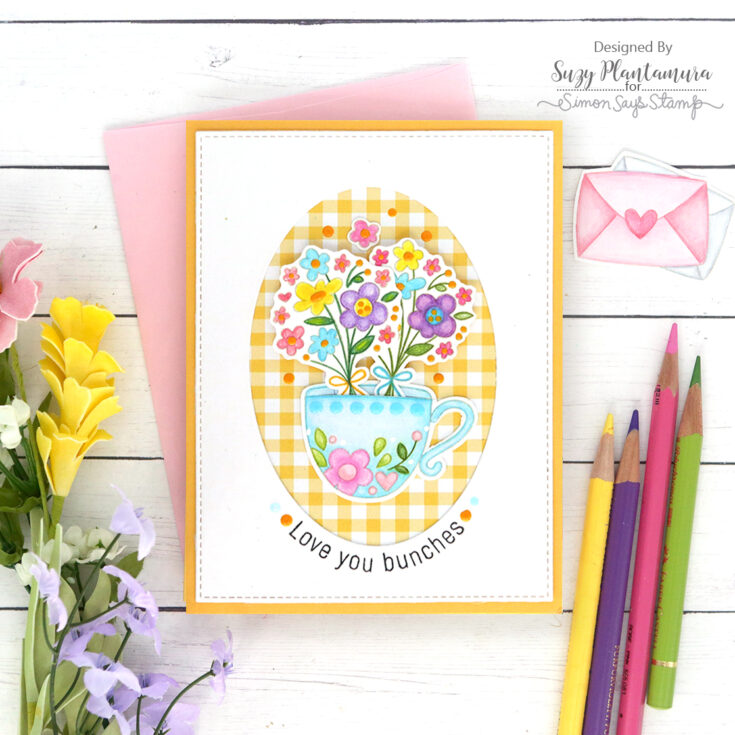
I used the SSS Nested Oval Dies to die-cut an oval out of white cardstock. I found another paper in my stash to use on the inside of the oval and I attached it to a yellow card base. I stamped the cup and two of the floral bouquets on white cardstock with light ink and colored them in with colored pencils.
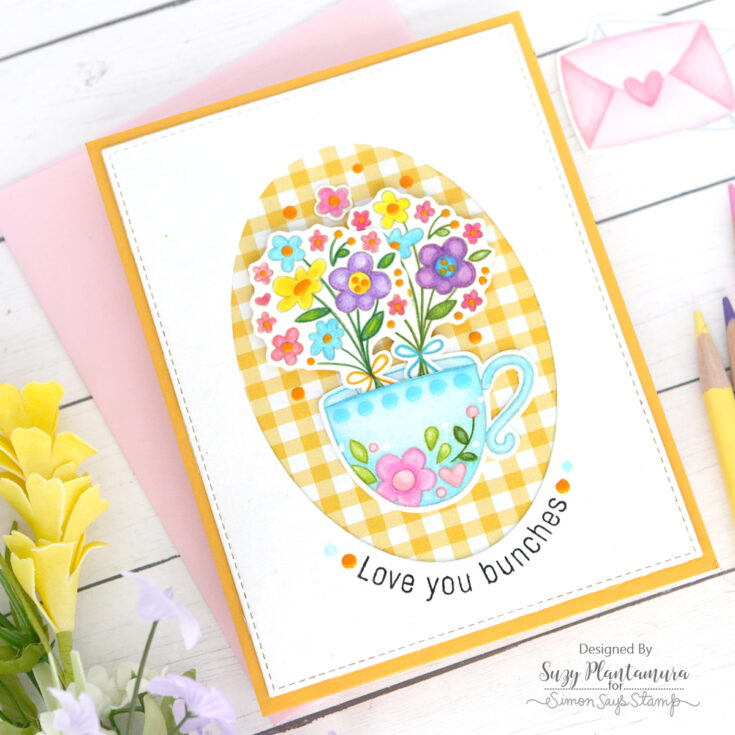
I slit the top of the cup almost to the edge so I could tuck the flower bouquets into the top of the cup. I added Nuvo Drops in Dandelion Yellow to all the yellow areas on my bouquets. I used some light blue drops on the top of the cup. I stamped the sentiment at the bottom of the oval with Intense Black Ink. I had to slightly bend it wider than it was to fix on the bottom of the oval which is easy to do using a Misti. I added both colors of Nuvo Drops around the card to finish it.
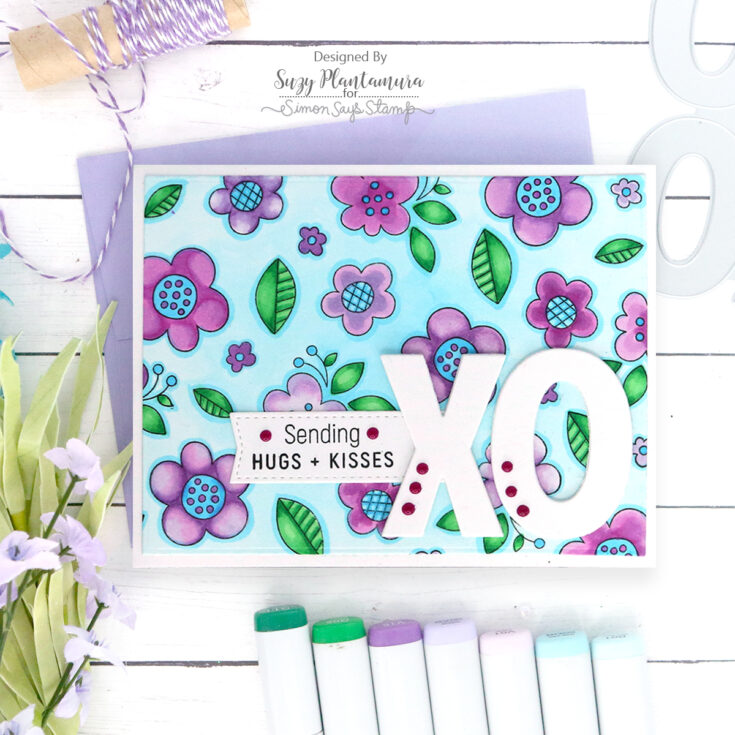
I did my favorite “random stamping” technique to create the background of this card. I always try to arrange the stamps in my stamp sets like a puzzle to create card fronts because I love to color! I stamped the flower images multiple times with Intense Black Ink on a piece of A2 sized white cardstock. I then colored them all in with Copic Markers. I also colored the background with light blue Copics moving from a darker color in the center to a lighter color around the outside. I used the darker one to outline each of the flowers.

I die-cut the SSS Big XOXO die from the “And Back Again” release 3x from white cardstock. I glued them together for extra dimension and attached them to the front of the card. I stamped a sentiment from the stamp set on a stitched banner and tucked it under the left side of the X. I added some Windsor Wine Nuvo Drops on the letters. I LOVE Nuvo Drops as you can probably tell, so each time they come out with new colors I have to buy them! This is one of the newest colors and I love it!
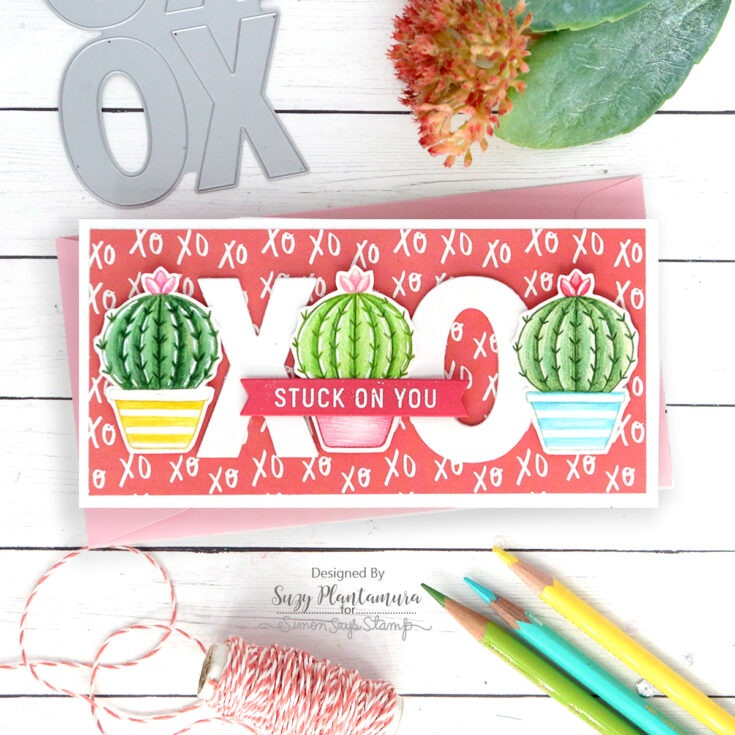
I loved a piece of Simple Stories Happy Hearts paper that was in my February card kit that it inspired my design for this card. I made a white cardstock mini slim-line card and attached the paper to the front of it. I die-cut the Big XOXO dies and glued them together 3 times for depth.
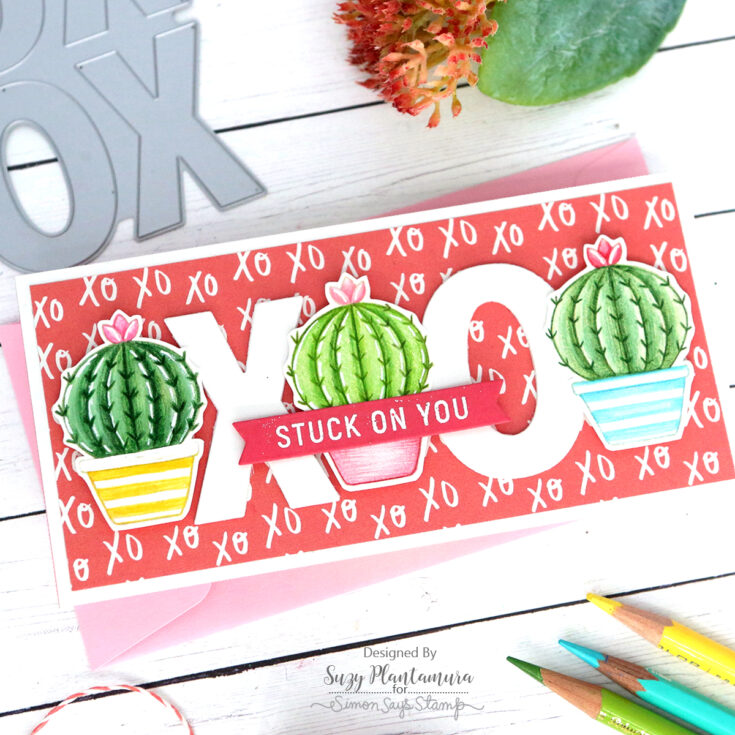
As soon as I saw this cute succulent in the stamp set, I knew I wanted to use it multiple times on the same card. I stamped it 3 times with a light ink and colored them in with colored pencils. I attached the pots with foam tape behind them and the X and O between them to the card front. I embossed the sentiment from the stamp set on a Honey Bee Sentiment Banner with white embossing powder. I attached that over the center pot. I resisted the urge to add any Nuvo Drops! haha
I love doing this blog series on my blog weekly and here on the SSS blog monthly as it gives me a reason to think of multiple ways to use my stamp sets. I hope I have inspired you to try and use your stamps more as well! And if you are tired of the cold weather, I hope that I have given you a little feeling of Spring, which will be here before we know it! Thanks for visiting today! Suzy
SUPPLIES:
|


Thanks so much for stopping by, and to Suzy for being our guest!


