Yippee for Yana: Mass Produce Last-Minute Christmas Cards

Hi friends! Happy Tuesday! Please join me in welcoming back special guest Yana Smakula! Please read on and be sure to watch the video for all the details on this gorgeous card design! Enjoy!
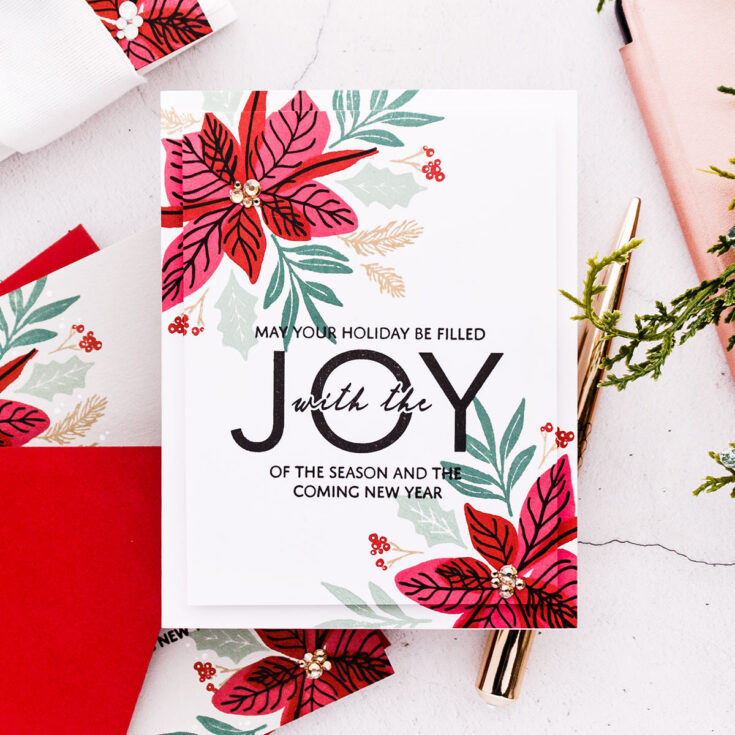
Hello, crafters, this is Yana Smakula for SimonSaysStamp.com! Welcome back for another Yippee For Yana video! In this video I’m talking about mass producing last minute Christmas cards.
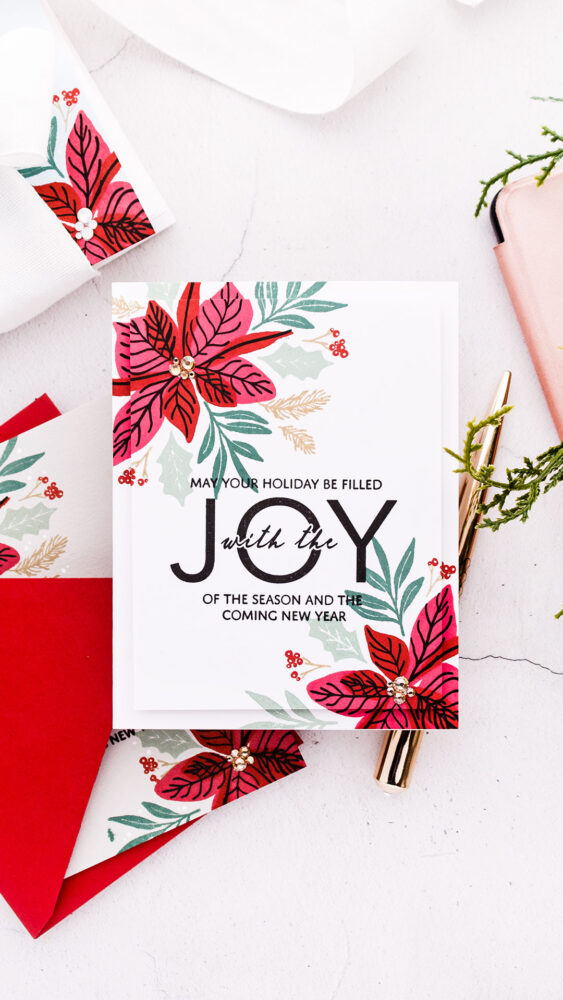
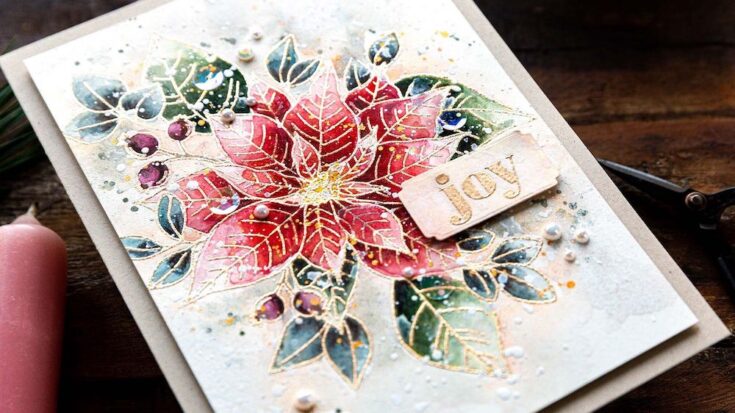
I often like to test stamp my card designs on a piece of scrap paper and I did that for these cards. I stamped 2 different designs using identical products. One has less stamping, and the other one requires a bit more stamping. Probably twice as much. If you are pressed for time, you can pick the design with a single poinsettia and you’ll be able to stamp that much faster and make twice as many cards versus stamping the design with 2 poinsettias.
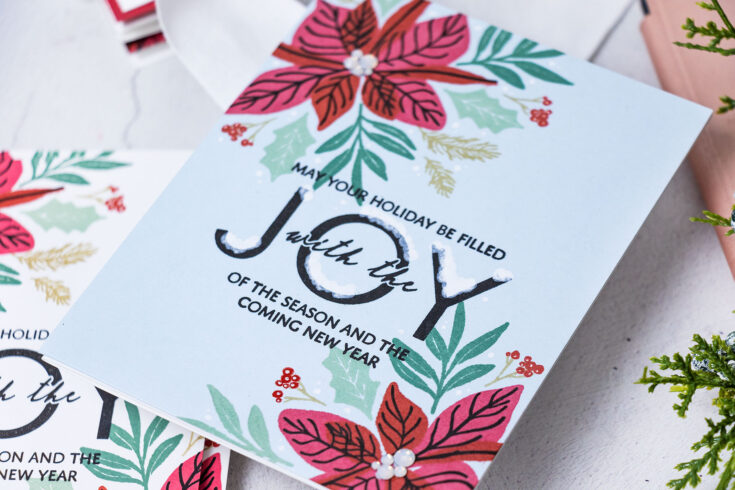
With design selected I moved onto selecting the paper I wanted to do my stamping on. I knew I’d stamp the majority of my cards on white cardstock. I like to use Simon’s 120lb or 130lb cardstock, but I also love to stamp on colored cardstock so I picked several very light colored cardstock sheets from my stash. You need to go with light colors, because your stamping won’t be visible or as prominent on dark colors of cardstock.
The next step is to set up your MISTI or whatever other stamping tool you have. The key to quick stamping here is of course using a stamping tool as that will allow you to stamp a bunch of identical panels in very little time.
Having placed my blank panel inside the MISTI I then place the test stamped design on top and I use that as a guide. I already have this beautiful design all figured out, I don’t need to re-invent it, I can use it as an exact guide for image placement. So I place the stamps over it and align the stamps over the previously made impressions. From here, I stamp away. If you plan to make say 20 cards, I would stamp a few additional panels just in case, as you might mess up some during the process (I messed 2 of my panels up).
The stamps I picked are from Simon – the sentiment comes from the Inside Christmas Greetings set and the poinsettia comes from the Happy Poinsettia set.
My cards consist of only stamping. I don’t have any die cutting, there’s no foiling, no embossing, no anything else, just simple beautiful solid stamping.
The poinsettia stamp set has coordinating dies and I have shared another card on my blog where I used the dies to step my design up. For mass producing cards, and especially for cards that I plan to mail I prefer to keep them simpler, I prefer to eliminate the extra steps, if possible, such as die cutting in this case and I prefer to keep the number of layers to a minimum, most of these cards are one layer with just a handful being 2 layer cards.

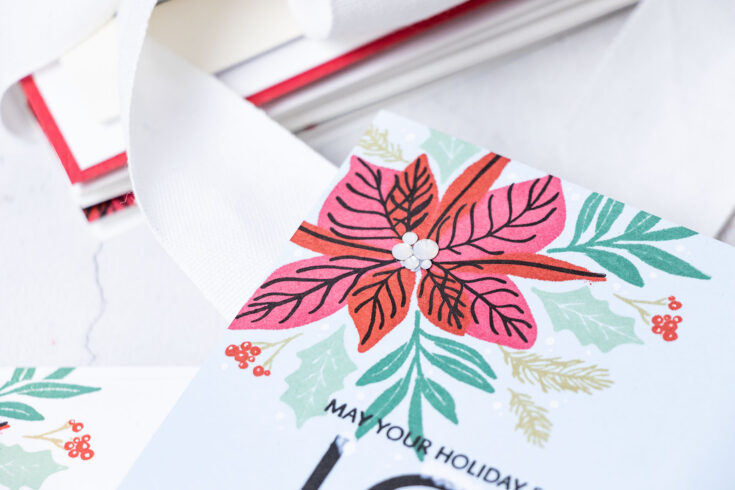
The design of the poinsettia allows you to nestle the leaves in between the petals or the leaves of the poinsettia, so you don’t need to do any masking or to die-cut the elements to create a beautiful design.
Stamping on colored cardstock will give you slightly different results, the colors of ink will look different, but this gives you more options while still using the same card design. I particularly liked stamping this on gray and also on blue because this allowed me later, to use a white pen to add white accents to my cards.
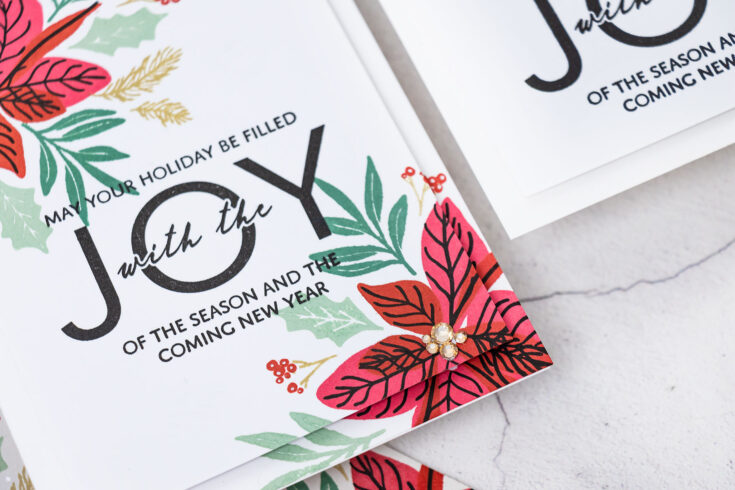
To assemble the cards I used different approaches. The panels with the single poinsettias were trimmed 1/4” from each side and I foam mounted them onto A2 whit3 card bases.
I used a white pen and added some snow accents to the cards stamped on colored backgrounds and added white dot highlights to the berries on each card.
The designs with the 2 poinsettias were adhered onto A2 card bases as is, I didn’t trim them. If you have extra panels by the time you are finished making your cards you can add an element of 3D decoupage to them. You need 2 identical panels – adhere one directly onto the card base, next trim the other one down about 1/4” on each side and foam mount on top This gives a beautiful dimension and a continuous design on your card front.
Lastly, you can add some gems – I decided to use gems for the poinsettia centers and I adhered gems in various sizes to create the irregular centers for my flowers. Have fun stamping and Merry Christmas!
WATCH THE VIDEO:
SUPPLIES:
|


Thanks so much for stopping by, and thanks to Yana for being our guest!
Doodling with Debby: Easy Heat Emboss Resist Watercolor
Hi friends! Happy Monday! We’re delighted to welcome back special guest Debby Hughes! Please be sure to watch the video for all the details and enjoy!

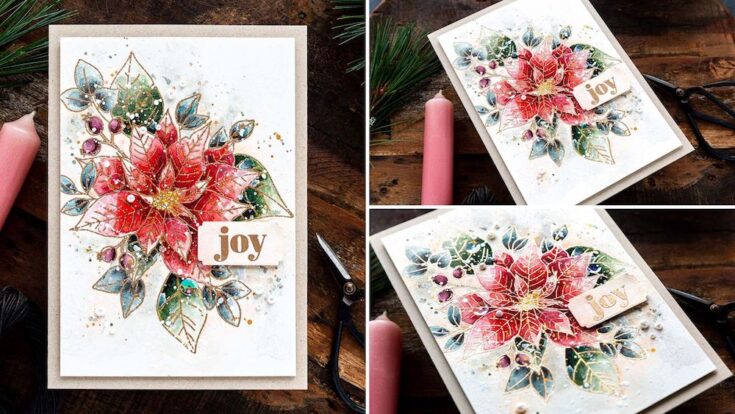
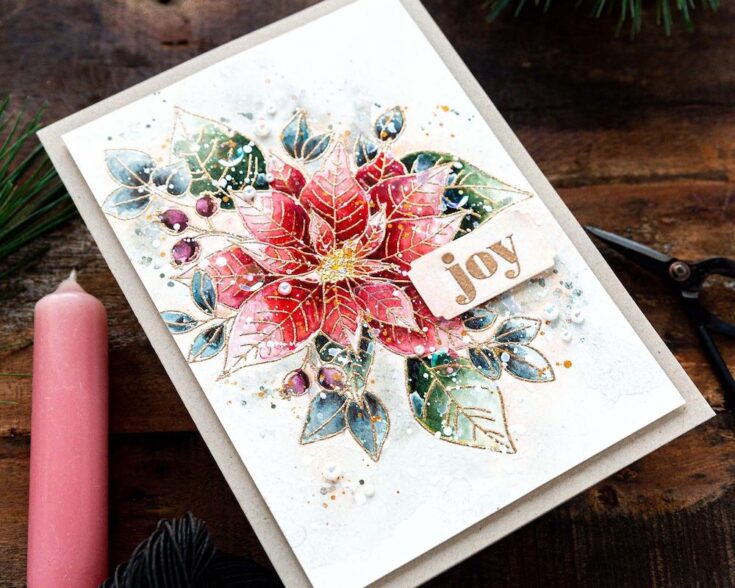
Hello, it’s Debby here. I know it is Diecember, but when I saw the Winter Flower stamp set with that gorgeous Poinsettia bouquet, I knew I had to stamp and paint it! I did use a die for the greeting though LOL.
STEP BY STEP HOW-TO:
• Prepare Hot Pressed watercolour card with Antistatic Powder.
• Stamp the Winter Flower image in Versamark ink and heat emboss with Antique Gold Embossing Powder
• Tape the card to a board to prevent warping when adding lots of water.
• Paint a light layer of watercolour into the areas contained by the embossed lines. Dot in more concentrated paint where the shadows will be – on the base of the leaves tucked into the bouquet and at the base of the petals where they dip into the flower center.
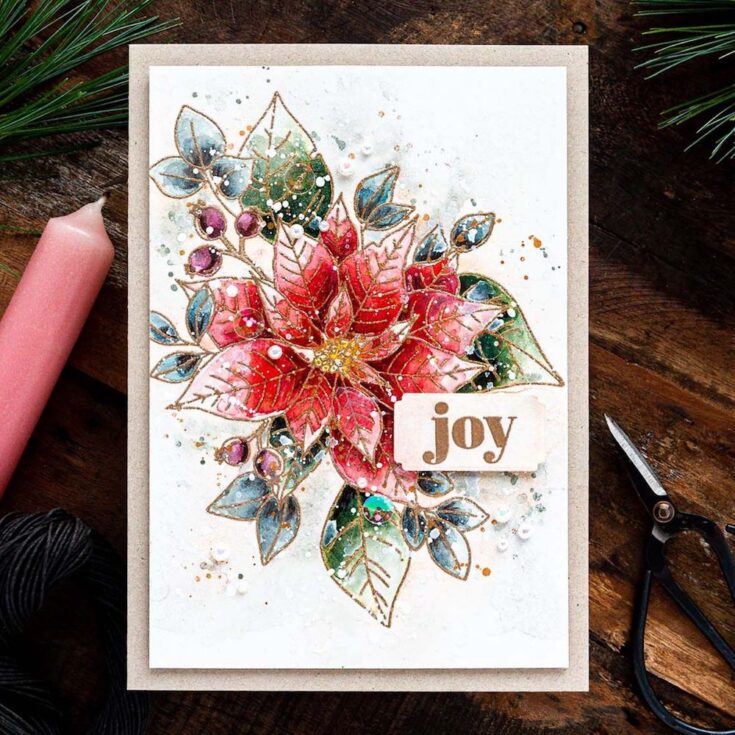
• Build up the layers of paint as each layer dries, adding more layers until there is depth but equally highlights on the painting.
• Emphasise the shadows with a brown Faber Castell Polychromo pencil.
• Splatter with White Gouache and left-over paint.
• Trim the panel to fit on a 5 inch by 7 inch Neenah Desert Storm card base.
• Heat emboss a sentiment from the Holiday Greetings stamp set.
• Die cut the greeting with a Mixed Label die.
• Rub Antique Linen and then Tattered Rose Distress Ink around the edges of the label with a blending brush.
• Splash with water and soak up some of the colour on the tag with a cloth.
• Attach the panel to the card base with foam tape.
• Attach the label, again with foam tape and using a T-square ruler to ensure the label is on straight.
• Embellish with Darice Crystal Sequins and Little Things From Lucy’s Cards Eggshell Pearls.
Well, that’s me for this month. I hope you enjoyed this tutorial; you’ll find the video below.
Thanks for joining me and I hope to see you next time for Doodling With Debby.
WATCH THE VIDEO:
SUPPLIES:
|


Thanks so much for stopping by, and thanks to Debby for being our guest!
Crafty with Caly: Etched Magnolia Blossoms

Hi friends! Isn’t this floral card by Caly Person in the latest edition of our Crafty with Caly blog series dreamy?! Be sure to read on and watch the video for all the details and enjoy!!
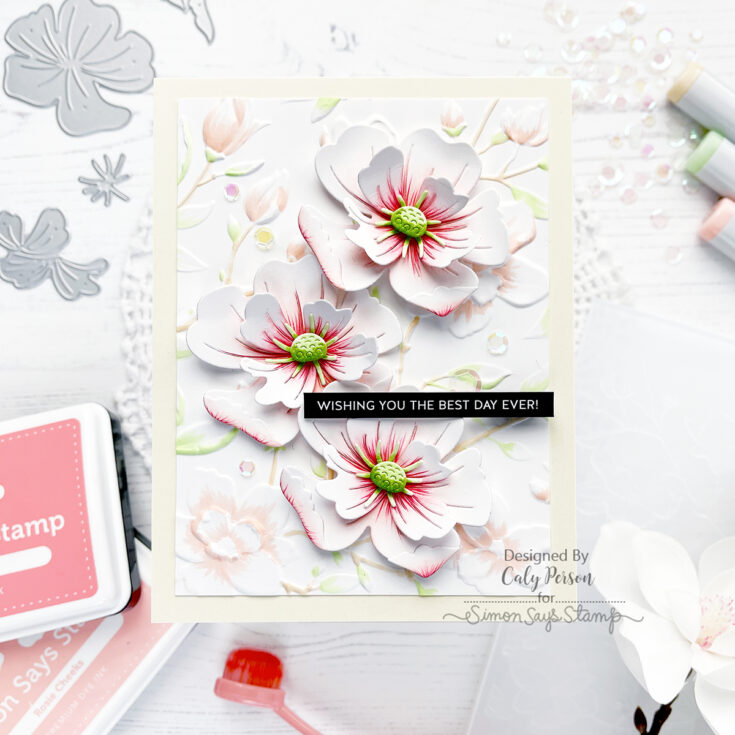
Hello Friends! I hope you love 3D flowers on cards because I have a fun one to share today using the Magnolia Branches Embossing Folder along with the new DieCember® Etched Magnolia Blossom dies!
I have a video to show how these fun Etched Magnolia Blossom dies are put together. I hope you’ll enjoy watching!
WATCH THE VIDEO:
I die-cut the pieces in white and ink-blended the petals to add color using Rosie Cheeks and Teeny Bikini inks. For the stamen and cone center, I used YG11 and YG17 Copic markers. The pieces are small so Copics are easier for me to add color on those elements. I also used a red colored pencil to add some veins and more dimension to the petals too.
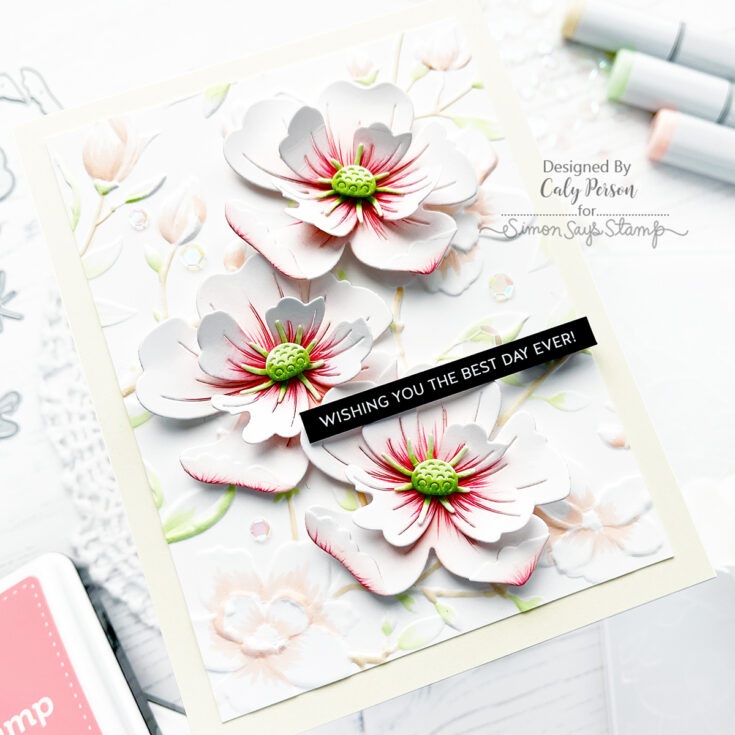
After assembling three Etched Magnolia Blossoms, I embossed the Magnolia Branches Embossing Folder on some white Copic-friendly paper. You can leave it white or add colors in various ways – I opted for some quick Copic-coloring with some flicking to add color. This gives me a nice backdrop for my 3D flowers that I created.
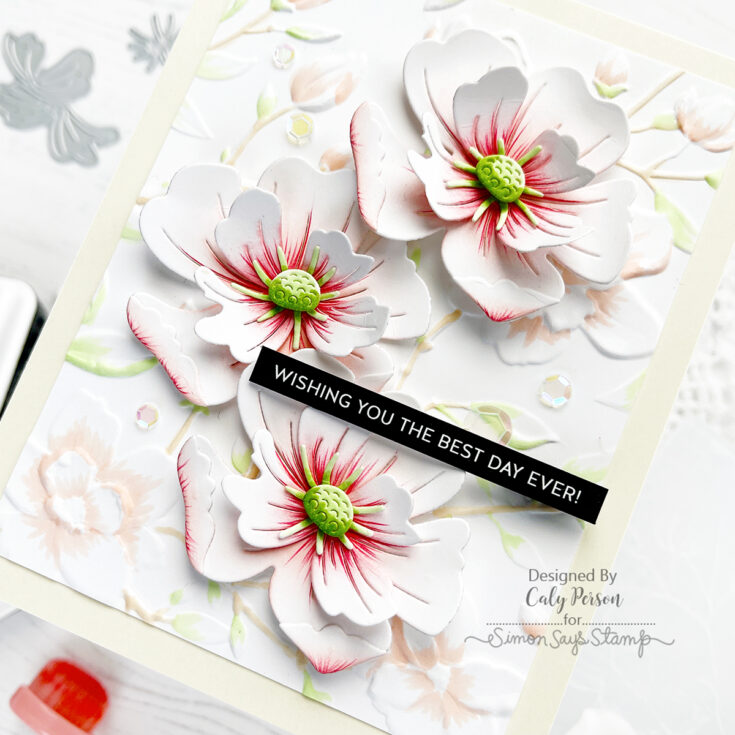
To finish today’s card, I adhered my Etched Magnolia Blossoms, attached a sentiment strip from the Reverse Family Sentiment Strips set, and embellished my card with some iridescent sequins. I hope you like it! Thanks so much for spending time with me here today! Have a good one! ~Caly
SUPPLIES:
|


Thanks so much for stopping by, and thanks to Caly for being our guest!


