Yippee for Yana: Easy to Mail + Elegant Christmas Cards!

Hi friends! Happy Tuesday! If you’re anything like me, this gorgeous card design by Yana Smakula will make your jaw drop! Elegant, gorgeous, and honestly relatively easy to mass produce! The one-layer design makes it ideal for mailing too! Be sure to read on to learn more and enjoy! (Please note; our dear friend Yana is Ukrainian, to show support to our brothers and sisters in Ukraine, please see Yana’s post HERE.)

Hello, crafters, this is Yana Smakula for Simon Says stamp! Welcome back for another Yippee For Yana video! In this video, I am showing how to create elegant Christmas cards that are easily mass-produced and easy to mail, too.
I’m working with a new stamp set from Simon called Glistening Snowflakes. This stamp set is filled with beautiful snowflake imagery. If you want, you can also get a coordinating die set to cut these images out and I love that there’s a die for every single snowflake in this set. It makes it very versatile as you can use these snowflakes on many other projects.
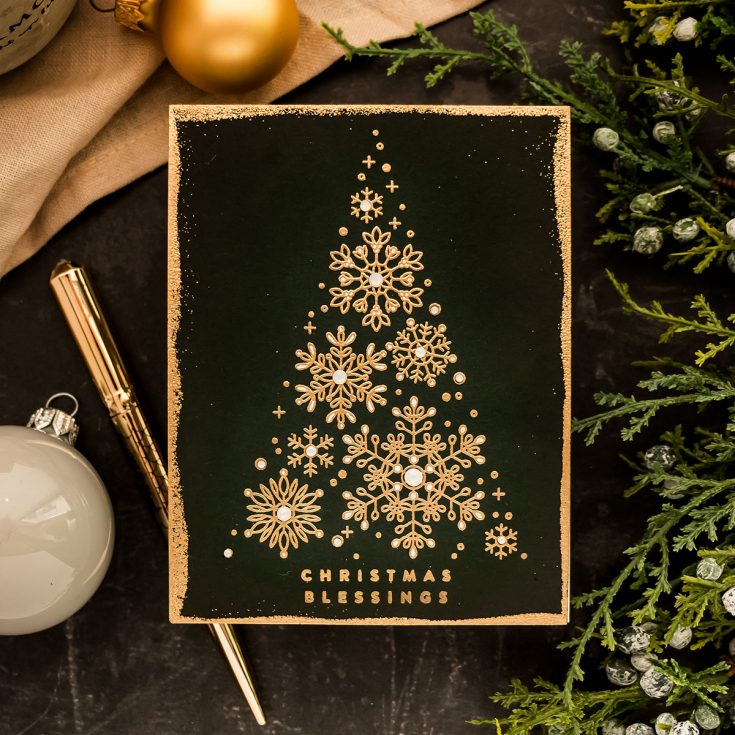
There are no sentiments in this set, so I brought in another set, called Simple Holiday Greetings – just like the name says, these are simple font sentiments and they go well with the complexity of the snowflakes and complement them nicely.
My plan for these cards is to heat emboss the image in the center of dark colored cardstock panel using metallic color embossing powder and darken the edges of the panel using an ink blending to bring the eye of the viewer to the center of the card and the beautiful snowflakes.
First, I stamped the image in clear embossing ink and covered it with Antique Gold embossing powder. I love this color of powder from Simon, I come back to this color every time I create Christmas cards. Next, I warmed up my heat tool and heat set the powder to melt it. The trick is to keep the heat tool moving otherwise if you keep it in one spot for too long, the paper might warp affecting the look of the finished card. Mine warped a little bit, it is expected when you do this kind of technique.
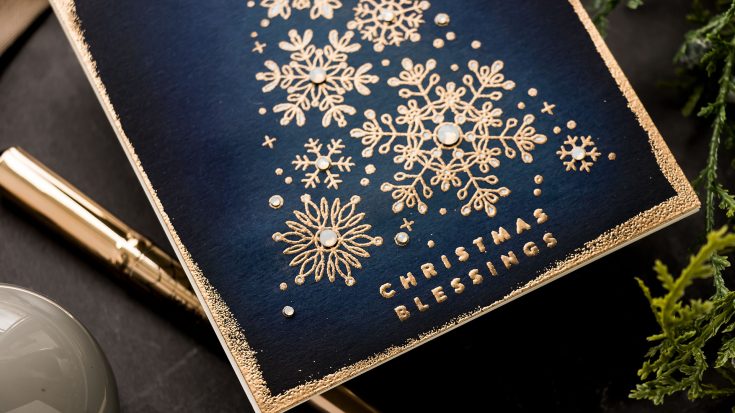
Next, I gave the powder a few seconds to cool off, you want to make sure to do that, otherwise, you might smear the hot powder on the paper, I have done that many times because of my lack of patience. Once the powder is cool, and it takes just 5 seconds for it to cool off, I used my pencil eraser and removed and leftover anti-static powder on the panel.
To add wow to this card, I ink blended dark green and black ink around the edges of the panel, staying away from the embossing.
Next, I wanted to add gold embossing around the edges to make it look as if the panel was dipped in gold paint. I love this technique, it always gives very beautiful and elegant results. When doing this, you don’t want to pour the powder directly onto the panel because it will stick to any area that is wet. Instead, add a little bit of powder onto scrap paper, and then just dip the panel into the powder. Imagine you are dipping the panel into the paint. And you can control how deep you want to go in, meaning how much or how little embossing powder you want to get on your panel. And you can also use a paintbrush and knock any excess embossing powder if you feel like you have too much there.

Next, I used the heat tool and heat set the powder in place to create that beautiful gold-dipped edge. Lastly, I want to decorate my card with gems – I added Opal Gems from Spellbinders to the center of each snowflake and colored some snowflake section white using a white pen. Have fun stamping!
WATCH THE VIDEO:
SUPPLIES:
|


Ways to support Ukraine:
If you are looking for ways to support Ukraine, we encourage you to visit this page on Yana’s blog:

Thanks so much for stopping by, and thanks to Yana for being our guest!
Spooky Spider Halloween Card with Kristina Werner
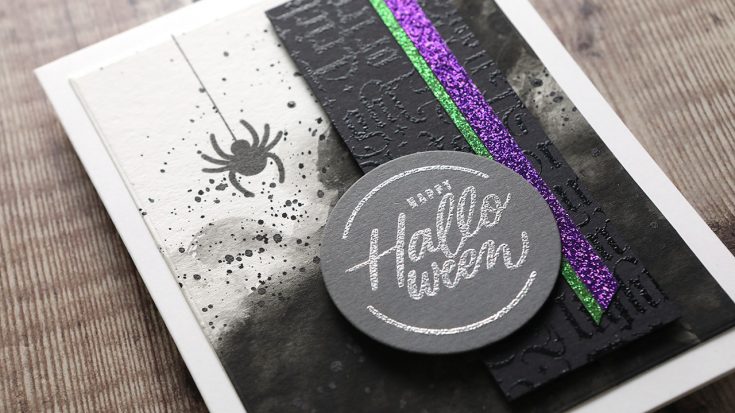
Hi all! Kristina here with a spooky Halloween card! Why is it spooky? There’s a spider! All spiders are spooky, right?!
I used the Gothic Halloween cling stamp to created a clear embossing texture on black stock, stamp and silver embossed the Happy Halloween greeting from the Circle Sayings stamp set, and then watercolored a moody background. The spider was added by ink blending one of the spiders from the Layered Spooky Icons stencil set.
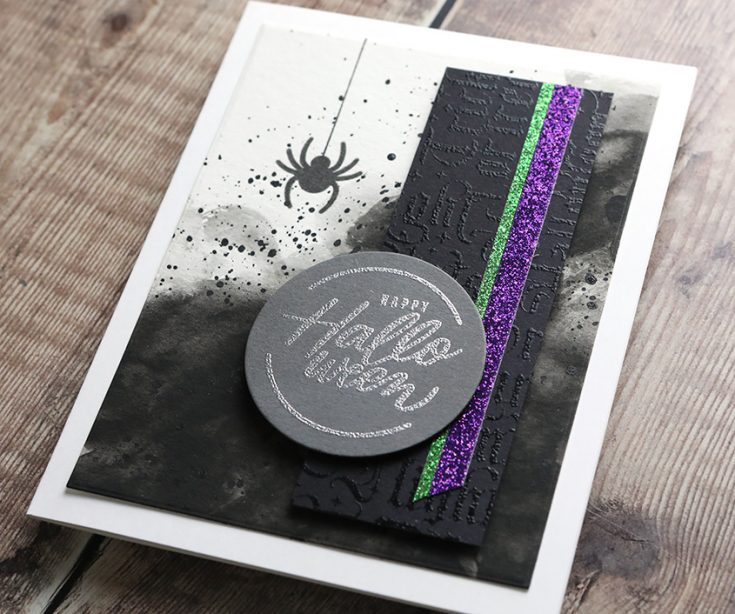
For a pop of color, I used small strips of Eggplant and Pine glitter cardstock.
Enjoy the video!
Supplies
|


Quick & Cute Halloween Card Ideas!
Hi friends! Happy Sunday! I’m delighted to welcome back special guest Cheiron Brandon with this super fun trio of cards for Halloween to surely delight any recipient! Read on to learn more and enjoy!
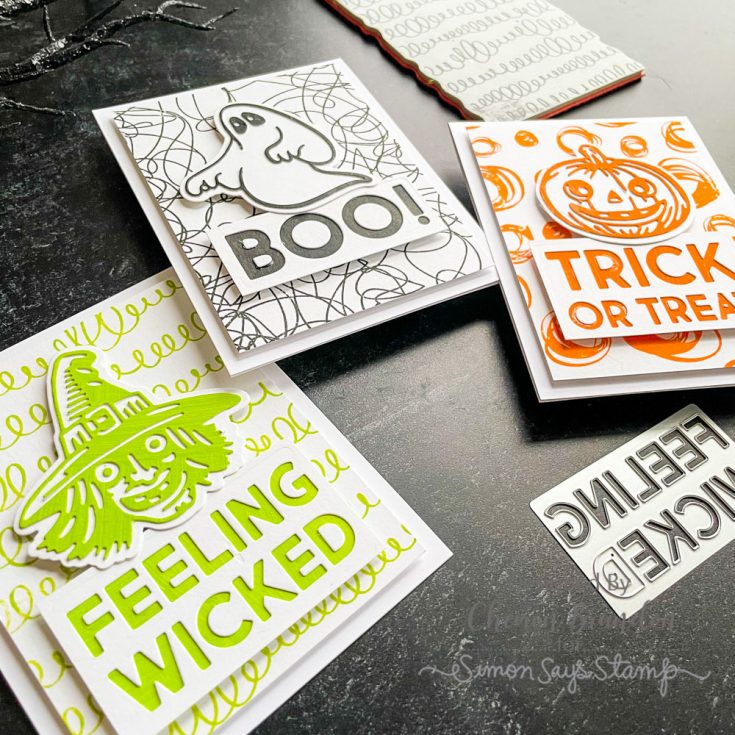
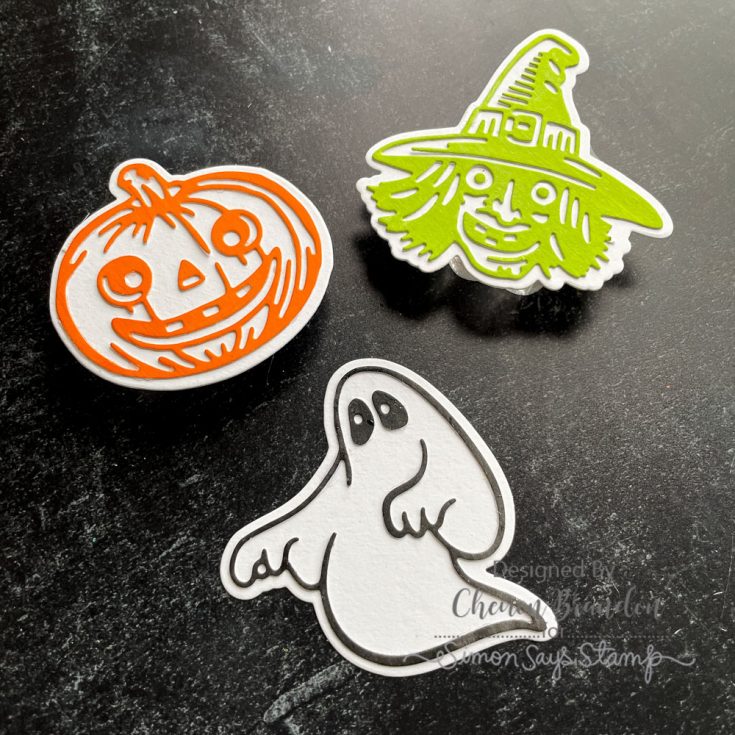
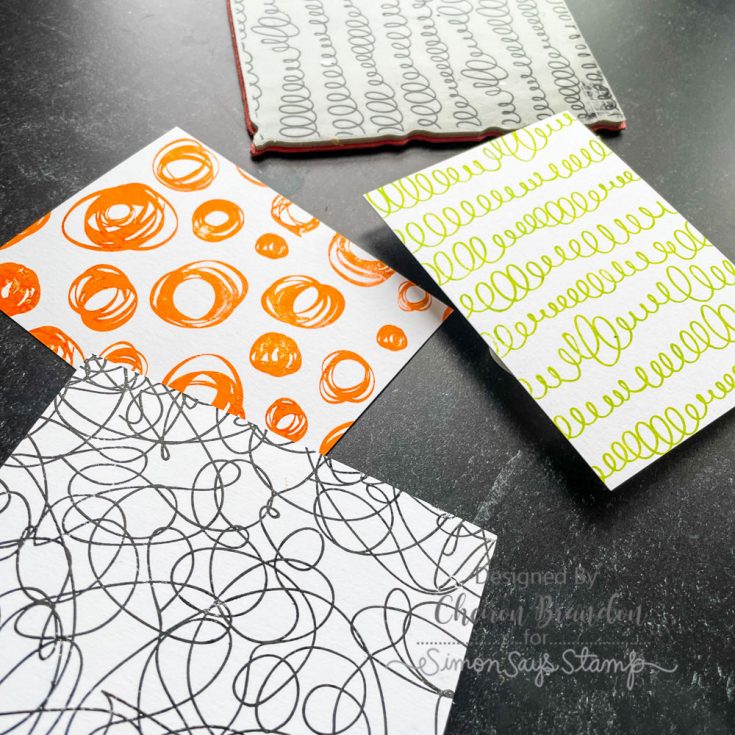
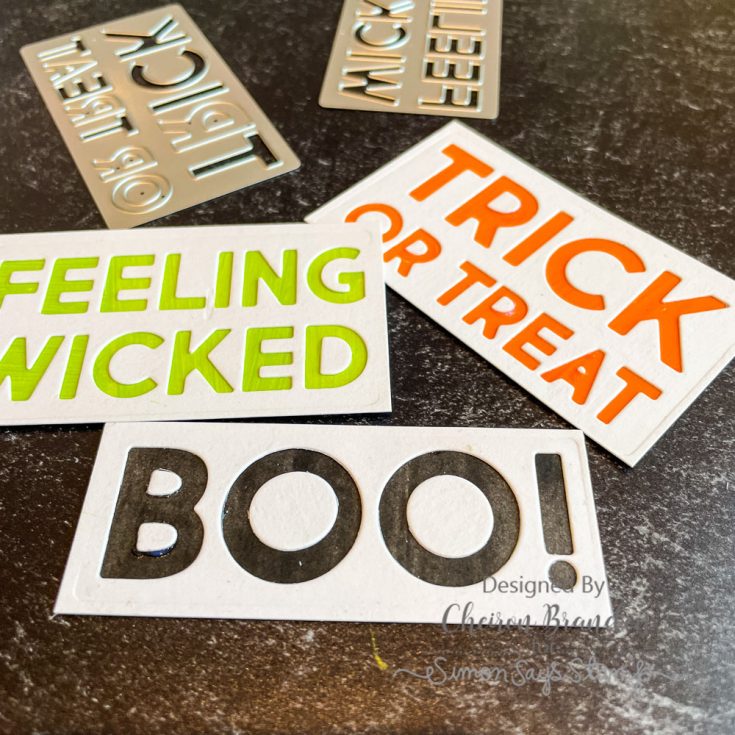
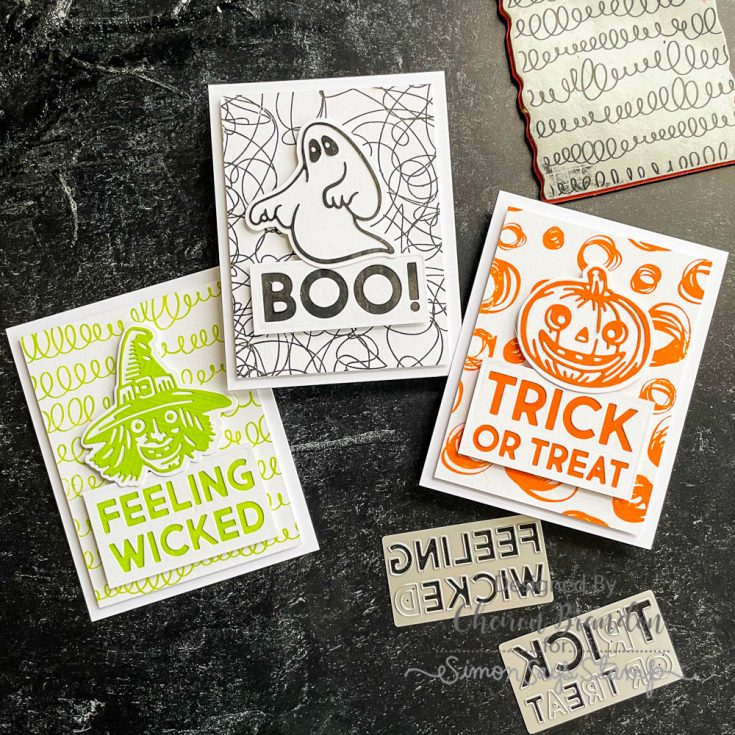
Hello crafty friends! It’s Cheiron Brandon here and I am thrilled to be back with another project this month using Tim Holtz products. Today I have a fun trio of Halloween cards for you that are perfect to send to friends or give with Halloween treats. I combined the Tim Holtz Sizzix Retro Halloween and Halloween Bold Text dies with some of my favorite whimsical Stampers Anonymous background stamps to make these monochromatic cards.
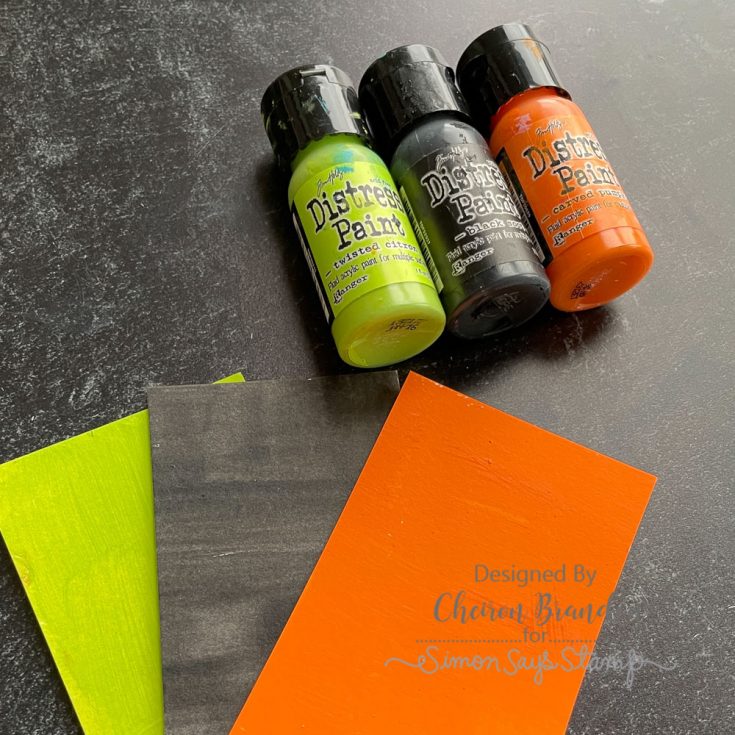
To create these cards, I painted Distress Watercolor Cardstock papers using Distress Paints in Black Soot, Carved Pumpkin and Twisted Citron. Once the papers were dry, I cut my Retro Halloween Thinlits from Distress Watercolor Cardstock (for the white) and the painted papers. You could also use ink, but I love the matte look of the paints on projects, especially paired with the DIstress Oxide backgrounds I used. I cut the Halloween Bold Text words from rectangles of Distress Watercolor Cardstock and backed them with pieces of the painted papers.
To make the card panels I cut Distress Watercolor cardstock (3 3/4 x 5) and stamped each panel with a background stamp in Distress Oxide inks that were the same colors as the painted papers. Once the ink was dry, I added the Bold Text sentiment to the card using foam tape, then the Retro Halloween image (also with foam tape) onto the background, overlapping them ever so slightly. Finally, I mounted the panels to an A2 card using foam tape. I love the look of these one-color cards and hope you do too!
SUPPLIES:
|


Thanks so much for stopping by, and thanks to Cheiron for being our guest!


