Art Journaling: Cruising into 2023


Happy New Year!!! I’m cruising into 2023 with a fun art journal page featuring the new Tim Holtz Road Trip dies from Sizzix. I’ve been wanting to use this set since its release and thought of what a fun way to document bringing in the new year.
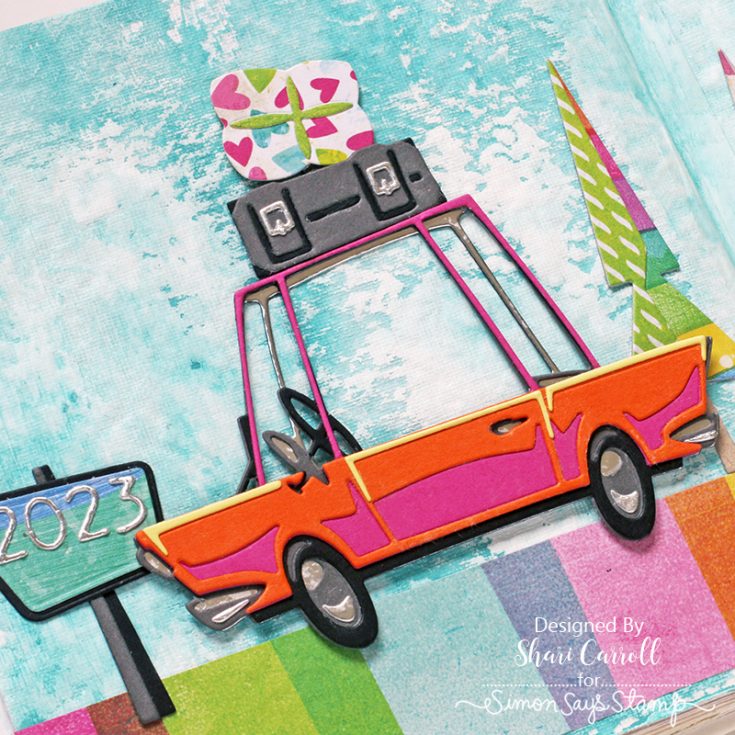
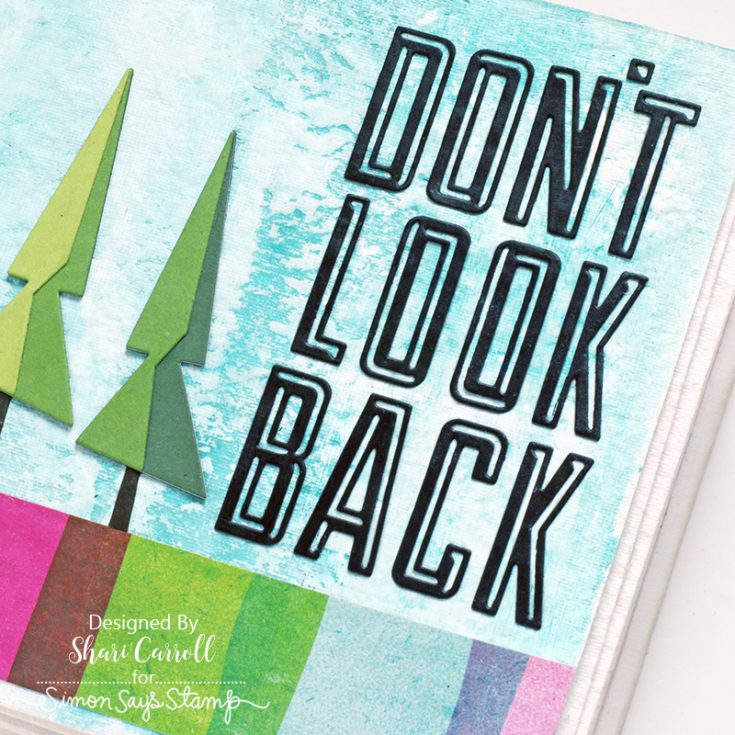
Bright color cardstock was in order to spiff up my ride! I’ve also used a couple of Alphabet set dies to create the year 2023 and “Don’t Look Back.” A strip of rainbow color stripes was a perfect road, and trees that get better (and brighter) with the coming new year.
I filmed the process, which you can view in the video below. Again, Happy 2023, and ENJOY!!
SUPPLIES:
|


One Stamp, Five Ways: Forever Yours

Hi friends! Happy Saturday, AND happy last day of 2022! What a year! Is it just me or do they some how go quicker each year?! Nonetheless, we’re delighted to share this gorgeous floral beauty by Suzy Plantamura on the last day of the year! Read on for all the details and enjoy!
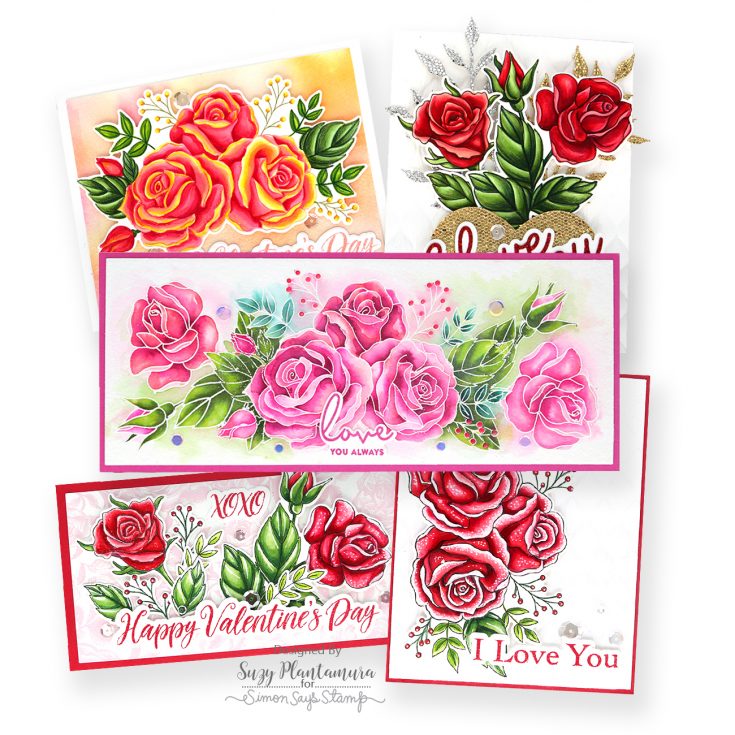
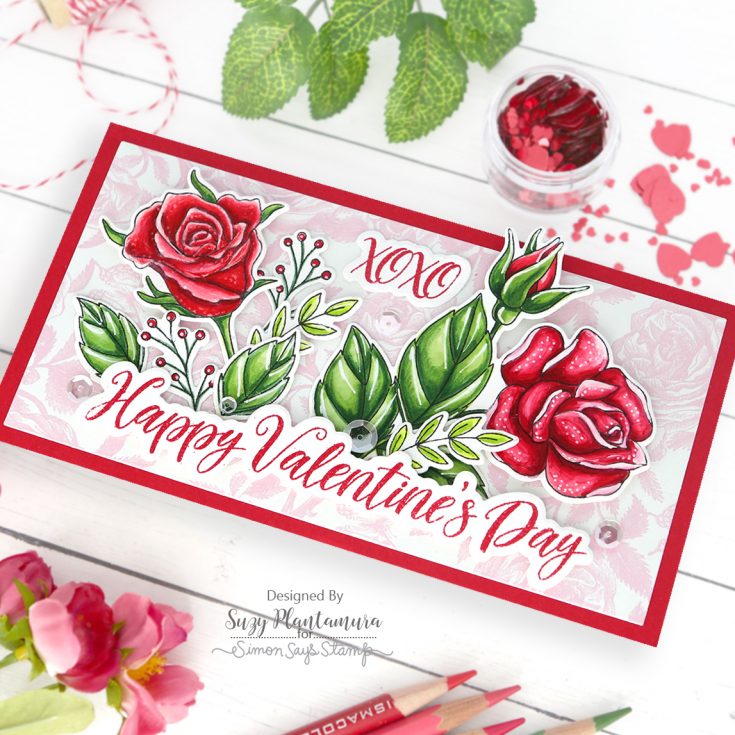
Hello friends! Well, the holidays are officially over and we are moving into a new year. I have a “one stamp, five ways” post to share with you that will get you ready for this big change! Instead of Christmas cards, I have created 5 cards for Valentine’s Day using the new Forever Yours stamp set and matching dies. What makes this post special for me, is I illustrated this stamp set too! So you are getting a lot of ME today!!! I have also used some of the other new products from the Hugs release.
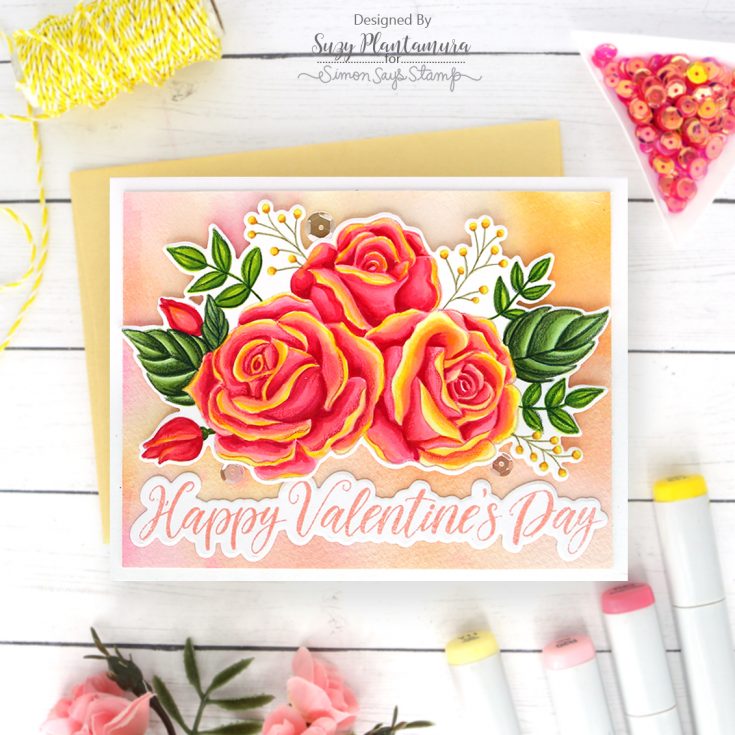
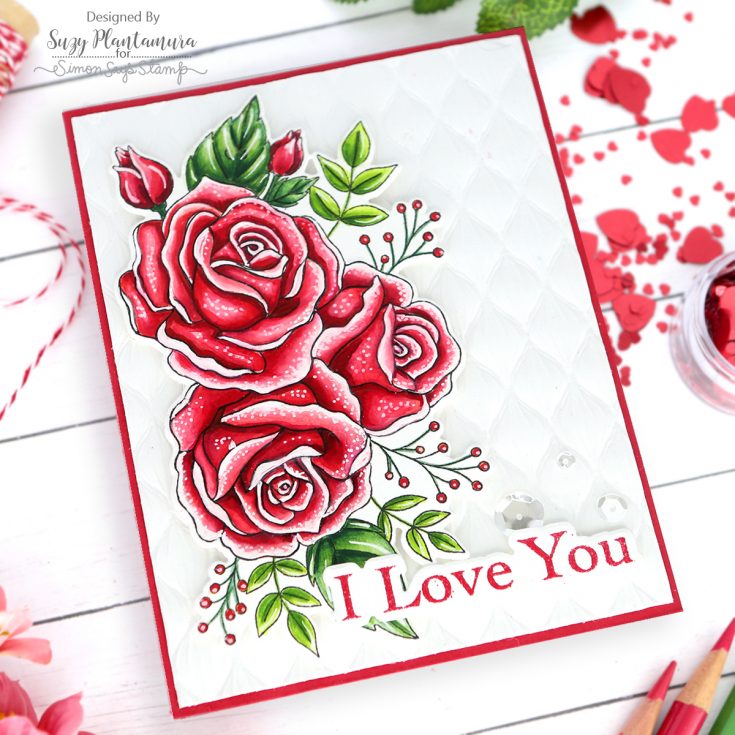
I stamped the large rose grouping from the Forever Yours stamp set with Latte PS Ink. I colored it in with Copic Markers. I wanted to make the roses look like the ones that are pink with yellow edges on the petals, but I’m not sure I did it right! I die-cut this out with the Forever Yours Dies.
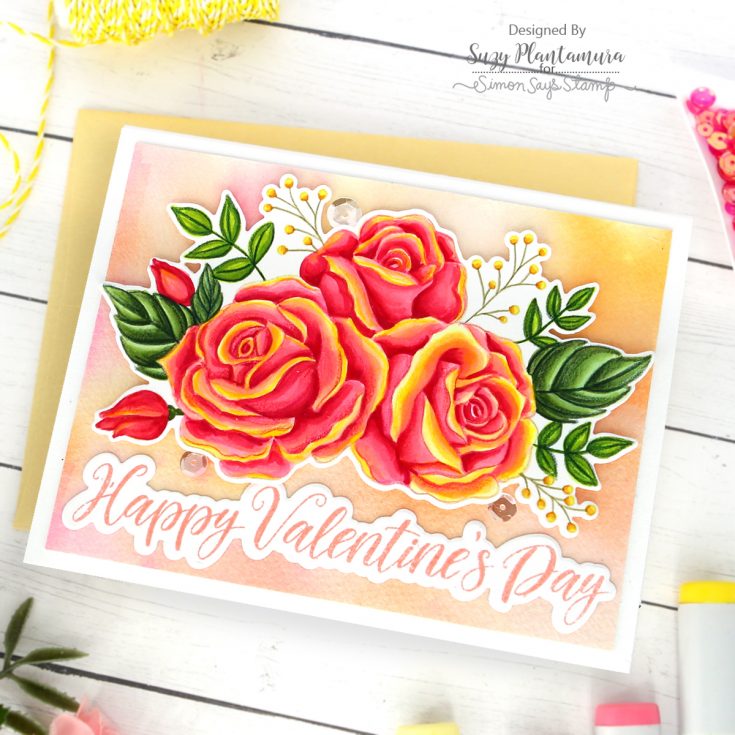
I painted a background with watercolors on a piece of Arches watercolor paper to match the flowers, but kept it a fairly light wash so it would be subtle. I attached the flowers with foam tape behind them. I embossed the “Happy Valentine’s Day” sentiment with Tim Holtz Saltwater Taffy Embossing Glaze and attached that below the flowers. I added 3 sparkling clear sequins around the flowers.
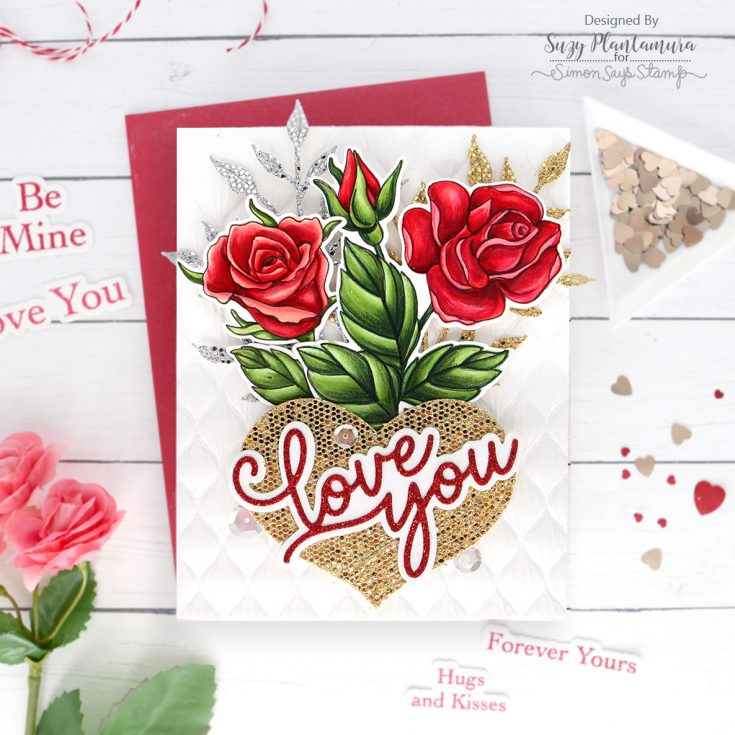
I made this card using the new Spun Glass embossing folder for the background. I like this folder so much, that I used it for two of my cards today! I embossed it with white cardstock, running it through my die-cut machine three times to get a good impression! I then stamped two of the floral images and one of the leaves from the Forever Yours stamp set with Intense Black Ink and colored them in with colored pencils. I die-cut them all out with the matching dies.
I die-cut the Highlight Heart Wafer Die from the Die-cember release from the new Gold Luxe Glitter Cardstock. I die-cut two of the Winsome Branch Wafer Dies from the Gold and Silver Luxe Cardstock (both are in the Luxe Cardstock Assortment from Die-cember). Last, I die-cut the CZ Swoopy Love You die from both white cardstock and red glitter paper. I arranged the two branch dies behind the stamped roses and then attached the heart over them with foam tape behind it. I glued the love you sentiment on top and added some sparkling clear sequins around it.
I stamped all of the images in the Forever Yours stamp set except the large floral group with Intense Black Ink and colored them in with colored pencils. I used a white Uniball gel pen around the edges and added dots to the petals and lines on the leaves. I die-cut them out with the matching dies.
I die-cut a piece of patterned paper in my stash (from a previous February card kit) with the Mini Slimline Rectangle Die and attached it to a red cardstock card base. I embossed two of the sentiments in the Forever Yours stamp set with Red Geranium Embossing Powder and die-cut them out with the matching dies. I arranged the sentiments and the flowers/leaves around the patterned paper and added some sparkling clear sequins.
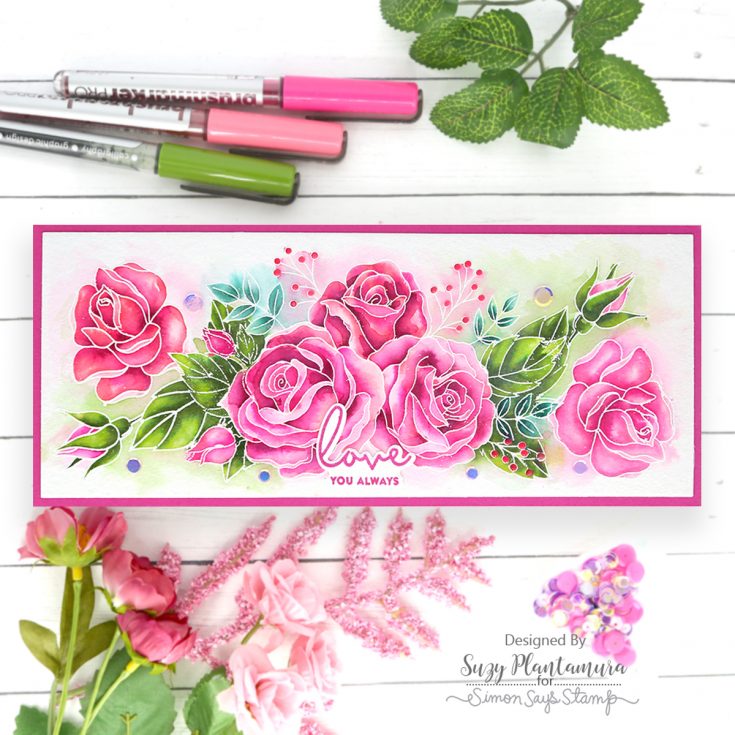
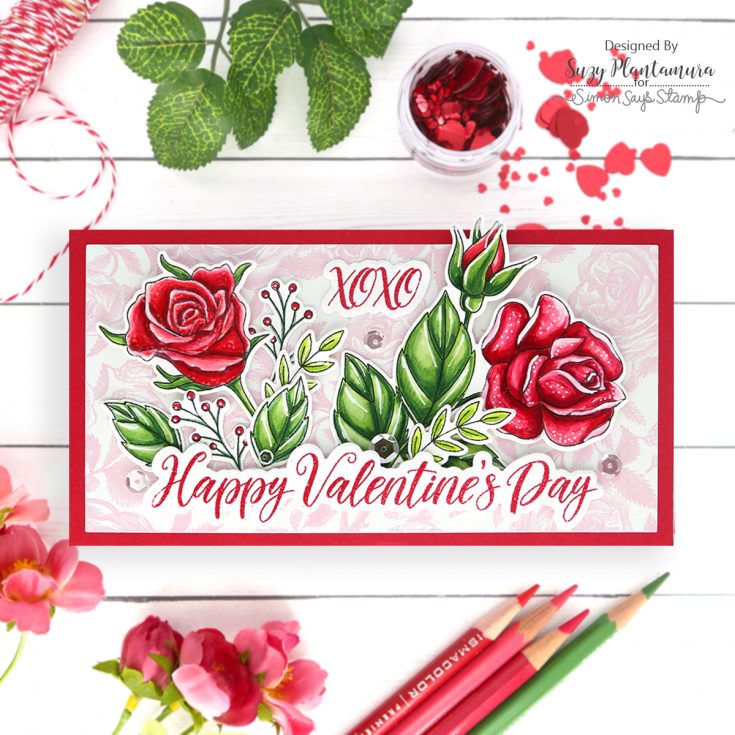
I die-cut a piece of Arches Watercolor Paper with the largest rectangle in the SSS Nested Slimline Rectangle Dies. I then stamped the large floral grouping on masking paper and cut it out. I first embossed this stamp on the rectangle with white embossing powder. I then placed the mask over it and embossed the larger single rose stamp on both sides of it.
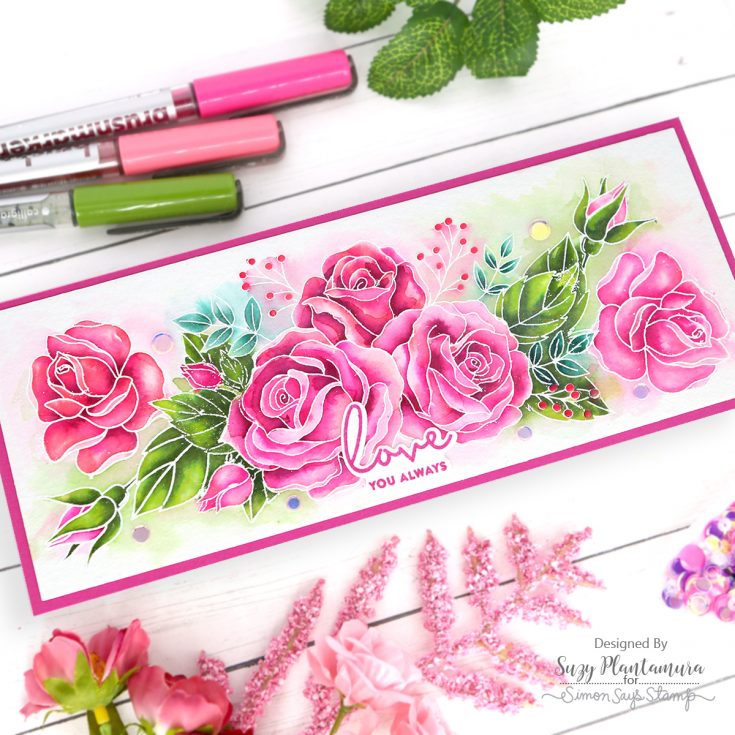
I painted the flowers in with Karin Brushmarkers. I love using these markers with embossed images as the colors stay where you want them! I used a wet brush to purposefully move some of the color around the edges for a soft background wash. I added some of the new Hugs Sequin Mix around the flowers. I stamped the sentiment from the Forever Yours stamp set with black ink and die-cut it out and added it to the bottom of the card.
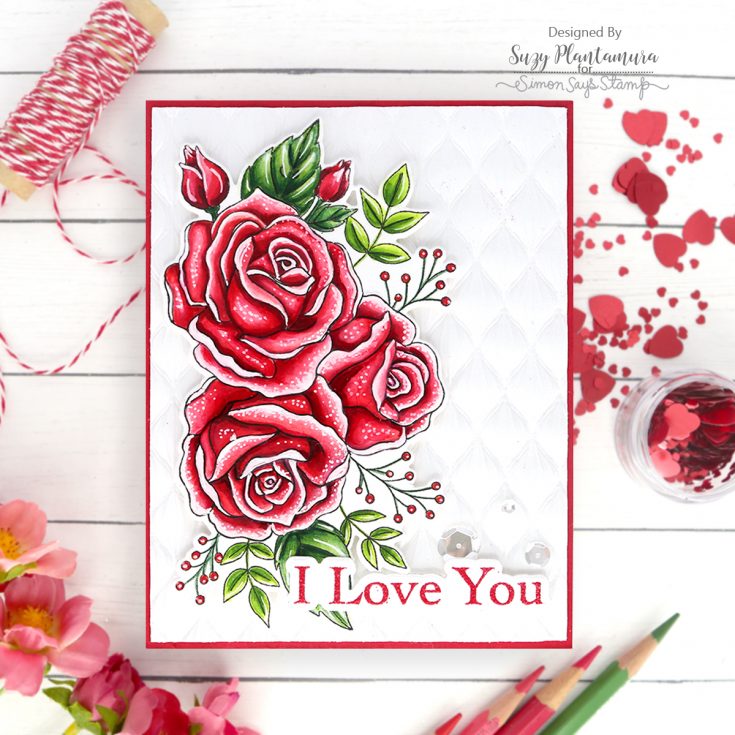
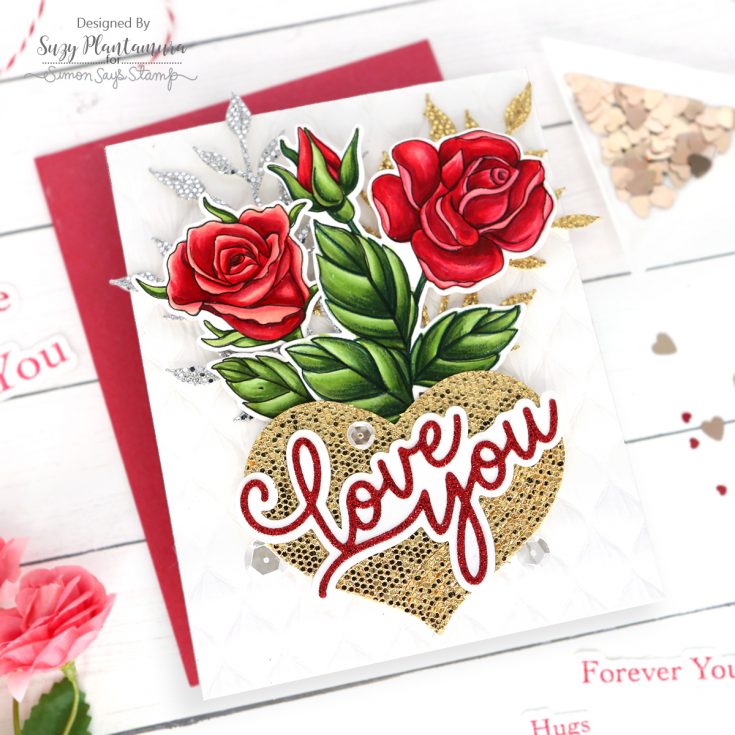
I used the Spun Glass embossing folder for this card also. I cut it down to fit on a red card base. I stamped the rose grouping from the Forever Yours stamp set with Intense Black Ink. I colored it in with colored pencils. I added white lines and dots with a Uniball Gel Pen.
I die-cut it out and attached it over the embossed background with foam tape behind it. I embossed the “I Love You” stamp with red embossing powder and die-cut it out. I attached that to the bottom of the card also using foam tape behind it. I added several sparkling clear sequins around it.
How is that for getting you out of the Christmas mood and ready for a new holiday in a new year! Speaking of that, HAPPY NEW YEAR to all!!! I post a “one stamp, five ways” post on my blog weekly, so come visit if you like these posts! I’ll be back at the end of January! Suzy
SUPPLIES:
|


Thanks so much for stopping by, and thanks to Suzy for being our guest!
Yippee for Yana: Balloon Greetings Birthday Cards

Hi friends! Happy Friday!! Please join me in welcoming special guest Yana Smakula back to our blog. (Please note: our dear friend Yana is Ukrainian, to show support to our brothers and sisters in Ukraine, please see Yana’s post HERE.)

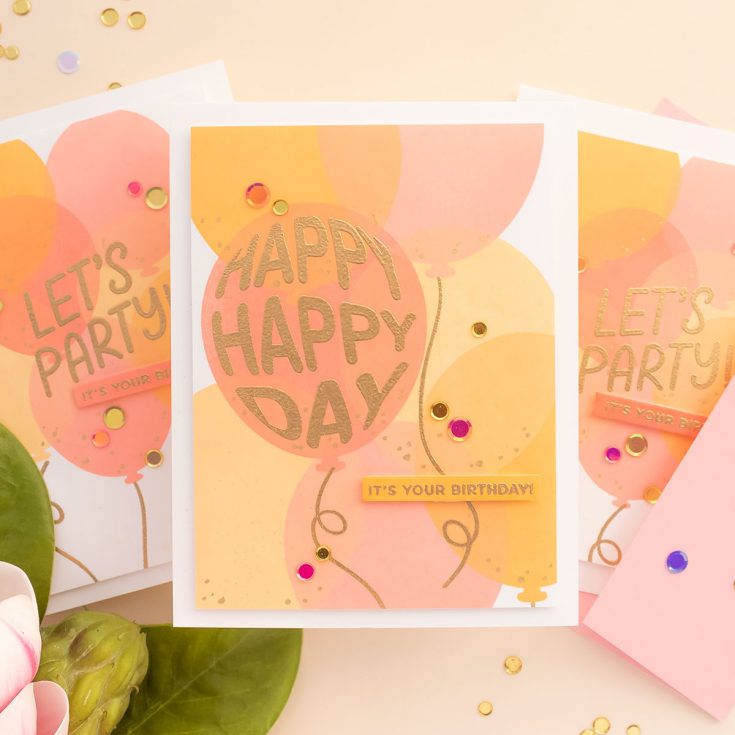
Hello, crafters, this is Yana Smakula for Simon Says stamp! Welcome back for another Yippee For Yana video! In this video I am stamping simple Birthday cards using the Balloon Greetings stamp set.
The idea for my projects today is to stamp a balloon cluster or a balloon background using various colors of ink.
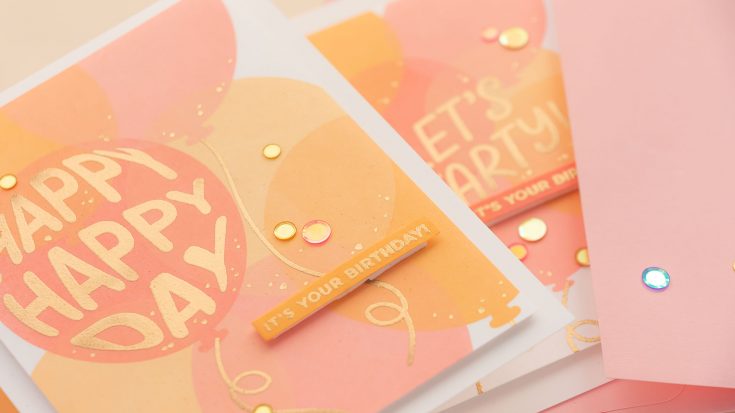
I have my mini-MISTI stamping tool and white cardstock panel already placed inside the MISTI. I found I needed to double stamp each balloon so using MISTI works well. I started with the color Melon, and stamped it onto my cardstock. Next, I cleaned the stamp using the stamp shammy and re-positioned it on my panel to stamp the next balloon. I wanted to overlap the images as must as possible, to create the illusion of some balloons being placed in the foreground and some in the background. The next ink color I used was Cheeky.
The inks I am using today are the Simon Says Stamp Pawsitively Saturated inks, they are very easy to clean off a stamp, and it is easy to go from one ink color to another as they don’t stain stamps. These are the perfect inks for this type of stamping. I picked 4 colors of ink for each background. I stamped 3 balloons in the bottom row and next 2 balloons in the row above it, and 2 more in the very top row. I also used Blush and Cantaloupe.
With this smaller balloon I didn’t fill the entire background, but I rather made a grouping of the balloons. I also used the bigger balloon image and stamped it in a similar way filling the background in, since that balloon is much bigger it worked well to fill the entire card background.
You can change the colors to adapt the design to make a masculine card, just pick blues and greens for your balloons.

The next step is to add a sentiment to our backgrounds. I wanted to do heat embossing, gold for the feminine card and silver for the masculine card. To do heat embossing on a stamped background, I needed to make sure the background was bone dry. So, I used my heat tool to dry it. You can set you panel aside and let it air dry, but that is going to take a lot longer, so using a heat tool is a good option if you want to continue creating without making a pause.
Next, I trimmed my panels to either 3 3/4 x 5” or 3 1/2 by 4 3/4”, I wanted the balloons to go outside the edge of my panels, so the size of the panel depended on the balloon placement. If the balloons were spread out, I only trimmed the panel to 3 3/4” x 5”, but if they were clustered tightly in the center, I had to trim the panel down a bit more.
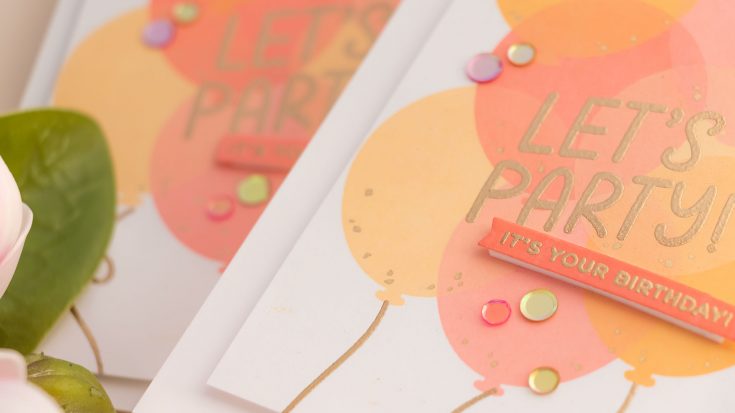
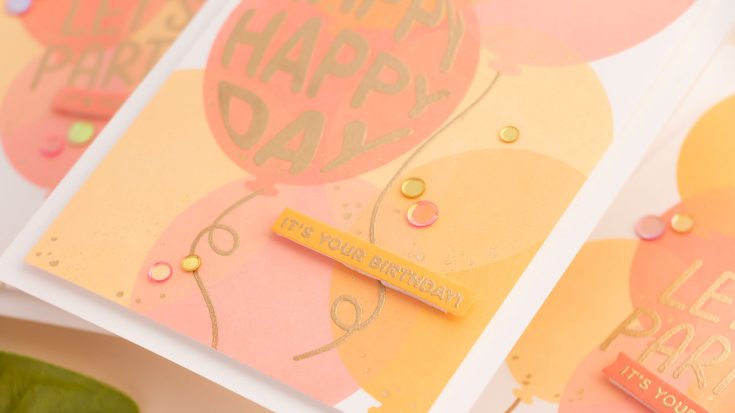
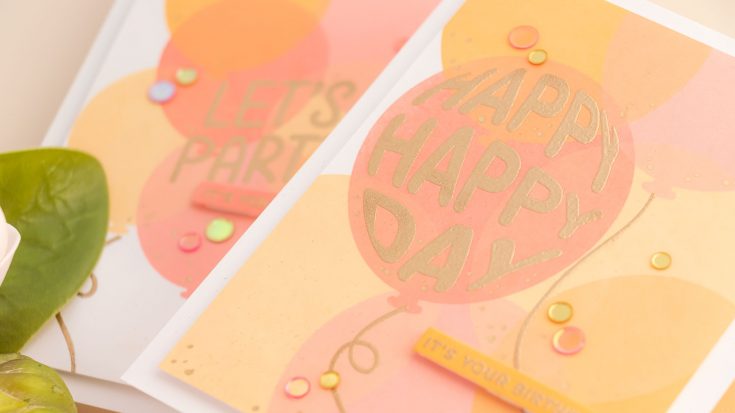
Next, I went back to my mini MISTI and used it to stamp the sentiment. Since these balloons are smaller, the sentiment doesn’t fit inside the balloon. So, I just have the sentiment in the center of the panel spanning across the balloons. I treated my panel with anti-static powder tool, inked up the stamp with clear embossing ink and stamped it. Next, I added Simon’s Antique Gold embossing powder and heat set it to melt it.
I then stamped the balloon strings in the same way – there is one balloon string image in the set, but you can rotate it to have 2 different string designs on your card, and that’s what I did.
Next, I wanted to heat emboss a sub sentiment, and I wanted it embossed on colored cardstock, to make sure my paper would match the color of the stamped balloons I made my own cardstock by swiping the ink pad on the white cardstock panel. This gave me a piece of paper that matched the balloon stamping perfectly! I used my heat tool to dry the paper, tested it for dryness and once it was perfectly dry, I heat embossed a sub sentiment in gold embossing powder. Next, I used a banner die from my stash and cut it out in my Spellbinders Platinum 6 die cutting machine.
Next, I cut a piece of white fun foam, just slightly smaller than my stamped panel, I added double sided tape to the foam and adhered it from the back of my stamped panel. This helped flatten the panel, as it warped slightly from all the heat that I applied to it, and it also added dimension to my card.
I used a foam strip to pop up the heat embossed sentiment strip. Next, I embellished the card with several colorful sequins – I picked pink and gold to match the color of the stamped balloons, I scattered them around the sentiment, this added some playful movement to the card and finally I used a gold pen and added some gold dots to the base of each balloon, this created the illusion of confetti inside the balloons, and it just helped pull the card together. I love the way it turned out!
Have fun stamping!
WATCH THE VIDEO:
SUPPLIES:
|


Ways to support Ukraine:
If you are looking for ways to support Ukraine, we encourage you to visit this page on Yana’s blog:

Thanks so much for stopping by, and thanks to Yana for being our guest!


