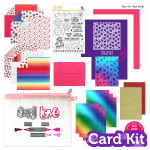
Interactive Donut Box Card with February 2023 Card Kit
Hello, all! Kristina here with a fun card make using the February 2023 Card Kit!
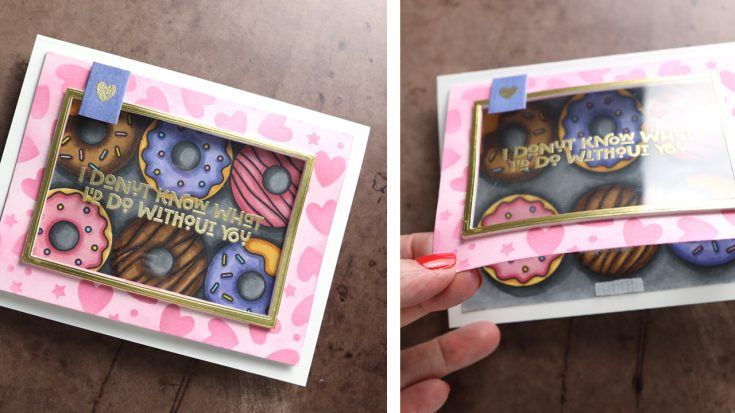
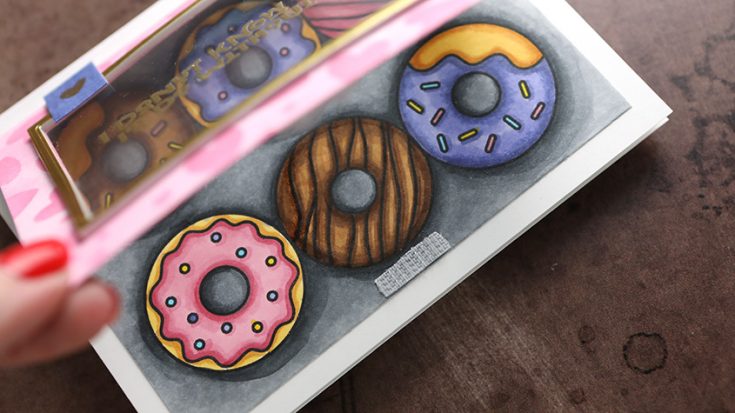
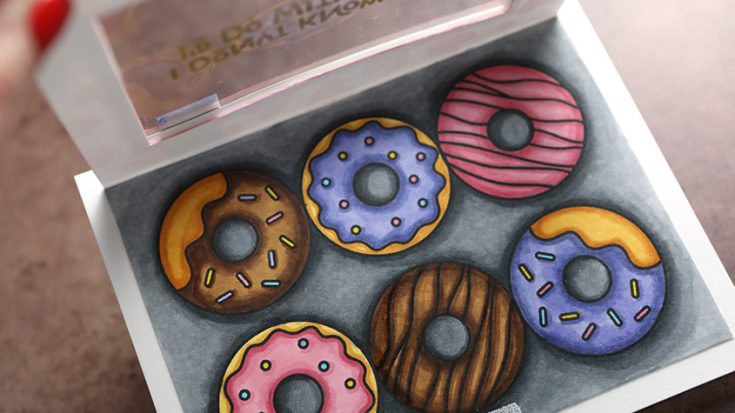
The donuts in the Sweet Days stamp set were just begging to be in a bakery box, right?! I just had to create a card that looked like a box of donuts.
I first stamped all six donuts on the inside of a folded piece of cardstock (essentially a “card” that’s slightly smaller than an A2 card). Then I used rectangle dies to cut a window into the front of the “card”, and to create a thin gold frame.
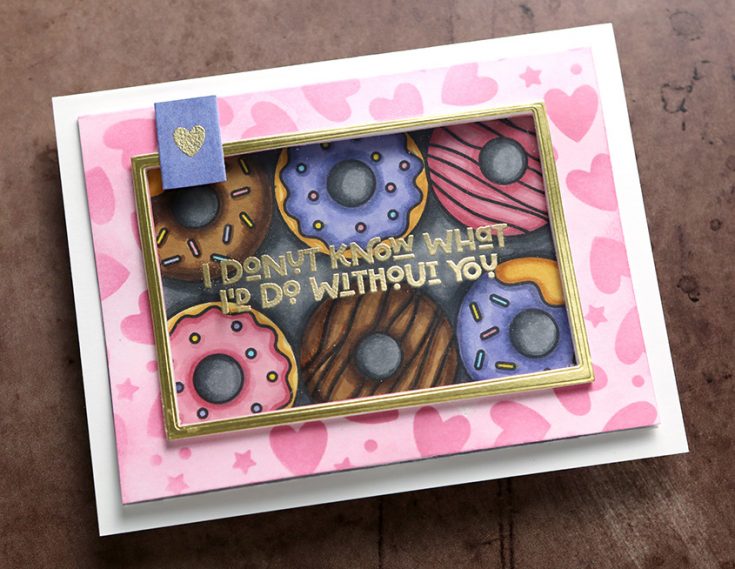
I stamped a greeting from the Sweets Days stamp set on acetate and heat embossed it with gold embossing powder. Then I adhered the acetate to the gold frame, and the gold frame to the window.
The donuts were colored using Copic markers, and then the entire card/box was adhered to the front of an A2 card. This allows for the donut box to be opened, and then the full card opened.
You can pick up the February 2023 Card Kit HERE, or subscribe to receive this kit and future kits HERE.
Thanks for stopping by!
Supplies
|


Love card idea for Valentine, Anniversary, or just because!
Hi friends! Happy Monday! Please join me in a warm welcome back to special guest designer Mindy Eggen to our blog! She’s created this gorgeous Love card to inspire you today! Read on to learn all the details and enjoy!
Hi crafty friends! I’m so excited to be on the Simon Says Stamp blog to share a project with you today. With Valentine’s Day fast approaching, I thought a Valentine card would be a good one to share but keep in mind this card could be sent any time of the year or even for anniversaries.
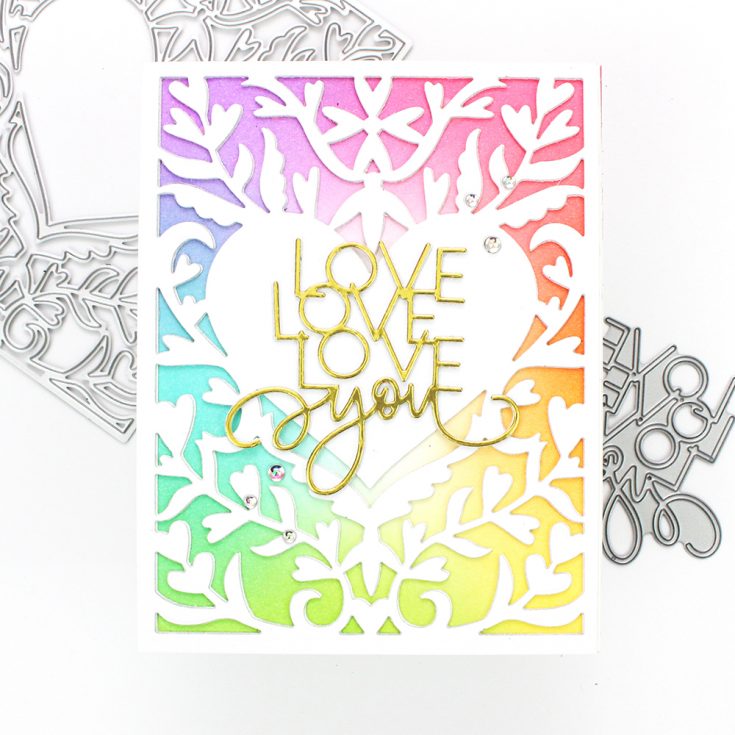
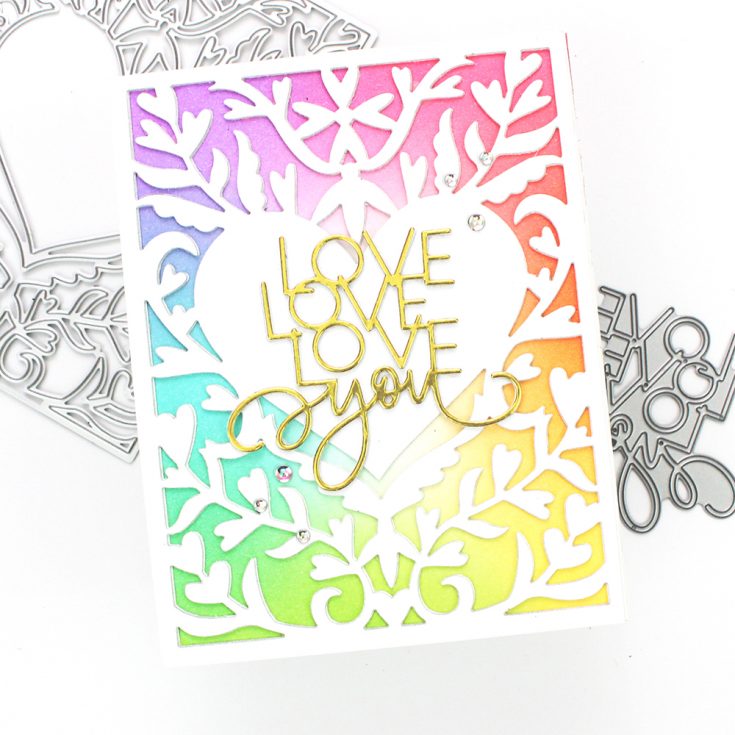
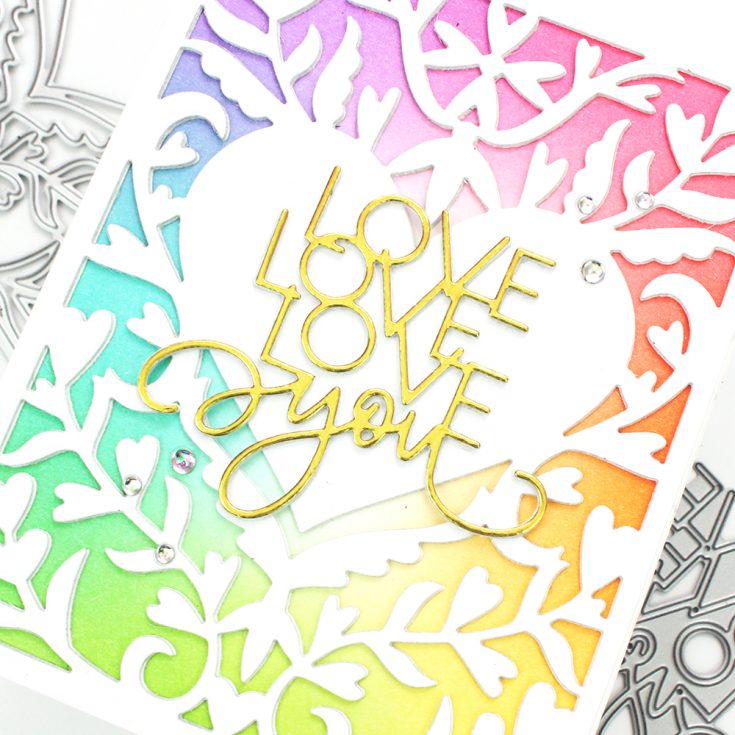
I have this beautiful Heart Flourish cover die from Hero Arts that I thought would look great with an ink blended background. The inks I used were Honeysuckle, Marmalade, Buttercup, Parsley, Oceanside and Orchid. I applied the ink to the outer edges of the Smooth White cardstock using flat blending brushes.
To add dimension to the card front, I die cut the Heart Flourish three times from White cardstock and layered together with my Connect glue that I have in a fine tip bottle. This really helps me get to those intricate areas the die cut out.
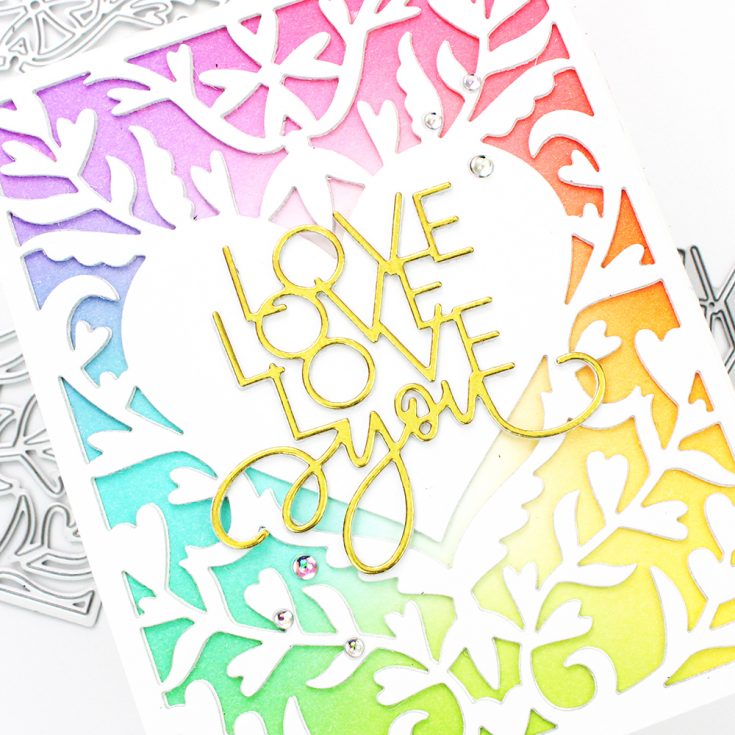
For the sentiment, I have this lovely word die from Concord & 9th. It comes from the Love Lines Die set. I knew it would fit perfectly inside of the heart on my card front.
This I cut twice from 110 lb White cardstock and once from Matte Gold cardstock and layered together. Then I could add it to the center of my heart for my focal point.
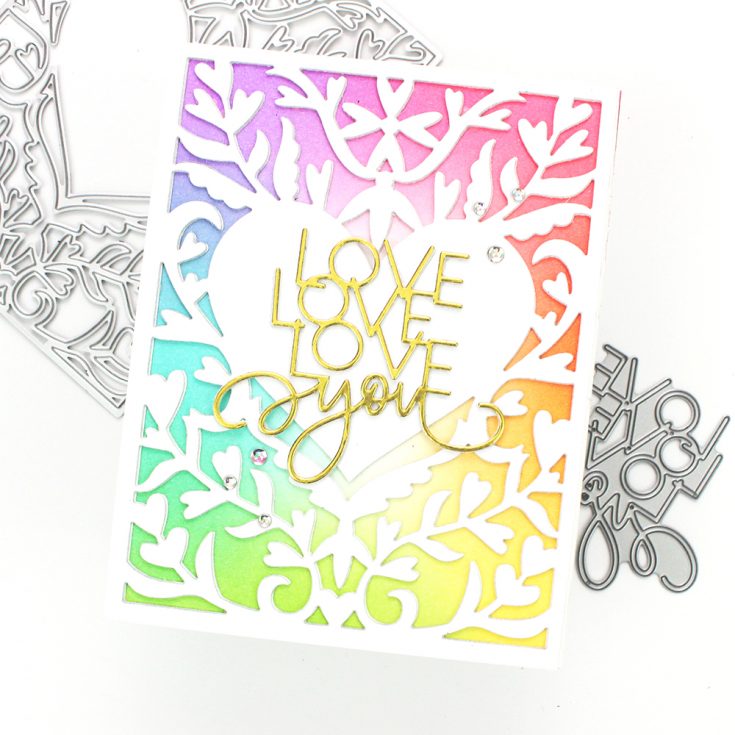
I could stop here with my card but I can’t resist adding some Clear Iridescent Drops to embellish. For this I like to use my Gina K Designs Pick N Stick Tool.
I love a good rainbow but there are so many color combinations that would look great with this too!
A fairly clean and simple card as far as supplies go but boy does it pack a punch!
Hope you enjoyed today’s card project and inspiration. Thanks so much for stopping by today and thanks to Simon Says Stamp for inviting me. Hope you have an amazing day! -Mindy
SUPPLIES:
|


Thanks so much for stopping by, and thanks to Mindy for being our guest!
WOOD you be mine?
Hi friends! Happy Sunday! Have you seen the cuteness that is the new collection from Lawn Fawn for Valentine’s Day (and general love cards)?! Special guest Chari Moss is sharing this gorgeous new design featuring some new products with a card idea that is perfect for guys and gals! Read on for all the details and enjoy!
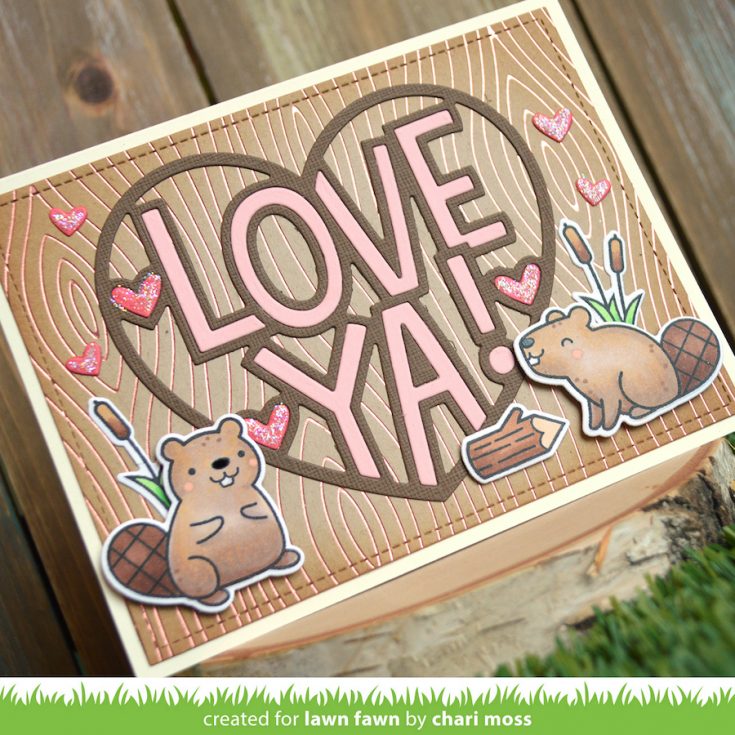
Hello Crafty Friends! Today I have a cute woodsy Valentine to share with you. I pulled out some of the newest products from Lawn Fawn to play with for today’s card and wound up with a cute card mixing dies, stamps, and hot foil! Hot foil is newer to me, I just started using it recently with the introduction of hot foil plates from Lawn Fawn but I love that it gives me another option for my card designs.
For this card I started with a beautiful foiled woodgrain background. I used the Woodgrain Background Hot Foil Plate along with some Rose Gold Glimmer Foil on Kraft cardstock. Then I inked the edges with a little bit of tea dye distress ink to darken it up. The Hot Foil will resist the ink and can be wiped clean with a dry cloth. The background is cut out with the largest Outside In Stitched Rectangle and mounted to a Vanilla Malt cardstock base.
Next I moved on to my sentiment, the Giant Outlined Love Ya Die is perfect to layer over the background and fill the card. To keep with the warm woodsy feel of the card, I cut the sentiment rom Chocolate Bar cardstock for the outline. Then I filled the letters with Ballet Slipper cardstock. I love how the foiled woodgrain lines peek through the openings in this die cut. I also cut some scraps of Guava cardstock to make pink hearts to pop into the sentiment cut out as well as sprinkle around it.
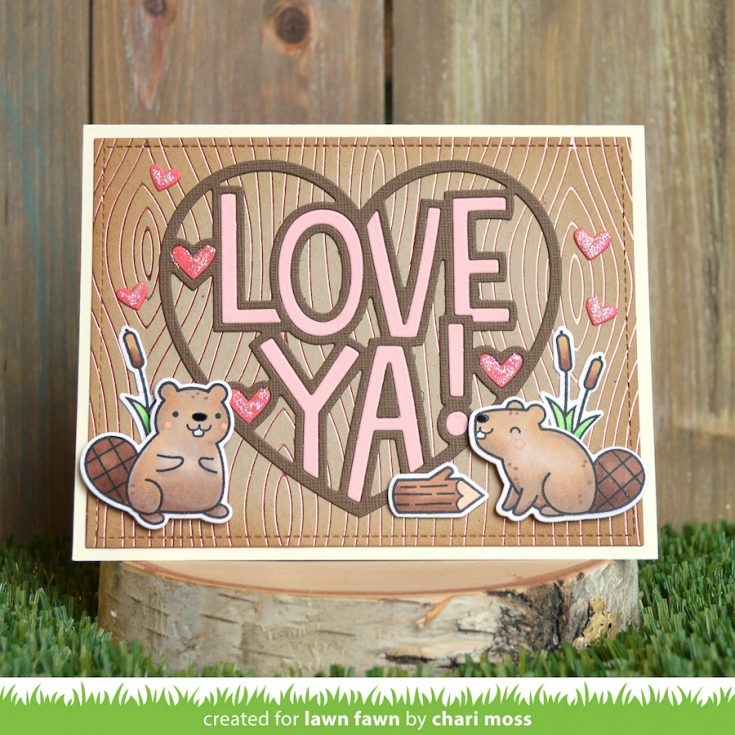
Finally I stamped, colored, and die cut some cute beavers from the Wood You Be Mine? stamp set. I stamped them in Jet Black ink and colored them with Copic markers. I tried to keep them lighter in tone so they would match my background nicely. They are almost camouflaged which really makes the sentiment stand out. I added them to the bottom corners using foam adhesive so they stand out from the background just a bit. Finally I added some Stardust Stickles to all the hearts.
I love how it all turned out and I think it would actually be a great card to give to a guy, it has a some masculine vibe with all the warm woodsy colors. Thanks for joining me today!
SUPPLIES:
|


Thanks so much for stopping by, and thanks to Chari for being our guest!


