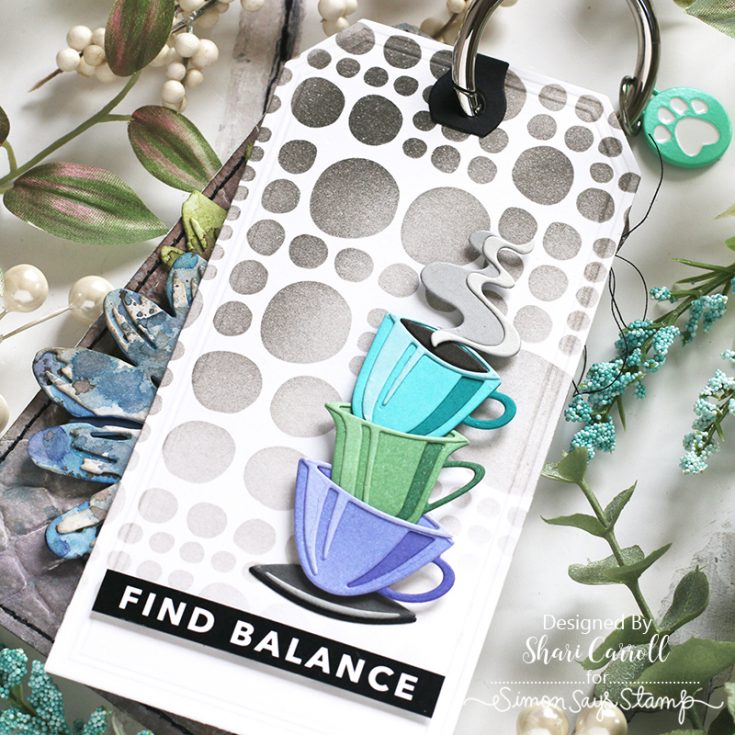
Art Journaling with Shari: Find Balance

Welcome, everyone!! Happy MARCH!! With Spring around the corner, I’m in the mood for fresh color! Last month I started a new journal by creating individual tags and securing them together with the Simon Says Stamp O Clip. This loose tag journal is very freeing for me. I can rearrange the tags, add more bulk and layers, sew, and use more techniques.
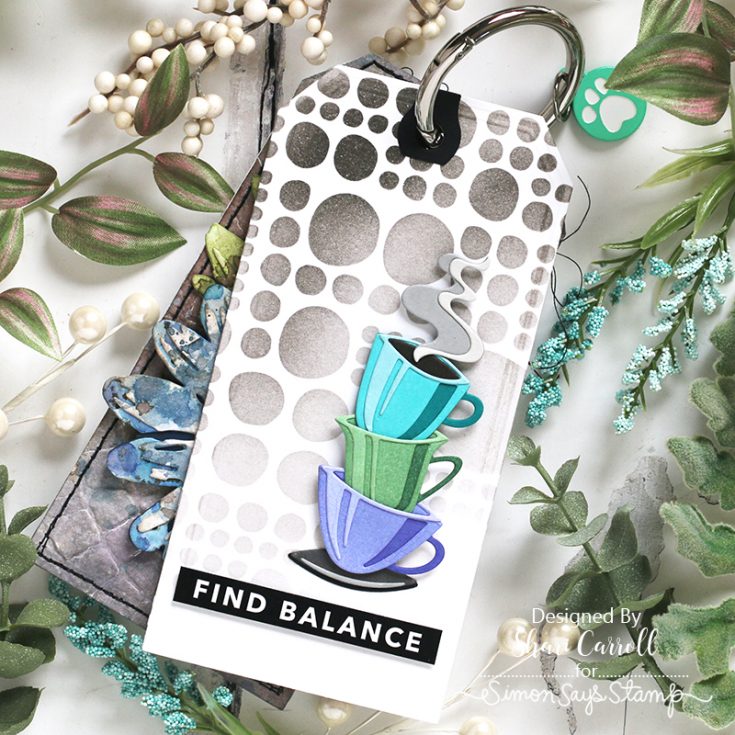
Today’s tag features the Tim Holtz Sizzix Papercut Cafe dies. I’m a coffee lover, so these were a must-have. I’ve used a stacked design where the cups are wonky, which represents life sometimes, and my message is a reminder to find balance. I ink-blended a couple of the cups with inks that I love to create a freshly brewed color combination.
To see how this all came together, check out my video below. Enjoy!
SUPPLIES:
|


Fantastic Flowers! One Stamp: Five Ways!

Hi friends! My goodness, can you believe another month has flown by? I sure can’t! Please join me in welcoming back special guest Suzy Plantamura for her monthly installment of showing how you can make at least 5 unique and gorgeous cards with ONE stamp set! This month we’re showcasing our Fantastic Flowers set! Read on to learn more, and enjoy!
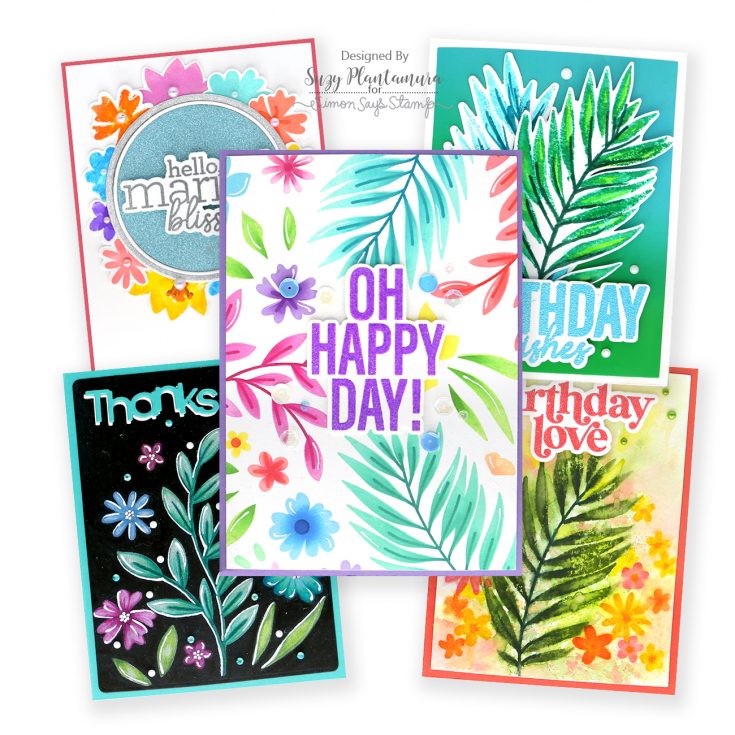
Who is ready for spring? I have you covered in this month’s “one stamp, five ways” post as I used the new Fantastic Flowers stamp set in the Be Creative release. With lots of color. Of course! I have five cards to share with you using different techniques with this stamp that also has a set of matching dies and a stencil to use with it. Let’s get started!
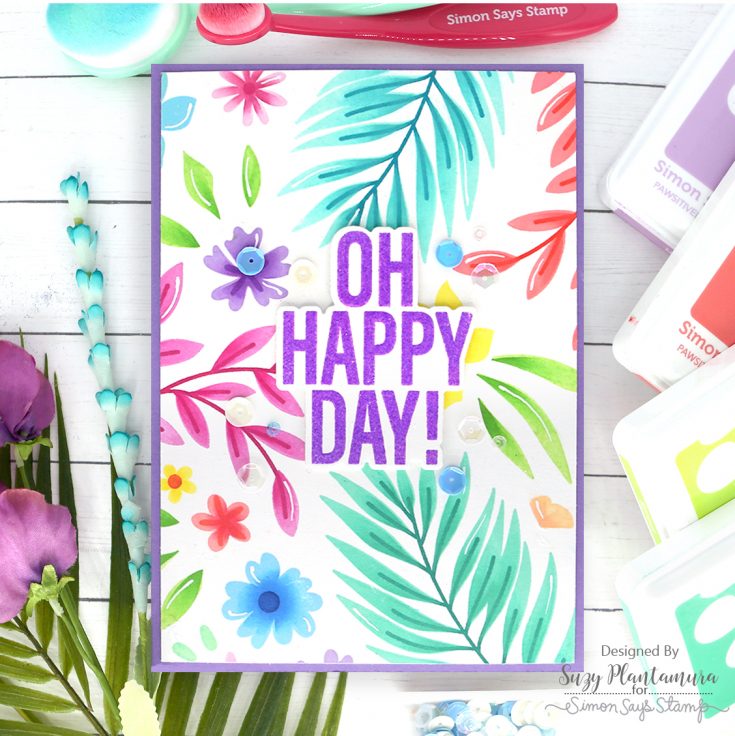
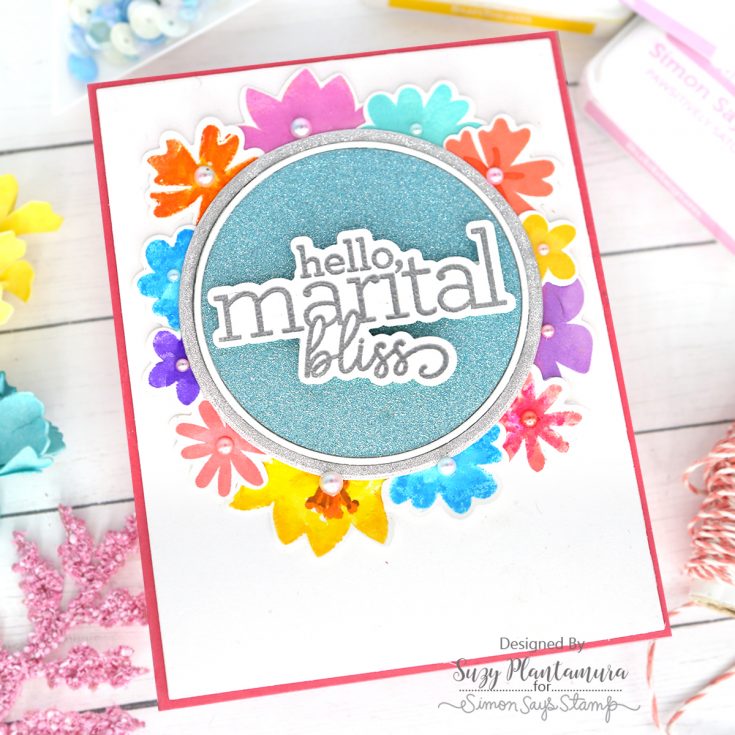
I made this card a 5 x 7” so I could fit more of the fantastic flowers in the Fantastic Flowers stamp set on it! I used the stamp set and the stencil to apply the inks. I stamped all of the flat stamps first in the lightest color. I then applied the medium color of ink to just the edges or center of the stamp and used my finger to blend the ink color out. I then attached the stencil and used the flat brush to apply the darkest color in the Trio to the center of each flower. I used a white gel pen to add some lines to the leaves and flowers.
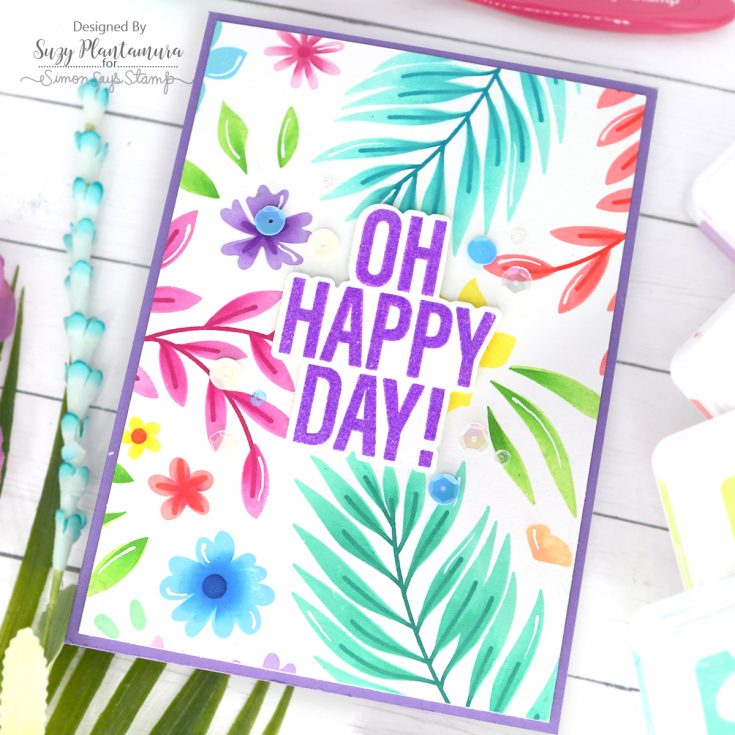
I cut this piece down and attached it to a lavender card base. I embossed a sentiment from the CZ Big Old Birthday Stamp Set using Wilted Violet Distress Embossing Glaze and die cut it out with the matching die. I attached that to the center of the card with foam tape beneath it. I added some April Showers sequin mix around the sentiment.
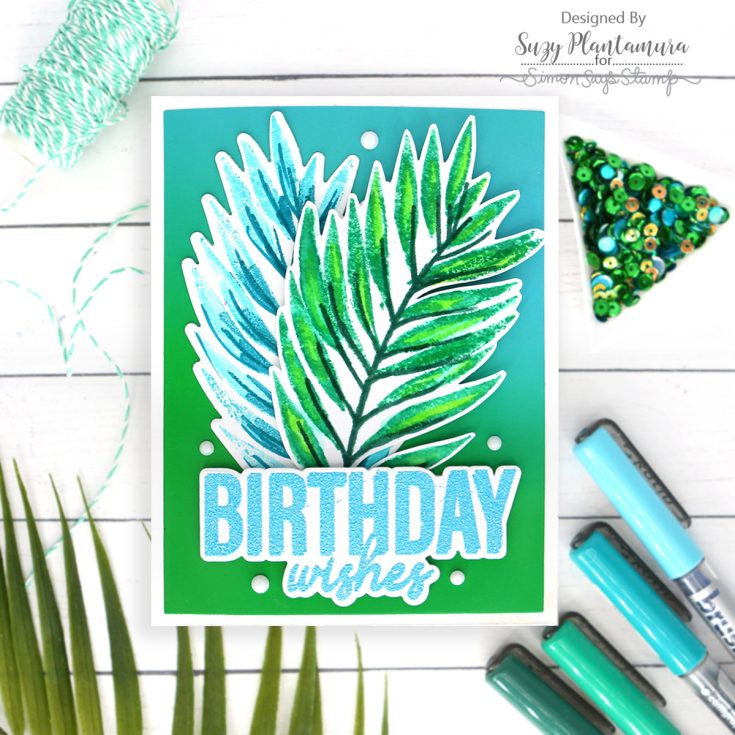
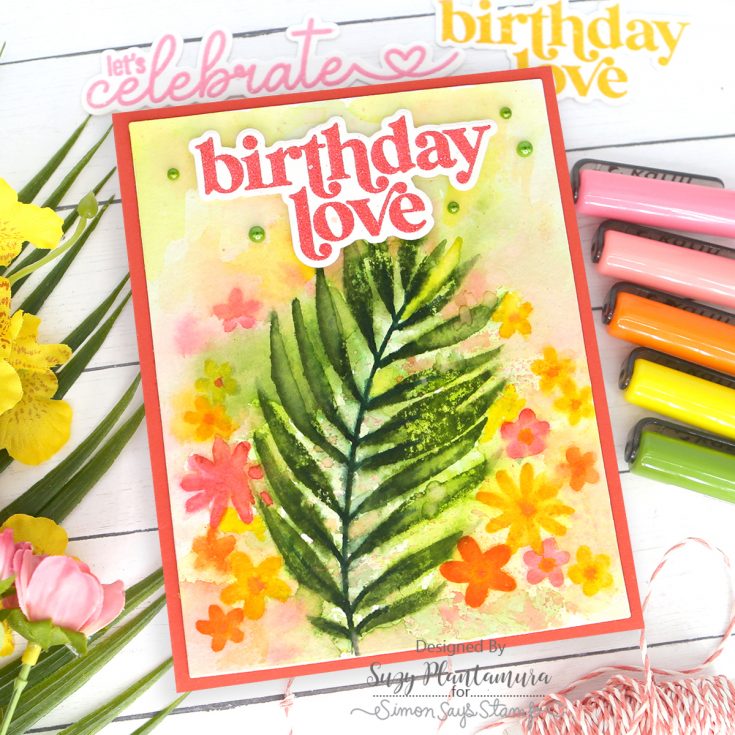
For this card, I used my Karin Brushmarkers directly on the stamps with Ranger Watercolor Paper. I applied a dark green or aqua to the outside of each leaf and stamped it one at a time. Then I applied a lighter color directly to the paper over the leaf and blended the colors with a damp paintbrush. I stamped the stem of the branch with the darkest color marker. My paper moved a bit while stamping the one in the front, so the die didn’t match up to it. I fussy cut that one out and was more careful with the one in the back, so I used the die for that one.
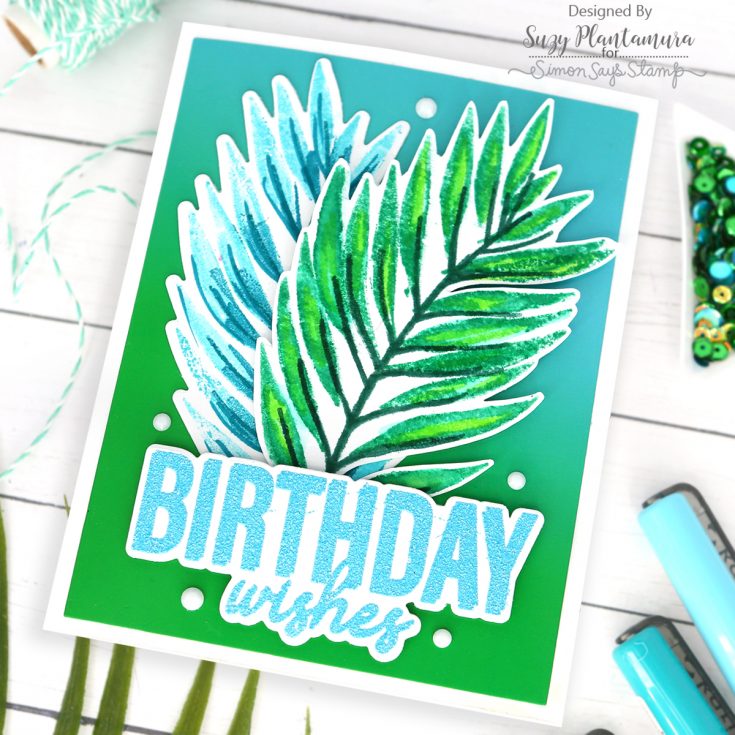
I die-cut a piece of the SSS Color Blend Cardstock with a SSS Basic Rectangle Die and attached it to a white card base. I then attached the two branches with foam tape beneath the top of the front one. I embossed a sentiment from the CZ Big Old Birthday stamp set with blue embossing powder. I die-cut it out and attached it over the bottom of the branches with foam tape beneath it. I added some white gems around the card to finish it.
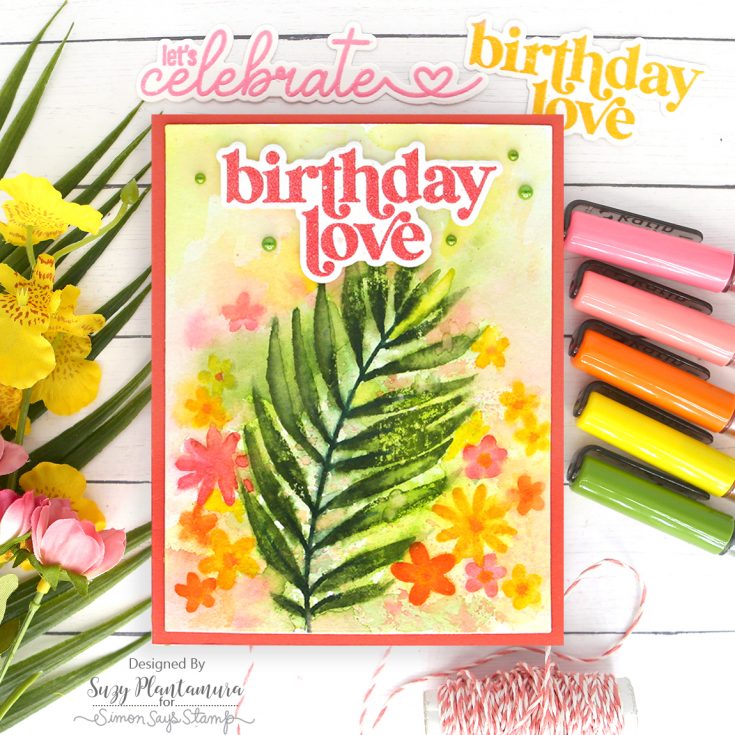
This card was me trying a new technique and me not sure I like how it turned out haha. I started with a piece of Arches watercolor paper, and I used my Karin Brushmarkers again. Using watercolor markers directly on flat stamps is the best way to watercolor with them. I applied the markers directly to the stamps again, but this time I wet the paper first, so the stamped images were messier. I was going for an impressionistic look. I used a wet paintbrush to move the colors around the background as well. Once it was dry, I wanted the images to be a little more realistic, so I applied some more marker on them directly on the paper and used a wet paintbrush to blend them. This gave some a more muted look and some a more realistic look appearing to be in the foreground.
I die-cut this piece out with a SSS Basic Rectangle Die and attached it to a coral card base. I then embossed a sentiment from the same CZ Big Old Birthday Stamp Set (because who can have too many birthday cards) using Nuvo Coral Chic embossing powder. I die-cut it out and attached it to the top of the card with foam tape behind it. I used some Honeybee Happy Hearts Pearl Stickers in green around the sentiment.
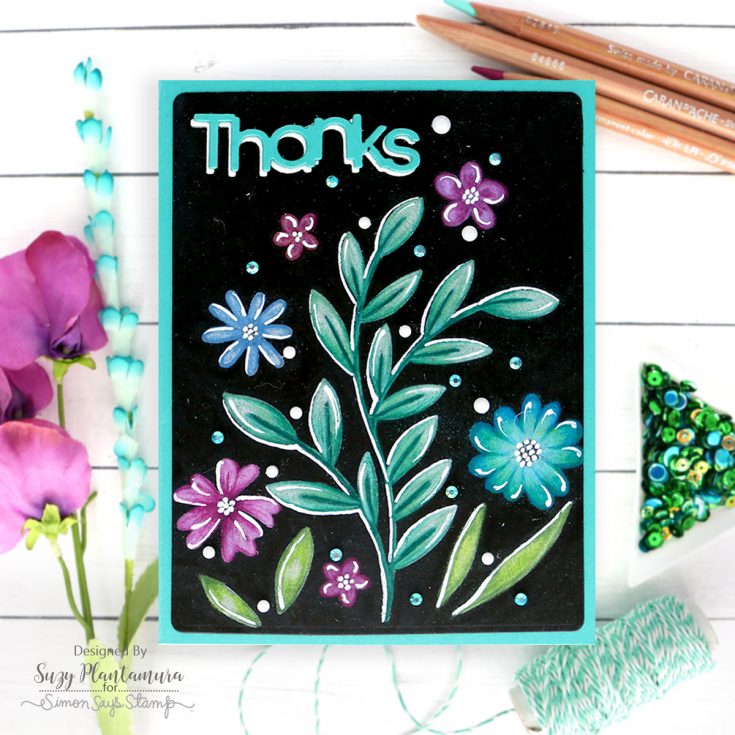
I wanted to try to color some of the stamps with colored pencils on black cardstock. I stamped the images with SSS White Pigment Ink and let them dry. The white color helps the pencils to look lighter on the cardstock. I then tried all of my colored pencils to see which type worked best on the black and I preferred Luminance by Caran d’ache (they don’t cost the most for no reason!) or Prismacolor because they are waxier. I used a white gel pen to add details to the flowers and stems as well.
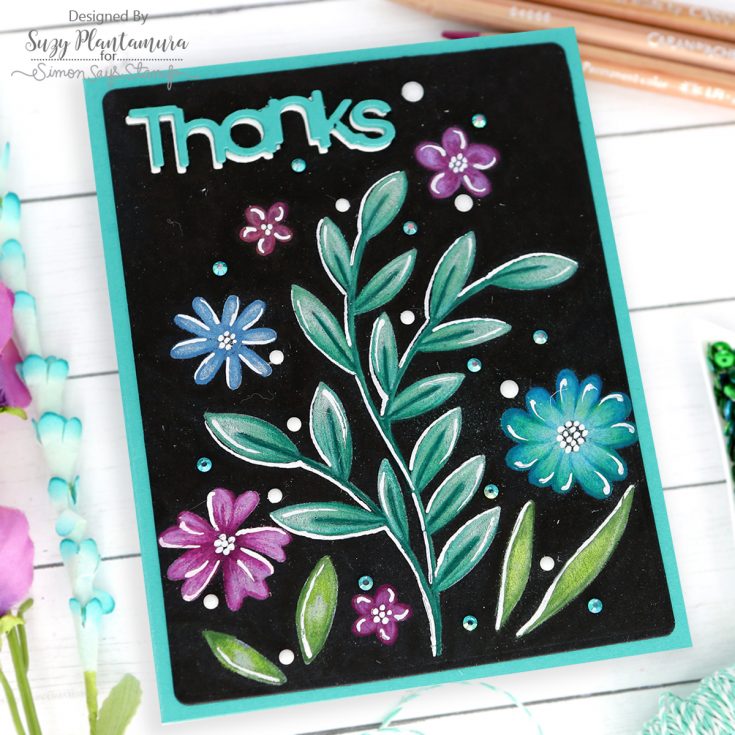
I die-cut this piece down and attached it to a teal card base. I then die-cut a title from both white and teal using the new Greetings Trio Wafer Dies. I didn’t use the frame for it as I felt like it was too much, so I just shadowed the teal work with the white one on the top of the card. I added some gems in white and teal around the card.
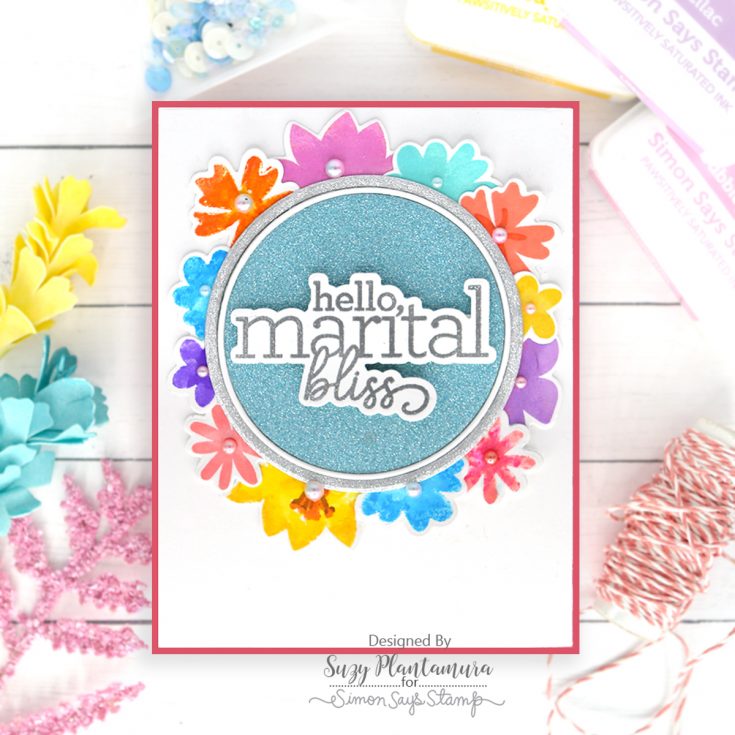
As I made the other cards, I had a few flowers left over both stamped with Pawsitively Saturated Inks and stamped with Karin Brushmarkers. I was trying to think of a way to use them all on a fifth card. I created a circle with the SSS Thin Frames Circle Dies and glitter paper I had left over from a previous kit (Tim Holtz Idea-ology Winter Deco Sheets attached to white cardstock). I attached the center circle to a white card base first. I then cut the flowers to fit around it right up next to it. I then attached a silver frame around it over the edges of the flowers. I used a white cardstock frame for the inside thin one.
I embossed a sentiment from the CZ You Did stamp set with SSS Silver Embossing Powder and die-cut it out with the matching dies. I attached that to the center of the circle with foam tape beneath it. I then added some of the Honeybee Pearl Stickers over the center of each of the flowers to finish it. I think this card is a good demonstration of a way to use up your extra stamped images after making other cards.
Let’s be honest here. This Fantastic Florals stamp set could have been used for way more than 5 cards! And what I love the most about it is it can be used for ANY subject card you want with other stamp and die greetings or even your sentiment labels. It is so versatile that I hated stopping at five haha! I hope this post inspires you to think of lots of ways to use your stamps and brings you some sunny feelings! Happy stamping! Suzy
SUPPLIES:
|


Thanks so much for stopping by, and thanks to Suzy for being our guest!
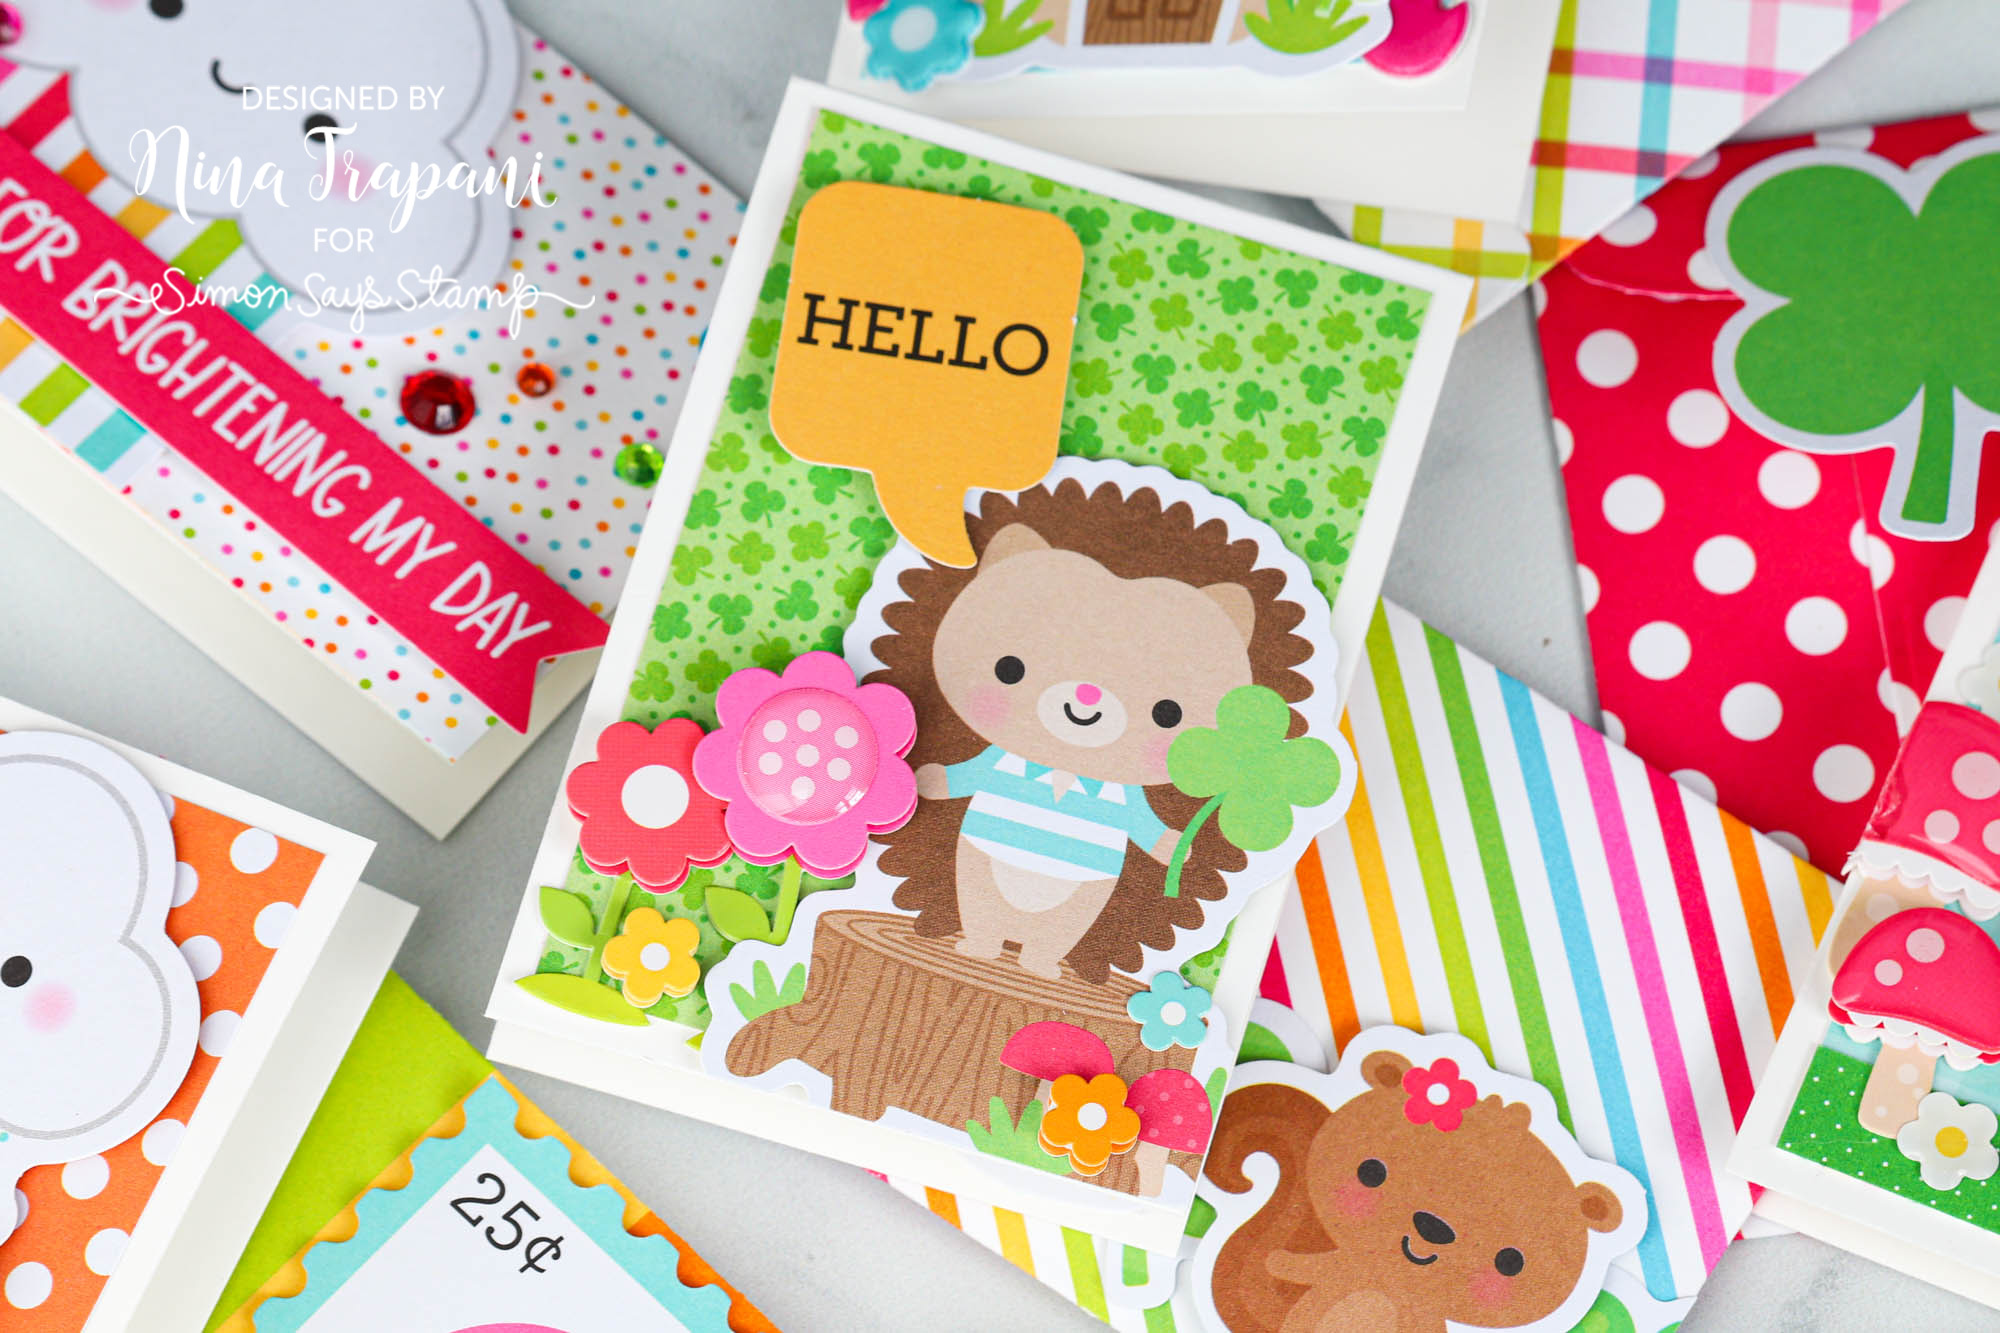
SO EASY! Mini Cards + Envelopes with NEW Doodlebug!

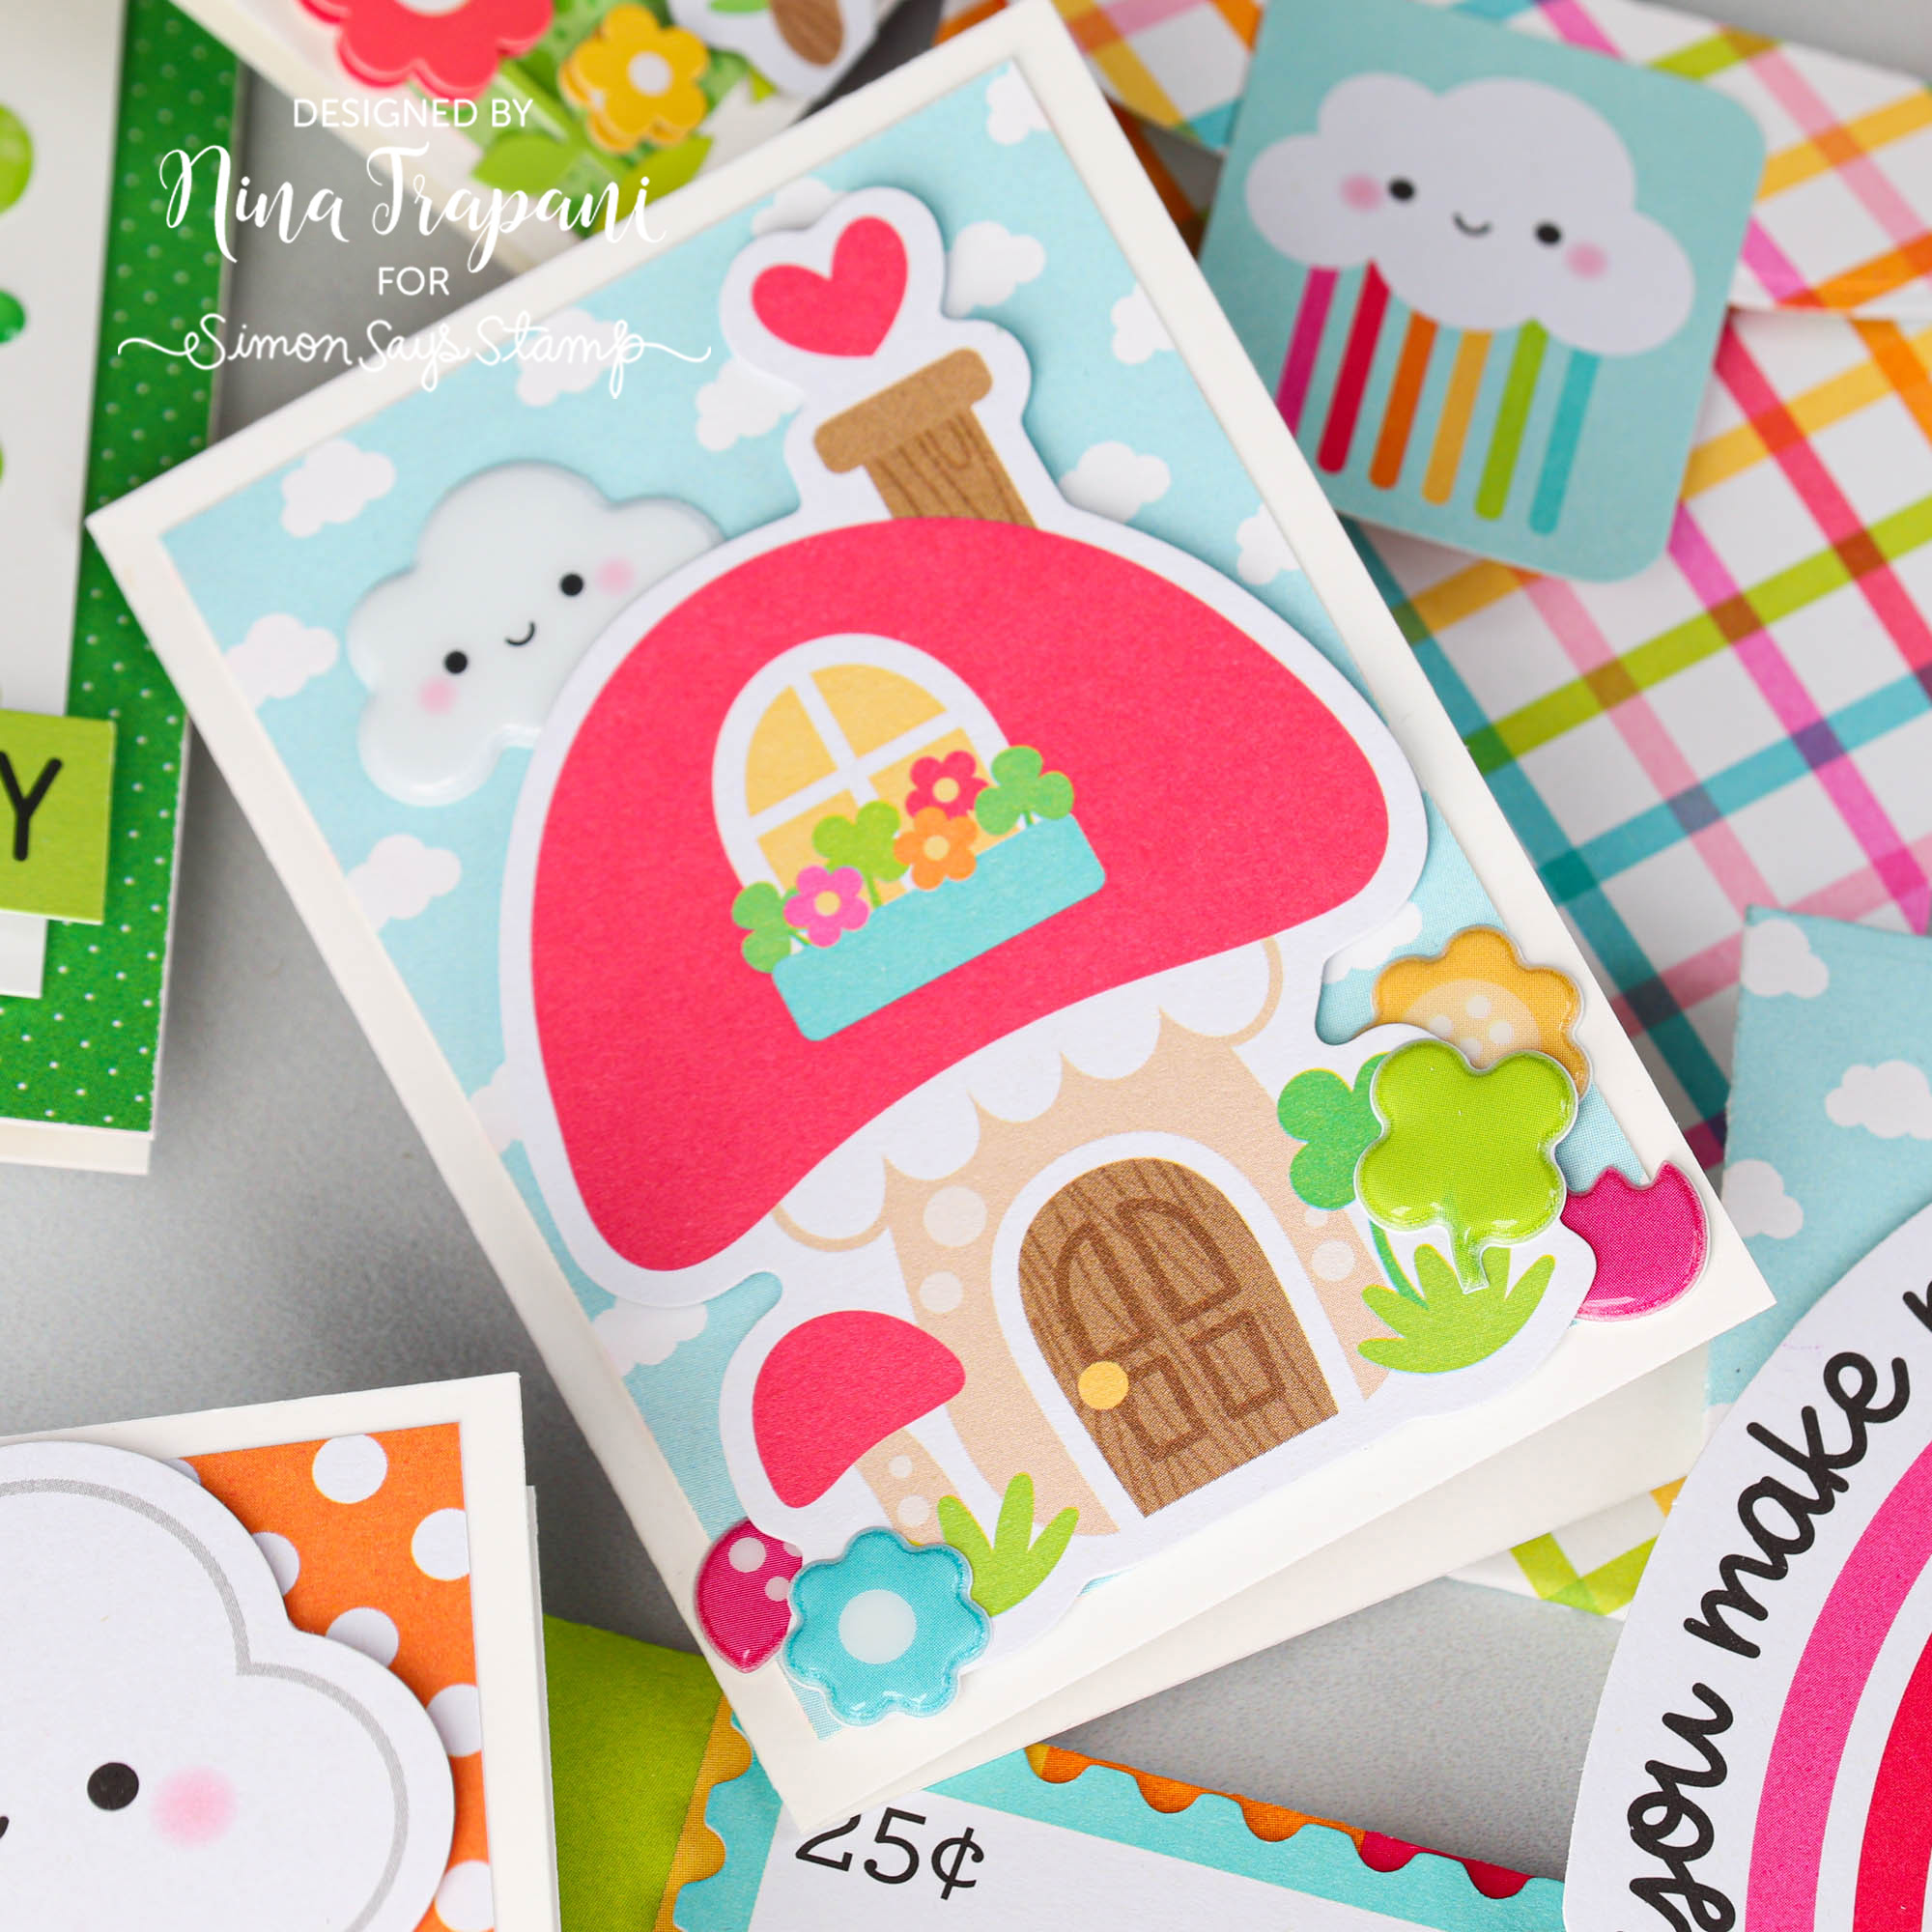
Hello there crafty friends, it’s Nina-Marie Trapani here with you! Today we’re using Doodlebug’s new Over the Rainbow collection to make darling mini cards and envelopes that would be perfect for sending, giving in lunchboxes, gifting for birthdays and special occasions… the sky is the limit for creating and giving these adorable notes!
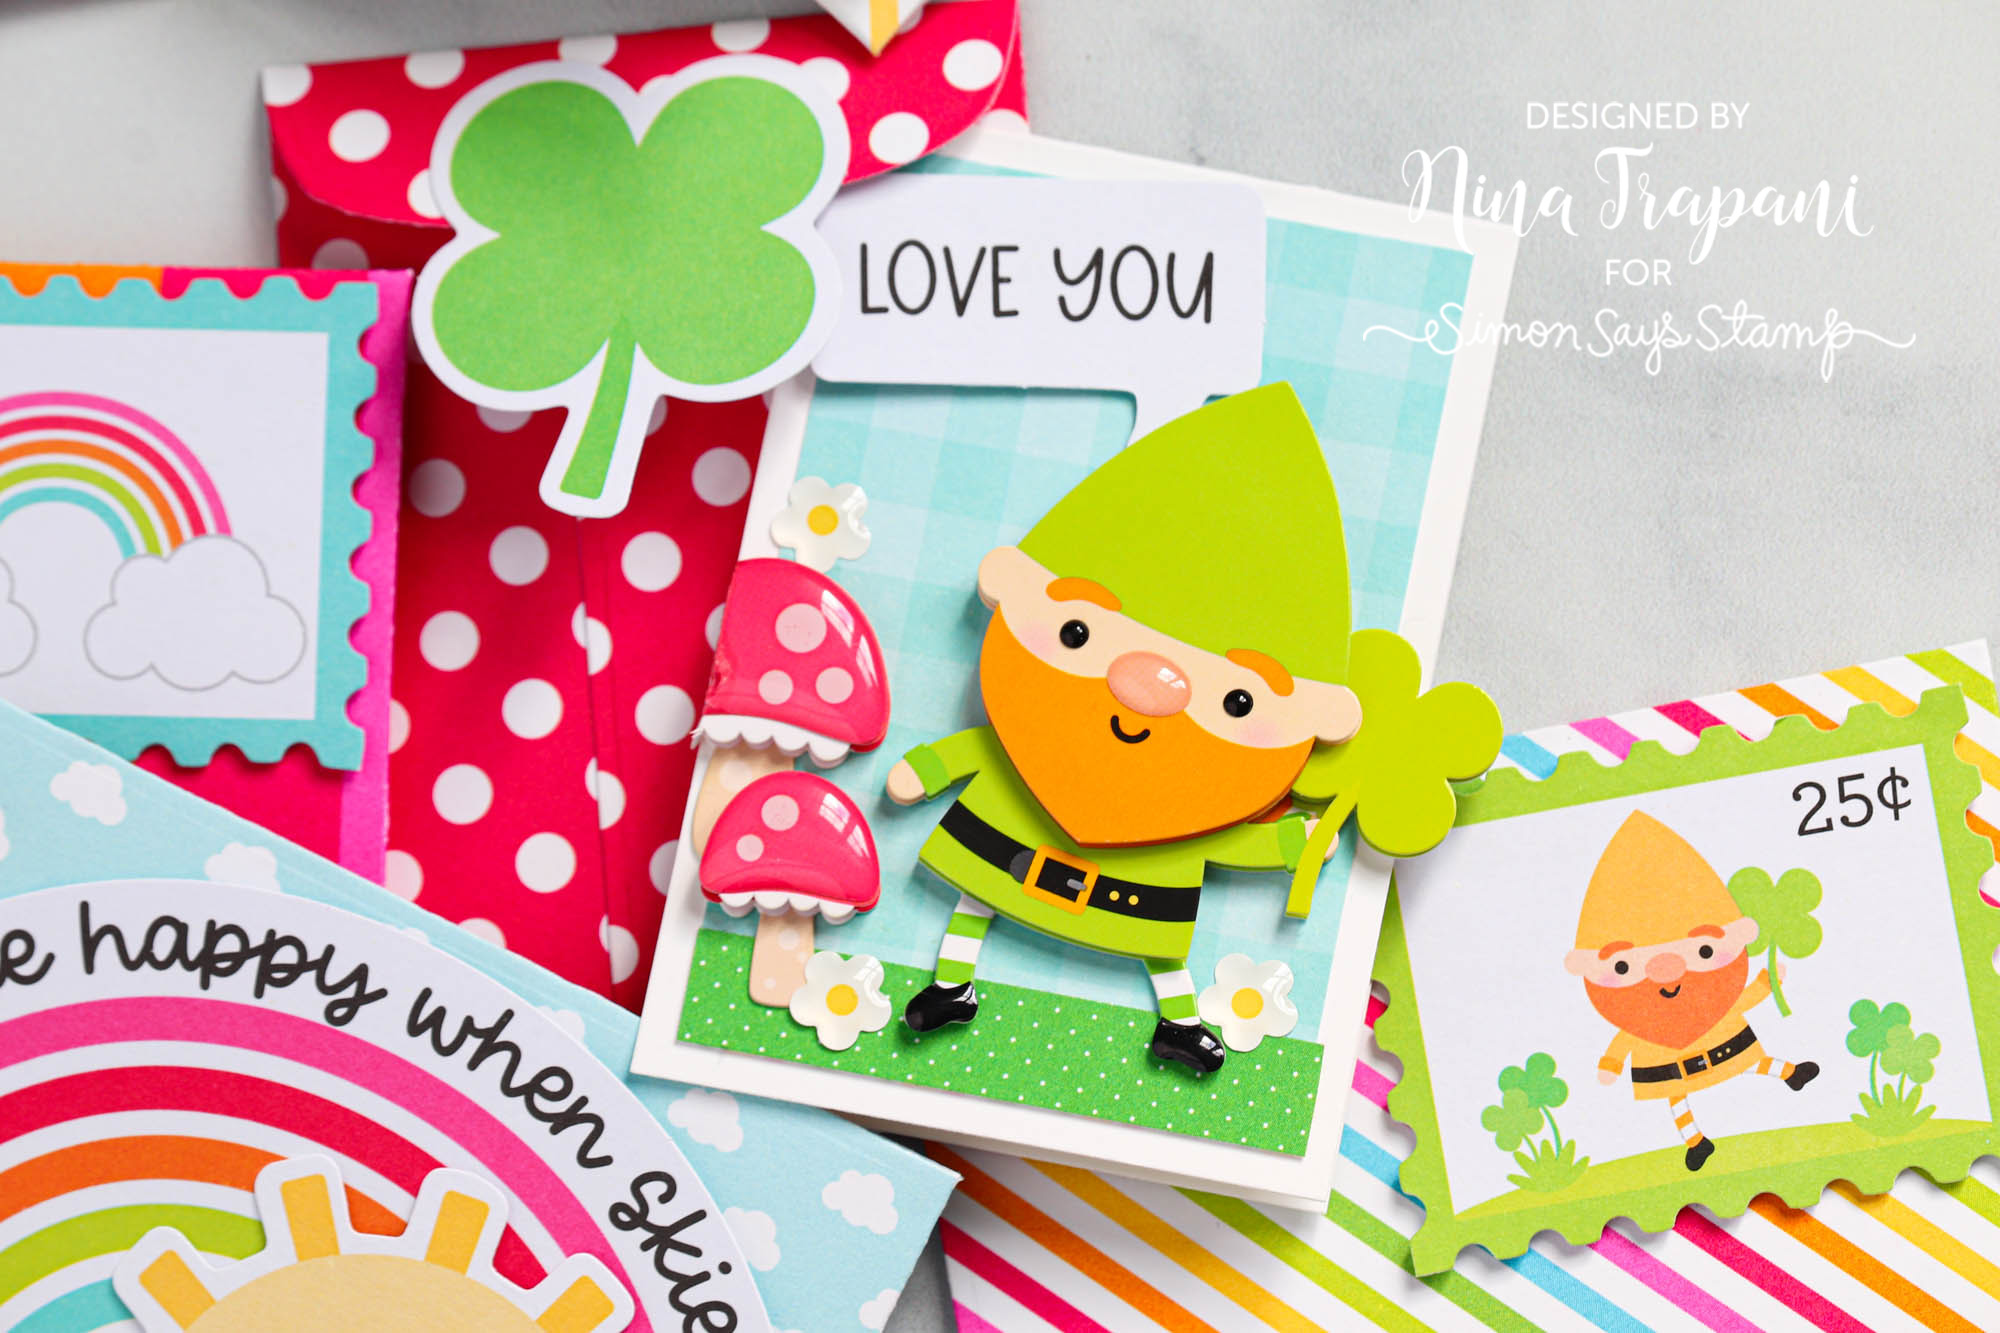
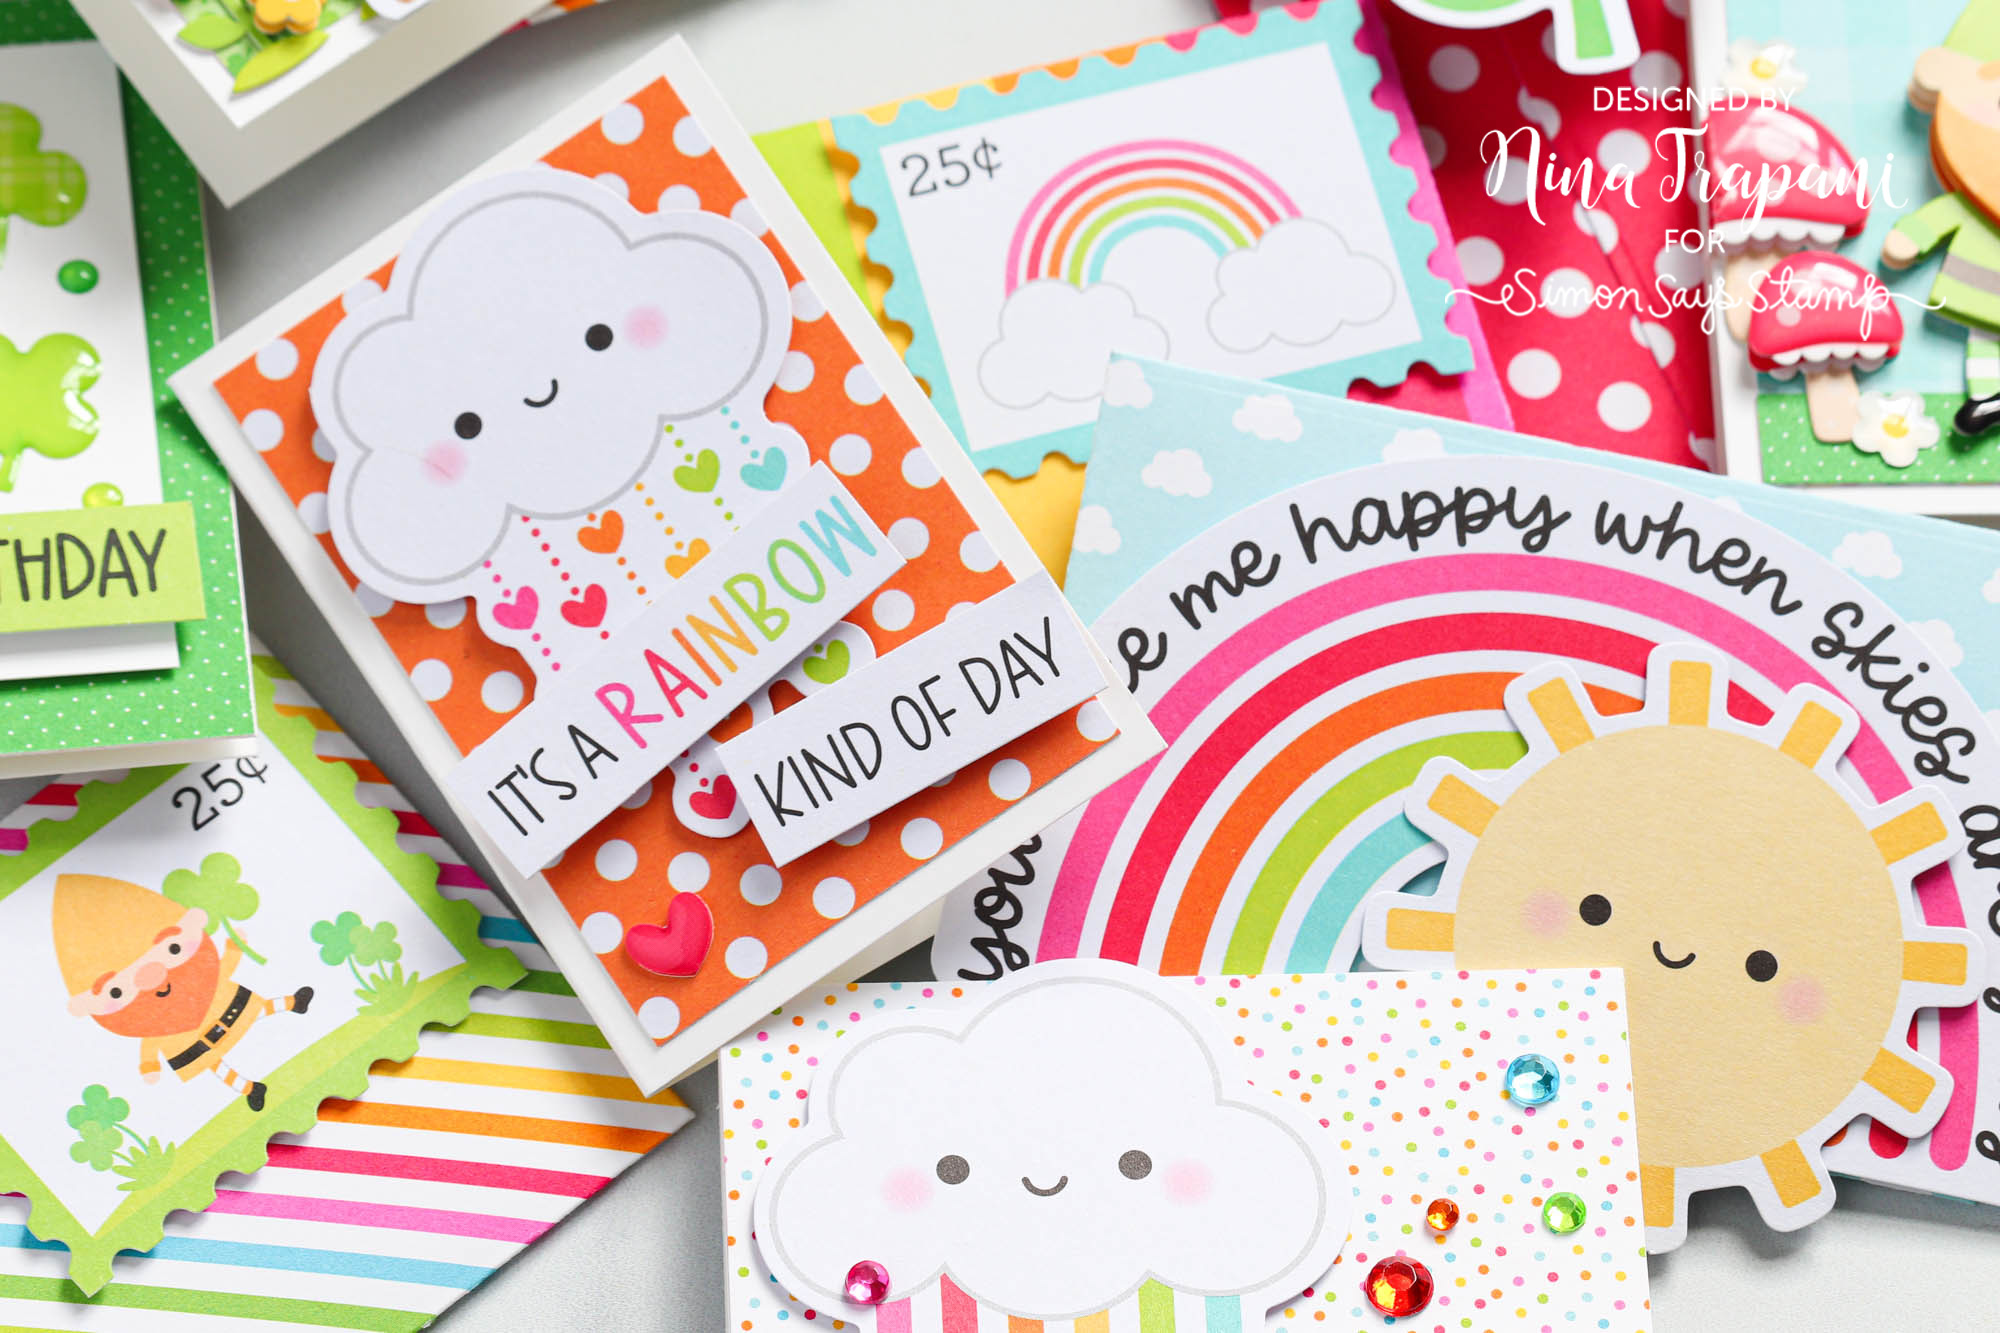
I made these cards to be 3 1/4 x 2 1/4 in size, which fit perfectly inside our Simon exclusive Gift Card Envelope die! With patterned paper from Doodlebug’s Over the Rainbow collection, I made colorful little envelopes that my cards can slip inside. Each envelope is customized to match the card, which makes things coordinate so beautifully.
Want to learn more about how I made these cutie-patootie mini cards and envelopes? Be sure to watch the video below for all the details!
WATCH THE VIDEO
SUPPLIES
|


