Go ALL IN with an EXPLOSION of Bright Floral Die Cuts: Making the Cut

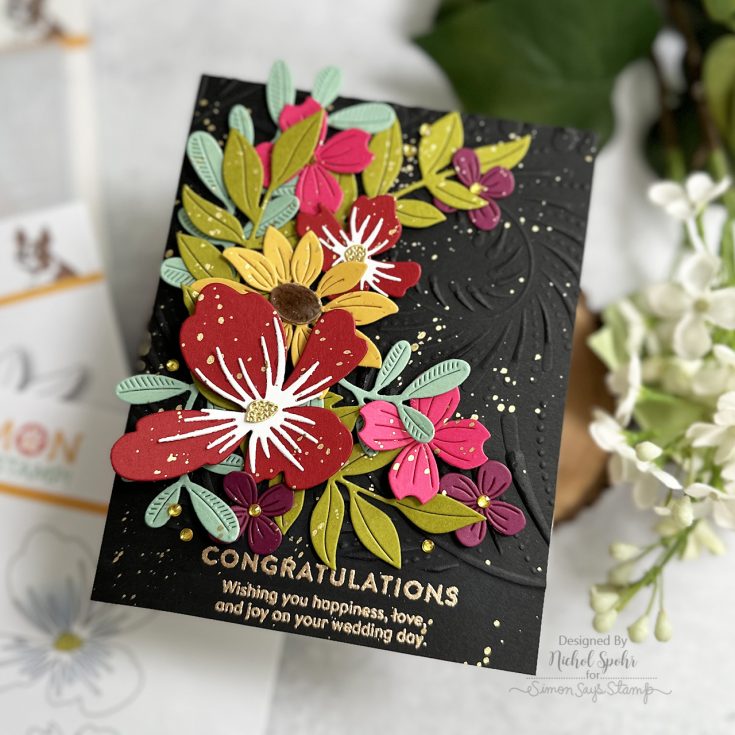
Hi friends! Happy Tuesday! Welcome to the latest edition of our Making the Cut monthly blog series where our friend Nichol Spohr shares a card that embraces the love of all things die cutting! She’s spotlighting a gorgeous assortment of our floral die sets including the Layered Dandy Flower, Lush Leaves, Etched Layered Daisy Stem, Arched Leaf and Flower Blooms, and Olive Leaves! She made a gorgeous background to layer these on with our Feather Spiral Embossing Folder! Read on to learn all of the details on this stunning card and enjoy!


WATCH THE VIDEO:
SUPPLIES:
|


Thanks so much for stopping by, and thanks to Nichol for being our guest!
Step Up Stamped Images with THIS Stencil Idea! Studio Monday with Nina-Marie

Hey everyone, it’s Nina-Marie Trapani here with you and I am sharing a project using some brand new Pinkfresh Studio products!

In this video, I will be coloring stamped images from the Be Fearless stamp set with the coordinating stencils; but to step the ink blending up a bit, I’m going to add transparent glitter paste to one of the layers to create an unexpected touch of sparkle!

This 5×7 card also features some patterned paper from Pinkfresh’s Picture Perfect collection, a stamped sentiment from our Simon Says Stamp Airy Greetings set, and some Dazzling Gems in a pretty teal color!
Make sure you watch the video to see the magic happen! This is such a fun technique that really elevates your stamped and stenciled images.
WATCH THE VIDEO
SUPPLIES
|


Make a Birthday Card with the Vault Funky Floral Wreath from Tim Holtz!

Hi friends! Happy Sunday! We’re delighted to share (in case you missed it!) that the SUPER popular Vault Funky Floral Wreath Tim Holtz Sizzix die set is now back in stock!! What better time to welcome back special guest Cheiron Brandon with a gorgeous card using this great die set! Be sure to read on for all the details and enjoy!

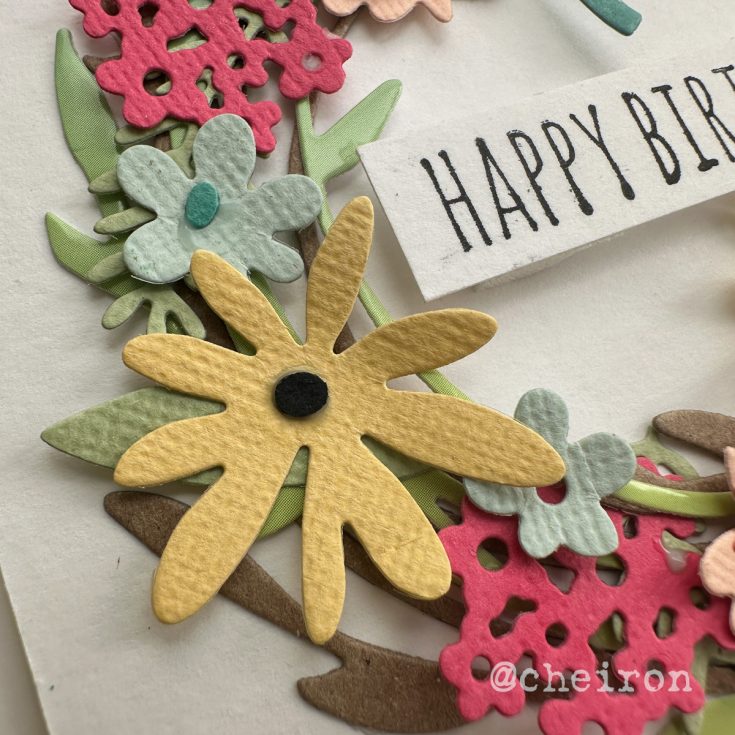
Hi there crafty friends! It’s Cheiron here with another Tim Holtz tutorial. This month I am using one of the new Tim Holtz Sizzix from the Vault dies, Vault Funky Floral Wreath and combing it with some lovely Sizzix textured cardstock in all the colors of spring to create a beautiful birthday card. I also used my Sizzix Shaping Kit, which has a solid foam pad and shaper tools to give your flowers that little something extra and make them really come to life.


I started by cutting out the wreath from the Vault Funky Floral Wreath from Distress Kraft Heavystock, then also cut another one from the Simon Says Stamp Color Blend cardstock. I adhered my wreath pieces to a panel of Distress Watercolor Cardstock cut to 3 ¾ x 5, letting them hang over the edge slightly. Once they were dry I turned my paper over and trimmed off the excess part of the wreath that was hanging over. I cut the florals from the die set from the Sizzix Cardstock. I love the texture it has.


Once I got all of my florals cut out, I used the Sizzix Shaping Kit to make my flowers more dimensional. You simply take your flower and put it on the mat that comes with the kit and use the ball end of the tool and make small circles starting from the inside of your flower (best to start with a smaller side of the tool and then work bigger). After I added dimension to the flowers, I adhered them to the wreath using Distress Collage Medium.


Once my flowers were dry, I stamped the sentiment from the Crazy Talk Stamps then added it to the panel with foam dots. When that was completed, I added the entire panel to an A2 card base. I hope you enjoyed this fun wreath of spring flowers; I do love the look the shaping kit gives to them!

SUPPLIES:
|


Thanks so much for stopping by, and thanks to Cheiron for being our guest!


