HOT Technique for a Quick WOW factor showcasing our September 2024 Card Kit


Hi friends! Happy Wednesday! Please join me in welcoming back special guest Nichol Spohr to showcase two gorgeous cards showcasing tons of components from our fabulous September 2024 Card Kit! Want to save $5 instantly on this already awesome valued kit? Become a subscriber! Be sure to watch the video for all the details on these cards and enjoy!


WATCH THE VIDEO:

SUPPLIES:
|


Thanks so much for stopping by, and thanks to Nichol for being our guest!
DIY Halloween Background: Yippee for Yana

Hi friends! Please join me in welcoming back the oh-so-talented and amazing Yana Smakula! (Please note: our dear friend Yana is Ukrainian. To show support to our brothers and sisters in Ukraine, please see Yana’s post HERE.)

Hello, crafters, this is Yana Smakula for Simon Says Stamp! Welcome back for another Yippee For Yana video! It’s that time of the year! Time for Halloween Cards!

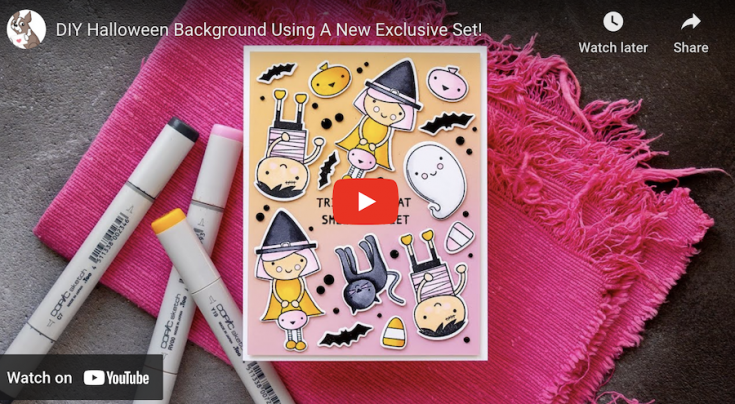
I’m creating a cute Halloween card with the Simon Says Stamp Halloween Friends stamp set! This time, I wanted to do a girly color combo and went with pinks and yellows for my card. It is not spooky, it is not scary, it is utterly adorable!

I stamped the images from the Halloween Friends in Memento Tuxedo Black ink onto Neenah Solar White 80lb cardstock and colored my images using Copics. I used the following colors: RV00, RV10, Y08, Y19, C1, C5, C7, C9, E51. My coloring was simple, anyone can copy and replicate this look.

Next, I cut the images out using the coordinating dies and created an arrangement on Simon’s pink-to-yellow Pastel Color Blends paper. I just loooooove this paper! The panel was trimmed to 4 x 5 ¼” and foam mounted onto the A2 side folding card base. I heat embossed a sentiment in VersaFine Onyx Black ink and clear embossing powder (it embossed just fine with minimum warping) and foam mounted my die cuts on top using thin foam adhesive for a bit of dimension.

Lastly, I filled any gaps in my background using the Onyx gems from Spellbinders. Love!
Have fun stamping!

WATCH THE VIDEO:
SUPPLIES:
|


hanks so much for stopping by, and thanks again to Yana for being our guest!
Ways to support Ukraine:
If you are looking for ways to support Ukraine, we encourage you to visit this page on Yana’s blog:

From Simple to Stunning: Enhancing Stamped Images for Maximum Impact. Let’s Get Crafty With Caly!
From Simple to Stunning: Enhance Simple Stamped Images for Maximum Impact! Let’s Get Crafty With Caly!

Hi everyone! It’s Caly Person here today!
I’m sharing a card using products from the September 2024 Card Kit – Chunky Thankful Greetings!

The stamp set from Cathy Zielske has a bold sentiment with simple layered flowers. I stamped them with two colors to give them depth and dimension. It’s one way to elevate a stamped image!

I have a video share and hope you’ll enjoy watching it! You’ll see how I ink up these stamps to give them the extra shading and ombre colors.
WATCH THE VIDEO:

The white background panel is embossed with the Butterfly Burst Embossing Folder. It’s a small detail but adds beautiful texture.

I also used the beautiful patterned paper from the kit to mat my card. The Prima In Full Bloom 6″x6″ paper is colorful and comes in a variety of colors close to what I used on my flowers today. Once I adhered the paper layers to my card, I did a rough layout of the flowers before I adhered them in place.

I finished my card by adding some Northern Lights Embellishments and finished with some white highlights using a Posca White Paint Pen. Adding details like this will also elevate a “flat” stamped image.
I hope you enjoyed this card! Thanks so much for stopping by today!
~Caly
SUPPLIES:
|


