Ink Smooshing with a Tim Holtz Stencil: EZ with CZ

Hi friends! Happy Thursday! Please join me in welcoming back special guest Cathy Zielske with our latest edition of EZ with CZ! Read on, and be sure to watch the video for all the details! Enjoy!

Hey everyone! It’s Cathy Z. here and today I’m going to show you a quick and easy way to use stencils and inks for a very funky type of background (To get a similar look as I have, use the Tim Holtz Layering Dotted Stencil).
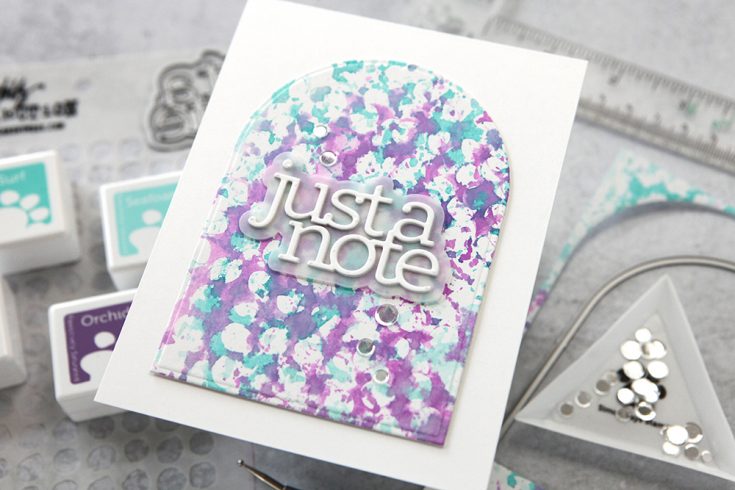
Stencil stamping is simply using your stencils to pick up some ink and pop it down onto your paper. It creates very unique looks, and it’s always different depending on the type of stencil you have. The only real requirement is to use ink colors that follow one another on the color wheel so you don’t get weird, muddy looks!
Here is my tutorial showing you how to stamp a pattern with a stencil:
WATCH THE VIDEO:
You can make several fun patterned panels this way, and then just trim to a desired size or shape and pop on a favorite greeting.
And don’t forget to add a greeting on the inside! I used my CZ Design Just a Note stamps to add the greeting in a coordinating ink color.

Thanks so much for stopping by and I’ll see you back here next month!
SUPPLIES:
|


Thanks so much for stopping by, and thanks to CZ for being our guest!
Did You Know: June 2024 Edition!
Hello crafters, it’s Shari Carroll here with you! I have a new edition of our popular Did You Know series today!
If it’s your first time seeing this feature, each month, we bring you fun facts, creative tips, and even crafty hacks about your favorite supplies and brands; you can then use these awesome tips that you learn in your next crafting projects! Are you ready to learn some fun tricks? Keep on reading!
FOIL TRANSFER CARDS WITH MATCHING DIES

We love foiling options!! We have beautiful foil transfer cards and acetate sheets in our store and we’ve also started making foil transfer cards with coordinating dies. These foiling card sets have unique designs that work with specific dies. Our A2 toner-printed cards come in sets of 4. Grab a few to go with the matching dies if you love a design.

If you’re new to foil transfer techniques, I have some essentials to help you. You may be asking, what do I need? I’ve got a simple list for you below.
- Laminating Machine (for transferring the foil to the printed surface)
- Toner printed cards or acetate sheets (I have some suggestions for you in the supplies below)
- Transfer foils (I have some of my favorites in the supplies below)
Transfer sheets and foils are effortless: You transfer the foil to the design using a toner foil and a laminating machine. Put the foil onto your transfer card with the pretty side up. Use the carrier sheet to cover it, feed it into a heated laminating machine, and wait for it to come out on the other side. You’ll certainly be delighted with the results when you remove the foil from the card.
Tip: Don’t forget about your Simon Says Stamp sentiment strips!

Ok, let’s Taco ’bout BUNDLES! Did you know our designers have been creating more coordinated items with the same theme, including stamps, dies, foiling cards, stencils, and sentiment strips? When we come out with new releases, we bundle ALL those items together to make your shopping experience easier.
TIP: When you find a Simon Says Stamp design that you like, search the item’s name to see if there are additional coordinating items you might like.

I make a lot of cards and projects with dimensional items, and I’m always asked how I mail them. Simon Says Stamp is now stocking bubble mailers in seven colors: black, Navy, Blue, Teal, Purple, Red, and Pink. Each color comes in packs of 6. They are self-adhesive and fit items up to 6×9, with plenty of room for bulky items. They are a pretty way to protect your works of art as they travel through the mail!
Tip: Use a permanent marker or adhesive label for addressing.
I hope these tips have helped you learn a few tricks for your upcoming crafting projects… Thanks for tuning in today and spending some time with me!
SUPPLIES:
|


Go ALL IN with an EXPLOSION of Bright Floral Die Cuts: Making the Cut

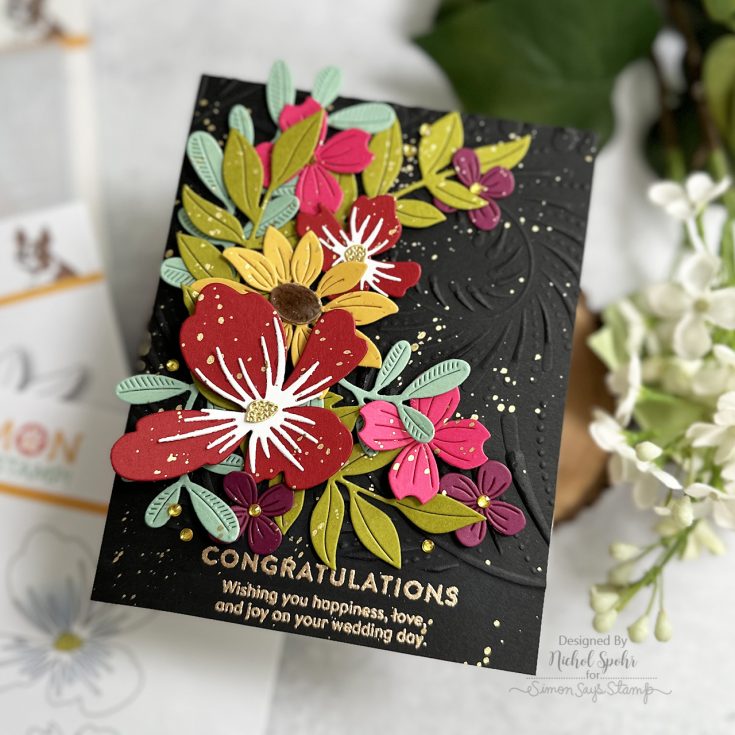
Hi friends! Happy Tuesday! Welcome to the latest edition of our Making the Cut monthly blog series where our friend Nichol Spohr shares a card that embraces the love of all things die cutting! She’s spotlighting a gorgeous assortment of our floral die sets including the Layered Dandy Flower, Lush Leaves, Etched Layered Daisy Stem, Arched Leaf and Flower Blooms, and Olive Leaves! She made a gorgeous background to layer these on with our Feather Spiral Embossing Folder! Read on to learn all of the details on this stunning card and enjoy!


WATCH THE VIDEO:
SUPPLIES:
|


Thanks so much for stopping by, and thanks to Nichol for being our guest!


