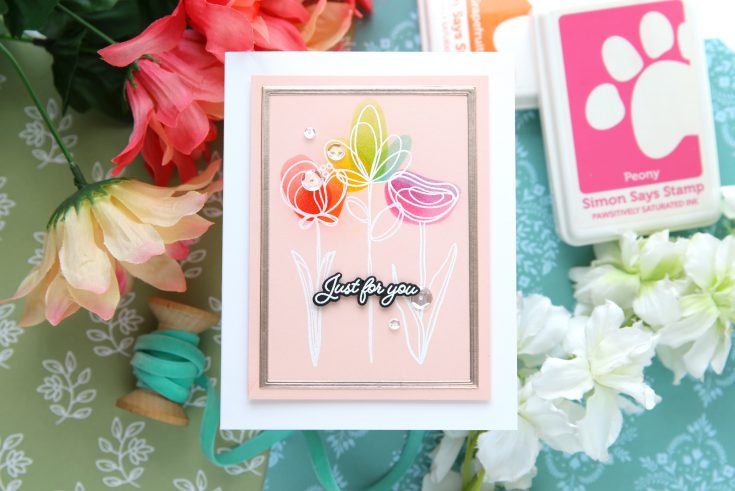
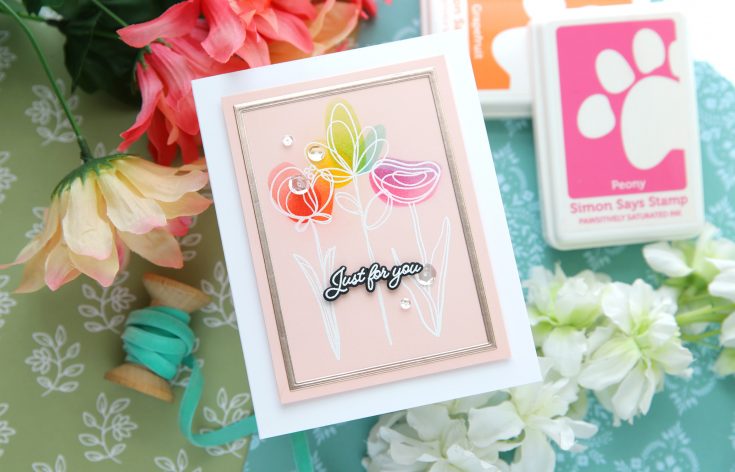
Rainbow Emboss Resist on Colored Cardstock | Easy WOW Technique

Hi friend! Happy Tuesday! We’re delighted to welcome back special guest Laura Bassen with this pretty inspiration showcasing our brand new May 2026 Card kit! Be sure to watch the video for all the details, and enjoy!
WATCH THE VIDEO:

SUPPLIES:
|


A big thank you to YOU, our reader — and to Laura Bassen for being our guest!
Did you know?! We’ve made our card kit subscription BETTER THAN EVER!

Here’s what makes our new service a crafting paradise:
Exclusive Access: As a subscriber, you get first dibs! Each month, you’ll get an exclusive sneak peek at our new kit, with the option to add more coordinating items to your cart, including handy replenishable supplies, all shipped together for your convenience.
Hassle-Free Payments: Say goodbye to monthly billings! Our automated system smoothly charges your preferred card, ensuring an uninterrupted flow of crafty goodness – unless you decide to pause, of course!
$5 Off Magic: Enjoy a special $5 discount off our kit’s retail price, exclusive to our beloved subscribers – no codes needed, just automatic savings!
Crafting Inspirations: Dive into a sea of creative ideas monthly, all tailored around your kit, to keep your inspiration flowing endlessly.
Flexibility First: Fear of commitment? Not here! Our subscription is as flexible as it gets – pause or cancel anytime, no strings attached.
Why wait? Step into the realm of our NEW Simon Says Stamp Monthly Card Kit service. Welcome a box full of crafting marvels, right to your doorstep. Craft with ease and let creativity come to you!
Ready to elevate your craft? Subscribe Now and open the doors to boundless creativity!
We’re thrilled to have you in our crafting community and can’t wait to embark on this renewed creative adventure together!
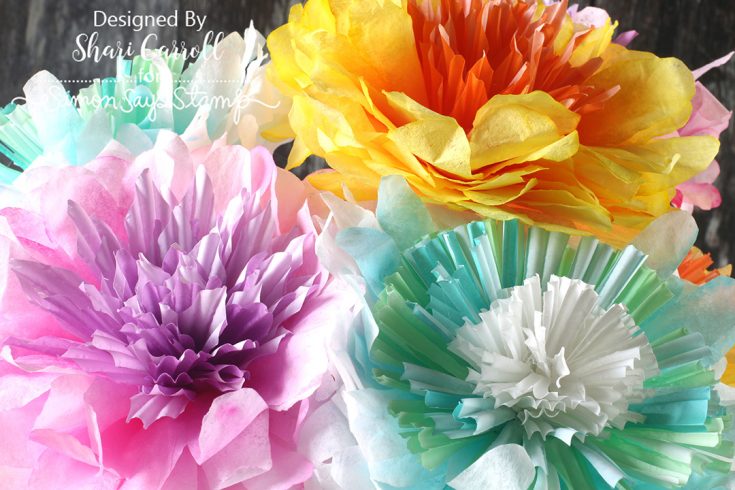
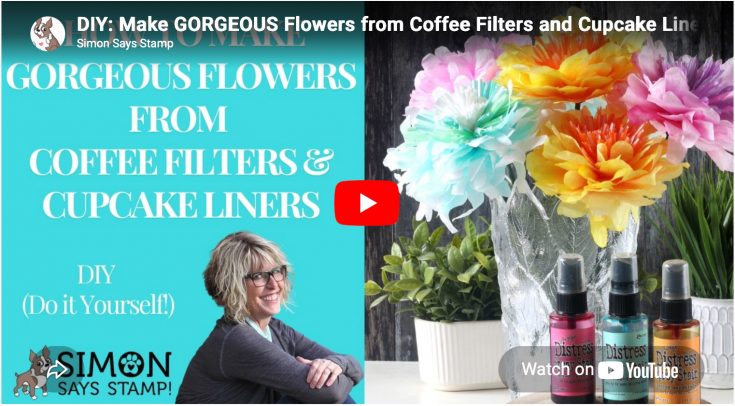
Do It Yourself: Make Gorgeous Flowers from Coffee Filters and Cupcake Liners

Are you ready to get your crafting on? I’ve got a very fun and rewarding “Do It Yourself” idea to create some gorgeous flowers. I’ve been seeing these online and just had to give them a try.
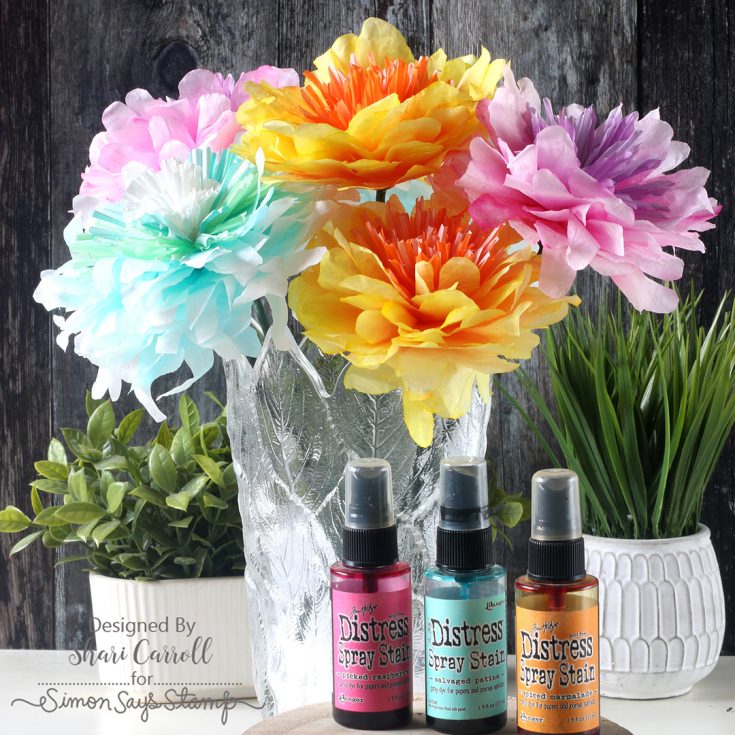
These were made from some basic supplies you might have on hand! Plain white coffee filters are used for the flower petals and were colored using Tim Holtz Distress Sprays.
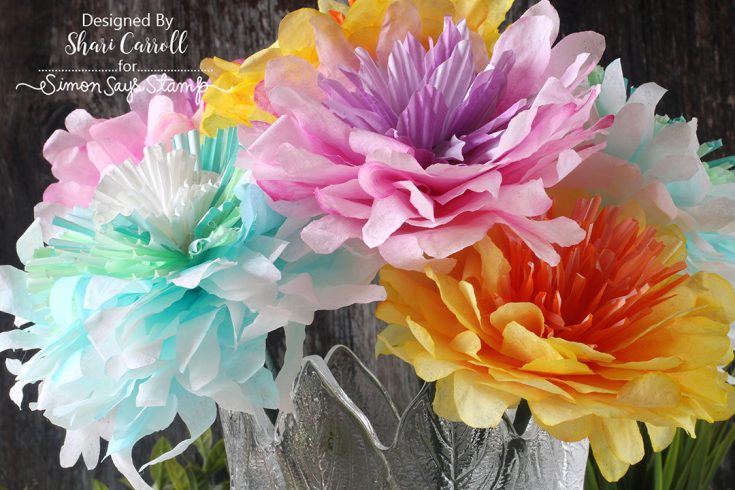
The flower centers are made from colored cupcake liners. These were cut on the sides and added to a bamboo skewer to get the flowers started. The hardest part about making these is choosing what color to use!
I have created a video that you can view below. Enjoy!
|


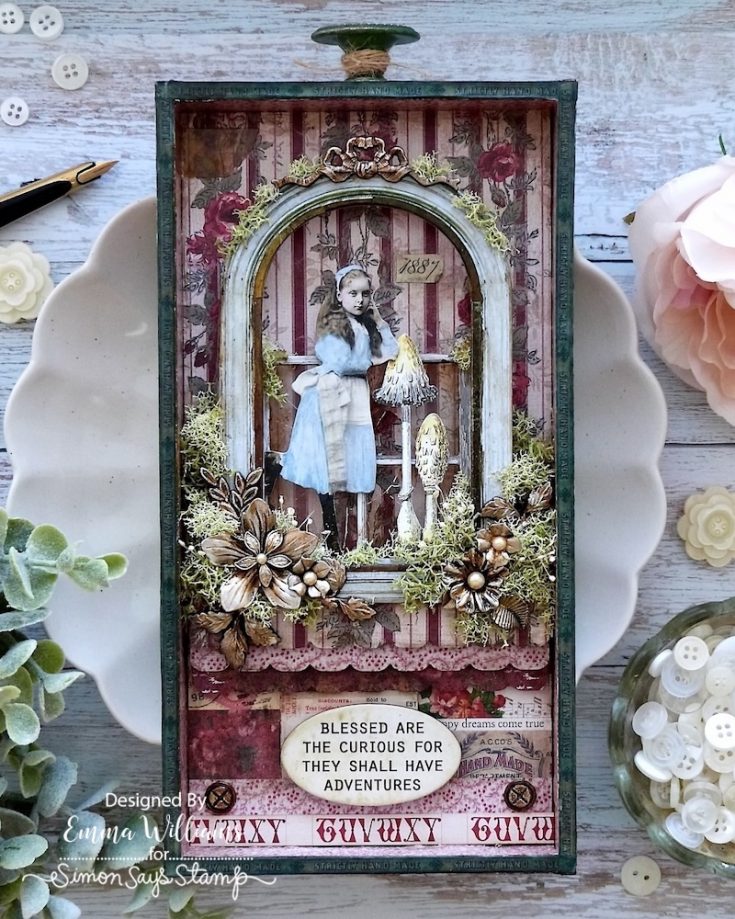
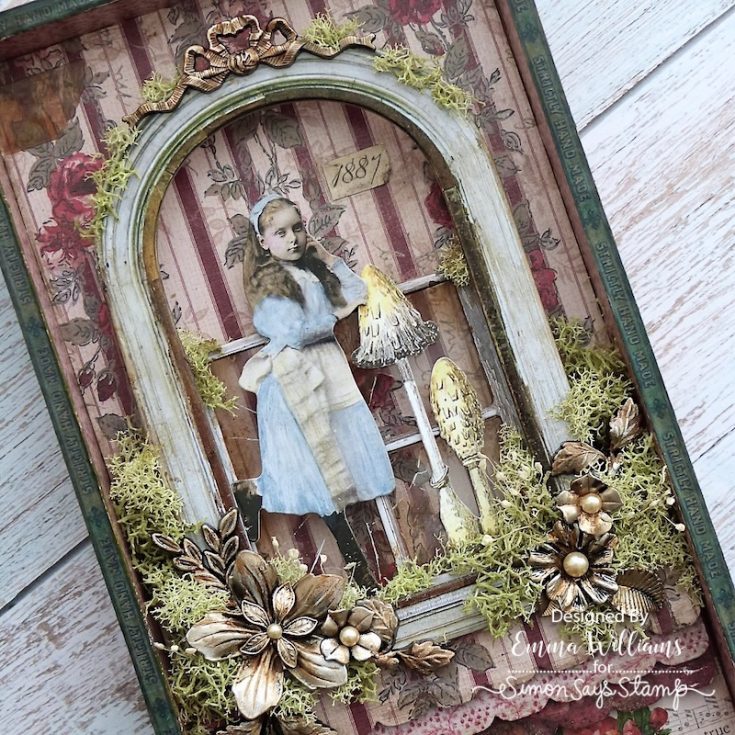
Blessed Are the Curious Vignette Tray by Emma Williams
Hi friend! Happy Sunday! I’m beyond delighted to welcome back special guest Emma Williams to our blog today to share this GORGEOUS mixed media creation! Read on and enjoy!

Hello everyone and happy Sunday…
I’m thrilled to be back on the Simon Says Stamp Blog and really excited to be sharing my latest project with you. A project that was inspired by my love of classic fairytales and with this in mind, I decided to create a home decor piece celebrating these enchanting stories from my childhood and of course, the stories that I still love in my adult years….
So let’s begin and here’s how I created this Blessed Are The Curious Vignette Tray…
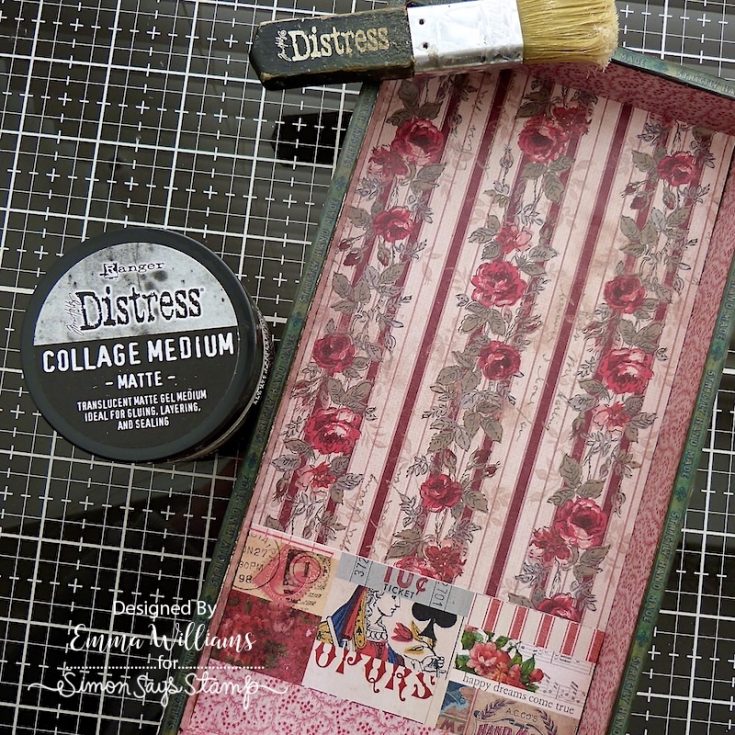
For this project, I worked with the smaller sized Vignette Tray and began by covering the outside of the tray using the stamp design paper from the 8 x 8 Red Paper Palette Collection. I cut strips to fit each of the four sides and adhered these to my tray using Matte Collage Medium. The size of the paper doesn’t quite fit the length of the tray but after piecing another section to elongate the paper size, you don’t even notice the join. After applying the medium over the top to seal the paper, I attached some Design Tape around the lip of the tray. Once the medium is dry, I used the Walnut Stain Distress Crayon and ran this around the edges, blending out any harsh lines of colour with my fingertip.
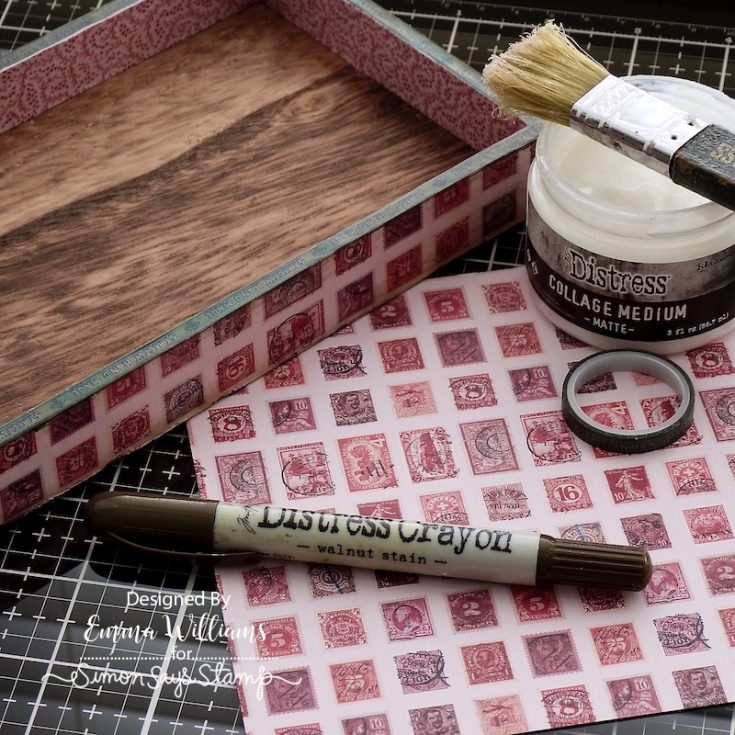
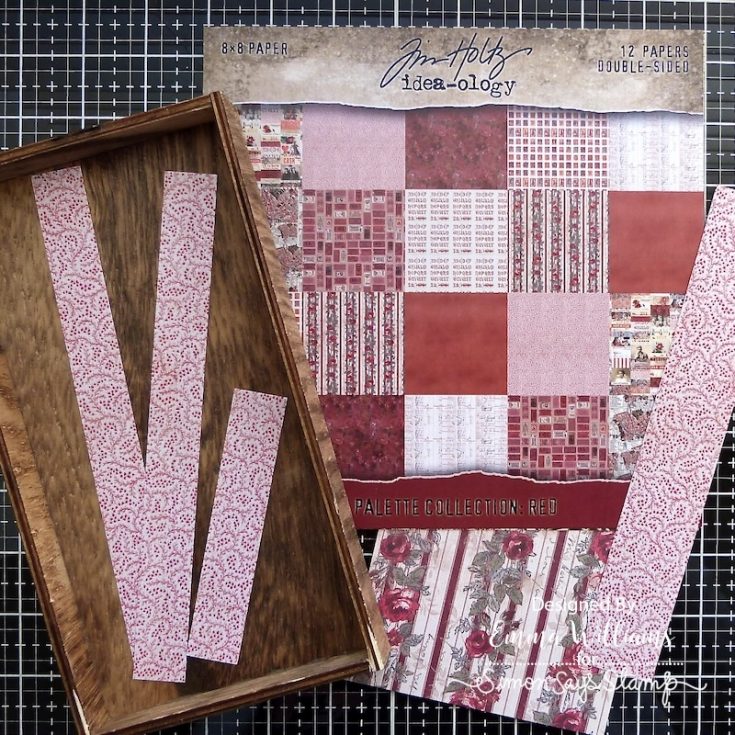
With the sides of the tray covered, I chose different designs from the Red Paper Palette to line the inside of my tray.
Cut pieces of the paper to fit the length of the back of the tray and the four sides. On the back I used two separate designs, adhering a longer length of paper at the top, and a smaller length at the bottom. Run the Walnut Stain Distress Crayon around the edges on the inside of the tray.
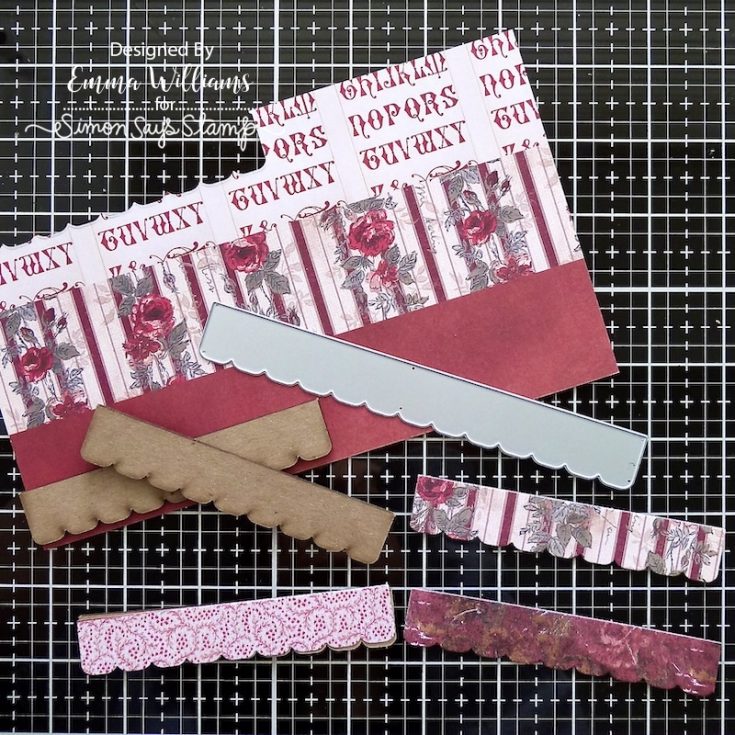
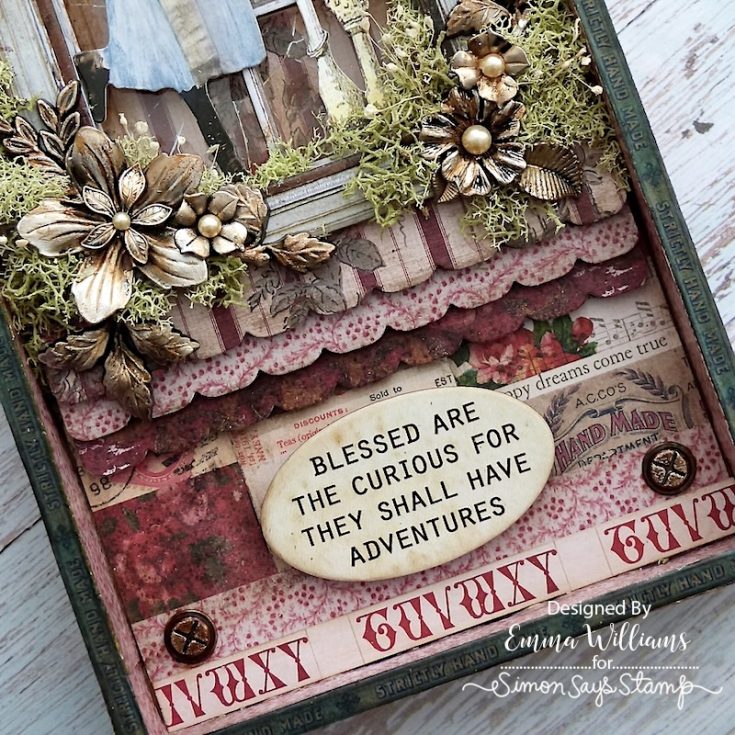
With the tray complete, I moved onto the Etcetera Trims. For this I used 3 of the smallest length but deepest width of Scalloped Etcetera Trim and cut some of the patterned paper with the Tim Holtz Decorative Trims die set by Sizzix.
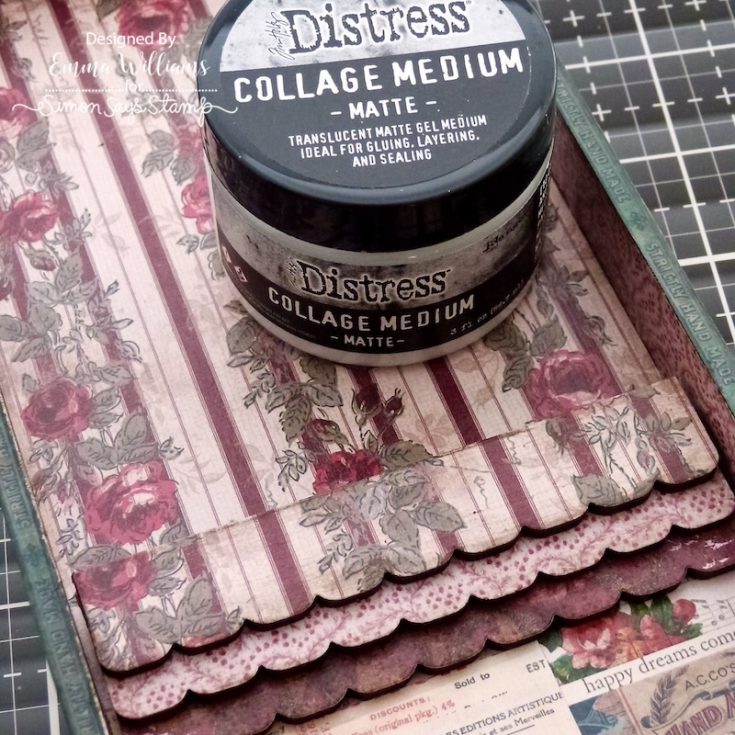
Once the paper is adhered to each of the three trims using Matte collage Medium, I attached them by overlapping each one to form one layered piece which I then attached to the back of the box.
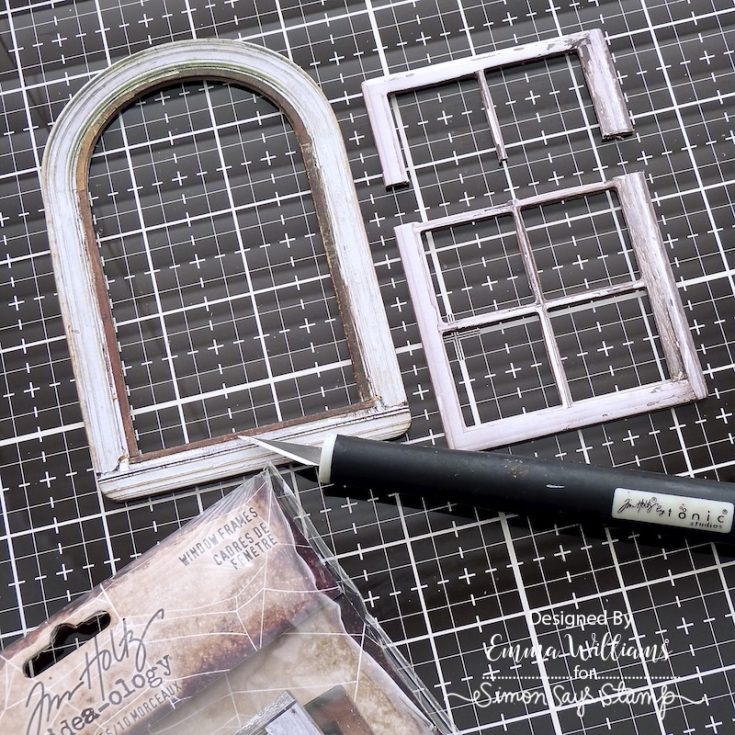
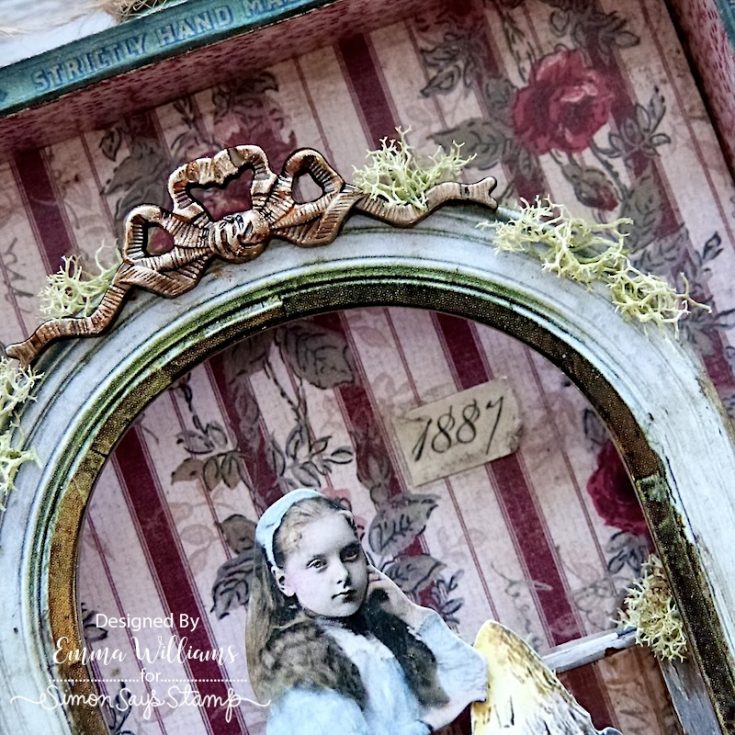
Moving onto the window frame and for this I took two of the Baseboard Frames, the arched frame and a rectangular frame and used a craft knife to cut away the top section of the rectangular frame.
Place the trimmed frame behind the arched frame, using foam strips to add the dimension.
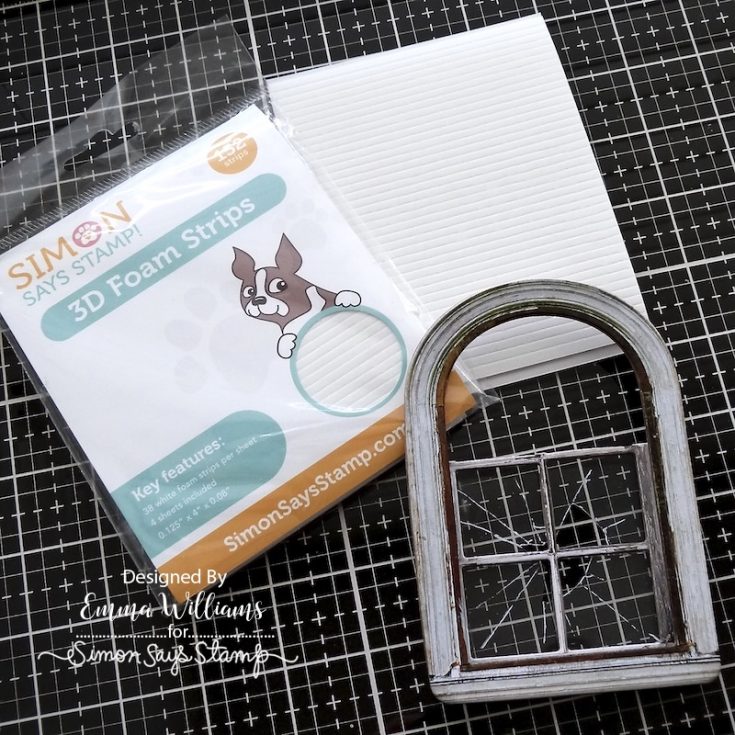

Taking a sheet of the idea-ology shattered window, I cut this to the same size as the trimmed frame and then attached it to the back of the frame with red line tape.
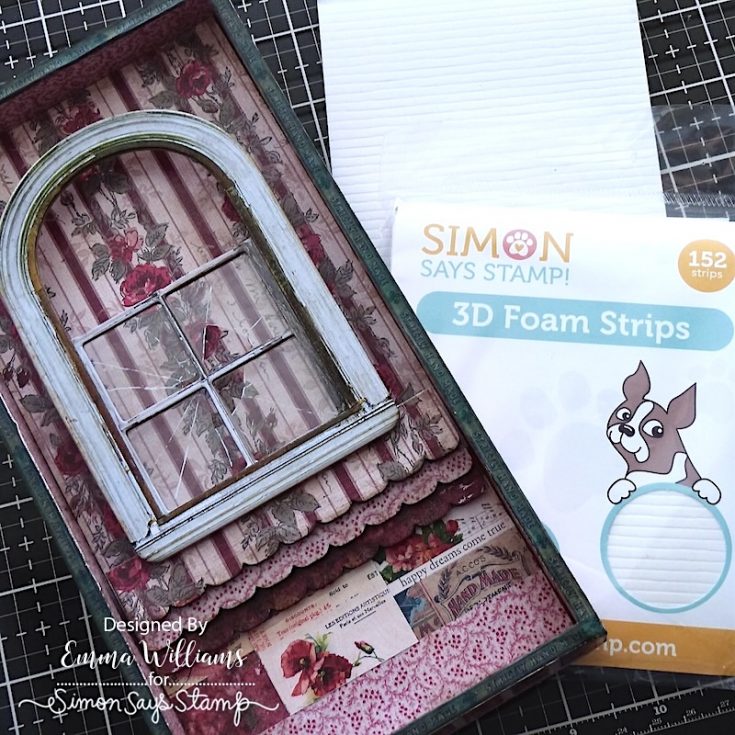
Place more foam strips on the back of the frame and attach to the inside of the tray, slightly overlapping the trims.
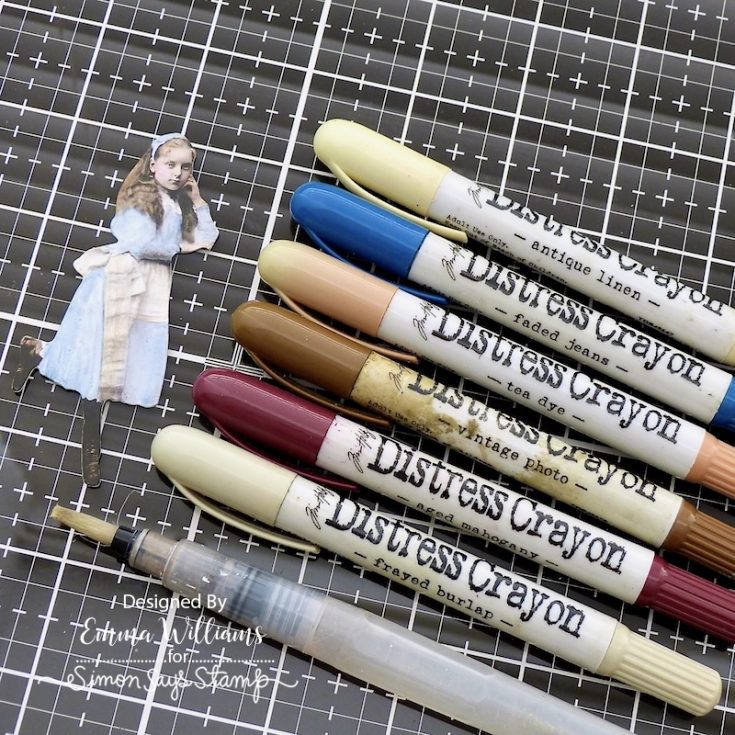
The young girl that I chose from the Paper Doll Poses pack reminded me of Alice In Wonderland and all she needed was some colour. I primed the surface of the image using Clear Gesso and once the gesso is dry, I used Distress Crayons and a water brush to apply the colour to the surface. Scribble the following colours onto your glass mat and pick up the colour with the brush. Apply the colour directly to the photo.
Colors used: Antique Linen, Faded Jeans, Tea Dye, Vintage Photo, Aged Mahogany, Frayed Burlap
Using foam pads on the back to add dimension, I attached the Paper Doll to the window frame, ensuring that she is in the right position, so that she appears to be leaning on the frame.

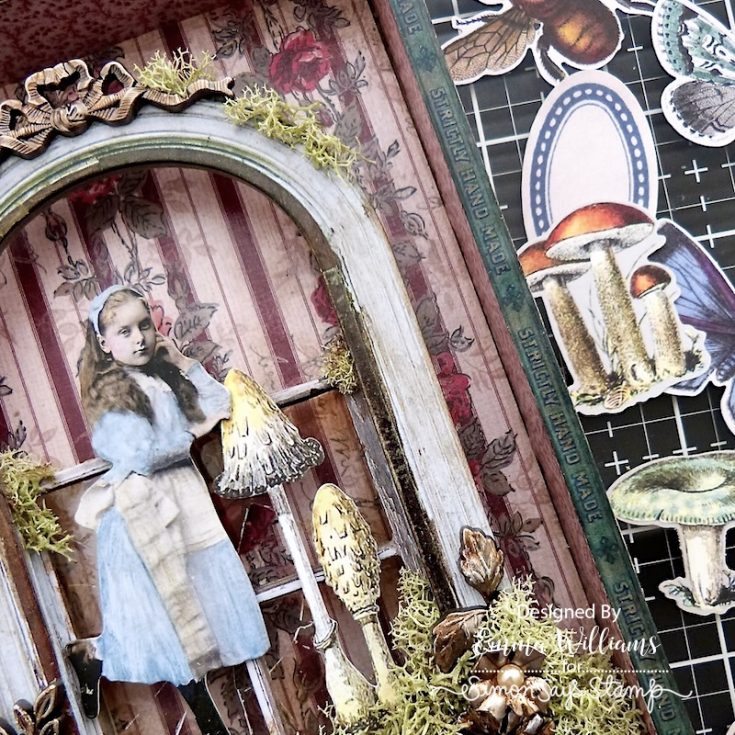
Next to the girl, I used more foam pads to attach a Toadstool Ephemera piece from the Field Notes Ephemera Pack before adding some clumps of moss around the base of the frame.
For the floral arrangement on either side and the metal bow that sits at the top of the arch, I used a selection of the Floral Adornments, Foliage Adornments and a bow from the Ribbons and Bows set.
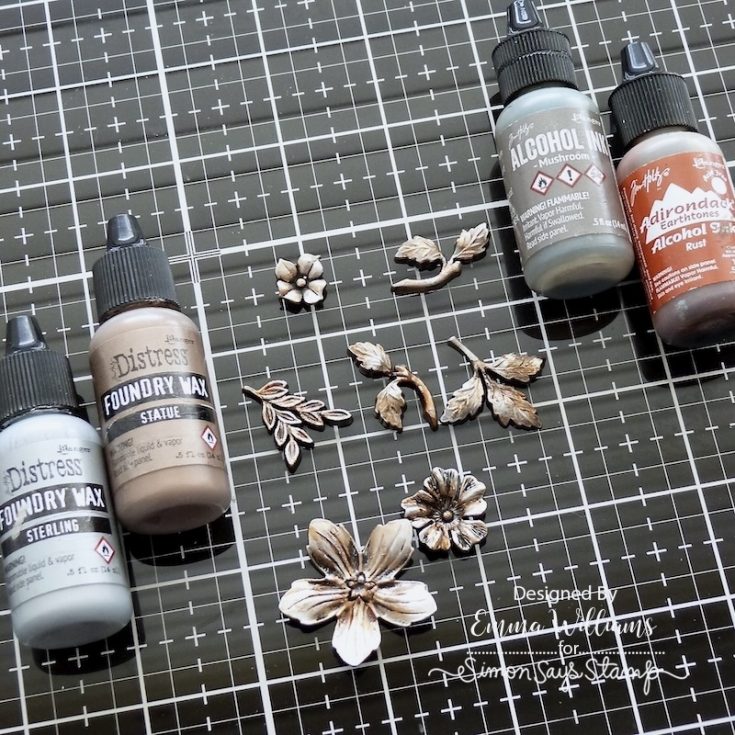
To alter the metal, I applied a small amount of the Distress Statue Foundry Wax to a craft sheet, and using my finger, I applied the wax directly to the surface of the metal pieces. If you have sensitivities or allergies, I’d advise to apply the wax with a brush. Heat set the first layer of wax and once cool, I applied the Sterling Foundry Wax over the top. You only need a small amount of this colour, and apply it to the metal very sparingly, as you don’t want full coverage, you want some of the previous colour to show through. Heat set the wax and once again, allow to cool. I then drizzled a small amount of Mushroom Alcohol Ink over the metal pieces, dabbing away any excess ink with a alcohol ink blending tool and then dabbed the edges of the metal with a small amount of the Rust Alcohol Ink, applied directly to the metal using the blending applicator.
Attach all the metal pieces using Matte Collage Medium, layering them and arranging them to cascade around the two bottom corners of the frame.
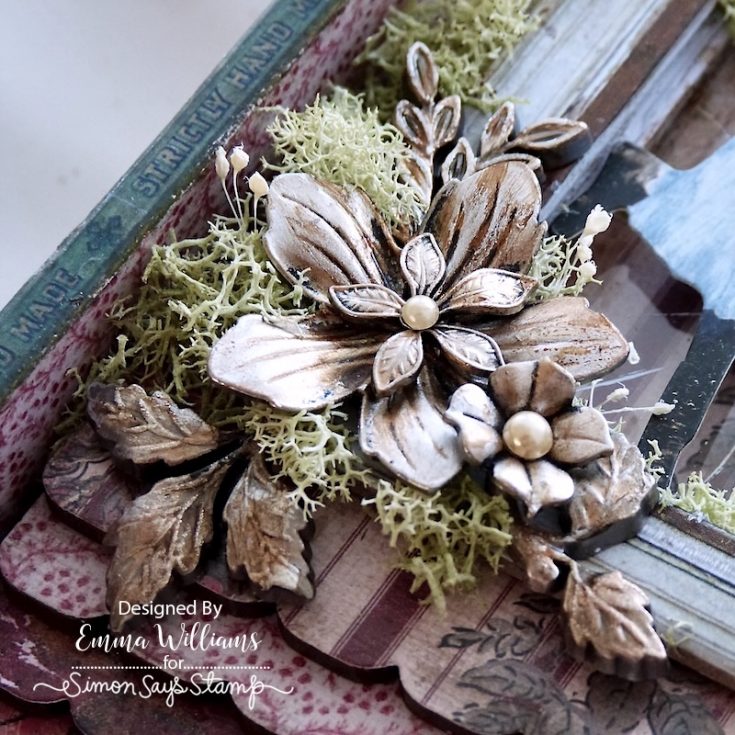
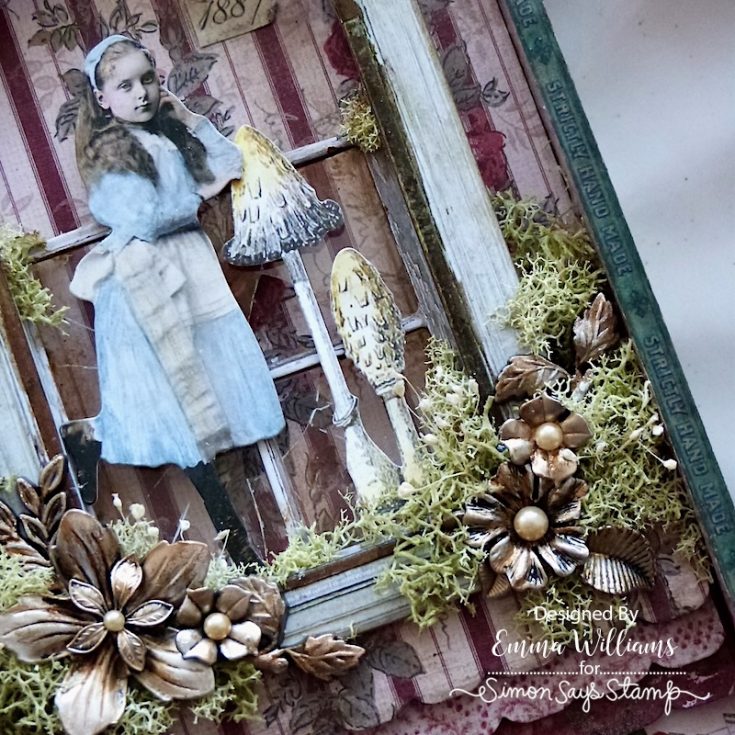
To complete the arrangement, I added some more moss and some dried flowers from my own stash. I also added a small amount of moss around the top of the arch.
I attached the Quote Label Chip to the tray, placing it centrally beneath the trims with foam pads before adhering an idea-ology Screw Head to either side. I altered the screw heads with the same technique as I used on the metal florals but this time, I added slightly more Rust Alcohol Ink to add more depth to the colour.
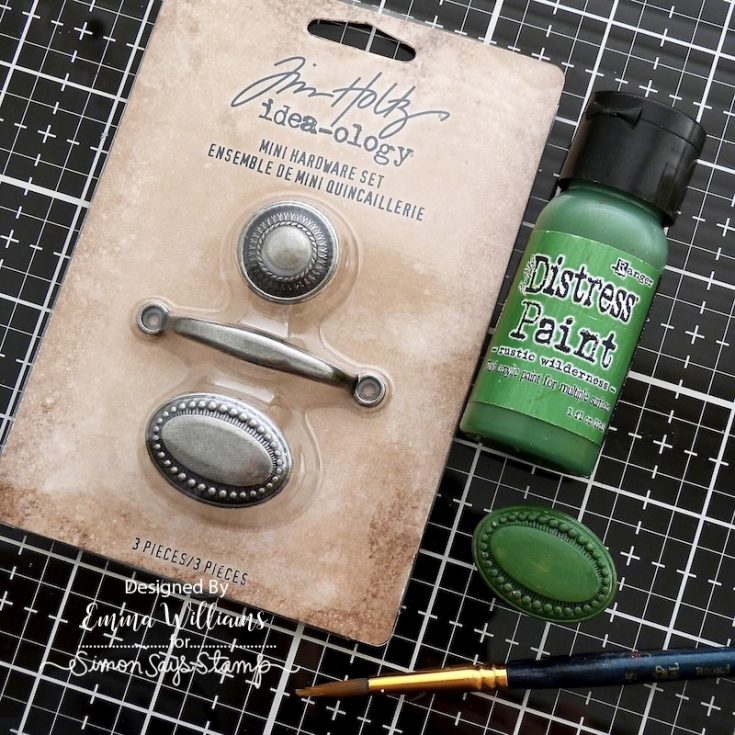
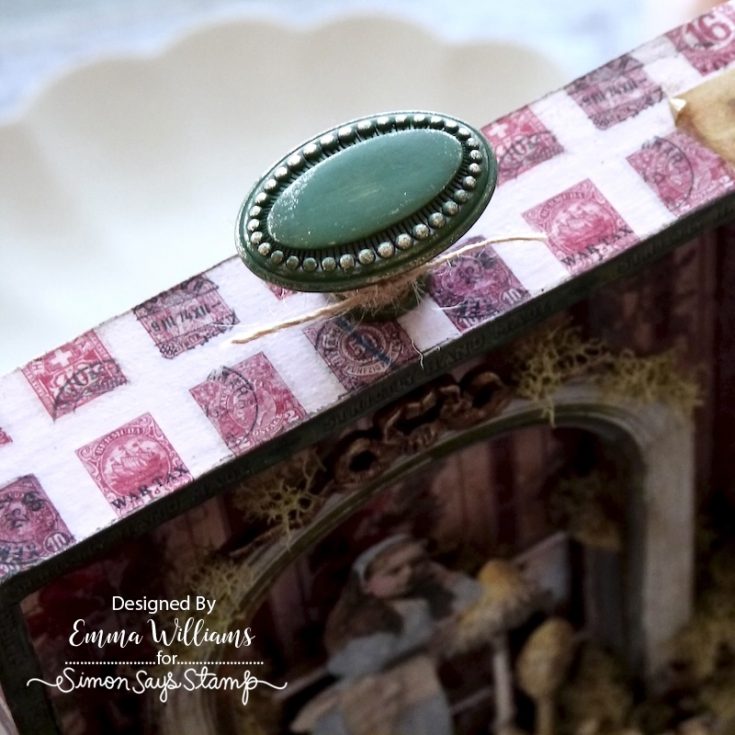
We’re nearly there and all that’s left is to add the knob at the top of the tray. I painted the knob from the Mini Hardware pack with Rustic Wilderness Distress Paint. Once dry, I added a touch of gilding wax to accentuate the detail.
I completed the knob by wrapping some twine around the neck and then attaching the finished piece to the top of the box, removing the screw and using Matte Collage Medium to secure the knob into position.

Finally, I added the finishing details and attached some Cello Sticker around the outside of the tray, and also on the inside.
So that’s my project complete, and I hope you’ve enjoyed this tutorial. As always, I’ve enjoyed sharing the tips and techniques to inspire you and I’d love to see what you make! See you all again very soon and Happy Crafting everyone…Emma x
SUPPLIES:
|


A big thanks to YOU, our reader for stopping by, and Emma for being our guest!
Deal alert! ENDS TONIGHT!


